Valve lapping is considered a simple technological operation of fitting the valve face chamfer to the seat. This process is relevant when repairing an old valve. Grinding is also carried out when updating the valve. During the procedure, a special paste or sandpaper with oil is applied to the valve chamfer. The whole process occurs with the help of the oscillatory movement of the knob. In parallel, the whole process continues until the gray color of the valve chamfer and seat is obtained. In a car service center, a special machine is used for the procedure, which processes 3-5 products at once. You can also perform grinding yourself without contacting specialists.
Gaps
Here is the combustion chamber of an ordinary Chinese scooter engine.
During engine operation, the valves heat up to significant levels. And in order to compensate for the expansion coefficient of the valve and the entire timing belt as a whole, there is a small gap between the valve and its opening mechanism. Called thermal.
In our case, the gap that we will adjust is between the valve and the rocker arm adjusting bolt. By tightening the adjusting bolt within the required limits, we can adjust the thermal gap as much as we need.
But do not forget that the gap should not be very large - otherwise the mechanism will work with a shock load and quickly fail. And very small: the valve will heat up, hit the rocker arm and burn out.
Adjusting motorcycle valve clearances
Adjusting valve clearances is necessary to extend the life of heads and valves. These clearances are thermal and are intended to compensate for the expansion of the valves while the motorcycle engine is running. An increase in the gap leads to a sharp drop in power , as a result of loose closure, but if the gaps are too small, the valve cover will run out, which will lead over time to the destruction of the root rod.
In order to understand whether there is a problem with clearances, it is necessary to start the engine. When its parts are not yet warmed up, you can hear a distinct, characteristic chirping sound as a result of the beating of the valve cover. The absence of such a sound when the engine is warm after a trip can also confirm your guesses.
The valve clearances of a Ural motorcycle or any other must be checked according to the regulations specified in the passport for the technical device or instructions. According to information from the manufacturer, every 3000 km or when operating the vehicle for a period of 3 months or more, it is necessary to check the clearances or adjust the valves.
Photo report: Adjusting valves on a Chinese scooter (139QMB, 157QMJ)
During operation of a four-stroke air-cooled engine (such engines are found on most Chinese scooters and motorcycles), the cylinder head (hereinafter referred to as the cylinder head) can heat up to 260 degrees. This is, of course, not the operating temperature, but this is often the peak temperature.
The valves that are located directly in the cylinder head itself heat up in the same way as the head, with the only difference that the intake valve heats up a little less since it is cooled by the working mixture, and it is ordinary atmospheric air saturated with gasoline vapors, and the exhaust valve heats up much more. Since a flow of exhaust gases passes through the exhaust valve, the temperature can reach 600 degrees.
The problem is that metal parts expand when heated. Valves are no exception: during operation, the valve heats up and becomes a little longer. And when the valve becomes longer, it simply rests against the gas distribution mechanism and opens a little, or rather does not close completely (squeezed), due to which gases under high pressure seeping through leaks melt the working edges of the valve and its seats.
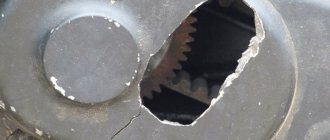
The edges of burnt valves look something like this.
By the way, not only the valves burn out, but also the sockets in which they sit
And this is what the working edges of valves and seats look like after repair.
As you can see, there is little point in regulating something that has already gone bankrupt for a long time. A burnt-out valve will no longer hold compression. And if you find that one of the valves has been jammed, then feel free to remove the head and grind the valves, otherwise there will be no point.
Photo report: How to grind scooter valves
Due to its initially unfavorable location, the cylinder head valve takes on the main load arising during fuel combustion. The exhaust valve is especially hard hit, since the main flow of hot gases passes directly through it.
In order to increase the resistance of valves to temperature, vibration, wear and various deformations, they try to use more expensive, and therefore high-quality materials and technologies for the manufacture of scooter valves and cylinder heads. Chinese manufacturers constantly save on something, so the “quality” of valves and cylinder heads made in China leaves much to be desired...
The valve can be removed from the cylinder head using this device, which consists of two washers of suitable size welded together through small spacers.
We place our device on the valve plate and, using a suitable clamp, compress the spring and remove the crackers.
After removing the valve from the cylinder head, we clean it and the cylinder head from carbon deposits using all available means.
What parts should look like after cleaning.
Lapping:
We take pliers, use them to clamp the valve right next to the plate, and apply a little lapping paste evenly over the entire surface of the chamfer.
All manipulations with valves should be performed with round nose pliers, this way you will protect yourself from getting abrasives on the valve stem.
After applying the paste, use pliers to insert the valve into place.
We push the valve all the way in and put a rubber tube of a suitable diameter on it on the back side.
The valves should be ground in according to this principle: lightly pull the tube, then turn the valve in one direction about one turn, then raise the valve a little, again lightly pull the tube and turn the valve in the opposite direction by half a turn, and repeat this many times until it is ground in the valve to the seat completely. Yes, it is long and tedious, but the result will be worth it.
During lapping, constantly monitor the condition of the chamfers and carefully ensure that the paste does not get on the valve stem.
This is the chamfer that was originally on the burnt out exhaust valve.
You should grind until the shells, irregularities and other damage are completely removed; as a result, you should get a uniform chamfer with a matte color on the seat and valve plate.
Here are examples of an ideal ground bevel.
After grinding in, we thoroughly wash all the parts and proceed back to installing the valves on the cylinder head: Install new valve stem seals (preferably), use a syringe to apply engine oil to the valve stem and insert it into place, then put on the valve springs and using our device We put the crackers in their places.
The direction of the inner and outer valve spring coils after installation should be in different directions.
After installing the crackers, to check their secure fit, lightly hit the valve stem from the spring side with a hammer.
After all that has been done, the valves should be checked for leaks, for this there is a special stand which, unfortunately, I do not have, so I will check them the “old-fashioned” way using kerosene.
We turn the head over so that the outlet or inlet channel is at the top and fill it with kerosene to the very edge, and after 30 minutes we see if the kerosene has leaked out, then we disassemble and grind everything again, and if everything is dry then the head can be put back in place, work on The installation of the cylinder head is described in detail in the article: Installing a piston 170 CC instead of the standard 150 CC on a scooter
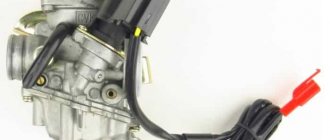
The principle of operation of the scooter carburetor solenoid valve
When the engine is cold, the valve with the spool needle 6 is raised as high as possible (open). The needle opens the fuel supply channel, and the flap opens the air supply hole. At the first engine revolutions, a vacuum is created in the emulsion channel and gasoline located in chamber 7 is sucked into the engine through channel A, causing a strong enrichment of the mixture and facilitating the first flashes in the engine. After the engine has started, but has not yet warmed up, it still needs a rich mixture. The enricher works like a parallel carburetor - gasoline enters it through jet 9, mixes with air and enters the engine.
When the engine is running, alternating current from its generator is always supplied to the contacts of the ceramic heater 2 of the thermoelectric valve of the starting system. Heater 2 warms up drive 3. As the engine and drive warm up, the rod gradually extends by 3 ... 4 mm and drives the damper through pusher 5. Thus, the engine warms up along with the thermoelectric valve, the spool with the needle drops and closes the air and fuel channels, and the mixture gradually becomes leaner. After 3 ... 5 minutes, the damper closes completely and the degree of enrichment of the mixture on a hot engine is regulated only by the carburetor idle system.
When the engine stops, heating of the valve stops, the damper drive cools down (the powder is compressed) and under the action of spring 10, pusher 5, rod 4 and damper 6 return to their original position, opening the channels for subsequent start-up. Cooling down and returning to its original position also occurs within a few minutes.
The disadvantage of this type of enrichment is that it operates separately from the engine. For example, very often, especially in warm weather, while the engine is still hot and there is no need to enrich the mixture, the thermoelement is already cooling down. We start the engine and it gets a rich mixture.
Operating principle of the second type of starting enrichment (with a membrane)
When cold, the valve is open. After starting the engine, a vacuum occurs in the manifold and is supplied to the membrane through a thermal valve. As a result of low pressure, the membrane rises and opens a channel for additional air supply. As the cylinder head warms up, the valve closes and the valve with the needle is lowered under the action of a spring, cutting off the additional fuel supply.
With this design principle, the connection with the actual engine temperature is maintained, and fuel dosage is carried out more correctly.
Types of valves for rubber boat
The part consists of a plug, a fixing part - a “glass”, rigid gaskets, a feed and adjustment mechanism. Products of Italian, Russian, Ukrainian and Chinese production are offered for sale. There are no universal models, so you won’t be able to buy any valves for a rubber boat. The watercraft and device must be of the same brand.
Currently, manufacturers produce three design options for rubber vessels:
High quality products have the following characteristics:
· long service life; · the presence of a cover that provides protection from debris and dirt, · full airtightness provided by a special gasket on the cover and membrane; · Possibility of quick replacement if damaged.
Operating principle of a membrane enricher
The membrane starting enrichment works on a different principle. When the engine is not warmed up, the valve is in the open position. Starting the engine causes a vacuum in the area of the intake manifold, which is transferred to the membrane thanks to the thermal valve. Under the influence of reduced pressure, the membrane tries to rise, opening a channel responsible for supplying additional air volume.
Further heating of the cylinder to operating temperature causes the valve to close and lower the spring-loaded valve associated with the needle. As a result, the supply of additional fuel is cut off. Such a system with a membrane functions in a clear connection with the engine temperature, which ensures a more correct dosage of fuel.
The membrane starting enrichment works on a different principle.
How to check the solenoid valve on a scooter
Let's try to figure out how to check the solenoid valve on a scooter or moped.
This is a simple operation. Let's start in order:
- You should check whether the enrichment channel is closed by the solenoid valve needle. Start the cold engine and observe the change in idle speed. At first they are increased and then decreased to the desired frequency. In this case, you can make a conclusion about the serviceability of the starting enrichment and not search for its faults;
- If the scooter starts without problems, but the engine speed does not decrease after reaching operating temperature and remains high, there is a high probability that the starting enrichment is faulty. In this case, it is necessary to check the functionality of the solenoid valve;
Checking the solenoid valve on a scooter
If the power unit can be started only after long and exhausting presses on the kickstarter, the carburetor is not clogged, the gasoline level in the float chamber is set correctly, and the compression has not dropped, then most likely there are problems with the operation of the starting enrichment, and it needs to be checked.
So, we have come close to testing the scooter's starting enrichment for operability. To perform this operation, it is necessary to disconnect the wires connecting the solenoid valve to the scooter's electrical network. Then you should unscrew the fastening of the solenoid valve to the carburetor body and remove it. Next, you will need to prepare a pair of insulated wires, the length of which will allow you to connect the terminals of the starting enrichment to the battery.
When connecting, there is no need to observe polarity, since the solenoid valve is powered from an alternating voltage network
It is important to pay attention that the ends of the wires freed from insulation do not touch each other. All that remains is to connect the wires to the chips and supply 12 volts from the battery to the enrichment
With a working enrichment device, after a couple of minutes you can see the needle gradually moving out of the device body. The amount of stroke can be determined by measuring the extension of the rod before applying voltage and after turning off the power. For a faulty solenoid valve, five minutes after connecting to the battery, the needle will remain in the same position. If there are no defects in the wiring, then we can conclude that the enrichment unit is faulty.
Don’t be upset and try to repair the solenoid valve - the cost of a new one, depending on the model of the moped, varies between 5-7 dollars. When purchasing, it is advisable to have an old starting enrichment with you or clearly find out from the seller whether the spare parts he offers correspond to the brand of the scooter.
How to properly grind valves in a scooter
If flushing the valves with kerosene showed them to be leaky, and an external inspection did not reveal any defects in the valve seat and its working edge (chips, deep scuffs, burnout), the valve must be ground to the seat.
1. Clean the valve and seat from carbon deposits, soot particles and other deposits. To do this, you can use carburetor cleaner or solvent.
2. Select a plastic or rubber hose or tube that matches the diameter of the valve stem, as well as a drill or tool tip of approximately the same diameter.
3. Apply lapping paste to the working edge of the valve.
ATTENTION!
If kerosene leaks out relatively quickly when flushing the valves, it is necessary to grind in two stages - first with a medium-grained lapping paste, and then with a fine-grained one. If the kerosene level has only dropped slightly during the control pouring time, a one-stage grinding of the valves with a fine-grained paste is allowed.
4. We install the valve in its place, put a tube on the rod, clamp the tip or drill into the chuck of an electric drill or screwdriver, and put the hose with the other end on the tip.
ADVICE:
To secure the connection, you can additionally secure the hose to the tip and valve with clamps or soft wire.
5. Applying some “pulling” force to press the edge of the valve to the seat, rotate the valve alternately in different directions for several seconds.
ATTENTION!
If you use an electric drill, set the chuck rotation speed to the lowest possible speed; if you use an electric screwdriver, you can set the maximum speed.
Typically, for high-quality grinding of one valve, 4-7 minutes of processing are required at each stage.
6. Before assembling the unit, it is necessary to especially thoroughly rinse and blow through the cylinder head and valves with compressed air to prevent the abrasive lapping paste from getting into the valve guides and into the cylinder. The entry of abrasive particles into friction pairs will lead to rapid and irreparable wear of parts and their failure. For flushing, you can use kerosene, white spirit or carburetor cleaner.
7. To assemble the valve mechanism, you can use a special device, or use a more accessible method (see below).
Source
Adjusting valves on a scooter
Scooters with simple 50 - 150 cc engines have flooded the market and are now found on every corner. Why is this happening? First of all, they captivate with their low cost, unpretentiousness and every year the better and better quality of the main components and their assembly. Regardless of the year of manufacture, the entire scooter, and especially its motor, is subject to regular maintenance; this is the main requirement for maintaining the performance of the motors. One of the important adjustments that should be done regularly is adjusting the valves on a four-stroke scooter.
Many owners of scooters and motorcycles are afraid of this procedure due to ignorance and fear of damaging the engine. We believe that adjusting the valves on a 4t 80cc, 50cc, 150cc scooter is a task that any motorcycle owner can handle with a small set of keys and desire. Below, you will find step-by-step instructions on how to adjust the valves on a scooter with a 139qmb and 157qmj motor.
The essence of the reed valve
Before answering the question of what a reed valve is, it is necessary to recall the process of operation of a two-stroke engine, during which the reverse emission of the combustible mixture occurs. In addition to the fact that this increases fuel consumption, the mixture output reduces engine power. The purpose of the reed valve is to prevent fuel from backing up through the intake port into the carburetor. Thanks to this mechanism, the mixture that would otherwise be released into the atmosphere enters the cylinder. Accordingly, engine power increases and consumption decreases.
Why valves require regular adjustment
Many happy owners of absolutely any equipment, be it a bicycle or a car, after making its purchase, completely ignore its needs and requirements, which is fraught with the rapid deterioration of most components, in particular the motor. The main function of the valves is to supply the air-fuel mixture into the combustion tank, as well as to ensure the removal of processed gases.
The valves operate under conditions of constant high temperatures, which leads to expansion of the metal parts of the assembly and their gradual deformation. Frequent expansion of metals during heating, combined with deviation from backlash, can lead to inadequate operation of the valves - the pusher may jam and the valves will stop closing, or significant backlash will arise at the junction of these elements.
When an unacceptable amount of play forms in the intake valve, this prevents the air-fuel mixture from filling the reservoir, since its area becomes much smaller, and then a pusher malfunction is inevitable. When play occurs between the exhaust valve and the pusher, the ventilation process of the cylinder is disrupted. In both situations, the driver will experience a significant reduction in engine power and a number of other characteristics.
If we are talking about a large backlash for this unit, then its main signs will be characteristic clicks, and the consumption will increase significantly. To summarize, we can highlight a list of various signs indicating the need to check valves and their further maintenance:
Reed valve on a scooter
Most scooters are equipped with two-stroke engines, so a check valve is installed on them. The reed valve is designed specifically for such motors. A similar mechanical unit is not installed on a four-stroke unit, since valves are responsible for the distribution of both fuel and exhaust gases. And in the push-pull model, this process is controlled by a resonator. Therefore, for most scooters produced, the valve is an important integral part.
If the motor on a moped is malfunctioning, there is no longer enough traction, or it won’t start at all, one of the primary tasks is to check the degree of suitability for use of a part such as a reed valve.
On a scooter, it is very important to monitor the performance of the part, because the slightest breakdown can lead to further serious problems. If it is broken or erased, the seal is lost, and accordingly, fuel enters the carburetor and engine, and from there into the air filter
This may result in loss of response to throttle adjustments. If a valve malfunction is determined, both repair and replacement of the unit are possible. You can purchase petals separately and replace worn ones with new ones. Or change the valve entirely, which is quite simple to do. It is necessary to dismantle the carburetor by finding the installed part in the pipe. Then remove the valve. It's a pretty simple process.
Troubleshooting the scooter's power system
When troubleshooting a scooter’s power system, it is assumed that the central piston group of the scooter is in order and creates sufficient vacuum at the inlet to “draw” gasoline into the combustion chamber, as well as the integrity of the scooter’s crankshaft seals and the spark plug are also in order.
To determine whether gasoline is entering the combustion chamber, the easiest way is to unscrew the spark plug and make sure it is wet. If the spark plug remains dry even after several confident pumpings with the kick starter, you need to go from the very beginning of the power system: find out whether gasoline is flowing from the tank to the scooter’s carburetor.
To do this, remove the gas hose from the carburetor and direct it into some container.
Let's remove the vacuum hose and create a vacuum in it using a rubber bulb or some other method. Gasoline should flow out of the supply hose. If this does not happen, you need to dismantle the tank and find out the reason for the failure of the scooter's automatic fuel valve.
If it turns out that fuel is being supplied from the tank to the tank, the next step is to check the presence of fuel in the float chamber of the scooter carburetor. To make sure of this, you need to unscrew the drain screw at the very bottom of the scooter’s carburetor, next to the fitting with a transparent tube on it. Fuel poured out of the tube - obviously gasoline was getting into the carburetor, the float chamber was filled with gasoline. In this case, most likely, the nozzle is clogged, or the piston jet does not create sufficient vacuum to “draw” gasoline from the carburetor.
The next step is to check the scooter's reed valve located under the carburetor. The reed valve is involved in the distribution of the working mixture, preventing it from flying back into the carburetor during the reverse stroke. If the reed valve is damaged, which is expressed even in slightly open petals, the piston scooter will not start even with a completely new one. However, if this was achieved in some way, for example, with the help of ether, the scooter’s engine will work more or less confidently, but in the future it will still be difficult to start. We dismantle the petal valve. There is no need to remove the oil supply pipes from the scooter carburetor pipe; it is much easier to remove the pipe along with the oil pump (for two-stroke scooters).
By looking at the valve petals in the light, you can diagnose the presence of a gap between the petal and its seat. Such a valve must be replaced, although repairs are allowed in extreme cases. After removing the petals, you can bend them a little
But, attention, this can only be done with your hands! The use of the tool is not permitted! Such a repair can be regarded as a half-measure, since it is obvious that fatigue has already accumulated in the petals, and quite soon the scooter will again experience starting problems, especially when the engine is cold. If we are sure that fuel is flowing into the scooter's carburetor (the jets are not clogged), the reed valve is in order, but the scooter's spark plug is still dry, we can try the following: by removing the scooter's air filter pipe, closing the carburetor channel with the palm of your hand, pump it confidently several times kick starter
The palm should be damp from gasoline. If this does not happen, you should make sure that the scooter’s piston group is creating sufficient vacuum. Even if the compression ratio is in order, the main seals may be damaged, allowing air from outside to pass through, instead of creating a vacuum in the carburetor, ensuring its operation. Damage to the scooter's seals can be diagnosed by the characteristic sweating around them by dismantling the variator and the scooter's generator rotor. If the spark plug is wet, but the scooter engine does not start, it makes sense to first check whether old gasoline is poured into the tank. If not, then there are probably problems with the scooter's CPG or ignition.
See also Carburetor problems.
Author – Lapaev D.A.
What is needed for grinding in
All lapping tools work the same way. This means that the tool is attached to the valve head, lapping compound is applied to the valve seat or surface, and the tool is rotated in different directions to ensure a firm hold.
The procedure will also require:
- kerosene;
- lapping paste;
- a spring, along the outer diameter, which passes directly into the valve seats.
Valve grinding tools
There are certain tools for grinding valves. They will be discussed below.
So, the devices that are used for grinding valves with your own hands:
- Dry cloth . Necessary for wiping treated surfaces.
- Solvent . A special product that provides high-quality cleaning of work surfaces.
- Hose and spring . The springs must have a sufficiently reduced stiffness. Their diameter is 2 or 3 millimeters, slightly larger than the diameter of the valve stem. It can be placed on a rod. You can also use a small clamp to secure it securely. You also need a short metal rod with a diameter similar to the piston rod so that it fits comfortably into the rubber hose.
- Kerosene . Used in all lapping procedures.
It is also necessary to check the grinding in thoroughly after the procedure. It is very important to carry out the procedure very efficiently.
Valve operation on various models
Often the model of scooter will determine how durable the reed valve installed will be. Honda stands out in that there are practically no problems with this mechanism. This is facilitated by the materials used in manufacturing - rubber for the body, fiberglass for the plates.
On scooters produced by Peugeot and Yamaha, on the contrary, the part very often becomes unusable, again due to the materials. The plastic body and metal petals do not interact well with each other; over time, the saddles are knocked out by the plates, and the unit stops performing its direct function. Therefore, on such vehicles it is better to tune the valves immediately, since the factory layout will not be enough. Timely replacement of the plates, even if done immediately after purchasing the scooter, will not allow a broken valve to damage the entire motor. The best alternative to metal petals would be carbon ones.
Reed valve on a scooter - purpose, design features, breakdowns
The reed valve is located between the carburetor and the scooter engine in the intake manifold. The design of the location may vary significantly depending on the vehicle model, but the essence remains the same.
If you are the owner of a two-stroke scooter, you are used to carrying out its maintenance yourself, for example, cleaning the carburetor; in case of the above problems, do not be lazy to check the reed valve. It's very easy to get to. After dismantling the carburetor, take the time to also remove the inlet pipe. Below it you will see this most treasured petal valve.
Each scooter manufacturer has its own ideas about its shape and design; its shape can be single-slope or double-slope, in the form of a house, but the operating principle is the same in any case and the testing process is no different.
Check the condition of the petals; they should be perfectly smooth, without waves or distortions. There should be no cracks or chips. The petals should fit tightly to the saddle, the presence of gaps is excluded here. There shouldn't be any dirt either. For example, even a small grain of sand that gets under the petal valve can lead to serious interruptions in the operation of the scooter engine
That is why it is so important to keep this unit clean, monitor for damage and be sure to replace the part if damage is found
You can also read other articles on the topic:
Why is classical rubbing dangerous?
1. Caricature chamfer of the saddle. Some of the abrasive is pressed by the valve into the softer material of the seat and remains there. Scientifically, the effect is called caricature - this technology is used in industrial lapping, but only with separate finishing, and not on a part that will participate in the further operation of the unit. As a result, the seat becomes an abrasive tool and accelerates valve wear.
2. Changing the angles of the working surfaces. In the new engine, the plate chamfer angle is half a degree greater than the seat chamfer angle. It was not for nothing that the designers made such a difference - during thermal expansion, the diameter of the plate increases and the valve fits more tightly to the seating surface. If you grind the connection with abrasive paste, the angle is lost - when the engine warms up, the plate is pressed against the seat by only one point of the plane. The result is accelerated wear and reduced tightness.
The procedure using abrasive pastes is not used in professional service centers; this technology is not recommended by manufacturers. Today, valves are ground only out of desperation - when there is no suitable professional tool.
Tools
- Small pliers or special wrench
- Open-end wrench 9
- 14mm socket wrench or socket
- Socket wrench 8
- A set of measuring probes, preferably with a pitch of 0.02 mm
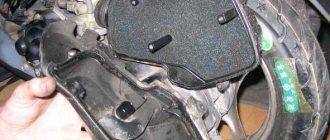
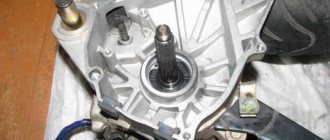
We free access to the cylinder head: depending on the scooter model, we remove the hood or seat tank. We find the valve cover there, unscrew the four 8mm bolts and remove it from the engine.
The valve cover looks like this. In my case, to get to it I had to remove the hood, saddle and seat tank.
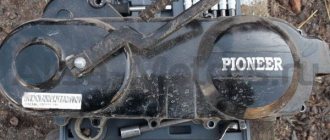
There is a generator casing on the right side of the engine - remove it. If you are too lazy to remove it, just take out the plug. The plug is located in the upper part of the case and can be removed using a regular screwdriver. Through the plug we will control the position of the marks on the rotor.
We insert a 14 mm socket wrench into the center of the generator casing and turn the engine (clockwise) until the “T” mark (from the English “Top” means top, in our case the piston position is at TDC) on the generator rotor is exactly opposite the ledge.
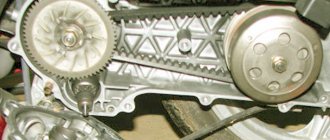
After the mark on the generator coincides with the ledge on the engine crankcase, we check what position the camshaft is in. The camshaft should be in a position where both valves are closed. And it gets into this position every second revolution of the crankshaft since it rotates twice as slow.
The correct position of the camshaft is determined by its sprocket. The sprocket should become the large hole facing up, and the small holes and the marks that are knocked out near them should become parallel to the plane of the valve cover connector.
This is ideal, but in practice the asterisk rarely becomes the way we need it. And the chain is often to blame for this - it stretches and the camshaft begins to slightly not catch up with the crankshaft. If your sprocket has become a little crooked, then by and large it’s nonsense. But if you have it for some reason, then this problem needs to be solved very quickly - otherwise sooner or later the valve will bend.
Once again, check that the “T” mark on the generator rotor is opposite the protrusion, and that the camshaft sprocket is in the correct position. Unscrew the locknuts on the adjusting bolts.
We unscrew the adjusting bolts a little, insert a measuring probe between the valve and the adjusting bolt and, without removing it, tighten the adjusting bolt with our fingers, clamp the adjusting bolt with pliers and secure it with a lock nut.
After tightening the locknut, check how easily the dipstick moves. Ideally, the feeler gauge should move between the valve and the bolt with barely perceptible force.
- If the dipstick moves without effort, loosen the locknut and tighten the bolt a little.
- If the dipstick moves with difficulty or becomes jammed, loosen the bolt.
How often are valves adjusted?
According to factory recommendations, valve clearances should be adjusted after the first 500 km, and then every 4-6 thousand km, depending on the engine.
In addition to this, the valve should be adjusted after a comprehensive engine repair, if a characteristic “clatter” appears, if the engine has noticeably lost acceleration, is sluggishly picking up speed, or does not start at all.
Required tool:
- Pliers;
- Curly screwdriver;
- Open-end wrench for 8 and 9;
- Socket wrench 10;
- Set of probes;
- Containers for collecting oil.
How does an electric valve work on a scooter?
To enrich the fuel-air mixture, a fuel enrichment device with a mechanical drive and an automatic control system is used. Let us consider the operating principle and features of each of these enrichment systems.
Manual
The manual enrichment system, which requires precise adjustment, is inconvenient to use. To start the scooter engine after parking overnight, you need to press the lever on the steering wheel, which transmits force through the cable to the pusher. After the power unit starts, warms up and reaches operating temperature, it is necessary to return the manual enrichment lever so that the volume control flap and needle return to their original position. As experience in operating scooters shows, such a system has a number of inconveniences.
Most models of modern mopeds are equipped with an automatic starting enrichment
Auto
An automatic type start-up enricher, called a thermoelectric valve, is installed in most models of modern mopeds with two-stroke and four-stroke engines.
The device consists of the following parts:
- housing in which the solenoid valve is located;
- ceramic heater powered from the on-board network;
- spring-loaded drive with a rod connected to a pusher and a valve.
The device is connected to an air channel that saturates gasoline from an additional float chamber before feeding it into the combustion chamber of the cylinder. One feature of scooter carburetors should be noted. They have two float chambers - additional and main, connected to each other by a starting jet.
A small tubular channel from the additional float chamber is connected to the mixing chamber, which is responsible for supplying air with gasoline to the engine. The cross-section of the mixing chamber is blocked by a valve, structurally similar to the throttle valve in a carburetor. Lowering the damper causes the spring-loaded needle to move, closing the fuel supply channel. The solenoid valve body is thermally insulated and located in a rubber boot. All modern scooters have a similar thermoelectric valve design.
Old scooter models are equipped with a starting enrichment without electric heating
Older scooter models are equipped with a starting enricher without electrical heating. The transfer of thermal energy to the drive is carried out thanks to a copper heat-conducting cylinder connected to the scooter motor. Instead of a powder drive, a membrane drive is installed. In this case, the intake manifold of the cylinder head is connected to one cavity of the bulb.
Reed valve on a scooter - repair, replacement, purpose
Most scooters from well-known manufacturers are two-stroke, because they have simplified characteristics. Such scooters have one important part - a reed valve.
If the reed valve breaks, it can have very bad consequences for your scooter's engine. Repairing a reed valve is a very simple procedure; in most cases it is easier to replace it with a new one. But if you are new to engine repair, then you are unlikely to know where this part is located. The reed valve is located in the intake manifold on top of the engine, see the photo for more details. The photo shows the valve location of most Japanese mopeds, but there are other locations.
Working principle of reed valve
This part is very important in the operation of the engine, because after receiving the fuel mixture into the cylinder, the valve closes and thus the fuel does not return to the carburetor. The reed valve must be precisely adjusted and free from any defects, because when the piston approaches the dead center, it tries to push the fuel mixture out
But the petal valve does not allow this to be done even in small quantities, because it has good tightness.
What can happen if a reed valve breaks?
If this very important part is broken, worn out, and begins to leak air, the fuel mixture will flow back into the carburetor. And the result will be a loss of power, since the engine simply will not have enough fuel. Then, after fuel enters the carburetor, gasoline is thrown into the air filter. Also, one of the consequences of a faulty valve may be a lack of response to adjusting the throttle.
Replacing the reed valve
Changing it is quite simple. If you notice the above problems and believe that the cause lies in the reed valve, remove the engine and carburetor. Next you will see that very important part, which is more than easy to remove. Judging by the name, you can understand that this part has petals. Therefore, they can often become unusable. A simple solution would, of course, be to completely replace this part; anyone can buy a reed valve for a scooter in any store and at a low price. But if you do not have this opportunity, you can try to erase the top layer of the petals, thereby smoothing their surface. Next, wipe the reed valve well, leaving no dirt or shavings behind. Install everything in the same order.
Valve lapping tools
The main tools for lapping valves include:
- Manual valve holder . One of the most frequently used tools. Often the holder comes complete with a special paste for grinding valves. You can also buy this tool separately at any auto parts store.
- Drill or electric screwdriver . Considering that this procedure is always performed in two directions of rotation, many prefer to use a drill. A drill that rotates in two directions at once and provides more efficient grinding. Also, for these purposes, some people choose an electric screwdriver. Its operating principle is very similar to a drill.
- Lapping paste for valves. You can buy a ready-made composition in automobile workshops. If you have some knowledge and skills, then save money and you can do it yourself.
Communities › Daewoo Matiz Club › Blog › Intake and exhaust valves are jammed! Because of which ?
Hello everyone, please give me some advice! The first time I got into the engine to adjust the valves was at 70,000 miles, they did everything well, but I didn’t notice much of a difference! At a mileage of 83 thousand, problems arose with cold starting, everything is described in detail in my blog, so after starting the engine doubled and ran very unstable, I rushed to change it from the simplest: spark plugs, high voltage wires, both gasoline filters, washed the injectors, distributor cap, nothing did not help ! I went to the service station where they immediately told me that the valves needed to be adjusted, they did it, it turned out that the valves were clamped, the gaps were set to 0.20 and 0.30, but after 3250 km the engine started working unstably again when cold, under warranty they did the adjustment again, again all the valves were clamped! The question is why, is it really the problem with the seats or the valves themselves? As a result, they told me to come and check the gaps after 2000 km! Thank you in advance !
Why adjust valves?
Many “riders”, when purchasing equipment, have little interest in its needs, which leads to rapid engine breakdown. The role of the valves is to supply the air-fuel mixture to the combustion chamber and remove exhaust gases. They operate under constant temperature conditions, and as you know, when heated, the metal begins to expand. Thermal expansion, together with gap deviation, leads to the fact that the valve may not close completely and the pusher is pinched, or vice versa, to too large a gap between the pusher and the valve.
If the intake valve has too large a gap between the pusher, then the combustion chamber is filled less with the mixture and the pusher breaks, and if the exhaust valve, the ventilation of the cylinder deteriorates. In both cases, this is felt as a loss of power and dynamic characteristics of the engine. When we talk about excessive clearance, then in this case the consumption may increase and a characteristic clattering sound can be heard.
That is, the engine requires adjustment of the gaps if:
- hard to start;
- does not start;
- stalls while driving;
- starts and stalls;
- consumption has increased;
- the maximum speed has decreased;
- a clattering sound is heard at the gas distribution mechanism;
- 500 km have passed since replacing the piston and cylinder group.
Step-by-step instructions for setting the valve clearance of the 157 qmj engine
Adjusting the valves of a 4-stroke scooter begins with freeing access to the cylinder head. To do this, we remove the seat tank, which is often secured with several bolts. Next, gaining access to the cylinder head, remove the 4 bolts and remove it from the engine. Now we get to the fan housing. It can be completely dismantled, allowing free access to the necessary marks, or if you do not want to dismantle it completely, you can unscrew the cover. The plug that the arrow points to can be removed with a simple screwdriver, and it is through it that the rotor marks can be seen.
Insert a 14mm socket wrench into the generator casing and rotate the rotor clockwise, while looking into the hole on the casing. It is necessary that the T mark appears in the inspection window (opposite the ledge), which indicates that the piston is at top dead center or TDC.
We look at the gas distribution mechanism. Here both valves should be closed and the holes on the camshaft sprocket should match the picture below. Did everything coincide? - let's move on. If not, then rotate the rotor again until the mark coincides with the protrusion, and again monitor the position of the valves and holes on the sprocket.
Note. Very often, the chain stretches and therefore the holes on the sprocket may not coincide 100%; if the deviation is small, then there is nothing wrong with it, but if you notice a complete mismatch, then this can lead to motor breakdown, which means the chain needs to be changed.
- Unscrew the lock nut holding the top valve.
- Insert the 0.05 feeler gauge and manually tighten the adjusting screw.
Leaving the probe, we take the pliers and fix the adjusting screw with one hand, and tighten the lock nut with the other. Now the probe should be pulled out with a little effort and also fall into place with a little effort. If this is not the case, then repeat the procedure again.
- Having set the intake valve, we move on to the lower valve. Here you need a 0.1 mm feeler gauge. The adjustment process is similar. We loosened the bolt, inserted a feeler gauge, then tightened everything up and checked the gap.
- Everything is ready, all that remains is to reassemble the engine in reverse order and test the new settings on the road.
Advice. After setting the gaps, it would be a good idea to check the carburetor settings.