How does a Ural motorcycle gearbox work with reverse gear?
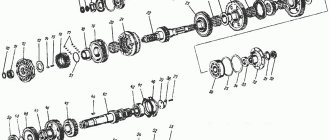
The two-shaft gearbox of the Ural motorcycle uses fewer gears when transmitting torque, which is the main reason for the increased efficiency. The input shaft of the gearbox has three initial speed gears, which are integral with the shaft. The purpose of the secondary shaft is to select the required gear, and the gears on it are not rigidly fixed. The gearbox of the Ural motorcycle with reverse speed has manual and foot shift methods, which makes it very convenient to use.
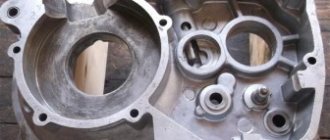
On later modifications of the gearbox, a removable rear cover appeared in the aluminum crankcase, allowing the gearbox to be repaired without removing it from the engine.
Among other motorcycles, it is precisely the ease of maintenance that distinguishes the Ural motorcycle - a major overhaul of the gearbox can be easily completed within a day, if the appropriate spare parts are available. It must be remembered that some parts from various modifications of the gearbox are interchangeable. This is one of the main advantages that makes it quite easy to assemble a working box from several faulty ones.
Total information
Motorcycle type: with sidecar. Wheelbase, mm – 1430. Ground clearance, mm – 130. Track, mm – 1100
Dimensions, mm: – length – 2420; – width – 1650.
Height (by ignition key) – 1000
Motorcycle weight, kg: – dry – 335; – worker – 380.
Fuel consumption on the highway, l/100 km – 7. Fuel reserve on the highway, km – 310. Highest speed, km/h – 85.
Capacity (oil), l: – engine crankcase – 2.0; – gearbox housing – 0.8; – reverse gear housing – 0.150; – air purifier – 0.2.
Fuel tank capacity, l – 22.
Removal and repair of Ural motorcycle gearbox
To remove the gearbox without unscrewing the motor, you need to do the following:
- Remove the rear wheel from the motorcycle.
- Remove the cardan drive.
- Remove 1 bolt and 3 nuts securing the gearbox to the engine.
- Then the gearbox can be pulled out of the motorcycle frame and you can begin to inspect it.
Repairing a Ural motorcycle gearbox involves replacing worn gears, followed by adjusting the gear shift mechanism. You should also pay attention to the seals - their wear will cause oil leakage, as a result of which the Ural motorcycle gearbox will operate in conditions of insufficient lubrication.
Engine
Engine type – four-stroke two-cylinder. Brand – M-72M. Cylinder diameter, mm – 78. Piston stroke, mm – 78. Working volume, cm³ – 746. Compression ratio – 5.5 ± 0.2. Maximum power, l. With. – 22. Maximum torque, kg m – 4.0. The block head material is aluminum alloy. Head gasket – asbestos metal 0.6 mm. The piston material is aluminum alloy.
Valve distribution phases (according to the angle of rotation of the crank), degrees: – beginning of intake to c. m.t. – 76; – end of inlet after n. m.t. – 92; – beginning of release BC m.t. – 116; – end of release after c. m.t. – 52.
Carburetor – Two K-37.
Dismantling and assembling the gearbox of a Ural motorcycle
To disassemble the gearbox, proceed as follows:
- dismantle the clutch mechanism along with the bearing;
- remove the starter lever, then the rubber coupling located on the secondary shaft;
- remove the gear shift housing cover;
- Unscrew the lid of the box and carefully remove it from the shafts.
Complete disassembly of the clutch mechanism, gear selection mechanism and kickstarter is allowed only when repairing them - otherwise there is no need to disassemble them.
The Ural motorcycle gearbox is assembled with reverse gear in reverse order. After assembly, the gear shift mechanism must be adjusted, otherwise problems may arise when choosing them.
The gearbox of a Ural motorcycle with reverse speed begins to be adjusted by placing the motorcycle on the stand. Then the 2nd speed is turned on and the pedal is pressed to the 3rd gear. If the ball coincides with the well, adjustment of the lower adjustment screw is not required. After moving from 3rd speed, you need to return to the second and check the alignment of the ball, tighten the upper screw if it does not match. This completes the gear selection adjustment.
The Ural motorcycle allows you to repair the gearbox with minimal effort, thanks to the simplicity of its design, which distinguishes this model from other two-wheeled vehicles.
Fault Inspection
When inspecting the parts, you should check the ease of movement of the forks along the rod. Condition of fork stays and ring grooves in movable couplings. The amount of axial movement of the forks in the groove of the engagement couplings.
The following malfunctions may occur in the trigger mechanism: - wear, crushing or chipping of the pawl; — jamming of the pawl pusher; — breakage of the pawl spring; — bending the ends of the return spring of the starting pedal; — damage to the working end of the buffer pin; — cracks in the starting lever; - wear of the oil seal.
How to change gears without a clutch
If you have a manual transmission car (manual gearbox) and you are moving in third gear, then in order to switch to the higher “fourth” gear, you must first engage neutral. To do this, you need to release the gas and move the gear shift lever to the neutral position. Then shift the lever to the desired gear position. After the engine speed of the gearbox gears coincides, torque transmission will occur. In the same way, you can shift to higher gears without almost squeezing the clutch in all brands of cars that are “equipped” with mechanics.
For beginners who are just learning to drive, the main problem is the manual gearbox. Problems with shifting arise especially in understanding, and at first by touch, which gear is quite difficult. This confusion, in turn, can cause serious transmission breakdowns, or worse, create an emergency situation.
We recommend reading: Will a notary certify a copy of a work book without the original?
Messages [1 to 20 of 40]
1↑ Topic from olegich 10-12-2012 22:57:12
Topic: please help me how to properly remove the box from the Urals without removing it from the motorcycle
Explain to a beginner how to remove the gearbox from the Urals without removing the engine from the motorcycle
Edited by olegich (10-12-2012 22:57:48)
2↑ Reply from mexanik62 11-12-2012 10:32:54
Re: please help me how to properly remove the box from the Urals without removing it from the motorcycle
Place it on the center stand Remove the rear wheel Remove the final drive Remove the fork Remove the elastic coupling Remove the clutch lever and whatever else you can remove from the clutch Remove the box just don’t forget about the clutch rod
3↑ Reply from olegich 11-12-2012 14:17:31
Re: please help me how to properly remove the box from the Urals without removing it from the motorcycle
Place it on the center stand Remove the rear wheel Remove the final drive Remove the fork Remove the elastic coupling Remove the clutch lever and whatever else you can remove from the clutch Remove the box just don’t forget about the clutch rod
how to remove main gear
Added: 11-12-2012 10:17:31
and you can remove the box without removing the main gear
4↑ Reply from mexanik62 11-12-2012 15:02:59
Re: please help me how to properly remove the box from the Urals without removing it from the motorcycle
Unscrew 2 or 4 nuts (depending on who) securing it to the fork leg
you can remove the box without removing the main gear
It is necessary to remove the engine mounts and move it forward (remove the silencers naturally)
5↑ Reply from [Leshy] 11-12-2012 15:58:14
Re: please help me how to properly remove the box from the Urals without removing it from the motorcycle
Unscrew 2 or 4 nuts (depending on who) securing it to the fork leg
you can remove the box without removing the main gear
It is necessary to remove the engine mounts and move it forward (remove the silencers naturally)
Why unscrew the divglo? I’m on the Dnieper 10, in my opinion, I removed the box without unscrewing the engine, you just unscrew the box, and then you’ll figure it out) and also, to pull it out, the platform on the battery is bent a little, and there will be a small problem with the clutch) but not It’s difficult, I took it off in about 30 minutes) you’ll figure it out
6↑ Reply from VlAiSLAV 11-12-2012 19:20:29
Re: please help me how to properly remove the box from the Urals without removing it from the motorcycle
Unscrew 2 or 4 nuts (depending on who) securing it to the fork leg
you can remove the box without removing the main gear
It is necessary to remove the engine mounts and move it forward (remove the silencers naturally)
Why unscrew the divglo? I’m on the Dnieper 10, in my opinion, I removed the box without unscrewing the engine, you just unscrew the box, and then you’ll figure it out) and also, to pull it out, the platform on the battery is bent a little, and there will be a small problem with the clutch) but not It’s difficult, I took it off in about 30 minutes) you’ll figure it out
on the Dnieper it is on the Dnieper. here the Ural won’t roll with it, there’s a little less space there, so you have to push the engine forward a little
7↑ Reply from Shaman 11-12-2012 19:22:50
Re: please help me how to properly remove the box from the Urals without removing it from the motorcycle
in the Urals it can also be removed without unscrewing the engine
8↑ Reply from partizan 11-12-2012 19:50:37
Re: please help me how to properly remove the box from the Urals without removing it from the motorcycle
Olegych, the main gear means the gearbox (the one that turns the rear wheel). in the Ural, everything can be removed just as easily: you take off the wheel (rear); unscrew the brake rod from the lever on the gearbox; unscrew that same gearbox (main gear); disconnect the speedometer cable from the box; take off the clutch cable; unscrew three nuts and one bolt (fastening box to the block); you move the box back, while kicking it slightly to the bottom - it jumps out! The most you can resort to is a large screwdriver or a mounting tool so you don't have to pull it with your hands. GOOD LUCK!
9↑ Reply from olegich 11-12-2012 22:28:06
Re: please help me how to properly remove the box from the Urals without removing it from the motorcycle
I'll do it in the spring, but right now I'm doing the general
Added: 11-12-2012 18:28:06
And after I take it all off and then put it back, nothing will need to be adjusted?
10↑ Reply from mexanik62 11-12-2012 22:30:12
Re: please help me how to properly remove the box from the Urals without removing it from the motorcycle
Clutch and brake
Gearbox adjustment
Are you having trouble shifting gears?
This may be due to a breakdown of the gearbox gears. If you are confident that the gearbox is in good working order, then you need to adjust the gearbox using the screws located on the box, near the base of the lever. Do not rush to immediately twist the screws, but check the condition of the balls and holes Are there any visible damages, is the shift sector working properly? If this is all in order, then proceed to the adjustment: Put the motorcycle on the stand. Set the hand lever to the left in 2nd gear, press the pedal with your heel to engage 3rd gear. If the ball coincides with the hole, then you don’t need to touch the bottom screw. If the hole in the 3rd gear does not align with the balls, it doesn’t engage (when the manual shift lever is pushed forward, it aligns with the ball), you need to unscrew the bottom screw a little. And if the hole jumps over the ball, it switches (the lever needs to be pushed back )screw in the lower screw. With the 3rd leg, switch to 2nd. If the hole of the 2nd gear does not reach the ball (the lever must be moved back), unscrew the upper adjusting screw. If the hole jumps over the ball (when the manual shift lever is moved forward, the speed is turned on ) tighten the top screw. 1amoto.ru
avtorep.ru
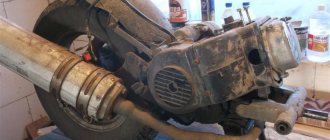
A Ural motorcycle has been in the garage since 1998. The motorcycle is separate, the engine is separate, the gearbox is in a completely different corner. I spent my entire childhood on this motorcycle, after buying a car, they forgot about it. And so I decided to restore it...
First, it was decided to deal with the engine, since, according to the owner, the crankshaft was knocking. Therefore, we immediately began disassembling the engine.
Removing the cylinders
I removed the heads, checked the piston clearances in the cylinders, everything was fine, only the right cylinder had a rusty emulsion - apparently moisture had gotten in. But fortunately the cylinder mirror was not damaged.
I checked the gaps on the fingers - everything is within normal limits. I pressed out the fingers, marked where the right and left parts of the cylinders were and put them aside.
Removing the clutch
Then I started disassembling the clutch to remove the flywheel. A simple screwdriver and hammer blows were not enough to unscrew the screws the first time. There is no point in buying an impact screwdriver just for one use. I turned on my ingenuity. And so he pressed the engine from the frontal side into the opening of the garage door, and pressed the screwdriver to the bolt with the help of a block and a jack, and with a gas wrench tore off the metal beads. And then everything opened without problems. I removed the clutch and started disassembling the frontal part, since I didn’t have a 36mm socket wrench on hand to unscrew the flywheel.
Removing the timing belt
In the frontal part, everything is disassembled simply, the cover is unscrewed, the ignition is removed, the ignition coil is removed, then the windshield is unscrewed. I unscrewed the two bolts that hold the camshaft and placed two mounting brackets under the camshaft gear using rags. And he pulled out the camshaft and gear. Upon inspection, no wear was found in the timing gears. The bearing is also in excellent condition. I secured the pushers with electrical tape to prevent them from falling into the crankcase and getting tangled.
Then I went to a friend and took from him a three-legged puller and a 36mm socket wrench. I unscrewed the bolts that hold the crankshaft main bearing in place at the front. And as in the video, I decided to grab the pressure washer with the puller, since the puller’s legs do not fit under the gear. The result is that the gear is removed, the pressure washer is bent and torn. Conclusion, it was necessary to tie steel wire around the gear and pull it. It will be a lesson for the future.
Removing the flywheel
After disassembling the timing belt, I started working on the flywheel. For the flywheel, you need a wrench so that the working edge is straight away, and not, like most heads, slightly recessed, since the flywheel bolt has thin edges. To fix the flywheel, I used a 12mm wrench and inserted one end into the clutch bolt and the other into the stud securing the box to the engine. I’ll say right away that it’s better not to do this, since I bent the pin. It’s better to take a 19-size open-end wrench, insert one end into the hole in the flywheel, and the other into the rod that you need to insert the lugs for attaching the engine to the frame. This is what was done when assembling the flywheel.
When I unscrewed the flywheel bolt, I pulled off the flywheel using a puller. Next, unscrewing the 9 bolts that hold the rear main bearing cover in place, I used the same puller to remove the cover itself. And now the reason for the knocking crankshaft was discovered - the main bearing separator had crumbled.
Removing the crankshaft
To remove the crankshaft, you need to remove the oil pump. To do this, I drained the oil and unscrewed the pan. I unscrewed the top cover of the oil pump and took out the gear. From the bottom of the pan, I removed the pump mesh and unscrewed it and removed it along with the rod, which will not allow the crankshaft to be removed.
Using a wooden mandrel and a hammer, I removed the front main bearing. To do this, the engine was placed on the floor with its back side. I placed a wooden mandrel against the front shank of the crankshaft and, using gentle and gentle blows of a hammer on the mandrel, knocked out the crankshaft from the front main bearing.
Next, to pull the crankshaft out of the engine, I took it by two connecting rods and put it in the position in which the connecting rods are at bottom dead center, then after twisting it a little inside, I pulled it out through the rear cover, and put it in place in the reverse order.
I cleaned the front crankshaft oil catcher of slag with steel wire, and I removed almost the entire main bearing cage from the rear oil catcher. The crankshaft itself had no wear above normal. I washed the inside of the engine with solarium to remove any chips that had formed during operation.
Ural motorcycle engine assembly
I found 207 bearings and assembly began. The first thing I did was put the crankshaft inside, I can’t explain exactly how it gets there, well, a few manipulations and it’s there. It didn’t work the first time, because I didn’t move the connecting rods correctly, and the right connecting rod ended up in the left window, and the left one in the right, so I had to pull it out again and put it back in place.
Then, heating the main bearings with a gas burner, I installed them in place. They finally fall into place when you install the pressure washer on the front (I replaced it with a new one, I did not restore the old one). And on the back is the back cover. To do this, they are first seated with long bolts, and then the original bolts are put in their place. I installed the back cover with sealant so that I wouldn’t have to worry about cutting out a new gasket.
When assembling the back cover, while tightening one of the bolts, it broke off. I had to drill a hole in the broken bolt. I tried to unscrew it first, but it didn't work, so I drilled the hole larger and cut a new thread. In the future, these bolts need to be replaced with new ones, as they tend to break off when tightened.
After that, I installed the timing gears, don’t forget about the lock washers. I did not use thread locker, but pinned the bolts with wire. Since this is my first time assembling and disassembling a Ural engine, I suddenly have to disassemble it again.
The timing gears are placed strictly according to the mark. Next, the breather is installed, the windshield is on top, and I bolt it on. I install the ignition in place, approximately according to the marks where it was. After that, I installed the rear main bearing seal. I installed it at the last moment, only after everything was assembled and checked. In order not to disassemble it again, rubber products do not like this.
I took the oil seal from a repair kit purchased back in the “dashing 90s”, it’s good that it was preserved.
Reinstalled the oil pump. Installed the flywheel and tightened it. Reassembled the clutch. Since there were no long bolts or studs on hand, in order to install the clutch as per the book, I had to press on the discs with my knee and tighten them with the original bolts “cross to cross”. This suggests once again that Soviet equipment can be repaired in the field.