1. How to change the oil in a Yamaha snowmobile? 2. How to set the clock on a Yamaha snowmobile? 3. How to identify and repair problems with a Yamaha snowmobile? 4. How to identify and repair a malfunction in the fuel system of a Yamaha snowmobile? 5. What should you pay attention to when purchasing a Yamaha snowmobile? 6. How to remove the track from a Yamaha snowmobile? 7. How to repair the hood of a Yamaha snowmobile? 8. How do I determine the Vehicle Identification Number (VIN) of a Yamaha snowmobile? 9. Tools for Yamaha snowmobiles? 10. How to remove the engine from a Yamaha snowmobile? 11. How to install the drive belt on a Yamaha snowmobile? 12. How to replace spark plugs on a Yamaha Viking 540 snowmobile? 13. How to remove spikes from a snowmobile track? 14. How to measure the tension of a snowmobile track? 15. How to remove the seat from a Yamaha Apex snowmobile?
How to change the oil in a Yamaha snowmobile.
A Yamaha snowmobile engine operates in much harsher conditions than any other vehicle engine. Therefore, it is especially important for a snowmobile owner to regularly change the oil and monitor the oil level indicator in the engine of his car. The oil change should be performed at least after the snowmobile has driven for the first 800 km, after which this procedure must be repeated every 4000 km. The oil also needs to be changed at the beginning of each winter season.
Instructions
You will need:
- Engine oil OW-30
- Bucket or pan for oil
- Philips screwdriver
- Rag
- Adjustable wrench
1. Park the snowmobile on a level, level surface. Turn the parking brake switch to the left to secure the snowmobile in place.
2. Start the engine and let it run for 10-15 minutes. Turn off the engine.
3. Loosen the four screws on the right panel and remove them. Repeat the same procedure with the screws on the bottom panel and bottom of the snowmobile.
4. Place a bucket or oil pan under the oil tank.
5. Disconnect the oil dipstick from the oil filler cap. Remove the oil filler cap.
6. Using an adjustable wrench, remove the drain bolt from the oil tank and allow the oil to drain completely.
7. Move a bucket or oil pan under the engine. Using an adjustable wrench, loosen the engine oil drain bolt and remove it. Let the oil drain completely.
8. Return both oil drain bolts to their original positions.
9. Pour 1.5 liters of OW-30 engine oil into the oil tank. Close the oil filler cap.
10. Start the engine. Let the engine run for a few minutes and then turn it off.
11. Remove the oil dipstick from the oil tank and wipe it with a cloth. Insert it back into the oil tank, remove it and determine the oil level in the tank.
12. If necessary, add oil. The oil level on the dipstick should be between the “L” and “H” marks.
13. Reinstall all removed parts.
Tips and Cautions
- Never fill oil above the “H” mark on the dipstick. This may cause engine problems and oil leakage.
to come back to the beginning
Oil for snowmobile Yamaha Viking 540 what kind of oil
after running in 1:50 Yamalub diluted
Is it possible to fill the Shtil saw with diluted gasoline?
It's a shame to waste so much gasoline.
I ran it and didn't find any problems
undesirable. in calm conditions 10,000 rpm. in a motor 3 times less. On the contrary, it is possible.
I pour motul into the tank.
Also, you need to test other oils
I have already plowed 6000 km, the day before yesterday I went outside the village
look for horses, the Iridium power candle burst at the base there. there is carbon deposits too.
Has anyone else tested any oils?
Besides official Yamaha oil, what else can you pour?
Lew Ravenol TC-W3 11400 km normal flight.
You need to pour 40:1. Not a bit more and not a bit less
I turned off the mix and added 1 k40 to the tank
And the problems with spark plugs and smut whether it works in cold weather or not are gone. I use Equalol but I don’t like the smokiness and the new price of it, I also took expensive Motul, I haven’t tried it yet, I heard that it smokes less, I also liked Zic 2t for testing, the price is 260 rubles. And the oils for plm They don’t seem to recommend pouring, although what difference does it make if it’s 2t?
Toko Yamalub synthetics - that's what Yamaha advised.
other types - you can run into a fake. I'm insuring myself
Do I need to dilute this with the mix?
Who knows when it will fail due to contamination, become airy, or get stuck in the cold?
Then, until it warms up, oil starvation is inevitable. Why pour oil here and there? slamming the hood in the cold, which can lead to a break in the wiring and a short circuit at the bend of the wires. For our conditions, I think the mix should be turned off. I removed the reservoir and the tattered hoses so as not to interfere, and looped the gear from the pump with a scrap hose and everything under the hood became neat and clear, the engine began to work noticeably better and I no longer climb under the hood.
Source
How to Set the Clock on a Yamaha Snowmobile.
If you don't want to get stuck in the snow after dark, keep an eye on the time.
The Yamaha snowmobile provides its owner with a variety of useful information thanks to the oil change indicator, brake warning indicator, speedometer and clock. The clock, which has become an integral part of many Yamaha snowmobile models, is usually located between the handlebars. If you replace the snowmobile battery, you will also need to reset the clock settings. You may also need to reset the time twice a year when changing to daylight saving time or winter time.
1. Find the “Select” and “Reset” buttons on your Yamaha snowmobile’s speedometer. They are located in the upper left part of the speedometer next to the tachometer.
2. Press these two buttons at the same time and hold them for about three seconds. The clock display should flash.
3. Click on the “Reset” button. Keep clicking on it to increase the hour number. One press of the button increases the time by one hour. Once you have set the time to the correct hour, press the Select button. The numbers indicating the minutes will begin to flash.
4. Press the “Reset” button to increase the minutes. Once the clock is set to the correct time, press the Select button.
Tips and Cautions
- Check your watches periodically to avoid being caught in the snow at night.
to come back to the beginning
Specifications
A simple and lightweight car can carry its owner at a maximum speed of 22 km/h. The small fuel tank holds only 3.6 liters of gasoline. This wave is enough for three hours of uninterrupted operation. The Husky snowmobile is designed for a payload of 120 kilograms. It is also capable of towing sleds loaded up to 100 kg. The snowmobile track has a width of 380 mm and a length of 1818 mm. The specific pressure on the surface is 36 grams per square centimeter. This allows motor sleighs with a full load to overcome loose horizontal snow cover not exceeding 30 cm. This machine has nothing to do on slopes and snow dumps. He can overcome gentle slopes up to 20 degrees.
How to identify and repair problems with your Yamaha snowmobile.
The Yamaha snowmobile lineup includes off-road snowmobiles, mountain snowmobiles, sports and cross-country models, as well as touring and utilitarian models of snowmobiles that can be used for recreation and travel, as well as for work. Mountain snowmobiles have a wide support surface, making it easier to climb and descend in mountainous areas. Touring models can become a real luxury item, equipped with a double socket for charging a mobile phone and heating the helmet visor. Every Yamaha 4-stroke snowmobile has an electric starter, so you don't have to pull the starter cable to start your snowmobile. In general, troubleshooting problems with your Yamaha snowmobile is fairly easy. Instructions You will need:
- Wire brush
1. If the engine cranks but does not start, check the fuel level in the tank. If there is enough fuel in the tank, check the fuel line and make sure it is not clogged. The fuel line connects the engine to the fuel tank. Inspect it for blockages and clean it if necessary. If there are no problems with the fuel or fuel lines, clean the spark plugs. To do this, remove the spark plugs and remove carbon deposits from them using a wire brush. If the spark plugs are wet, wipe them dry. 2. If the engine still does not start, tighten the cylinder head nuts. They could become loose, which in turn could lead to loss of compression. Replace worn or damaged gaskets. 3. Check the battery charge level by turning on the light. If the light is dim or does not turn on at all, the battery is low. In this case, try starting the engine using a spare, fully charged battery. 4. If the electric starter does not work, check the engine stop switch: it may be pressed. In this case, squeeze it out. 5. If the engine overheats, add coolant. By this time, the engine may have cooled down, but will overheat again if the coolant level remains low. 6. If the engine power is insufficient, allow it to warm up slightly. If you feel that the engine power is still insufficient, you may have to contact a service center to adjust the V-belt tension. 7. If the snowmobile does not move, check the V-belt tension. Another possible reason for the snowmobile not moving could be foreign objects caught in the snowmobile's drive track. Carefully inspect the caterpillar. A drive mechanism that is too tight, too loose, or damaged can also cause inability to move. To resolve such problems, contact a service center. The V-belt should also be carefully inspected if the engine does not upshift or downshift properly, or if there is noise or excessive vibration from the drive chain. The V-belt may be worn or damaged.
to come back to the beginning
Oil for snowmobile Yamaha Viking 540 what kind of oil
after running in 1:50 Yamalub diluted
Is it possible to fill the Shtil saw with diluted gasoline?
It's a shame to waste so much gasoline.
I ran it and didn't find any problems
undesirable. in calm conditions 10,000 rpm. in a motor 3 times less. On the contrary, it is possible.
I pour motul into the tank.
Also, you need to test other oils
I have already plowed 6000 km, the day before yesterday I went outside the village
look for horses, the Iridium power candle burst at the base there. there is carbon deposits too.
Has anyone else tested any oils?
Besides official Yamaha oil, what else can you pour?
Lew Ravenol TC-W3 11400 km normal flight.
You need to pour 40:1. Not a bit more and not a bit less
I turned off the mix and added 1 k40 to the tank
And the problems with spark plugs and smut whether it works in cold weather or not are gone. I use Equalol but I don’t like the smokiness and the new price of it, I also took expensive Motul, I haven’t tried it yet, I heard that it smokes less, I also liked Zic 2t for testing, the price is 260 rubles. And the oils for plm They don’t seem to recommend pouring, although what difference does it make if it’s 2t?
Toko Yamalub synthetics - that's what Yamaha advised.
other types - you can run into a fake. I'm insuring myself
Do I need to dilute this with the mix?
Who knows when it will fail due to contamination, become airy, or get stuck in the cold?
Then, until it warms up, oil starvation is inevitable. Why pour oil here and there? slamming the hood in the cold, which can lead to a break in the wiring and a short circuit at the bend of the wires. For our conditions, I think the mix should be turned off. I removed the reservoir and the tattered hoses so as not to interfere, and looped the gear from the pump with a scrap hose and everything under the hood became neat and clear, the engine began to work noticeably better and I no longer climb under the hood.
Source
How to identify and repair a malfunction in the fuel system of a Yamaha snowmobile.
Protect your snowmobile's fuel tank from snow and ice! To help you check your fuel level regularly while riding, Yamaha has installed fuel level indicators on its snowmobiles. The indicators of the indicator warning of low fuel level are duplicated by the indicators of the device warning of malfunctions. Yamaha snowmobile engines (such as the FX Nytro) run on readily available unleaded gasoline. Yamaha snowmobile fuel system problems may include low fuel levels, a disconnected fuel system, or a damaged fuel system. These problems can be resolved by following the instructions below. Instructions you will need:
- Spare parts for the fuel system
1. When riding a Yamaha snowmobile, if you are unsure of how much fuel is in the fuel tank, you can check the fuel level indicator to determine the amount. If you feel that the readings you are receiving are not accurate enough and would like more accurate readings, park the snowmobile on a level, level surface and then take a look at the indicator reading. As a rule, the indicator readings consist of eight segments. When only one segment remains on the indicator, the warning light lights up and a sound signal sounds. 2. If the fuel level is low, turn off the engine and fill the tank. Protect the tank from snow and ice! Remember that fuel expands when heated, so stop filling the tank when the automatic fuel refueling system turns off or when the gasoline level reaches the bottom of the filler neck. Close the fuel tank cap by turning it clockwise. 3. If the problem with the fuel system continues, check the fuel filler cap and oil seal for damage. Check the fuel tank for damage, cracks or leaks. If your snowmobile has been involved in an accident, carefully inspect the fuel tank. Over time, dents can become weak spots in the tank. Peeling paint can cause rust and fuel leakage. 4. Observe the fuel level warning indicator while riding your snowmobile. Flashing lights mean that the self-diagnosis system has not detected any system faults. These malfunctions may include disconnected components and damaged wires. Check the fuel supply line between the tank and the engine for any problems and replace them if necessary.
to come back to the beginning
Owner and snowmobile "Husky"
Reviews that positively characterize the model are quite numerous. All owners consider the main advantage to be the ability of the unit to fit in the trunk of a passenger car. Special thanks from the owners who do not have garages or sheds - they calmly store their snowmobile on the balcony. The simplicity and reliability of the power unit are also worthy of praise. Many fishermen have been successfully using motorized sleds for more than one year.
A snowmobile is ideal for winter fishing enthusiasts of retirement age - there is no need to trudge along slippery ice for several kilometers, carrying a bulky fishing box and being afraid of slipping and breaking or knocking something off.
And so, he got out of the car, took out fragments of the motorized sled from the trunk, collected it and went to calmly drill holes in the middle of the reservoir.
What to look for when buying a Yamaha snowmobile.
With a variety of snowmobile models that can be used in almost any conditions, Yamaha is firmly positioned as one of the most reliable and stable manufacturers. Yamaha is the first snowmobile manufacturer to use an exclusive four-stroke engine in all of its models. In doing so, she continued a long tradition of being an innovator and industry leader. Buying a Yamaha snowmobile 1. Decide how much you are willing to spend on a snowmobile, and compare this figure with the prices of new Yamaha snowmobiles. If you want to buy a Yamaha model with certain capabilities, but you don't have enough money to purchase a new snowmobile, then purchasing a used snowmobile may be your best solution. In this case, try to purchase the newest used snowmobile, if possible with a valid manufacturer's warranty. 2. Study the features of the various Yamaha snowmobile models that the company has offered this year. Every year Yamaha makes changes to its products, so when choosing a model, it is best to check its latest developments and latest improvements. Find out which model (or models) interest you most. 3. Make a list of your local snowmobile dealers. Call them to find out which of the models you are interested in are currently in stock and find out their prices. Remember that the market for snowmobiles works on the same principle as the market for cars: you can get the best price by talking to the seller. 4. Reach out to local classified advertising resources, both electronic and print, and find people selling their own Yamaha snowmobiles, or place an ad that you are looking for a specific model or year of snowmobile. If you're new to the world of snowmobiling, make sure you have someone knowledgeable in the field help you inspect your used snowmobile. 5. Browse offers on Internet sites. They may feature new Yamaha snowmobiles at a great price or with a great discount, but you have to put in some effort to get there. Please ensure that your consumer rights are protected before confirming your purchase. Tips and Cautions
- Consult experienced snowmobile owners about the various Yamaha snowmobile models. You can find them on forums on the Internet.
- Be careful when purchasing a used Yamaha snowmobile from a private party. If you're new to the world of snowmobiling and don't want to find yourself stuck in the snow with a broken machine, consider purchasing a new snowmobile.
to come back to the beginning
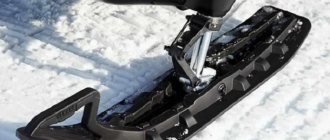
How to remove a track from a Yamaha snowmobile.
It is best to remove the snowmobile track with an assistant. If your snowmobile's track brackets are damaged or the guide rail has become unusable, you can remove the track without much trouble if you take the appropriate steps. Edge tears in your snowmobile track and broken reinforcing bars may also mean it's time to remove the old track from your Yamaha snowmobile. You may also decide to remove the track if it is stretched or if its outer studs are worn out. Instructions you will need:
- Socket wrenches or adjustable wrench
- Lifting support
- thick blanket
- Plastic bucket
1. Install a lift support under the rear bumper of the snowmobile. Make sure the snowmobile's track and frame are on the ground. Using a wrench, remove the rear suspension bolts. 2. Remove the drain plug from the chain housing and drain the oil into a plastic bucket. 3. Remove the screws that hold the gear in place and remove it. Remove the nuts that hold the outer race of the roller bearing in place. Remove the roller bearing outer race and the O-ring. 4. Unscrew the nuts that secure the speed sensor. It is located on the same side as the clutch disc. Remove the speed sensor. 5. Place the snowmobile on its side on a thick blanket to protect its cover from damage on a hard surface. Move the drive shaft back and forth and remove it through the chain guard. Gently tap the drive shaft to move it to the side and remove it. 6. Remove the track starting from the rear of the snowmobile.
to come back to the beginning
Reviews
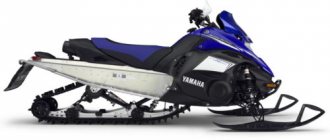
Sergey, Tver region. I have a Yamaha 540 with a reliable 535 cc engine that runs like a clock. The main thing is to carry out maintenance on time. Of course, the consumption is higher than that of four-stroke engines, despite their large cubic capacity. But there is a low gear that allows you to carry loads of 300 kg.
Nikolay, Tambov. I have been using a supported Yamaha 540 for three years now and have no problems. I will note the high cross-country ability thanks to the 50 cm wide track, especially on soft snow. Other highlights include an improved ProComfort rear suspension for a smooth ride. Of course, heated grips and gas are also available. The downside is the tiny 31-liter tank, which means you have to take a reserve for long distances. But the Snowmobile is very comfortable.
Source
How to repair a Yamaha snowmobile hood.
Yamaha offers its customers various models of snowmobiles. The hood of a Yamaha snowmobile is made of fiberglass, so any repairs to any model should be made using the same material. The procedure for removing the hood from the snowmobile frame varies depending on the model. Typically, the hood is attached using regular plastic clips, but on some older models bolts may be used for this. To repair the hood you will need some materials from an auto parts store and about 24 hours of total time. You can easily handle this job yourself with little or no snowmobile repair experience. Instructions you will need:
- Fine sandpaper
- Sealing putty
- Fiberglass patches
- Adhesive tape
- Fiberglass sealant
1. Disconnect the mounting clips located along the bottom of the hood. Remove the hood from the frame and place it on a clean, dry work surface. 2. Sand the damaged area with fine sandpaper to smooth the surface. Make sure you treat all dents and scratches. Fill all scratches, cuts and dents with sealing putty. Apply the patch to the hole on the underside of the hood. 3. Apply duct tape to the patch and allow it to dry until the patch is firmly attached to the hood. Rotate the hood so that the front of the hood is facing you and cover the patch with sealant. 4. Allow the sealant to dry and cure, then sand the surface to smooth its surface and level its surface with the surface of the hood. Once the sealant you used to fill scratches or dents has dried, sand those areas as well. If you want to hide traces of repairs, apply a primer to the surface of the hood and paint it.
to come back to the beginning
How to Find the Vehicle Identification Number (VIN) of a Yamaha Snowmobile.
Find out where the VIN is located on your Yamaha snowmobile! There are a number of different situations in which you may need to determine the Vehicle Identification Number (VIN) of your Yamaha snowmobile. The Vehicle Identification Number (VIN) contains information about each specific snowmobile, such as the model name or year of manufacture. You may need this data when registering or selling a snowmobile, as well as when selecting suitable spare parts for it. Instructions 1. Stand to the right of your Yamaha snowmobile. 2. Locate the right tunnel of your Yamaha snowmobile. The tunnel is the area under the seat where your feet rest when you ride your snowmobile. 3. Find the middle of the tunnel, approximately three inches below the seat. Find the 17-digit sign imprinted into the tunnel. This is the Vehicle Identification Number (VIN) of your Yamaha snowmobile. Tips and Cautions
- If you want to know more information about your Yamaha snowmobile, you can decipher its VIN.
to come back to the beginning
Yamaha Snowmobile Tools.
Special tools have been developed for snowmobiles. There are a wide variety of tools that can be used to repair, assemble, or fasten parts on Yamaha snowmobiles. The list of these tools is quite extensive, but when traveling and for repairs in the workshop, three of them are basic and of particular importance. Hook Extension Spring Hook extension springs were made to install or replace any snowmobile exhaust spring (as well as any other spring that needs to be tightened or loosened). They are made of stainless steel, so they have excellent anti-corrosion properties. The company produces coils with the ability to expand 4, 6 or 8 inches. The choice of spirals depends on individual needs. Liquid Vac The Liquid Vac is a tool that allows you to easily and accurately remove antifreeze or oil. According to Yamaha's recommendations, to use it, you must "introduce the suction hose into the dipstick tube or coolant reservoir, and then connect it to the vacuum cleaner's tank to collect the liquid." The Liquid Vac vacuum cleaner is equipped with a 7.5 liter tank that quickly absorbs any old liquid that needs replacing. SLP Press Tool for Replacing Springs on Yamaha Snowmobiles The CLP press clamp is used to compress and secure springs when connecting or disconnecting them. According to information released by Yamaha, the CPL spring press is “compact; it can be used both in the field and in stationary conditions in order to fix parts when repairing a machine in a workshop. This high quality powder coated metal construction is a quality tool that is practical and very durable.”
to come back to the beginning
Comparison with similar models from other companies
The main thing is not to compare it with full-fledged snowmobiles that are capable of moving at a speed of 80 km/h and cost several times more. If you compare it with Dingo T110, Irbis Dingo, Tesik, Mukhtar, Pegasus.
They are no different, except that “Husky” can be easily assembled and disassembled. Otherwise, they are all similar, their differences are very small, which concern only the chassis and engine parts.
How to remove the engine from a Yamaha snowmobile.
If your Yamaha snowmobile's engine is acting up, remove it and have it repaired. Yamaha snowmobile engines are typically two- or four-stroke. Like any other engine, a snowmobile engine can wear out quite a bit over time and, therefore, need repair. With the right tools and some mechanic skills, you can remove it yourself without too much trouble. Instructions you will need:
- Clean rag
- Socket wrench
1. Turn off the engine of your Yamaha snowmobile. Pull the seat up and back. Lift the hood to access the engine. 2. Disconnect the clutch and use a socket wrench to loosen the bolts that hold the engine in place. 3. Carefully lift the engine up and out.
to come back to the beginning
How to Install a Drive Belt on a Yamaha Snowmobile.
Replacing the drive belt on a snowmobile is a procedure that every driver should be able to perform. The drive belt on a Yamaha snowmobile is what connects the drive and driven clutch plates. These discs work in tandem and adjust the torque produced by the engine to adjust the required track speed. With constant use, the belt may wear out. It can also be damaged when shifting gears at too high a speed. You can easily replace a damaged belt while traveling. This procedure is simple and does not require tools. 1. Release the latch and open the hood. Remove the side molding to gain access to the rims. 2. Remove the belt drive protective cover and secure the parking brake. 3. Reach the clutch driven disc and grab one of the lugs from behind with your hand. 4. With your other hand, press down on the spring and at the same time push down on the belt. The belt will move away from the disc. 5. Remove the belt from the drive plate. Install the new belt by repeating the steps in reverse order. Make sure you install the new belt in the correct direction.
to come back to the beginning
Yamaha Viking 540 engine - how much oil to fill
Fourth generation 2012-2015
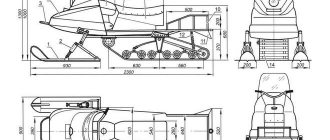
Compared to its predecessors, a modern snowmobile has better cross-country ability and load capacity. In addition, the developers have increased the torque and efficiency of the engine, which is a time-tested Yamaha two-stroke engine with two cylinders and a volume of 535 cc. cm. The snowmobile is equipped with a lightweight torsion bar rear suspension with independent operation of two 40 mm shock absorbers. The TSS suspension is installed at the front, ensuring precise following of the specified trajectory.
The snowmobile is shod with wide Blow Mold skis of an original design. Their width is 228 mm. Also included is the new Camoplast Rispaw Full track, which is said to be lighter and more durable. It works as a chain drive and thus provides better traction on virgin snow, including thanks to 7T external gear drive stars.
Two-stroke, 535 cc. cm, oil volume – 3.5 liters, specifications: JASO – FD; ISO – L-EGD; API-TC+
How to Replace Spark Plugs on a Yamaha Viking 540 Snowmobile.
You can change the spark plugs on your Yamaha Viking 540 snowmobile yourself. The spark plugs on the Yamaha Viking 540 snowmobile need to be changed quite often. The Yamaha VK540 snowmobile is equipped with a two-stroke engine. Two-stroke engines burn oil along with fuel. The oil-fuel mixture fouls the spark plugs quite quickly. In order for the engine to continue to run smoothly and smoothly, it is necessary to periodically change the spark plugs. Replacing spark plugs is an inexpensive and quick process. You can do this job yourself using the most common tools. Instructions you will need:
- Ratchet wrench
- Candle key
- Marker
- Masking tape
1. Park your Yamaha Viking 540 and allow the engine to cool completely. 2. Open the hood of the snowmobile. 3. Locate the spark plug wires on the surface of the engine. They are attached to the spark plugs. The Yamaha VK 540 III snowmobile is designed to have two spark plug wires. 4. Disconnect the wires from the spark plugs. To do this, use a marker and masking tape to mark the wires as “left” and “right” so as not to confuse them. Pull the spark plug wire and disconnect it from the spark plug. 5. Using a ratchet wrench and spark plug wrench, remove the spark plugs. To do this, turn the spark plugs counterclockwise. 6. When replacing spark plugs, insert the new spark plug into the spark plug wrench. Turn the spark plug clockwise. Tighten it using a ratchet wrench and a spark plug wrench. Connect the spark plug wires.
to come back to the beginning
Yamaha VK540V Viking test: better and cheaper
The first generation of the most popular snowmobile in the world, the Yamaha VK540, appeared 30 years ago. The fifth was presented in 2016, in Russia it appeared in the 2016–2017 season, but due to the too high price (almost a million rubles!), resulting from the collapse of the ruble that happened then and the introduction of a recycling fee on snowmobiles, it did not gain much fans. But over the time since then, the ruble has strengthened, and the price of the fifth Viking has dropped slightly, which, of course, has led to increased demand for the new product.
Our acquaintance with this utilitarian snowmobile took place in the mountains of the southwestern Urals, on the border of Bashkiria with the Chelyabinsk region. Despite the fact that the Yamaha VK540V is by no means a mountain bike, it felt right at home in that area. There are several reasons for this. Firstly, the Japanese seriously worked on the suspension and installed a new track. Secondly, the work on the model took into account the opinions of employees of the company’s Russian representative office, who collect feedback and wishes from clients from all over the country. But if the “Viking” can be called a mountaineer for its longevity and vitality, then it did not become a “mountainer” even after the changes described above. Nevertheless, the deep snow now seemed less scary to him.
The first thing you feel when entering virgin lands is confident movement forward. Even if there is a slight rise. The main thing here is not to stop skiing up. The Cobra WT track with 1.5‑inch (38 mm) snow lugs does the rest. It is not too wide, but it copes with its responsibilities.
The Viking handles better now. Motorists would say that earlier generations had understeer. Now the steering wheel has become more obedient, although nothing has changed in the steering itself. Apparently, due to the fact that the VK540V has become more rider-friendly: the handlebars have grown up, the driver’s saddle has risen to the same level as the passenger’s, the suspension settings have changed, and the footpegs have been improved so much that it has become easier to control rolls in corners. There is now less snow deposited on them, the running boards.
A new windshield and hood with protective deflectors prevent precipitation from blowing into the passenger area. There is less snow not only on the running boards, but also on the hood, and even under it. This is the result of serious aerodynamic work carried out when designing the exterior of the snowmobile. Less snow being thrown into the engine compartment, which the VK540IV suffered from, is just one aspect. Another is the more pleasant appearance of the new Viking. If all previous generations of the model differed little in design from the tarpaulin boot of the 1913 model, then the VK540V is already more like a felt boot from Versace. Or even fashionable Ugg boots. True, it cannot yet boast of a variety of colors, offering itself only with a black, white or orange front end.
During the ride, I felt and appreciated the smooth, rhythmic operation of the engine in almost the entire speed range, as well as at different altitudes and at different temperatures. The previous Vikings could not boast of all this.
The VK540 engine is highly reliable and durable. This is noted by all Viking users - from Canada to Kola. Therefore, the Japanese left the engine the same: a two-cylinder two-stroke with a volume of 535 cm 3. And his power system did not become injection. However, the Mikuni carburetor has changed. Instead of the previous B38/34 with an oval diffuser and rotary damper, a flat throttle TM33 is installed. To do this, the design of the air filter housing and intake manifold had to be changed. The TM series carburetors are heated, so they were equipped only with liquid-cooled engines. The VK540 has always had air cooling. Therefore, to heat the working mixture preparation device, it was decided to use two 30-watt electric thermocouples. Heating the carburetor not only made cold starts easier (which is vital in the Far North), but also stabilized idle speed when the engine warmed up (no need to constantly adjust the throttle position to prevent the engine from stalling), and reduced spark plug fouling. Additionally, as with liquid-cooled engines, it helps combat carburetor icing and two-stroke power loss. And I experienced all this myself, starting the VK540V cold and driving it through the mountains from bottom to top and back. The analogue AC-CD ignition system has given way to a more modern digital DC-CDI.
How to remove spikes from a snowmobile track.
If the snowmobile track studs become worn or damaged, they must be replaced. A snowmobile's track is the part of the mechanism that pushes the vehicle forward through the snow using spikes. Before removing spikes from the track, you must raise the rear of the snowmobile off the ground. Then you can easily reach the spikes and remove them. Instructions You will need:
- Snowmobile lift
- Socket wrench
- Replaceable 7/16 or 5/16 inch heads
- Flat head screwdriver
1. Raise the rear of the snowmobile off the ground using a winch or lift. Attach the hook on the end of the winch hoist rope to the rear of the snowmobile. Pull the rope and lift the snowmobile. 2. Determine what size sockets you will need to remove the tenons. To do this, alternately place a 7/16-inch and a 5/16-inch socket on the tenon and determine which one fits easily onto the support nut. 3. Install the appropriate size socket in the socket wrench and place the socket wrench on the first tenon you are going to remove. 4. Turn the socket wrench counterclockwise to loosen the nut. Continue turning the nut until it comes off the tenon. 5. Remove the track support plate. You may need a flat head screwdriver for this. 6. Push the spike away from you and remove it from the track. 7. Repeat the procedure for any remaining track studs that require replacement.
to come back to the beginning
According to all-season efficiency
If you have a choice of buying oil for low temperatures or giving preference to an all-season option, then you need to choose the second option. This oil will help preserve the engine from the inside during operation at low ambient temperatures, and will also help you survive the period when the snow will settle in anticipation of snow cover.
This choice will allow you to move through the snow without problems even in extreme sub-zero temperatures, but even above-zero temperatures will not be an obstacle to travel.
How to measure snowmobile track tension.
Too much tension will typically cause the snowmobile to lose power and be detrimental to the suspension components. A thumping sound coming from the snowmobile's track is a warning that the track may be loose. Either way, you can measure the track tension to determine if your snowmobile needs track tension adjustment. Too much tension can result in loss of power and adversely affect suspension components. Regularly measure the track tension on your snowmobile and adjust if necessary. Instructions you will need:
- Snowmobile lift
- Measuring tape
1. Place the snowmobile on a snowmobile lift and turn off the engine. 2. Raise and secure the lift. 3. Measure the distance between the skid shoe and the bottom of the snowmobile track. The distance obtained should correspond to the distance specified in the owner's manual. For example, on a Ski-Doo Citation snowmobile, this distance should be ½ inch between the shoe and the bottom of the inner track surface. There are similar recommendations for your snowmobile as well. Tips and Cautions
- If the distance you have determined is greater or less than what the manufacturer specifies, you will need to adjust the track tension.
to come back to the beginning
Constructor
The front telescopic suspension rests on two short skis. The rear one has a simple balancing design.
The four-stroke engine produces low power - 6.5 horsepower. This is quite enough, given the weight of the snowmobile, which is 79 kg. The lubrication system holds only 600 grams of oil. The engine starts manually - there is no starter. The model does not have any lighting devices, which makes it impossible to operate in the dark.
The unique design, which has no analogues in the world, makes the motor sleigh a convenient transformable transport. It is easy to turn it into an easily transportable oversized cargo, ready for transportation by any passenger car.
The structure can be disassembled without special tools in a matter of minutes. The heaviest weight is the part with the engine and caterpillar – 31 kg. This makes loading a snowmobile into the trunk a manageable task even for older anglers.