Domestic motorcycles of the IZH brand, despite their age, are still popular in various parts of our country. This simple and unpretentious transport is especially popular among residents of rural areas. Not every imported motorcycle can start at +40 or -30, run on any gasoline, and when modified with a sidecar, it turns into a universal transport for a hunter or fisherman. Unfortunately, these motorcycles also have a significant drawback - low engine life. It’s rare that an IZh can work for several seasons and not fail. That is why below you will find step-by-step instructions on how to disassemble and reassemble the IZH Planet 5 engine.
Engine assembly
When restoring the engine, remember that its main characteristics will depend on the accuracy and thoroughness of your actions in fitting and installing engine parts.1. All removed engine parts and spare parts must be thoroughly washed with kerosene or white spirit and inspected for chips or other serious defects. Such parts must be replaced with new ones.2. All joining surfaces must be cleaned of traces of gaskets or sealant.
3. Polish the gear shift forks until they shine.4. Using sandpaper, remove any roughness from the crankcase halves, then wash the housing parts in water and detergent.5. Fill the left oil seal with grease and install it in place along with the bearing ring and spacer. Next, install a shaped washer in the left half of the crankcase.6. Install the retaining ring and check the accuracy of its installation.7. Install the main bearing rollers and lubricate them generously with grease.8. Cut a mandrel from a plastic bottle and install it on the left oil seal.9. We mount the crankshaft with the left end up. Carefully place the left crankcase half onto the crankshaft.
10. Remove the plastic seal mandrel, install a pre-lubricated ball bearing on the shaft and press it in until it stops using a 19 mm tool head.
11. Install the spacer washers, followed by the retaining ring.12. Lubricate the connecting rod bearing with a small amount of engine oil and check how easily the crankshaft rotates. All subsequent steps for assembling the engine are carried out in the reverse order of disassembly. The grease-free connecting planes of the crankcase connector and the threads of the bolts must be lubricated with heat-resistant sealant, but only after checking that the crankshaft and other parts rotate freely. The sealant should be applied in a thin layer without breaking. It is also necessary to lubricate the bearings, their seats and gears.
Lightly tapping the parts with a mallet, connect the crankcase halves.
Photo report: Engine repair of the Izh-Planet motorcycle (SZD sidecar)
The engine that we will be repairing today was bought by me several years ago through an advertisement in the newspaper. The person who sold it swore that he bought this engine from “some grandfather” back in “those times”, or rather, he bought a motorized wheelchair (“disabled person”) from “his grandfather”, then cut it “into metal”, and the engine together I removed the gearbox and other bells and whistles in order to later make a tractor based on it, but as always, something didn’t work out, it went wrong...
As the seller assured, the engine was supposedly in perfect technical condition, the mileage of the motorized stroller was about 5,000 km, which is not very much for a “Planet”. He asked for a small price for it, so the engine was purchased without delay and delivered to the garage on the same day.
After disassembly, it turned out that the seller’s talk about ideal condition was greatly exaggerated: the crankshaft was practically jammed, the connecting rod had to be replaced, the piston had critical wear, the motor chain was stretched, the oil seals, clutch discs and crankshaft support bearing were worn out, but overall the engine was in excellent condition condition and, most importantly, this engine has never been “opened”, so this purchase can safely be called a success.
It is always easier to restore even a very worn-out engine if, after factory assembly, no one has yet managed to stick their drunken face in there before you, than after all sorts of tusks...
For those who don’t know: the engine of the Izh-planet and the SZD of the motorized stroller are almost identical in design, with the exception of minor details, so you can safely apply everything you read in this article to your “Planets” without fear.
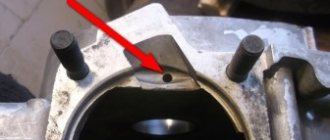
So, before assembling the engine, we thoroughly wash all the parts, check the condition of the crankcase and threaded connections, clean and blow through two oil channels (marked with an arrow) located in the upper part of the crank chamber, prepare a clean work area, take two planks and place the left half of the crankcase on them.
Using a special puller, install the crankshaft oil seal retaining ring into the left half of the crankcase.
From the inside of the crank chamber, we install a spacer ring into the mounting hole of the main bearing.
We heat the mounting hole of the main bearing with a technical hair dryer and, using a mandrel, install the oil seal all the way and immediately, so that later you do not forget to lubricate the edges of the oil seal with clean engine oil.
Place the oil guide washer on the oil seal; the washer has a convex shape similar to a plate; when installing, orient its convex side towards the oil seal.
We again heat the crankcase mounting hole with a hairdryer and, using a mandrel, install the outer race of the crankshaft main bearing into it. In the second half of the crankcase, the main bearing race is installed exactly according to the same principle.
We are looking for a metal plate 7-8 millimeters thick, cut a small wedge in it so that the connecting rod fits easily into this cutout. We place the crankshaft on the plate so that it fits between the cheeks, take the main bearing and, using a mandrel, slowly and without much effort, press it onto the crankshaft journal - first on one, then on the other.
It is worth cautioning: many people who are unfamiliar with technology prefer to press the main bearings onto the crankshaft in the classic collective farm way: they take a hammer or sledgehammer and simply, with all their heart and soul, brazenly hammer the bearing into place.
As a result, either the bearing race bursts (as always, the Chinese or traders are to blame for this...), or the journal comes out of the cheek into the crankshaft, which leads to blocking of the connecting rod, or the crankshaft is deformed, which leads to a divergence of its axes, as a result to loss of engine power. But more often than not, both things happen...
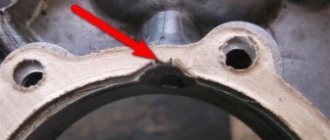
Thoroughly lubricate the lip of the oil seal and the race of the main bearing with clean engine oil, then very carefully, so as not to accidentally wrap the cuff on the oil seal, twist the crankshaft a little into the left half of the crankcase. Depending on the situation, we either hammer or knock out the crankcase guide bushings (marked with arrows) so that they extend 5-6 millimeters above the crankcase connector plane.
We degrease the crankcase planes of both halves of the crankcase, apply a layer of engine sealant to one of them, lubricate the main bearing and the oil seal edge of the second half of the crankcase well with oil, and tap the crankcase halves a little with a wooden mallet.
Immediately put the gearbox cover in its place without the gasket and tighten the crankcase bolts. The bolts should be tightened according to this principle: we start tightening the crankcase with the bolts located in its middle and then tighten the remaining bolts crosswise, gradually increasing the force over several circles and tighten them completely.
We turn the engine over, heat the seat with a hair dryer and, using a mandrel, install the crankshaft support bearing in its place, then install the retaining ring there.
The retaining ring should be flush against the bearing. If you end up with a gap of more than 0.1 mm between the retaining ring and the outer race of the bearing, remove it with an adjusting washer. Otherwise, the crankshaft will have large axial play.
Because of this, the crankshaft will “run” along its axis, knock and cling to the walls of the crank chamber, so excessive axial play must be eliminated without fail. After everything has been done, leave the engine alone until the sealant dries.
An important point: when you install the oil seal on the generator side, do not place the oil seal flange on the sealant. You will ask why? Because there is a special oil channel (marked with an arrow) through which the right main bearing and oil seal are lubricated.
Many people unknowingly cover this channel with sealant, which naturally leads to the destruction of the oil seal and the main bearing (an example of the destruction of the main bearing is shown at the end of the article). The standard gasket does its job perfectly, so there is absolutely no need to apply sealant to this place.
Unfortunately, it will not be possible to display all the stages of assembling this engine in one article, primarily for technical reasons. Therefore, the repair of other components of this engine will be described in the following articles, and as they are added, links will be provided in this article. And that's all for today.