Author: Evgeny Zhivoglyadov. Publication date: November 30, 2022. Category: Motor vehicles.
Today's motorcycles not only look much more stylish than they did half a century ago, but they are also more functional. Modern components and systems of “bikes” continue to be constantly modernized. One example of motorcycle equipment upgrades is a motorcycle fairing.
It is understood that this useful accessory is produced at the factory of the manufacturer of the iron horse, but not all concerns support this policy and motorcyclists have to think about making wind protection themselves.
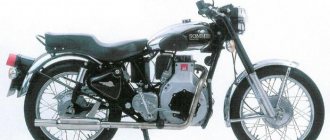
Fairing for motorcycle
Today, motorcyclists have certain requirements for their “iron horses”. They relate not only to technical characteristics, but also to the external and functional qualities of bikes. Motorcycles become more advanced in the hands of experienced and skillful owners.
Many modern motorcycle owners are trying to equip their bike with various additional systems and components that will make control more comfortable. External qualities also undergo all sorts of changes. Bike owners try to make their “iron horse” stand out from all the others. New fairings are used for this purpose.
Fairing for motorcycles: purpose
Today, various motorcycle manufacturers install quite attractive fairings. However, sooner or later, every biker wants to modify his equipment so that it stands out from everyone else on the road. Adding a fairing to your motorcycle means modifying your bike and making it more modern. The main purpose of any fairing is to protect the driver of a motorcycle from oncoming wind flows and from dust and dirt, which are his undoubted companions during the journey.
In addition to this purpose, the fairings also have the function of protecting the dashboard from damage. This happens during a fall. During an accident when a motorcycle falls, in most cases the dashboard is damaged. She needs to be protected. This can be done by installing a high-quality fairing.
Motorcycle headlight fairings
008_moto_0712_092
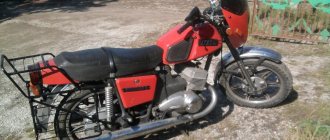
But what can we say about those who already have good wind protection! The main consumers of glass are drivers of classic motorcycles, cruisers and light enduros used for tourism.
Here everything turns out to be simpler than in the case of “tourers” and “sports”. The first reason is the speed limit. At speeds up to one and a half hundred, almost any form of glass works tolerably. The second reason is that on motorcycles that do not have any fairings from the factory, you can install the glass arbitrarily and adjust its position in the process. After all, the glass is attached either to the handlebars or to the crossbars of the motorcycle through brackets, allowing some freedom of positioning.
I’ll leave one remark for endurists. When choosing and installing glass, you need to remember that the main position when riding a motorcycle is standing. So the glass should be high enough and set forward so as not to interfere with riding in the rack. Placing a sharp edge of glass close to your neck is not a good idea. As a last resort, the edge should be as vertical as possible.
One way or another, whether you have a huge Harley or a small endurike, installing glass will be an interesting experiment.
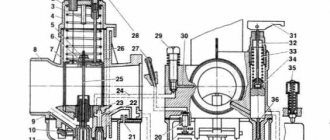
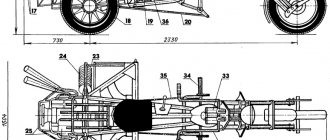
WINDSCREENS AND AIR FLOW PATTERN:
What is required to make a fairing at home
Not every modern motorcyclist can afford to purchase expensive parts for his “iron horse”. That is why in most cases masterpieces are born in the garage. Here you can create your own fairing. If you try hard, it will turn out to be of high quality and excellent from an aesthetic point of view.
You can make a motorcycle fairing with your own hands from the following items:
- Foam material.
- Knives for cutting foam material.
- Glue.
- Metal tubes. They will serve as the basis for the future fairing.
- Welding device.
- Small parts that can be used to securely secure the structure.
- Glass material.
- Epoxy resin.
- Mesh of small thickness to strengthen the structure.
Using these items and tools, you can make a fairing for a motorcycle headlight.
Important: Extreme care must be taken when creating the fairing. After all, it is very important to cut all the parts with extreme precision so that the final product turns out to be of high quality and neat.
The most popular types of spoilers
All spoilers can be divided into two types:
The spoiler does not have to be made entirely by yourself. If you like the store-bought parts, but do not fit the width of the trunk, you can buy a ready-made one, saw it and extend it with an insert (or cut it) to the desired size.
To make a spoiler for a car yourself, you don’t need special tools or expensive materials, but when tuning a car with your own hands, it’s important to know when to stop. If you go too far with the size of the element, the car will look ridiculous, and driving such a car will be unsafe due to impaired aerodynamics.
Source
DIY motorcycle fairing
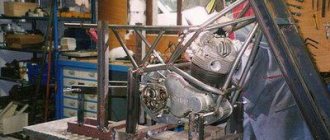
Motorcycle fairing photos show that at home it is quite possible to make a high-quality protective structure for your “iron horse”. First you need to work on the frame for the future product. To determine its dimensions, you need to cut out parts of certain sizes from foam plastic. Using them, a frame of a certain shape is made from metal pipes. The parts are fastened together using a welding tool. The form can be changed depending on what you want to get in the end. Each motorcycle owner has his own preferences. They may differ in each case. Here every motorcyclist has the opportunity to show all his imagination.
The shape of the structure must be given a smooth and neat appearance. Next, the finished structure must be covered with a layer of paraffin. Before use, it must be mixed with a small amount of gasoline. The glass fabric must be coated with epoxy resin.
After this, you can cover the frame with fiberglass. The entire structure is covered with a fine mesh for strength.
The instructions for creating a fairing at home are not very complicated. If you have the desire and skill, then a fairing made in a garage will work no worse than one purchased in a store.
There is virtually no cost required to create a fairing using your own hands.
007_moto_0712_092
Modern touring motorcycles generally have no problems with seating. No matter how you sit, you are in a zone of reliable protection from the wind - an aerodynamic shadow. Most “tourists” have a system for adjusting the height and angle of the windshield. Thanks to this, it is much easier to move quickly in a straight line on a good tourer than on a sportbike. But there are difficulties here too. The fact is that tourist windows are made very high, and only very tall drivers can look at the road over the glass raised to the top position. This is not always convenient. For example, in the rain, wet glass distorts the road. One compromise for a tourer could be glass with a small V-shaped cutout in the middle. You can see through the cutout, but the effectiveness of wind protection is slightly lost, and in wet weather you still have the opportunity to arrive dry.
Moreover, when the window is fully raised, the wind begins to blow not in the face, but in the back, since an area of low pressure appears behind the large “burdock”. You also need to get used to this. To reduce this effect, small slot-like slits are made in the glass. For older “tourists”, where the glass height was not adjustable, two-story “windbreakers” are produced. Another movable one is fixed parallel to the upper part of such a shield. By moving it, you can achieve very good results for a given driving mode.
Unfortunately, on motorcycles with a fairing it is not always possible to “get right” with the glass, and not all tuning glasses are better than standard ones. Test drive your motorcycle before you decide to buy. Best of all - on average long-distance, about three hundred kilometers - and along the way look for the most comfortable position of the body and head. Perhaps you just haven’t found “your” riding position on the motorcycle. If comfort does not come, choose glass from well-known manufacturers and avoid extreme forms. Remember that the wind does not like sharp corners and sharp transitions. Another important point is the material from which the glass is made. Organic glass cannot be used for shields. It is fragile, and when cracked, it turns into sharp daggers. Only durable polycarbonate will do. Moreover, you need to remember that the fastenings should not be too strong and rigid. The best choice is rubber cage nuts, which, in the event of a fall, will allow the glass to “unfasten” from the motorcycle and prevent it from causing harm to the driver. And so that you can return your purchase to the store, do not peel off the protective films from the glass and chrome parts during the first installation. Roll it, and if the glass works in the selected position, fix the fasteners and remove the transport film. When fighting the wind, keep in mind: the fairing is not always the cause of the inconvenience. Even a loose jacket can create irregular swirls. Yes, and luggage cases often cause very serious interference, noticeable when taxiing. Don't forget about the passenger. If you like to travel together, ask his opinion before you start improving your motorcycle, otherwise the result of your efforts may not be appreciated!
Acute windproof issue
Today, not only the appearance of steel horses is actively improving, but also their functionality. The bikes are complemented by various kinds of modern components and systems. A motorcycle fairing is clear proof of the overall modernization of motorcycle technology. Many iron horses receive this useful accessory from the factory, but there are also those who were disadvantaged by not adding beautiful wind protection.
Our grandfathers and fathers started making fairings with their own hands. Even they, during the years of infringement on the comfort of Soviet citizens, lacked such an element of the bike. Riding around with wind protection is much more pleasant, and individual motorcycle fairings can complement the appearance in the best possible way. It just so happens that today you will probably find on the Internet many options for a homemade motorcycle fairing, which has a wide variety of designs and colors.
Get to the point with your own hands
Creating an aerodynamic motorcycle fairing is not at all difficult.
To do this, you will need a not so wide list of materials, as well as tools. Don’t be afraid, you probably won’t spend much on purchasing the first ones, of course, if you don’t need the titanium version of the wind-protective structure. The above mentioned fashionable and useful motorcycle accessory is capable of increasing the top speed of any motorcycle bike as it actively reduces air resistance. Moreover, you can make your own fairing for a motorcycle at home.
The list of things needed to create wind protection for the iron horse is of a more or less simple type: - polystyrene foam; — sharp tools (needed for cutting foam); - PVA glue; — several metal tubes to create a frame; - welding machine; — small fasteners; — glass (fiberglass); - epoxy resin; - very thin mesh (to strengthen the structure).
A do-it-yourself motorcycle fairing is created with extreme care. This is especially true for the process of cutting materials. First, a blank mold is created from polystyrene foam. It can be made in several forms, which are glued together using PVA glue or the Moment we are already familiar with. The blank itself must be made in a closed state, that is, without holes even for the headlight.
000_moto_0712_092
The romance ends somewhere at 150 km/h. Then the wind turns into a howling hurricane, which tries to tear off the helmet along with the head or, at least, shake out the remains of the brain. That's why those who love speed hide behind windshields. These little pieces of polycarbonate solve a lot of problems. But only if they are the right shape and in the right place.
It’s surprising that wind deflectors appeared on production motorcycles only in the seventies (although already in the forties many devices developed decent speeds). The first-born in 1975 was the BMW R90S. But the real boom in the development of fairings and windshields began in the eighties. They began to appear in all classes of motorcycles. And today, perhaps, more motorcycles are produced with wind deflectors than without them. Fairings improve the aerodynamics of the motorcycle and rider comfort. Help save fuel and stabilize motorcycles at high speeds. Of course, it would be possible to create an aerodynamically perfect shape, but everything is spoiled... by the driver. After all, it is the size of the rider, his height, weight, the way he sits on the motorcycle and the shape of the helmet that greatly influence how air flows around the motorcycle at high speeds. And that is why for many average versions of factory glass are not ideal.
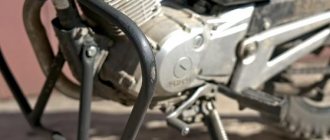
Motorcycle fairing in detail
After you have made a mold for the future design of the wind-protective element, you need to consider the locations of potential attachment to the fairing frame.
The latter is installed using brackets. It is immediately clear that this motorcycle accessory cannot be attached to the main frame; it must move in unison with the front fork, which means that it will be mounted on it. The frame of the above protection against air flows is made of durable metal pipes. The blank form itself must be brought to the place of future fastening and assessed by eye how well it fits with the design of the iron horse. If necessary, adjust the final version of the shape for the future fairing to the aesthetics or needs of the motorcycle, and to yours (the driver’s), first of all. At the end of this “moral” procedure, clean the surface of the form, making it as even as possible. After this, everything should be covered with putty. The latter is better to use polyester type. The putty itself dries quickly enough and can just as easily be sanded with a regular file or sandpaper.
How to make a motorcycle fairing with your own hands
Publication date: November 30, 2022. Category: Motor vehicles.
Today's motorcycles not only look much more stylish than they did half a century ago, but they are also more functional. Modern components and systems of “bikes” continue to be constantly modernized. One example of motorcycle equipment upgrades is a motorcycle fairing.
It is understood that this useful accessory is produced at the factory of the manufacturer of the iron horse, but not all concerns support this policy and motorcyclists have to think about making wind protection themselves.
Making a fairing
Before you make a homemade moped fairing, you need to think about the design of the future accessory. After this, you need to measure the headlights and, taking into account the dimensions of the future product, prepare a pattern (for this it is best to use cardboard).
The next step will require a blank. It is best to use penoplex for this (of course, you can also purchase cheaper foam, but this material quickly crumbles, so it will be very difficult to give it the desired shape). The fairing pattern is applied to the material (it is better to leave a margin of 5 cm on the sides), after which we perform the following steps:
- We give the workpiece a streamlined shape (you can use a jigsaw and any available cutting materials).
- We cut the shape in half and cut off a little material at the joints and at an angle (thanks to this, the product will be even more voluminous). After this, both parts are fastened with paper tape.
- We cover the entire fairing with the same tape (so that it covers the entire surface).
- We apply packing (ordinary brown) tape to the model (this will help protect the penoplex from corrosion). We cover the product with cling film on top, this will simplify the process of removing the model from the workpiece.
- We install our fairing in a horizontal position at some distance from the surface so that there is access to all sides of the product.
- We cut the required size of fiberglass (preferably with a margin) and moisten it in a solvent.
- We cover the fairing with fiberglass, straighten it so that there are no folds or creases, and pour epoxy resin over the mold, distributing it evenly.
Healthy! Some people use any available rag material instead of fiberglass.
- We lay another layer of fiberglass and repeat the procedure. In total, you need at least 3 layers (the optimal thickness for the matrix is 10 mm). After this, we leave the workpiece to dry.
- We remove the penoplex.
The resulting semi-finished product, made by hand, already resembles a motorcycle fairing, but there is still a lot of work ahead.
Fitting and preparation for painting
At the next stage we do the following:
- On the inside we glue a plastic element (you can use a piece of plastic and give it the desired shape using a hair dryer) for fastening (its size and shape depends on the motorcycle model).
- We cover the entire surface of the fairing with a large piece of fiberglass and again pour it with epoxy resin.
- We apply several more layers of material, but this time in small pieces, to give strength to the sides and joints (the more pieces of fiberglass that are applied, the stronger the product will be).
- Using a grinder, we cut out holes for the round headlights.
- We cover the motorcycle headlights with polyethylene so as not to damage them and install the manufactured fairing in its rightful place.
- We take fiberglass automotive putty (mix with hardener) and use it to work out the holes for the lighting elements so that there are no unnecessary gaps. You need to work quickly, as this material sets very quickly.
- Remove the fairing and sand it thoroughly.
- We putty the front side of the product with fiberglass automotive putty.
- Sand the surface.
After this, you can work on the fasteners. As a fastening, you can install a metal plate on the motorcycle, to which another metal element mounted on a plastic blank (prepared earlier) will be attached.
Healthy! If the fairing made for a motorcycle with your own hands is stationary, then it is attached to the frame. If it must move, then it must be attached to the front fork.
After this, you can begin to prepare the fairing for painting. For this:
- We cover the surface with automotive primer (it is better to apply a thick layer using a spray gun).
- After the soil has dried, apply the developing mixture.
- We sand down minor defects, if any. To do this, we use small-sized sandpaper (first 800, and then 1200).
- We paint the product to match the motorcycle using a spray gun (for convenience, the fairing can be hung on a hook).
After this, all that remains is to make a windshield from plexiglass. To do this, it is enough to cut the product to the required size and give it a curved shape using a hair dryer.
see also
Comments 15
Vladimir, thank you very much for the material, I’ve been sitting here all day, racking my brain on how to make a windshield, otherwise without it (especially on the highway) it’s difficult.
Glad it was useful)
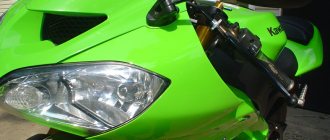
But with a thickness of 2mm, did the air flow at speed bend the upper corner of the glass towards you?
On Kawasaki no, it didn’t bend. The glass is quite narrow and curved, which creates additional rigidity. On the Honda, after 140, half the glass was bent, since it is much wider. A bit of a bummer... So I changed it to 3 mm.
and how about 3 mm on a Honda? didn't it bend at 140? What height of glass did you have there?
It’s confusing that in their video testing snowmobile glasses, they bend them like plasticine. It’s clear that you stop bending - the glass takes its previous shape, but for me the whole point of the purchase is so that you can scald 130-150 without lying on the tank, and if the glass bends at such a speed, then the point of the purchase is lost ((
3 mm does not bend. I tried up to 160 ti. It just fiddles with the air flow a little. But it had to be heated over a gas stove to give it a curved shape. Otherwise, the plastic of the muzzle begins to bend in the opposite direction. It (3mm polycarbonate) is much stiffer than 2mm. At first I made the altitude on Transalpa small and the air flow hit directly the upper edge of the visor. Then I made it higher by 4 cm. Up to 120 is comfortable even with an open visor. But it’s a little inconvenient to drive through the intersection. The glass seems a little high. Now I'm thinking of making a spoiler on the standard wing so that I can adjust the height
ok, thank you very much, I'll try it