Frame
It will be easier to make an Izh tricycle with your own hands if you have experience in welding and understand the design of motorcycles or cars. The frame will have to be completely manufactured from scratch, have a pre-designed shape and structure. Usually the calculation is made in such a way as to exclude breakdowns and places with vulnerable structures, so that the trike can travel hundreds of kilometers without maintenance.
Strengthening is achieved by welding corners and additional pipes
so that the fork does not vibrate. The basis of the transmission can be taken from a walk-behind tractor or combine harvesters. If you want to get a traction type Izh Planet tricycle, it is better to use sprockets in a ratio of 2:1, i.e. 50 and 25 teeth respectively.
Fork
The length of the fork is determined by your project. If you want to make a long front fork, this trike is suitable for flat roads and long rides. A more aggressive driving style will require a shorter length. A tricycle from Izh, photos of various mods of which can be found on amateur forums, may even have a trunk located above the front wheel. Of course, in terms of cross-country ability, trikes are not competitors to ATVs, but for trips to the country, garden or fishing, the work invested will more than pay off.
Engine
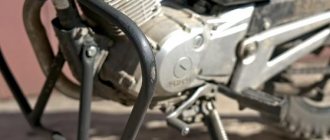
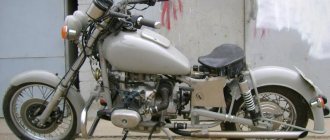
Izh tricycle is made with my own hands based on the “Planet 3” model. In this case, the original crankshaft, generator, and 6-volt ignition coil are used. A feature of the type of body design is the transfer of the power unit to the rear, which shifts the balance when driving. Moreover, such a scheme determines high characteristics of maneuverability, controllability, and, consequently, speed.
When installing the engine and creating the frame, it is worth providing convenient access to places that require frequent maintenance. Many craftsmen make quick-release sections of the frame in order to be able to further customize their three-wheeled iron horse. If you are interested in how to make a tricycle from Izh, and how much time and money it will take, try to get not just a design drawing, but a detailed diagram and a step-by-step plan for installing the units. Better yet, watch the detailed instructions and video review!
Everyone knows that for good support you need only three points, but for some reason three-wheeled vehicles are not as common on our roads as four-wheeled cars. Although the first tricycles appeared in the 18th century. It was on such steam engines that it was proposed to transport cannons and heavy weapons for the army.
Recommendations
It is important to consider some features of using tricycles. These devices are usually intended only for dry areas. And even there they cannot accelerate faster than 30 km/h. And when driving together at a speed of more than 20 km/h, the shock absorbers may not cope. More powerful motors help compensate for some of these problems.
A few more subtleties:
pay attention to torque;
attach the gearbox to the motor as firmly as possible;
The brackets should be made of stainless steel sheets.
To learn how to make a tricycle from a scooter with your own hands, see the following video.
A homemade tricycle is the transport of many generations.
At one time, tricycles were much more common than their own, but today we don’t often see three-wheeled vehicles on the roads. Photos of trikes - this is the second name for tricycles can be seen on the websites of bikers or car enthusiasts. It is worth noting that a tricycle can be both a type of motorcycle and a type of car, so if you are planning to make a tricycle with your own hands, immediately decide what kind of tricycle you imagine.
Of course, before building a trike with your own hands, you should study in detail the operating principle of such a vehicle and have drawings. You can make the drawings yourself if you have the necessary education and good knowledge of the operation of all components. But if you don’t have such skills, and you really want to create a homemade trike, you can find ready-made drawings of homemade trikes that other craftsmen have designed.
By the way, you can watch videos of tricycles that you made with your own hands as garage Kulibins on remodeling sites or YouToube, where videos of testing garage inventions are posted.
DIY trikes: where to start
Donors for a tricycle can be any kind of vehicle, but the most often collected is a tricycle from the Ural or a tricycle from IZH.
In this option, you have to do the least amount of modifications, because the motorcycle base is most suitable for trikes.
Many people make Ural and ZAZ trikes with their own hands, putting these two vehicles together.
The first stage of work on the trike is the creation of the frame and rear axle. The axle can be attached to the frame using rods, similar to VAZ cars, or mounted on springs, as is done in Moskvichi. Naturally, the frame will have to be extended, but this is easy to do with the help of pipes and profiles. If you are planning to make a homemade trike from the Ural with your own hands, almost everything will remain original - the fork, brake discs, hydraulics, fender, etc. By the way, such homemade tricycles look good in the chopper style with elongated forks and a low seat. On the Internet you can see photos of tricycles -
Motorcycles produced back in the Soviet era are already considered a rarity. It is unlikely that he will be able to interest any of them as a vehicle. A museum piece, nothing more! Such equipment is sold very cheaply, a little more expensive than scrap metal. Despite the fact that the old “horse” has already served its purpose, it’s time, as they say, to retire, but I don’t want to part with it. Common situation? Often such a vehicle does not have documents, you cannot go far from home in it - troubles from the police are guaranteed.
Not everyone will think that an old Ural motorcycle, gathering dust idle in the garage, can be turned into a practical unit. Such a homemade product from the Urals does not require huge financial investments, but a certain amount of patience and a few hours of free time will be very useful.
Building a trike with your own hands (48 photos)
It all started in September 2003. In Crimea, while walking along the evening embankment, I came across a bearded guy who offered to take a photo on a miraculous yellow self-propelled vehicle for 10 hryvnia. For about ten minutes I couldn’t take my eyes off it (the trike). Since then, this device has sunk into my soul. When I returned home, I looked on the Internet, figured out how much such equipment could cost and realized that I couldn’t bear such expenses. And in the spring of 2004 I bought myself a motorcycle. I drove it for a season. And in September, while searching for spare parts for my motorcycle, I came across Palych’s article on the Internet about building a trike.
A week later I was already disassembling the purchased Cossack for parts. I removed the engine and gearbox, rear suspension, wiring, seats and everything related to the brakes and clutch. The rest I threw away. I brought it all into the garage and walked around this pile of old iron for a long time and thought about where to start. I didn’t think long, about two weeks. Then I got hold of a bunch of different pipes and channels and work began to boil. Rear wheel mounting adapters were manufactured at RMZ. The rear part of the frame is welded from pieces of channel material. The rear arms were screwed to it and the engine was hung. Then the rear wheels were bolted to all this. The back is ready. Further more.
According to my sketches, RMZ manufactured elements of the front fork - crossbars, and steering wheel mounts. Everything was carefully polished and chromed. I bought the headlights, steering wheel handles, front brake, air horn and instruments in China. The steering wheel was bent from a stainless steel pipe. All that remained was to connect the rear of the trike to the front fork. This is where I had to think twice. We tried many options. Sometimes it turned out weak, sometimes it turned out great. Finally, after much torment and experimentation, I managed to draw something similar to a frame. Now our trike was rolling around the garage on three wheels. All that remained was to restore the beauty, do the wiring, brakes and clutch. We started with the seats. Frames were bent from water pipes. The foam rubber was taken from Zaporozhye seats. Then they took it all to China and covered it with leather. Natural. I probably had to tinker the most with the tank. He did not fit entirely into the galvanic bath. I had to saw off the halves, chrome plate them individually and then weld them back. We finished decorating the tank with a homemade instrument panel a la Harley, into which we inserted a fuel and engine temperature indicator from a VAZ four and a couple more light bulbs. The tank turned out to be fake. The real tank is under the passenger seat. It is from a VAZ-2108 with a chrome-plated neck welded to it from Zaporozhka. The rear fenders are also homemade, welded from stainless steel and polished. Then the engine was overhauled. And on the evening of March 30, 2005, the trike left the garage gate under its own power for the first time. The feeling was indescribable. Everything worked, everything turned on and switched. My joy knew no bounds. The entire construction took 7 months.
Homemade tricycle from the Urals
The main advantages of a tricycle based on the Ural:
- good handling;
- the ability to develop sufficiently high speed;
- high power;
- comfort during long trips;
- a spacious body for transporting cargo weighing several hundred kilograms.
The predominant part of the components belong to motorcycles; the engine for the trike is suitable from a ZAZ-968. The most labor-intensive process is making the frame. In the design, it is a kind of connecting link on which all components and parts are installed.
Design Features
For inexperienced designers, when assembling a tricycle, the drawing will be an excellent guide to action. It is important to think carefully about the size issue.
The rear shock absorbers, which are similar to their automobile counterparts, are mounted on the upper beam. When driving on a road with uneven surfaces, the shock absorbers will react sensitively to them. The glasses are fixed to the beam by welding, which provides the desired comfort. The pipes are welded at the end together with reinforcing gussets - the fastening will be reliable.
Due to the fact that the power unit is installed in the rear, the center of gravity is there. With a sharp increase in engine speed, the front wheel lifts off the road and the tricycle rears up. This effect can be eliminated by placing the balance closer to the front wheel.
If the engine is slightly tired, it needs to be repaired a little. The exhaust system in this case is homemade, and the cooling system can be chosen as water or oil type.
Since the right hand is busy adjusting the gas, the gear shift lever, naturally, should be on the left side.
Assembly sequence
- The frame is constructed according to the drawing. Anything made of ferrous metal must be coated with a layer of primer and then paint.
- The rear axle must be in good condition. It can be removed from a Zaporozhets or Moskvich car.
- All main components and assemblies, represented by the engine, filters, exhaust system and oil cooler, are mounted on the rear axle.
- To have easy access to all parts and ensure ease of assembly, it is recommended to use a jack or lift. The frame must provide a reliable connection between the front fork, rear axle and engine.
- When fixing the elements, no backlash should be allowed; there should be no clattering. To avoid vibrations, make connections using locknuts.
- Fastening by welding is considered the most reliable. This must be taken into account when fixing it to the frame, rear axle and cross members.
- Attaching the fuel tank, seats, trunk and other accessories is done at the very end of the assembly, when the homemade trike is already put on wheels.
Do-it-yourself tricycle assembly from the Urals
Before starting work, it is necessary to think through the design of the future tricycle and the location of all elements. Ideally, make a drawing of the future vehicle.
Important design points:
- All joints must be reinforced.
- Car cups are welded to the top beam. It also serves as a support for shock absorbers.
- Frames are welded to the central beam, which serve as footrests for passengers and also support the suspension bump stops.
- The base for the pedal weights is the lower transverse tube, which is attached to the frame.
- A support for the gearbox is also made on the transverse frame.
The main difference between a tricycle and a motorcycle is that the engine is located at the rear and therefore the center of gravity of the vehicle is shifted back. When accelerating, such a tricycle rears up a little. Below you can see a diagram of how to convert a Ural motorcycle into a tricycle.
Location of tricycle parts
As we have already said, the engine of a Ural tricycle is not located on the main axis, like in motorcycles. It is placed between the rear wheels, because of this, when accelerating quickly, the tricycle easily rears up. But this is a much safer event than on a motorcycle and adds adrenaline and entertainment to the trip.
As a motor, you can use a native motor from the Urals or take a car engine. The main parameter of choice is its capacity between the rear wheels. Be sure to securely fasten it in at least three places. Most often, if the power unit is in good condition, then you don’t even need to do anything to it. And if the engine is old, then you can replace the radiator or some other elements.
Depending on the engine you choose, you will also have to change the exhaust system by installing one muffler for each cylinder.
When converting a motorcycle from the Urals into a tricycle with your own hands, the gearbox is usually installed on the left side, because you usually need to hold the steering wheel firmly with your right hand. You'll have to think a little about how to connect it to the engine, because now the gearbox will be located at a much greater distance from it.
The standard motorcycle suspension will have to be redone due to the fact that the load on the wheels in the Ural moto tricycle is distributed differently.
This is done using two consoles and two large springs (aircraft springs are ideal, but car springs will also work). The consoles are connected by levers through which the front axle passes.
Powerful springs are needed because when moving, a huge load is placed on the front wheel and suspension. The remaining springs can be left as standard motorcycle springs.
Battery
A separate frame is usually welded under the battery, which is attached between the engine and the driver’s seat. All the main details are thus arranged in one place. And if you attach panniers to the tricycle, they will completely hide all the important elements.
Homemade ATV from the Urals
Heavy Ural motorcycles are not very popular. One of the reasons is the huge consumption of gasoline. Many motorcyclists and bikers are not satisfied with the large dimensions of the Urals. Despite this, folk craftsmen are interested in such motorcycles. Points such as the presence of reverse gear and a fairly powerful four-stroke engine are very tempting in terms of converting an old Ural into an ATV. Its cost is ultimately much lower than its European counterpart, and the engine power is much higher. Such homemade products from the Ural motorcycle will appeal to everyone who likes to create with their own hands.
Design Features
Craftsmen from the city of Barnaul received a successful version of a homemade ATV:
- The Ural motorcycle was taken as a basis; in particular, the frame with the engine was left.
- The reinforced gearbox was removed from the motorcycle of another model of the domestic motorcycle - “Dnepr”.
- The drive had to be made of a cardan type, due to the fact that options with sprockets and chains are less reliable.
- Two pairs of wheels fit well from the Gazelle car. The appearance of the ATV turned out to be rough and uncouth.
The engine power of a homemade ATV allows you to pull a load weighing up to 500 kg. Without a load on an asphalt road, the wheels slip during the start.
The management of Russian automobile factories should think about the issue of producing domestic ATVs and tricycles, taking advantage of the excellent experience, for example, of Barnaul craftsmen. Moreover, most of the components had already rolled off the assembly lines of these enterprises at one time!
Homemade Ural motorcycles can look different. In any case, this technique is impressive.
Homemade tricycle assembled from Soviet motorcycles
Dear visitors to the “ Samodelkin Friend ” website, from the material presented by the author you will learn how to independently assemble a tricycle from spare parts from old Soviet motorcycles with your own hands. This trike was assembled by Viktor Bryukhanov and was based on the Voskhod motorcycle frame, front fork with wheel, tank and seat, single-cylinder internal combustion engine borrowed from the Minsk motorcycle. The rear part (gearbox, axle shafts, wheels) is from the Ant cargo scooter. IZh “Planet” shock absorbers; by the way, the tricycle has a reverse speed and an additional towbar for a trailer. Rear brakes, no front brakes)
Thanks to its wheel arrangement, the tricycle is more stable on a dirty dirt road, perfect for fishermen and hunters for traveling long distances off-road (within reasonable limits))
So let's take a closer look at the design features of the tricycle.
Materials
- motorcycle frame "Voskhod"
- ICE "Minsk"
- gearbox, axle shafts and rear wheels “Ant”
- Shock absorbers IZH "Planet"
Tools
- welding inverter
- set of wrenches
- Angle grinder (grinder)
- skillful hands and a bright head)
Step-by-step photo of assembling a homemade tricycle from Soviet motorcycles with your own hands. Rear part from ant, shock absorbers IZH "Planet"
Engine motorcycle "Minsk"
Torque is transmitted using a chain transmission.
Shock absorber "Planet"
There is also a reverse speed.
Rear wheels "Ant"
Homemade snowmobile from the Urals
Most craftsmen who have tried to build a snowmobile with their own hands are faced with the problem of choosing a lightweight engine with high power. It is also difficult to find a track track.
Important criteria that a homemade snowmobile must meet:
You can use one of two motorcycle engines for a homemade snowmobile: the light IZH-Planet or the heavy Ural. Through experience, you come to the conclusion that the latter option is much better.
Features of a homemade snowmobile
- When selecting and modifying the chassis, you can use the Buran snowmobile diagram. The track system is in the form of rollers, but only one of them was needed for the homemade unit.
- The implementation of power transmission from the gearbox to the drive shaft is made possible through a chain.
- In the front part there is a pair of racks, which are designed so that there should be skis instead of wheels. The struts are equipped with springs from the rear shock absorbers of the Izh-Planet motorcycle.
- The mileage of the homemade snowmobile over 3 thousand km did not affect the operation of the engine - there was no overheating. Traveling a distance of 90 km, a snowmobile consumes almost 10 liters of gasoline.
When the snowmobile was equipped with an Izhevsk engine, the result was much worse.
Making homemade Ural motorcycles on tracks or skis is a difficult task, but doable. Not every person can find a vehicle to suit their own taste - especially if he wants something unusual. Therefore, it is worth thinking about the fact that you will have to do everything yourself - this is the only way out, but it is also the best one if you understand mechanics and know a lot about assembly. But what can you put together on your own that will surprise everyone around you? A great example of this would be a tricycle - you can't buy them in stores, they are rarely mass produced, so you can create your own unique vehicle that will be the envy of everyone around you. However, a serious question arises here - how to make a tricycle with your own hands? To do this, you will need a wide variety of spare parts that you can get, while using the base and parts of one of the available motorcycles, such as the Ural or Izh. Chances are you have one of these in your garage. They can be easily converted into a tricycle or used to assemble your own unique model from scratch. Accordingly, you will need to think through everything in advance, make a drawing or download it from the Internet, because there are definitely enough enthusiasts like you on the network. And then you need to prepare for long and not the easiest work, which a few tips can make easier. You can read them further.
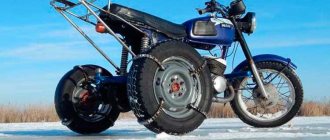
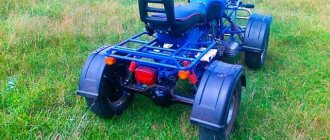
Homemade swamp tricycle on IZH Planet 3
The design of this homemade swamp vehicle is so simple that almost any car enthusiast can repeat it in his own garage. The basis of the swamp vehicle is the IZH Planet 3 motorcycle. IZH Planet motorcycles often become donors in all-terrain homemade vehicles, this is primarily due to the endurance and unpretentiousness of their engines.
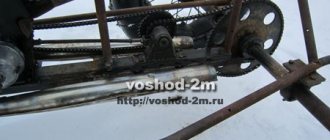
The bridge was taken from a Muscovite and modernized. We cut out the bearing mounts from the doll with a grinder, then welded the yoke to the bridge stocking (if it is not welded, the stocking will warp when you cut it in half), then cut the stocking itself in order to secure the sprocket. The chain tensioner was also borrowed from the combine.
The KF-97 cameras are used from the agricultural trailer of the T-150 tractor. The tire for such a tube wheel is the same tube, only cut to a smaller diameter. First, the “tire” is put on, then it is tightened with belts. The transverse harnesses turned out to be 1.02 m long, and the longitudinal strip was 3.5 m long. The width of the longitudinal strip is 30 centimeters. The transverse belts with the longitudinal strip are connected using bolts.
The basis was taken from cornfield disks, cut in half using a small grinder and extended by 30 centimeters with steel plates welded between the disk halves (6 plates in total). The disc is covered with a chamber from a VAZ car, cut to a larger diameter. Since the disks were used from a Niva, and the axle from a Muscovite, the rear disks at the mounting points had to be trimmed.
Frame, brakes and transmission
The motorcycle frame has been lengthened and strengthened. To prevent the pendulum fork from “walking”, it was welded. The chain and sprockets are borrowed from the combine. Their ratio is 2 to 1. A small star with 25 teeth, it is attached to the drum using eight hardened 10-point bolts. A large star with 50 teeth. The braking system of a swamp vehicle is no different from any other, so the brakes are left unchanged. But the drum was modernized to accommodate sprocket mounts.
Tricycle layout
The first thing you need to think about if you are going to make your own trike is its layout. The fact is that the power unit, which is usually located directly on the axle of motorcycles, thereby improving the balance and reliability of the vehicle on the road, can no longer be there. Accordingly, you need to carry it by the axle, between the two rear wheels. Naturally, this affects the stability and controllability of the tricycle - and not in the best way. But if you are an experienced driver, you will be able to adapt quite quickly. Moreover, this opens up some interesting prospects - for example, the ability to rear up your vehicle without any problems when developing at high speed. It looks extremely impressive and, unlike motorcycles, in this case you do not risk anything - this is an absolutely safe action (of course, if you do not pull the car too much, but on a motorcycle such a trick is much more difficult in any case). Accordingly, you will be able to impress everyone around not only with the appearance of your vehicle, but also with its spectacular capabilities. This alone is enough to convince yourself to make a tricycle with your own hands.
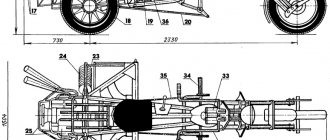
TRICYCLE-PNEUMATIC TRUCK
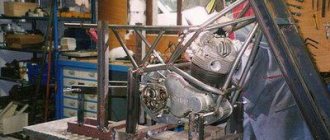
The arcs at the bottom were fixed on the bosses of the engine mounting cheeks. The cheeks were cut from 8 mm steel. Then I turned out the bosses, the outer diameter of which also corresponds to the inner diameter of the pipe with an allowance for interference. I cut an M20x1.5 thread both on the machined end of the bosses and in the drilled holes in the cheeks, screwed the former into the latter and pressed the pipe onto the boss.
But fastening the bars to the motorcycle does not have the reliability and rigidity that is necessary for installing an additional frame and tensioning the drive chain of an all-terrain vehicle. Therefore, the arcs were additionally connected to the motorcycle frame. To do this, I unscrewed the standard side trailer linkage bolt from under the saddle and in its place inserted an axle with two homemade tips at the ends.
From them to the clamps pre-installed on the arches, I ran two struts from bed pipes with a diameter of 27 mm with tips. At first I pressed all the tips into the pipes, but during the work it turned out that it was better to fit them onto the threads, since in the future all the parts would have to be disassembled for chrome plating.
To make the rods and racks of the attachment frame, I used pipes with a diameter of 27 mm from the same bed headboards almost everywhere. They are chrome plated and look good. True, they have holes in the walls, but during assembly the rods were placed so that these holes were hidden from view.
In the pipes of the struts I cut a thread M20x1.5 to a depth of 25 mm. I made the rods in the same way, only on them I installed tips with locking nuts M20x1.5 for a 24mm turnkey, in which an internal groove was made with a diameter of 27 to a depth of 5 mm.
To make them easier, I drilled blind holes with a diameter of 14 mm in the tips. In order not to confuse the connecting parts when assembling the all-terrain vehicle, I tried to unify them. (If possible, it is advisable to make it on one side of the connection with a right-hand thread, and on the other with a left-hand thread, which will ensure better adjustment of the attachment in relation to the motorcycle.)
The dimensions of the rods shown in the figures are recommendations, since during assembly they will have to be adjusted to the location.
For the all-terrain vehicle, I used the Moskvich-402 rear axle without brake drums. I removed the main gearbox from the crankcase and sawed off the attachment point for the drive gear “shank” from the body with a grinder. I loosened a large helical bevel gear in a forge and ground its back side to fit the landing diameter and thickness of a sprocket with a number of teeth of 56 and a pitch of 19.05 mm. I drilled the appropriate holes in the sprocket and, using standard bolts, installed it on the modified gear.
First, the housing in which the differential is insulated was sawed lengthwise with a grinder, ensuring free rotation of the sprocket. I kept the differential and axle shafts.
Having marked the location of the sprocket on the bridge housing, I also cut it across with a grinder. Here I also cut out a strip 40 mm wide so that the chain would not subsequently catch on the body.
Then the bridge was assembled, centered and pre-welded with four reinforcing bars to install a protective casing for the sprocket. To do this, I made two stencils from cardboard, one repeating the outer profile of the axle housing along the cut, the other along the outer diameter of the sprocket, taking into account the height of the chain and a small gap. I made protrusions in front of the casing; perhaps later I will enclose the chain in rubber tubes. I cut out two parts from 2 mm thick steel using stencils and attached them to the bridge body. I connected both parts along the outer contour with a metal strip.
Before finally boiling, I made sure that the semi-axial casings (“stockings”) were aligned. For greater reliability, I also welded a rope truss made of 5 mm steel at the bottom of the bridge. The bridge turned out to be not so heavy, but quite strong.
To make a hub for the drive sprocket, I took an old “Izhevsk” wheel and, having cut off all the excess on a lathe, left only the brake drum. On the sprocket g = 18, I bored out an internal hole for the hub tube, put one on top of the other and welded it.
Since I used the hub from an old model Izh, I had to install washers on the axle between it and the rear wheel drive housing, since the length of the spline connections is shorter and the hub is pressed (modern types of wheels are better used with the “original” hub; on a lathe “free” it from the spoke holes, and weld an asterisk onto the metal bearing housing).
I kept the stock brakes. I would like to immediately warn you: spinning wheels of such a large diameter have significant inertia, so you should not brake sharply - this transfers large loads to the chain, sprockets, differential and axle shafts, which can lead to their breakdown.
For the same reason, when shock absorbers are compressed, the chain sometimes slips. So, instead of shock absorbers, I installed two special spacers made from the same nickel-plated pipes as the rods. The bushings-tips were pressed into the pipes.
To connect the rear axle to the additional frame of the motorcycle, I made two docking units. The basis of each unit is a section of channel No. 12. On one side I connected it with two M10 bolts with a profiled plate welded to the bridge, to which the spring is attached on the Moskvich. The second side was connected to the bridge casing with “Moskvich” spring stepladders, draped over the “stocking”.
Between the channel and the “stocking” I installed a hardwood spacer so that the axis of the bridge and the center line of the channel were parallel. I drilled holes in the channel flanges: the front one for the diameter of the spar pipe, the rear one for the tension bolt. When modifying the bridge, the sprocket was installed offset to the left from the middle of the bridge by approximately 30 mm. I took this distance into account when making parts from channels: to maintain the symmetry of the wheels, I made the left part 30 mm longer than the right one. I also shifted the holes in the shelves of the left part to the same distance towards the middle. The position of the wheels could be adjusted by shifting the discs in the rims. I was in a hurry to weld them, and this adjustment had to be done with washers on the hubs.
So that in the event of a break in the drive chain, the rear axle remains on the pipe-spars of the attachment, I made a special detachable bracket with a hole for the diameter of the pipe. The lower half of the bracket with threaded holes was welded from the outside to the channel flange. After tensioning the chain, the M10 bolts are tightened, and the bracket with its jaws compresses the spar pipe, connecting the motorcycle and the attachment as a single structure.
I installed an easily removable ski under the front wheel (descriptions of its various options were repeatedly published in “Model Designer”). Deep soft snow is, naturally, an obstacle for my pneumatic vehicle - the weight of the motorcycle itself affects it. His element is dense snow crust and off-road conditions.
V.BARANOV, Novosibirsk
We recommend reading
- “ANGELS” IN THE SKY OF SPAIN Dive bomber Hs-123. After the end of the First World War, the capacity of German aviation enterprises decreased significantly. The restrictions imposed by the Treaty of Versailles...
- MODEL CONSTRUCTION 2013-08 MODEL CONSTRUCTION No. 8 2013 IN THE ROOM: Public design bureau of Y. Myaki. “BEACH JEEP” V. Kondratiev. SCHOOL OF AIRCRAFT CONSTRUCTION In the world of models...
Power unit
Naturally, when you think about making a tricycle with your own hands, you will need to choose a suitable engine. In this case, you do not have to take a power unit from another motorcycle - an engine from a car will also work. The main thing is that it fits properly between the rear wheels. This way you can improve the performance of your vehicle. In some cases, you won’t even have to make any changes or improvements; in others, you won’t even have to replace the radiator or some other part. It is also recommended to install other mufflers, and increase their number by installing one on each cylinder. Naturally, there are other options - it all depends on which power unit you decide to choose. For example, if you make a tricycle from the Ural with your own hands, then it is better to replace the engine completely.
Gear box
When you make a tricycle from the Ural with your own hands, you definitely need to take into account where exactly the gearbox will be located. You already understand that the engine itself will be off the axle, behind the seat, between the two rear wheels. At the same time, make sure that it is attached as securely as possible in at least three places - especially if you plan to perform various tricks, as described above. As for the gearbox, it is better to install it on the left side of the steering wheel, since your right hand will be occupied most of the time. It is unlikely that if you take the engine and gearbox from a car, you will be able to make a design that is convenient enough to change gears without stopping driving. Also don't forget that you need to take care of connecting the box to the motor, which is a bit more difficult considering that it is now located a little further from the box than it should have been in the original. But if you're trying to figure out how to make a tricycle with your own hands, you always need to be prepared for these kinds of surprises and difficulties.
How to make a tricycle from a Ural and ZAZ-968 motorcycle
The front fork works like in the Urals, a lever system is used and the front axle is located between the transverse arms.
When creating a trike from the Urals and a ZAZ-968 car, the rear part remains practically unchanged, like a car. Only a muffler, oil cooler and air filter are added there. The gearbox and engine are also original to ZAZ. The engine is mounted as before, and the gearbox is placed on the left.
In general, there is not much to change.
DIY assembly steps
- At the very beginning, the rear axle is removed from the car.
- A beam is attached to the cut.
- Mufflers, an air filter, an oil cooler and pipes are installed on the rear wheel axle. If you use engines from the 90s, then all these elements will already be installed.
- A frame is being made that will be the basis of the tricycle, so it is necessary to make it strong and reliable.
- An extended front fork is manufactured by welding with shock absorbers attached to it. Lengthening occurs by replacing the fork rods with longer ones or by welding more tubes to the Ural fork.
- Welds the frame and rear axle of the car, forming a solid structure.
- The fork is connected to the frame by welding, just like with the rear axle of the ZAZ.
- After this, the seats, gas tank and other elements are attached.
- Finally, the new tricycle is painted and chromed.
Suspension
It doesn’t matter whether you make a tricycle with your own hands from an Izh or any other motorcycle. You will have to remodel the front wheel suspension anyway. After all, the distribution of forces in a tricycle is very different from that observed in a regular motorcycle. To do this, you will need two pairs of consoles, as well as two powerful springs - if possible, try to get helicopter or airplane springs, but springs from passenger cars can also be used if necessary. The consoles need to be connected to each other by levers, through which the axle of your front wheel will pass. Naturally, this is not the only way - there are a large number of ways to make a tricycle with your own hands. Drawings are available on the Internet (one of them is in our article), but this method is one of the most effective.
How the suspension works
If you are not making a trike out of a scooter with your own hands and are counting on a powerful and impressive model rather than a children's tricycle with a motor, then you need to seriously think about the action of your front wheel suspension. What are helicopter or airplane reasons for? The fact is that the movement of the wheel along the vertical axis will occur with much greater force than on a motorcycle, so you need to install stiff and durable springs - at least in the lower part of the suspension, which compensates for movement along the vertical axis. To compensate for movement along the horizontal axis, you can use softer springs - for example, from the Izh motorcycle. As you can see, assembling a tricycle with your own hands is quite difficult, but if you follow all the instructions, have a clear drawing and all the necessary materials, you should be able to cope.
Manufacturing stages
Making a tricycle from a scooter with your own hands begins with cutting the bicycle frame. It is most convenient to cut metal using an angle grinder with a cutting wheel. The mounting points for the bearings are drilled with a crown. Then comes the time to form the frame, and after that you will need to make a plate that will attach the engine to the frame. An alternative solution is to use moped and bicycle parts.
The very first step in this option is the manufacture of bearings and mounts for the rear axle. Such fastenings are usually a pair of brackets. To prepare them, steel plates are used, cutting grooves that exactly match the diameter of the axis. They provide a pair of holes where the bearings are secured. When making a homemade tricycle, only one pipe is taken from the bicycle, which previously ended in an axle with pedals.
The points where the welds will pass are cleared of paint in advance using an angle grinder. The next step is to assemble the rear frame segment, which holds one axle and the motor. Some amateur craftsmen simply weld plates and square pipes. It is worth noting that you will definitely have to work on a lathe. This is necessary to secure the sprocket and brake disc.
If you don’t have your own machine, or there are fears that instead of improving the machine, the opposite effect will occur, you should contact an experienced turner. The sprocket is usually taken from motorcycles or mopeds. Its value is directly proportional to the speed that the tricycle must develop, as well as the engine power.
A hole must be bored in the sprocket, the size of which exactly matches the diameter of the axle.
The next step is installing the brake pad. Hydraulic brakes are most often used. You will have to place a strong plate under the pad, welded on the disc side. At the front, a classic bicycle brake is usually used, complemented by a metal cable.
Next steps:
assembly of frame halves;
production of exhaust system;
installation of seats, exhaust pipe and electrical components;
Battery
The battery for your tricycle must be installed under the driver's seat - for this purpose a special frame is created, located above the engine. This way, everything important about your vehicle is in one place. You should also consider making the passenger seat behind the driver's seat. Not only does it allow more people to ride at the same time, it can be attached with saddlebags that will completely enclose the engine and battery, making your trike complete.