Chainsaw starter repair
During frequent use, some components of the chainsaw may be subject to constant dynamic influences, which is why, for example, at the most inopportune moment the cable may burst, the shaft will begin to rotate at a much lower speed, or the teeth of the ratchet will crumble. Taking this into account, repair and inspection of a chainsaw starter can be an operation that is carried out more than once during one working season!
Spring repair
If the quality of the spring material is poor, the latter tends to burst, and usually the rupture occurs at the site of contact with the drum, in the place where a loop is formed
In this case, it is not necessary to change the spring at all! It is quite enough to simply thoroughly clean the surface of existing grease and dirt, and then carefully sand the damaged area. At the end, the spring is released at a temperature of 600-650 degrees until the steel gets a crimson hue
The part should cool gradually, where at 100-150 degrees you can carefully wrap the end of the spring on the inner surface of the drum according to the shape of the limiting protrusion so that the material obtains the desired plasticity. In this case, the elastic characteristics of the spring will remain the same.
Replacing the cord
If the cord is pulled, the cable begins to rub against the starter housing. Replacing the cord begins with disassembling the unit body, during which the ratchet drum is carefully lifted so that the return spring does not slip from its socket. It is more correct and more convenient to do this together, where the second one will hold the spring while replacing the cable! After the cable is successfully fixed in the grooves of the drum and the handle, it is wound onto the roller, followed by the assembly of the housing.
What is the design of the gear-six starter?
The VAZ 2106, produced after the 1980s, has a starter with an end manifold model 35.3708. Earlier cars from the Volzhsky plant had a different gear mechanism installed - ST-221, which was equipped with a cylindrical manifold. Their structure is approximately the same, so they are completely interchangeable.
Let's take a closer look at the design of the mechanisms that interest us, using model 35.3708 as an example. The “six” gear starter consists of the following main parts:
- field winding (i.e. stator) and housing;
- electric drive with anchor;
- three special covers;
- electromagnetic traction relay with two windings (one of them is retracting, the other is holding).
Using bolts, the starter housing is secured into one block with three covers. The armature of the mechanism we are interested in has a core, a commutator and a shaft. The last of these elements rotates in metal-ceramic bushings (there are two of them structurally provided). These bushings are pressed into the covers and must be impregnated with a lubricant. The starter drive is located at the end of the shaft. It includes a gear and a roller clutch, which is necessary to transmit torque to the flywheel.
On the front cover there is a relay consisting of a yoke, several flanges and a core. When the gear mechanism is turned on, two processes occur simultaneously: the armature is retracted, and the drive and gear mesh with the flywheel; a special contact plate closes the bolts. The result of these processes is the start of power supply to the windings of the device we are considering. As you can see, the circuit for switching on and operating the “six” starter is quite simple.
Finishing
When the starter position is set, it must be removed in order to finally weld the flange to the gearbox housing. You can do this yourself, but you will need equipment for argon welding. Make sure all the parts are in place and start working. Remember that after welding the metal must cool on its own, since its forced cooling will lead to a significant decrease in the strength of the joint.
After the metal has cooled, assemble the starter on the flange and make sure that its gear does not move away from the ring even under fairly strong loads on the assembly body. Now you can connect the electric starter to the battery - during operation it should create a monotonous sound, and also rotate the gear without blocking or braking. In addition, it is worth checking how easily it engages and disengages with the crown. Unfortunately, installing an electric starter may interfere with the operation of the engine start pedal. Since it is not advisable to completely remove it, it is better to simply change the shape of the part, while maintaining a backup method of starting the motor.
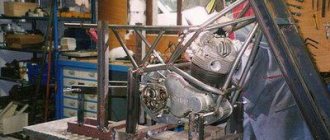
Stages of turning a Dnepr motorcycle into a custom one
Perhaps this is said loudly about turning the Dnepr motorcycle into a custom one. Because more often such alterations fall under the definition of tuning. What is the difference between custom and tuning?
Tuning is the alteration of individual spare parts or components of a motorcycle. A custom motorcycle is a bike that has been completely modified to suit the owner's wishes. Moreover, it becomes unique and inimitable.
Stages of turning a Dnepr motorcycle into a custom one:
- engine replacement or upgrade
- front fork upgrade
- chassis modification
- exhaust replacement
- adding decorative elements
The engine is additionally cleaned and polished. This is done on purpose so that it does not differ from new parts. Various rings or a direct flow system are installed on the exhaust. You can also add a decorative nozzle.
All these manipulations are easy to do yourself, since they do not require special technical knowledge. Other spare parts can be purchased in specialized stores. For example, valve covers and engine ignition covers can be purchased in our online store.
Effortless: installing an electric starter on a motorcycle
Starting a motorcycle with a kickstarter can require a lot of effort, which is why many owners of domestic equipment often abandon it in favor of inexpensive foreign analogues. However, Russian motorcycles have their advantages, represented by ease of tuning, low cost of spare parts, as well as low sensitivity to fuel quality and the reliability of most components. That is why experienced owners of two-wheeled domestic vehicles often install an electric starter on a motorcycle - such an operation can make the Ural or Dnepr much more convenient. This also applies to small-capacity budget-class foreign motorcycles, which are also often equipped only with a kickstarter. Let's look at the procedure for installing an electric starter using domestic technology as an example.
A little history
The progenitor of the “Soviet Harley” appeared in the late 20s of the twentieth century. At first it was a model designed by Mozharov on the basis of IZH and PMZ, but with a heavy frame and a 1200 cc engine that consumed a lot of fuel, it had a power of only 24 HP and lost control at speeds above 60 km/h.
Therefore, it was decided to adopt European experience and use the advantages of the BMW R-71. Naturally, the German was not repeated completely, but only borrowed some ideas, adapting them to the realities of the USSR. In particular, they installed a double-disc clutch, increased the gear ratio and tank volume, increasing cross-country ability.
Handy tools and tuning of the Dnieper for sports
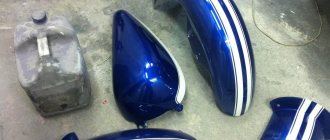
Tuning the Dnieper for sports primarily involves installing a plastic cladding. In the absence of special cladding panels and panels, the cladding can be made from a foam plastic model. Cheap and abundant material allows you to worry-free experiment with the design of the unit until the best option is found.
After cutting out the model, the foam is coated with a layer of liquid that prevents the fiberglass from sticking to it. The latter is cut to size, soaked in epoxy resin and applied in 4-5 layers to the foam. During the first two layers, it is recommended to add metal shavings to the resin, and, if possible, place a thin metal mesh between the fiber and the foam to strengthen the frame.
To completely dry the structure, you need to wait about a day, after which the foam can be removed. The resulting cladding is puttied, sanded, primed and painted. Painting in most cases is done in bright shades of blue, green, yellow, and red. Airbrushing is not uncommon, and it is performed entirely depending on the owner’s imagination.
Just as in the case of a chopper, tuning for sport involves changing the frame design, only in this case without lengthening or significantly tilting the front fork. A high “rocket” rear fender is installed, and the recessed seat is made to slope towards the high gas tank. The handlebars are shortened to an extremely comfortable length, and the exhaust pipe rises at an angle equal to the rear fender.
Installation
There are several options for attaching an electric starter to a boxer motorcycle engine:
- More powerful and longer gearbox studs are made, after which a duralumin plate with a pre-drilled hole with a diameter of 76 mm for the unit casing is put on them. This option is rarely used due to its low strength and negative impact on the service life of the electric starter;
- A composite mount in the form of two crescents is made from duralumin, which is welded from below to the gearbox housing. Be careful - during the argon welding process, all rubber elements of the transmission must be removed, but the shafts and covers should be left in place, since their absence can cause serious deformation of the crankcase;
- A solid duralumin plate is made and welded to the gearbox casing. The bad option is that it forces you to completely remove the contact oil filter, disrupting the normal operation of the transmission.
On foreign motorcycles, installing a starter is complicated by the lack of serious developments in this area. Therefore, you will have to show some engineering savvy and make an appropriate mount or adapter plate that will not interfere with other components.
Before installation, you need to carefully sand the surface of the electric starter stop with a grinding machine to achieve a perfect fit of the part. To properly secure the starter flange, you need to remove the solenoid relay, and also move the bendix fully forward to understand what its operating position will be. The unit is fixed using a flange, after which it is necessary to check the tightness of its fit and the stability of the position. Now you need to set the optimal gaps that will allow you to achieve stable operation of the device.
Between the gear located on the starter and the flywheel ring, you should leave a distance of 5–7 mm - to set it, you can use foil folded many times. You also need to leave a gap of 2–4 mm between the ring and the roller clutch, which is located immediately behind the gear. It should be measured in the rest position, and not in the operating state of the starter, which will allow the unit to achieve stable operation. If you purchased a used starter, make sure that its bronze-graphite bushings are not worn out and also match the diameter of the axle shaft - otherwise the reliability of the part will be significantly reduced, and starting the engine will be accompanied by unpleasant sounds.
Features of installing an additional relay on the starter
To install a relay on the starter, you will need:
- wires 1.5 mm2;
- flat female connector - 5 pieces;
- flat male connector - 1 piece;
- 4-pin relay with metal. ear (from 30 to 40 A);
- 2 ring tips for 6 and 8 mm.
Having secured additional relay at a convenient point for you, connect the wiring to the starter. Pull off the red wire from the flat input of the traction relay and insert the “folder” with the wire of the new relay into the connector. Place a wire with an 8 mm tip onto the + terminal and tighten it with a nut. And put the wire from contact 30 with the “female” onto the free contact. Tighten the new and standard wires with a clamp. Then screw the short wire from the new relay to ground. After finishing the work, be sure to hide all the wiring in the corrugation to protect them from moisture.
Brutal design
In this model, the author decided to give a brutal look to the old bike, using mainly Soviet-made parts. He decided to emphasize the metallic essence of the motorcycle. To do this, he used several alloys: iron, aluminum, chromium.
The engine, rear wheel and steering wheel remained from the Dnepr 11. The fork, tank and front wheel were taken from IZH. Tractor Belarus was happy to provide a headlight and fitting for the bike.
In addition, the master himself built a fiberglass saddle. The taillight and oil pressure gauge came from the Zil-164 motorcycle.
Every detail has been repaired, painted or adjusted. As a result, the bike came out so powerful that it could compete with Harley himself.
DIY tuning
The starter installation procedure described above requires fairly good skill and special equipment. Therefore, if you do not have an argon welding machine or a lathe, you should find out in advance where you can use the services of professionals of the appropriate profile. All manufactured fastening parts and gears must have minimum tolerances, since the reliability of the installed electric starter depends on this. The starter itself must be in good technical condition - to make sure of this, it is worth checking the bushings and shaft. If all these conditions are met, the electric starter will serve you for many years, providing maximum convenience for starting your motorcycle engine.
Selection of parts
The best option is electric starters from the Kherson plant, which are used in tractor starting engines, as well as in small-class boat engines. However, you need to be very careful in choosing components - components marked ST353, 367 or 369 are suitable for the Ural. You should not purchase the ST366 starter, which was installed on the Zaporozhets - it has a reverse direction and a different shape of the Bendix casing, incompatible with a motorcycle engine . For such an electric starter, you should purchase a crown from the Buran snowmobile - it requires only minimal modification. Be careful - you need a unit with a top-mounted retractor relay, since, being located at the bottom, it will interfere with changing the oil in the engine.
It is also possible to install an electric starter from a VAZ-2109 car or a more modern unit from a VAZ-2110, but in this case you will have to make the crown yourself, using a professional metalworking machine. To create a spare part, it is better to use steel grade 40-X or another that meets the hardness standard 35-42 HRC/E. For imported motorcycles, the electric starter must be selected especially carefully - many owners of two-wheeled equipment say that components from industrial generators or powerful garden equipment are a suitable option. However, you will definitely have to grind the crown for the starter yourself, since unification is a distinctive feature of domestic motorcycles.
Selecting the ring gear and starter
First of all, we pay attention to the flywheel of the motor, it is the key for further work. Its rotation, when viewed from the gearbox, occurs counterclockwise, which means you need to select a starter that rotates in the opposite direction (clockwise)
Here are the models that suit us:
- ST 353;
- ST 367;
- ST 369;
- From VAZ 2110 (21011);
It is also possible to install a starter in the Urals from a number of models suitable for imported cars. The problem with such starters is their high cost, which also applies to modern VAZ car models. Here, choose for yourself what is your priority - the cost of the part or the service life.
Pay attention to the presence of the casing and its orientation. The method of fastening the part and further ease of maintenance will depend on this parameter.
Rotating the starter relative to its own axis is not advisable and can lead to its breakdown.
Now you need to pick up the crown. The crown is a gear lining on the flywheel that transmits the rotation of the starter to the engine through a gear transmission. The problem is that purchasing the part is quite problematic. A spare part from the Buran snowmobile, as well as more modern domestic motorcycles “Voyage”, “Cobra”, “Wolf” can be suitable for the size of the flywheel. The size of the teeth of the first ring is 2.5, and the modulus of the last three is 2.2. This parameter must be related to the starter module.
If the modules do not match, there are several options to solve the problem:
- We change the starter ring/gear to one that matches the module.
- We adjust the teeth of the existing starter ring or gear to the module.
- We make the starter ring or drive gear from scratch.
Additional work
Since the standard electrical system of the Ural motorcycle, as well as the circuit of most imported vehicles, is not designed to operate equipment with a starter, modifications will have to be made to it. At the slightest drop in ambient temperature, starting problems may arise - the starter will quickly discharge the battery, which will force you to recharge it and subsequently use the pedal. Experienced motorcyclists recommend installing a battery from a Japanese car from the 90s on a two-wheeled vehicle. This battery has compact dimensions and a fairly large capacity - up to 65 Ah.
However, installing a large battery will entail another problem - the generator will not be able to charge such a battery completely, and the starter will again be unable to be used. To resolve this issue, you can use the following technical solutions:
- Rewind a standard generator to increase its power by 100-200 watts. However, you need to understand that the reliability of such a node will decrease;
- Installation of a starter is often accompanied by replacing the standard generator with a unit from a light tractor or from a modern model from the Irbit plant;
- To replace the generator with a similar unit from an imported small car from the 90s - parts from Honda and Daihatsu are ideal.
Modifying the electrical network after installing the starter requires a certain amount of professionalism, since if the wires are connected incorrectly or if the insulation is insufficiently wound, you can simply burn the motorcycle.
Since the generator always loses some of its power over time, the starter may stop working again. To avoid such a problem, it is worth cleaning the brushes of the unit every 10 thousand kilometers, adjusting the clearance of its drive mechanism, and also eliminating minor faults. Also, every 5 thousand kilometers, inspect the wiring - if melted areas or breakdowns begin to appear on it, it is worth installing cables with a larger cross-section.
Typical faults
Obviously, malfunctions occur on the most loaded elements of the starting device - the drive and the electrical component. For example, problems often occur in the starter armature:
- it rotates at low speed because it becomes dirty, or the contacts in the brush assembly (also the solenoid relay) burn out - in this case, the current strength should be less than normal;
- if the current strength is higher than normal, then the armature can rotate slowly due to breakdown of the winding and various mechanical damage - rotor misalignment, drying out of lubricant, wear;
- the armature does not spin at all, and the current strength is less than the standard value - there is a break in the circuit, it is also possible that the wiring of the solenoid relay is broken;
- if the rotor does not rotate, but the amperage is normal, there is a breakdown to ground.
Other common types of problems encountered with the 4320 starter include:
- the brush assembly is triggered, so the electric motor rotates, but the motor does not start;
- contacts oxidize or the flexible mass is damaged, which leads to the starter clicking without rotation;
- the bendix teeth grind off, which is why the starter is unable to grasp the flywheel, although it works;
- The solenoid relay deteriorates, so the starter continues to rotate even after starting the internal combustion engine - short circuits, burnt contacts and other troubles are also possible.
Before removing the electric motor, it is recommended to carefully check the operation of the battery, the condition of its terminals, as well as the amount and condition of the oil in the engine. You should know that powerful diesel engine starters have one feature - often problems arise one after another, like an avalanche. For example, excessive load on the device leads to overheating of the winding and then short-circuiting the insulation. At the same time, the bushings begin to wear out rapidly, the rotor shaft breaks, the drive and even the flywheel crown are damaged. If the operation of the power circuit is disrupted, this leads to the starter losing its power, and an excessively high current literally burns out the brush assembly and armature commutator due to breakdown.
Body and frame tuning
Its appearance will largely depend on how the frame base on the motorcycle is redone. At the present stage, there are several popular ways to remake the Dnepr frame.
Regardless of the modification of this bike, all models have a similar frame design.
You can extend the frame at the rear of the motorcycle. This tuning involves adding 15-20 centimeters to the frame, which increases the space for the rider’s legs. When the frame is lengthened, the driveshaft also lengthens, and the adjustment of the distance by which the frame should be lengthened depends on the height of the driver. If you lengthen the frame in the front part, you can achieve a landing similar to classic American choppers, while you do not need to change the driveshaft, but you will have to redo the pedal arrangement.
The frame is also expanded. We are talking about installing a more powerful rear wheel. To do this, an additional gearbox is installed on the cardan shaft, which will shift the cardan output to the side. It is best to install wheels with a profile of 130-150 millimeters, this way you can achieve optimal ride quality from the bike. A tire that is too wide can add certain difficulties to the driver.
When changing the angle of the front fork, experts recommend increasing the angle of inclination by no more than 35 degrees, otherwise the handling of the motorcycle will be seriously affected. In addition, an increase in the angle of inclination is accompanied by loads on the “stays” of the front fork, which leads to their rapid wear and failure.
Changing the angle of the rear shock absorbers will provide a more aesthetically pleasing appearance for the motorcycle, however, as with the front forks, too much angle can result in a loss of load-carrying capacity to the point where even single-passenger riding becomes impossible.
Battery and alternator problems
After installing the starter on a Ural motorcycle with your own hands is completed, a couple of unresolved problems remain. First of all, a car starter requires a more powerful battery. The way out of the situation is to install an inexpensive battery on a new mount (from the side of the motorcycle. Everything will look quite rough, but it’s inexpensive.
Another way is to select an imported battery of a similar size with an increased capacity of 18 A/h. You will have to overpay quite a bit, but the appearance of the motorcycle will not suffer.
Finally, it turns out that the original generator is rather weak and is unable to charge a new battery. We’ll answer right away that rewinding will help increase productivity, but it will not be enough for our purposes. What should we do then? There are several options:
- generator from IMZ. There is a cheap model 14.3771, which fits perfectly, even without modifications to our motorcycle. Its biggest drawback is its terrible build quality. The generator often fails. The solution is modern models of the DENSO brand, which are equipped with these motorcycles.
- imported car generator. The problem here is its installation. If you choose to extend the shaft and install it through a faceplate, please note that all work must be performed with high precision. Also, such generators can be installed using a belt drive. The method has a lot of advantages, especially its unpretentiousness. All you need to do is monitor the condition of the belt and check the cavity of the generator cover for dirt every 10–15 thousand.
The disadvantages of such a modification are decreased engine power and increased shaft load. On the other hand, power can be increased in other ways, but engine load cannot be avoided.
Starter fastener
First of all, we determine the place of attachment of the element. The most popular is the upper left side above the flywheel. In this case, we will only be faced with the need to cut out a window for engaging the starter gears. It is difficult to install the starter in the center or on the right side, due to the need to redo a number of engine elements.
For installation, a hole is cut out under the Bendix casing. Next, measurements are taken, and the starter mount is cut out of a 4mm thick sheet of steel. This thickness is necessary to withstand the loads that the fasteners experience during operation of the starter mechanism. In a similar way, you can make not one solid, but a pair of fasteners. This way you can simplify the process of making fasteners, but adjusting the gaps will become much more difficult.
The finished plate is secured with bolts or pinched with argon, then a trial assembly is carried out. Now you need to make sure that the gaps are set:
- the gap between the flywheel gear and the roller clutch is 2-4 mm;
- between the bendix and the crown is 3-7 mm.
Next, the flywheel is rotated, observing the coincidence of the pitch of the bendix and the ring. In this case, rotation of the flywheel is ensured using a kickstarter. Once you are sure that everything is working as expected, you can perform a test turn by unscrewing the spark plugs. If the starter rotates the flywheel without any extraneous sounds, then the plate can be permanently welded with argon.
How to check the starter retractor relay: video and description
First of all, diagnostic work should begin with checking the starter. To carry out the check, one turn of the key in the ignition is enough. If the device does not work, you will hear characteristic clicks, which confirms that the element is faulty.
Next, you should bridge the contacts, which are represented by two copper bolts located on the relay cover. If the device starts to spin, then most likely the solenoid relay needs to be repaired.
At the same time, another option is also possible. In this case, disconnect the starter
It is important to do everything extremely carefully, because the rotational force of the mechanism is relatively high, so the likelihood of injury is quite high
After completing the dismantling procedure, we place the part on the ground. Using a wire, we connect the contact terminal with the positive one, as well as the ground of the starter with the ground of the battery. After such operations are completed, you should see the relay start up, which is accompanied by a characteristic clicking sound. If the relay activation is not detected, we begin to inspect the contacts - most likely, they are slightly burnt.
Another symptom is a characteristic click from the ignition system, but the starter never starts working. Finally, a sign will also be the mechanism running idle after the key is turned. At the same time, we see that the engine has not started.
If you don't know how to check the operation of the starter relay, the video on our website will help you figure it out. In it you will find a detailed description of how exactly to carry out a comprehensive diagnosis of this unit.
How to install a STARTER on the URAL/DNEPR with your own hands? Motorcycle repair Ural #31
Video text
Installing the starter took me quite a long time, firstly, because I was doing it for the first time, and secondly, this process is not at all simple and requires some skill. If you are also planning to install a starter on your Ural or Dnepr motorcycle, then this video, I think, will help you see some solutions, and will also help you avoid some of the mistakes that happened to me.
What do you even need?
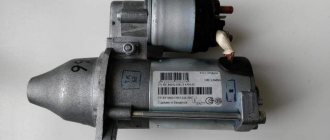
Well, first of all, it's the starter itself.
I bought it from Pramo-Electro, which is a little more expensive than its counterparts, but has a more compact size, which allows it to look harmonious on a motorcycle, and also, importantly, does not require bending the kickstarter lever. Secondly, you need to purchase a special mounting plate and a starter ring, which is installed instead of the last clutch disc
I purchased this set - plate and crown - from Ivan 66 (https://vk.com/motorazborperm)
But as always happens, you can’t just go and install a starter on a Ural motorcycle. I started by giving my original Ural flywheel to a turner so that he would align all the fingers horizontally, grind off 2-3 mm of the flywheel skirt and reduce the diameter of the intermediate clutch disc so that it would begin to fit into the starter ring.
After modifying the flywheel, I decided to try to assemble a clutch in this flywheel and it turned out that the holes in the flywheel pins and the holes for the countersunk bolts did not match - sad thing. I had to widen the holes on the starter ring. Having allocated one evening for this, we managed to fit everything and the crown was securely attached to the flywheel.
I put the flywheel with the starter ring installed in its place on the crankshaft and tried to figure out the gearbox housing, but I was unable to do this. The reason for this turned out to be special centering bosses on the gearbox, which began to rest against the teeth of the starter ring. The grinder is in hand and the hot flashes at the checkpoint are gone))) Now the checkpoint is working great.
It was decided to replace the gearbox mounting studs with bolts, simply because the length of the original studs is not enough to install the starter.
Finally, I’m starting to install the starter, or more precisely, I’m starting to cut the gearbox housing so that this starter can fit there. I applied the plate to the place where the starter should be located and cut the corresponding hole in the gearbox. Now the starter fits in without problems, but does not fit tightly to the plate, since the starter rests its body against the gearbox mounting bolt. I can’t do without this bolt, so I decided to replace it with an internal hexagon bolt, and make a hole in the starter housing for it. We sorted out the checkpoint.
Next, I decided to cut a suitable hole in the crankcase, but noticed that the starter would completely block the technological hole for setting TDC. But I wouldn’t want to lose it completely. Then I made exactly the same hole on the other side of the crankcase and set the top dead center value on the flywheel. Now nothing will stop me from cutting a hole in the crankcase for the starter.
The hole has been cut out. And then a very timely thought comes to my mind: how to set the engagement gap between the bendix and the starter ring? It is impossible to do this with the gearbox installed, since it blocks the entire view. Then I decided to measure the distance from the starter plate to the edge of the crankcase. In both the upper and lower mounts the distance was 26mm. Now I’ll dismantle the gearbox and simply hang the starter on the bolts, placing it in exactly the same way as with the gearbox, i.e. at a distance of 26mm from the crankcase.
After connecting the battery, the starter began to turn the Ural engine. And in my opinion, it’s very good!))) No unnecessary noise or ringing can be heard.
I hope that the starter will only please me on my journey.
Excellent crankshaft oil seal for the rear cover of a Ural motorcycle. Manufacturer: Toyota. Japan. Catalog number: 90310-50006. Average price in stores: 350 rub.
_____________________________ ABOUT THE CHANNEL “SANYA CHETODEL”
As you might guess, they called me that because I am constantly doing something. I really love working and creating things with my own hands. At the same time, I constantly force myself to learn something new and unknown. For example, in these videos I am repairing an old Ural motorcycle, on which, based on the results of the repair, I plan to go on a trip to Crimea. This motorcycle will not only receive a complete overhaul, but will also undergo some tuning. I talk in detail about everything I do with the motorcycle in the playlist “Ural Motorcycle Repair”
Electric starter
Well, I finally started writing this post. I’ve long wanted to install an electric starter on my Bolivar, but either I’m not up to it, I don’t want to disassemble the engine, and during the rebuild I want to quickly assemble it and drive it. However, after an unsuccessful trip to Rostov, on the birthday of the Olen bike house, when I turned the crankshaft in Yaroslavl with all the consequences, I decided to finally give myself an electric start during this capital campaign. Despite the fact that the Internet is full of articles on this topic, they are all quite vague, plus I have not seen a single video where a “live” 650cc Ural was started with an electric starter. No, the video is complete, but they show some intermediate stages, like: “here I attached the starter, here I connect the wires to the Akum and it seems like something is turning, but the engine is still half disassembled.” Somehow I got distracted, closer to the topic.
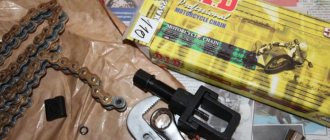
In order to install an electric starter, you need to buy a ring gear for the flywheel. Someone is remaking a crown from Buran (in my opinion), but I took a ready-made one, which is installed instead of the last clutch disc.
Ring gear
Together with the ring gear, a bracket for mounting the starter on the box was purchased. There are two such brackets, on top of the box and on the side. But, since I have a Ural gearbox, and the starter from the side looks, in my opinion, much more aesthetically pleasing, my choice fell on the side mount.
Starter mounting bracket
A tens starter with a 9-tooth Bendix was recommended as a starter. But I had a starter from Oka lying in my garage, which, as it turned out, is almost identical to the ten starter, the only difference is in the starter cover. After going around several auto parts stores, I finally found the cover I needed, so with a slight movement of the hand (and unscrewing a couple of screws) the starter from the Oka was turned into a tenth starter, and at the same time, preventive maintenance was done and the gearbox was lubricated.
Starter from Oka
Difference in starter caps
The starter we need
Then the fun begins. Using the starter mount as a guide, a window is marked on the engine crankcase and gearbox, after which it is roughly cut out (not to size, of course), followed by a file adjustment to the required dimensions.
Example window
After that, only the ring gear was placed on the flywheel, the flywheel was attached to the crankshaft, a mark was made on the crankcase (taking into account that the flywheel would sit deeper) where the ring gear ends and the flywheel begins. A mark was also made on the starter cover where the bendix ends if it is pulled out to the end, after which the flywheel was removed and the holes were adjusted to finish.
Estimation and final hole
The centering bosses had to be cut off from the box housing, otherwise the ring gear would rest against them. I had to disassemble the air filter and cut off part of it so that the starter could fit into place. We also made two box mounting studs, which had to be made larger due to the fact that now the starter was also attached to them.
After that, the flywheel and clutch assembly was finally installed on the crankshaft, the engine and gearbox were assembled, and the starter was roughly put in place. After fitting, there were small tests to see how the starter turns the flywheel, whether the teeth are torn off, whether there is any misalignment, etc.
Starter fitting
First tests
After I was sure that everything was going well, bushings were made to secure the starter at the required distance and at the same time press the box.
Once the starter was finally secured, a second test was carried out to ensure everything was going according to plan.
Second tests
After this, the final stage of engine assembly began. Since there is no air filter now, I temporarily installed zeros. In the future I will install a starter filter from KBMTS.
Final view of the engine
Starter filter
Well, now, actually, the finale. That's what this whole post was all about. Video of starting a Ural 650cc motorcycle using an electric starter. Engine just after rebuild. New crankshaft from Soviet stocks, aluminum cylinders, AT 78mm pistons, new heads. The video shows the second launch. I didn’t film the first launch, but it started up almost immediately, after which I let it run for 10 minutes, turned it off and decided to make this video. Enjoy!
Starting with electric starter
Bright, stylish, but still Dnepr
Looking at this motorcycle, different emotions immediately appear in me. On the one hand, the author of the project had a hand and spent a lot of time creating this “horse”, but on the other hand, I don’t see much point in them. It is unlikely that this homemade seat will be more comfortable than the standard one.
Exhaust
- the highlight of the whole design. As for me, the “cans” are too massive for the pipes that go directly to the cylinders. I think if they were made thicker in cross-section, this modification would look somewhat more impressive.
The colors here are extremely bright and dull
, but this is
a matter of taste
. And, according to the classics of the genre, we are witnessing the abandonment of the steering wheel and the fact that the author of the project gave preference to clip-ons, completely cutting down the ability to move around on this motorcycle.
Replacing the crown
Since the toothed rim is pressed onto the flywheel disc, it cannot be removed/put on without heating. The main problems with self-repair in this case are:
- the car owner does not have special equipment - they use burners, blowtorches and even heating a gas stove in the oven;
- the temperature of the crown is difficult to determine - heating is done “by eye”;
- technological requirements - the toothed rim should be heated to 200 degrees, but without special devices it is very difficult to maintain the temperature.
To increase the strength of the steel, the gear rim is hardened at the factory. It is not recommended to heat hardened parts, since in this case the crown is automatically subjected to another heat treatment - tempering. The performance characteristics obtained during hardening - hardness, wear resistance of the structural material - change into the opposite properties of the metal - toughness and plasticity.
In other words, if you overheat the rim, after putting it on the disc and cooling in the air, the teeth will become softer and grind off much faster. There are three types of leave:
- high - heating to 450 - 600 degrees to obtain a sorbitol steel structure;
- medium - heating to 300 - 450 degrees to obtain a troostite steel structure;
- low - heating to 150 - 300 degrees to obtain a martensite structure.
When overheated, the structure of the metal will change
Dismantling
The crown has no additional methods of fixation other than an interference fit on the flywheel, so it can be removed quite easily, even without heating:
- the part is placed on stands so that the toothed rim hangs down;
- uniform blows are applied with a hammer around the circumference of the crown.
Removing the toothed rim
If the toothed rim is definitely rejected for replacement, you can knock directly on the teeth. When the crown is rotated 180 degrees for further operation, the blows are applied through the gasket - a second hammer, a chisel, a piece of reinforcement.
Ring gear selection
Before replacing the flywheel crown with a new consumable part, it is necessary to select a complete replacement:
- centrifugal forces tend to rupture the disk during operation;
- the flat surface against which the clutch is pressed is distorted;
- friction of the linings on the flywheel causes heating, further increasing the warping of the plane.
After an interference fit, the toothed rim tightens the flywheel disc, eliminating the above defects. In addition to increasing the service life of the flywheel, the service life of the car’s clutch increases.
All of these design features are present in the rims manufactured by Tanaki. The number of teeth must match initially. In internal combustion engines of some manufacturers, the flywheel is used as an element of the DPKV crankshaft position sensor. In this case, two teeth on the crown are missing; before dismantling, it is necessary to create a mark of the relative position of the area with the missing tooth relative to the disk.
Installation
You can mount the crown of a car flywheel without heating only when turning it. However, even in this case, there remains a risk of the rim turning relative to the disk during operation, so after installation this part is secured by welding at 4 points.
Methods for heating the crown
The main heating methods when installing the crown on the flywheel are:
- oven or burners of a gas or electric stove - it is very difficult to overheat the part, you will have to turn it periodically on the burners;
- blowtorch or gas torch - it is necessary to control overheating visually, preventing the toothed rim from changing color.
Heating on an electric stove
Heating with a gas burner
In any of the above options, the flywheel disk must be in close proximity to the place where the rim is heated in order to install it on the seating surface as quickly as possible using pliers, pliers or hands wearing special heat-resistant gloves.
After cooling, the part will shrink on its own; if necessary, tacks are used at several points.
Flipping the old rim
To turn over the flywheel ring in use, you need to knock it off its seat, turn the disk over, and put the heated rim in its place. If at the factory or during subsequent replacement this element is put on with the chamfer inward, then when turned, the chamfer automatically remains on the outside.
Tooth rim revolution
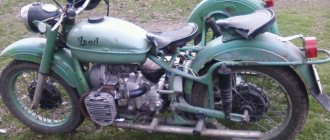
Spectacular bike
To create this masterpiece, a resident of Bashkortostan decided to attach a car wheel to a motorcycle. Parts from various vehicles were also used in the restoration.
The front brakes and fork came from the IZh Orion, the carburetor from the VAZ-2106, and the ignition from the Oka. After the repair, the motorcycle turned out to be impressive, its length was 2720 cm.
From the old Dnepr, only the gas tank and engine remained in the restored model. This motorcycle was restored back in 2007.
Heavy KMZ motorcycles have become famous for their strength and durability, which now remain their main advantages. These models do not allow enthusiasts to forget about the legendary technology and create unique cars on its basis.
Symptoms and causes of malfunction
Due to difficult access to the flywheel, visual inspection of this gear of the gearbox is difficult, so car owners remember about it with the following symptoms:
- problems starting the engine;
- jerking, grinding and extraneous sounds when the bendix engages the flywheel.
Engagement of the ring gear with the starter
The reasons why teeth wear out are:
- defects in the manufacture of the flywheel - overheating of the toothed rim during landing leads to tempering of the steel, a decrease in strength, and an increase in the ductility of the structural material;
- non-parallelism of the axes - the gear ratio is very high, any deviation of the axis of the starter shaft from the axis of the crankshaft will lead to the development of a tooth involute on one side;
- violation of the tooth profile - over time, the transmission elements wear out, at the moment of gear engagement/disengagement, the profile is cut off completely;
- lack of lubrication - due to the design features of the transmission, it is physically impossible to apply lubricant to the bendix and the flywheel crown.
Tooth wear
In any of these cases, it is recommended to replace the flywheel crown. In some cases, bedix can grind off only part of the tooth from the outside, so it is enough to change the sides of the crown.
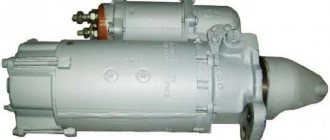
About the starter Ural 4320
The more massive the engine, the harder it is to start it.
And especially, diesel engines, like in the Urals 4320. The starter for this car is quite heavy - up to 25 kg. It is a commutator DC electric motor. It contains a gear drive and a bendix to transmit rotation to the engine flywheel. The functioning of the starting device is supported by several relays: a powerful retractor, starter and blocking relay. The retractor sits directly on the starter, and the other two are separate blocks. One of the main characteristics of the Ural 4320 starter is the rotation speed. To start a diesel engine, the crankshaft needs 2-3 revolutions with an amplitude of 130 rpm. The rotational speed of the electric motor intended for the Ural 4320 is 1500 rpm. Due to the action of the drive gear, this high value is normalized and only then transmitted to the flywheel crown.
Other important characteristics:
- supply voltage of the on-board network and, accordingly, the starter - 24 V;
- device power - 6-9 kW, depending on the model;
- current consumption - 130 A (idling) and 800-1000 A (during engine startup);
- Battery capacity is not less than 190 A/h.
Due to the fact that the components of a diesel car starter are subject to heavy loads, the device can last slightly less than the engine itself. The manufacturer himself recommends replacing the starter every 5-6 years.