(moto 12/98 page 57)
Among the owners of "Urals" and "Dneprs" they were always looking for originals that did not have enough power in the standard engine of their cars. And they set about forcing it. It was carried out in different ways: modified crankshafts, camshafts, new carburetors, and lightweight flywheels were used. In some cases it was possible to increase the power. True, often to the detriment of reliability and resource. And almost always forced engines overheated.
If you don’t want to make the same mistakes due to inexperience, get acquainted with some options for improving the quality of Uralov engines by Moscow professional mechanic Yuri Popov.
Looking ahead, I will say that experiments aimed at increasing the power of Uralov engines made it possible to achieve an indicator of about 40 hp. With. This became possible after installing larger diameter valves, a modified camshaft and pistons with a diameter of 79 mm (the normal size is 78 mm). The latter is not at all dictated by the desire to increase the engine displacement. The new diameter allows the use of piston rings instead of products from the Michurinsky plant, known on the shelves as “Piston rings”.
To reduce heat stress in the cylinder-piston group, an oil cooler was installed in the engine. They did this: two fittings were cut into the channel between the pump and the filter, so the channel was “cut”. Now the oil is cooled in the radiator before reaching the rubbing surfaces. The engine was subjected to comprehensive tests, which confirmed that the power increased to 40 hp. With.
But disappointment soon set in: the forced-up engines did not behave the best in operation. On the highway at speeds of about 100 km/h, no bad signs were observed, but in city driving mode the engine overheated. What about the oil cooler? No way! The Irbit oil pump pumps oil with insufficient pressure. So the radiator does not save you from “thermal stroke” - “stuck” occurs.
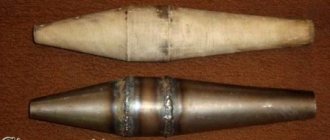
To prevent overheating of the pistons, we designed and manufactured a forced oil cooling system. There were two ways to go. The first is to intensify heat removal from the cylinder walls by replacing air cooling with liquid cooling. The second is to try to cool the piston itself. We chose the second one.
Here's how the plan was realized. A nozzle was installed in the engine crankcase, oriented so that a jet of oil escaping from it under pressure hits the inside of the piston bottom. Since the piston surface temperature is significantly higher than the oil temperature, the amount of heat removed is significant. This is what we need! We will not claim the uniqueness of our solution - to reduce the thermal stress of pistons in modern diesel engines of passenger cars, along with liquid cooling, the above method has long been used.
So, on the engine of the experimental Ural, instead of the standard one-section oil pump, a two-section one was installed, which consists of two modified standard sections with a common drive. Each section carries out its own work: in the upper (standard) section, oil is pumped into the filter and flows through channels to the rubbing parts. At the bottom - it rises from the sump, is supplied to the oil cooler and then through special nozzles is sprayed onto the piston bottoms from the crankcase side. Having taken away the heat from the pistons, the oil flows into the sump, and the process is repeated cyclically.
This design uses a standard silumin engine sump and homemade interchangeable pistons with a diameter of 79 mm with special recesses for injectors.
After installing the system, the engine was subjected to bench tests to understand what size the oil cooler should be. Luckily, the external dimensions of 200x100 mm turned out to be sufficient to ensure normal engine temperature in all operating modes. However, a radiator of this size is unreasonably large for a 650 cc engine. see. Unfortunately, this is the “merit” of the ineffective oil pump - it alone prevents the radiator from being reduced in size.
What owner of a domestic motorcycle has not thought about tuning the engine of a Ural motorcycle? This burning question worries many fans of domestic Ural motorcycles! The fact is that the standard Ural engine has many manufacturing inaccuracies and is technically imperfect. Depending on the model and year of manufacture, the power of the Ural motorcycle varies from 32 to 36 horsepower, which in our time is considered low for an engine capacity of 650 cubic centimeters. In this article we will look at how to increase the power of a stock outdated engine. I would like to note right away that a lot of turning work will be required; find a workshop in advance that will agree to help you in this matter.
The Ural boxer engine has great potential for tuning, thanks to a piston diameter of 78mm and a stroke of 68mm. With this configuration, the engine could be revving, unfortunately the quality of the parts and the purpose of the motorcycle do not allow this to happen. In the article we will look at the solution to this problem, due to which you can achieve impressive results from the operation of such an engine, namely:
- Engine head tuning
- Camshaft tuning
- Cylinders and pistons
- Carburetors and ignition
- Additional engine modifications
Engine head tuning
Through the channels of the engine heads, the cylinders are filled with a fuel mixture, and exhaust gases are released. The more efficiently the cylinders are filled and the exhaust gases escape more easily, the greater the engine power. To tune the Ural engine heads, you will need to remove the valves. The diameter of the original Ural valves is only 38mm inlet and 35mm exhaust, which affects the suffocation of the engine. Along with the valves, you need to press out the old valve seats and guides. The seats for the saddles should be bored to the size of the Dnieper saddles. New enlarged seats will allow the installation of larger diameter valves 40mm inlet and 38mm exhaust from the Dnieper. The best alternative to Dnepr valves would be valves from Audi. The quality of automobile spare parts is much higher, and thanks to the fixation with new type of crackers, the service life of the heads can be significantly increased. We recommend using bronze valve guides from VAZ 2101-2107.
Internal grooves improve lubrication of the valve stem. The movement of valves in them is the most efficient with minimal friction losses, and the service life is much longer. Bronze perfectly removes heat from the valve, which will have a positive effect on the stability of valve clearances.
It is important to know: when choosing valves, do not run into a fake. Exhaust valves made of heat-resistant steel should not be magnetized. Bronze guides are also not magnetic.
Please note that the gap between the guide and the valve stem is required from 0.04 to 0.06 mm. The valve should move freely in the bushing without dangling in it. By the way, we would like to note that the car guides have a seat for the oil seal. We strongly do not recommend installing it, since lubrication occurs by splashing oil, and not under pressure as in cars. After installing new valve guides, pay attention to the trimming of the valve seats. It is necessary to trim the seat along three chamfers: 60, 30 and 45 degrees, of which 45 degrees is the working one, which comes into contact with the valve plate, ensuring a tight fit. You will also have to replace the standard valve springs with automotive ones from the VAZ 2108. They are somewhat stiffer than the original ones, and are able to ensure smooth operation of the valves at high speeds. But keep in mind that with such springs, the camshaft is subject to accelerated wear - tuning a motorcycle engine requires sacrifice. The final procedure for tuning the heads is to bore the intake and exhaust channels with a cutter a couple of millimeters larger in diameter. At the same time, it will be possible to get rid of casting sagging and ensure better engine breathing. The exhaust channel should be polished to a mirror, and the intake channel should be left matte, slightly rough, to prevent fuel condensation on the walls. After tuning the heads, do not forget to blow out all the channels and hard-to-reach places with compressed air, and grind in the new valves. Grinding must be done manually using a two-component lapping paste. Never use a drill. A hose is put into tension on the opposite end of the valve stem, thus rotating the valve with your palms until you get a matte ring on the seat and valve plate with a thickness of 1.2-1.6 mm. Check the tightness of the valve by pouring keratin into the channels for 1-2 minutes.
INCREASING URAL ENGINE POWER
(Moto 12/96)
Many motorcyclists dream of increasing the engine power of their Urals. But not everyone understands what should be done for this and what consequences boosting the power unit can lead to. Firstly, work related to changing its design can only be carried out by a very qualified mechanic and with the availability of machine tools. Attempts to do something in a hurry are doomed to failure. Secondly, the engine, boosted according to sports-cross models, has a torque characteristic of little use for economic purposes, shifted to the high-speed zone and unimportant fuel efficiency. So before you start changing anything in the factory design, think carefully about whether you can handle a very serious job and whether you need it.
This material is a generalization of the experience of reconstructing the engines of serial road motorcycles M-63, M-66, M67-36, as well as serial sports engines M-63K (motocross) in preparation for competitions and runs by athletes of the DOSAAF society.
ATTENTION! Boosting an engine may be advisable only if it is practically new or has undergone a thorough overhaul. If your power unit does not meet the specified requirements, then there is a risk of losing what you have.
To increase engine power, the compression ratio should be increased from 7-7.2 to 8.5. With this value, you can only use gasoline AI-93, A-95, A-98, “Extra” and the like with an octane number of at least 85-95.
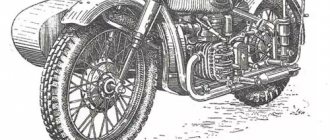
It is impossible to increase the compression ratio to such limits using standard pistons from Ural. Therefore, taking into account the data in Table 1, you should select pistons from the MT-8 engine (K-650 Dnepr) with a spherical head. In this case, to prevent the piston from colliding with the cylinder head, it is necessary to chamfer the step formed by the transition of the spherical combustion chamber to the mating plane of the cylinder head, ensuring a gap of at least 1-1.5 mm. To prevent the piston skirt from touching the crank pins, a special cut is milled on it, and the valve seats are changed on the piston bottom, since the camber angles of the latter are different for the MT-8 and M-63 engines (Fig. 1). To check whether the valves are touching the bottom of the piston, strips of plasticine 3-4 mm thick are applied to it, then the cylinder head is completely assembled and the crankshaft is turned. The presence and size of the gap between the valves and the piston are judged by the imprints on the plasticine. It should be at least 2-3mm. Before installation on the engine, the pistons are weighed, and the difference in weight should not exceed 2 g.
When boosting an engine from an M-63K sports motorcycle with cylinder heads trimmed at the factory, metal gaskets 2 mm thick are placed under the cylinders. Between the cylinder and the metal gasket, as well as between the latter and the crankcase, paper gaskets are placed for sealing. When using road bike parts, the spacer under the cylinder can be about half as thin. In any case, its thickness is finally controlled by on-site measurements.
The boost stage ends by clarifying the compression ratio in each cylinder. For this purpose, the piston is brought to TDC with the valves closed (end of the compression stroke). The engine is tilted so that the spark plug area on the cylinder head, in which the volume of the combustion chamber is measured, is located horizontally. In this position, spindle oil is poured into the cylinder from a graduated beaker. It is necessary to ensure that the volumes of the combustion chambers in both cylinders (and therefore the compression ratio) are the same. This can be achieved by changing the thickness of the gaskets described above.
To improve cylinder filling, it is necessary to reduce the aerodynamic resistance of the intake and exhaust channels. To do this, the balls carefully clean out the casting errors in them, and then polish them. The intake and exhaust valve heads are also polished.
To ensure a normal service life of the compression piston rings and improve the piston seal, at increased speeds of a forced engine, standard compression rings with a machined internal one-sided chamfer should be used (Fig. 2, a). This makes it possible not to reduce the mass of the rings and to reduce the impact on the cylinder walls. Even better results are obtained by using L-shaped torsion-type rings (Fig. 2, b). To make them, a serial ring is fixed in the chuck of a lathe using a mandrel (Fig. 2, d) and then a recess is made.
Since it is not always possible to make a new piston with grooves for two L-shaped rings, you can cut one groove for it above the upper groove, right at the edge of the piston bottom. A rectangular ring with a machined chamfer is placed under the L-shaped ring. The lower groove remains empty (Fig. 2, e).
When boosting the crankshaft speed, textolite washers are installed under the valve springs to lighten the pushers. Push rods are made of titanium or duralumin tubes with steel tips (Fig. 3).
On each cylinder, using a calibration disk mounted on the crankshaft axis, the valve timing is checked according to the data in Table 2. It is better to register the beginning of valve opening using an indicator. Adjustment of the valve timing can be done on the removed cam shaft by sanding the cams by hand with fine-grained abrasive stones or using a rubber grinding wheel and an electric drill. In this case, it is important to remove the minimum necessary amount of metal in order to preserve the upper cemented layer and distort the overall shape of the cams as little as possible. Their surface should be polished to a mirror shine.
Ignition timing is 43 degrees - early, 13 degrees - late.
It wouldn’t hurt to replace the standard ignition system with a contactless electronic one installed on the Ural-Solo.
Candles can be recommended A 20 DV, A 17 DV from the Zhiguli car, however, due to the large length of the thread, brass washers 8 mm high should be placed under them.
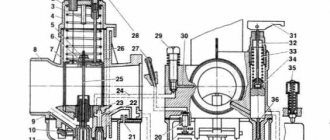
If an old engine equipped with K-301 (K-302) carburetors is being boosted, they should be replaced with K-63U (K-65T) with a diffuser diameter of 28 mm and a main jet capacity of 170 cc. cm/min. Carburetors will have to be attached to the cylinders through adapter washers, since the K-301 (K-302) mounting studs are located in a vertical plane, and the holes of the K-63U (K-65T) mounting flange are located in a horizontal plane.
A contact-oil air cleaner is completely unsuitable for a forced engine. The best solution is a homemade filter with a paper element from Zhiguli. As a last resort, you can use an air filter with a paper element from the Dnepr motorcycle.
The M-63 engine, boosted using the described technology, must develop a power of at least 30 kW (40 hp).
According to VNIIMotoprom, with a compression ratio of 8.5:1 and 5900 rpm, the engine power can be up to 33.6 kW (45 hp).
TABLE #1 Dimensional data of cylinder-piston groups
| Engine make | Cylinder diameter, mm | Piston diameter, mm | Size | Group index, mm |
| M-63 | 78,000-78,01 78,01-78,02 78,02-78,03 78,2(+0.03) 78,5(+0.03) 79(+0.02) | 77,91-77,92 77,92-77,93 77,93-77,94 78,2(-0,060-0,090) 78,5(-0,060-0,090) 79(-0,060-0,090) | — Normal — 1-rem 2-rem 3-rem | 1 2 3 — — — |
| MT-8 (K-650) | 78,00-78,01 78,01-78,02 78,02-78,03 78,03-78,04 78,20-78,24 78,59-78,54 | 77,95(-0,01) 77,96(-0,01) 77,97(-0,01) 78,98(-0,01) 78,18-78.14 ? 78,48-78,44 ? | — Normal — — 1-rem 2-rem | 1 2 3 4 — — |
NOTE: The MT-8 cylinder group index is stamped on the end of its flange on the side of the rod casings; The cylinder index M-63 is stamped on its upper end near the drain tube. The gap when mating the piston and cylinder is 0.08-0.10.
TABLE #2 Valve timing of motorcycle engines
| Motorcycle brand | M-61,M-62 | M-63K,-66AM |
| Start of intake before TDC End of intake after BDC Start of exhaust before BDC End of exhaust after TDC | 57sh 77sh 97sh 37sh | 70sh 145sh 135sh 70sh |
author - Dmitry Shekhavtsov sent
Camshaft tuning
This modification requires a very thoughtful approach; as a rule, a new cam shape is created experimentally and may not meet your expectations. A wide-phase camshaft will help to fully realize the capabilities of tuned cylinder heads. For moderate tuning, you can simply install it from the Ural model M 67-36. The photo below shows a wide-phase shaft on the left, and a regular one on the right.
If you want to achieve the maximum from the engine, then it is possible to increase the profile of the cams of the standard shaft. This can be done by welding the metal using argon welding. By increasing the width and height of the cams by a couple of millimeters, it is possible to achieve a shift in torque to the high speed region and increase power also by increasing the speed of the valve timing. Take into account the fact that such an engine will lose traction at low speeds and may even stall at idle. For this modification, we recommend finding a workshop or factory that can properly process the cam profile followed by carburizing. Then, it is important to make sure that the geometry of the shaft is even; there is a high probability that the shaft could be driven by a sharp temperature change; the curvature is checked with a dial indicator by an experienced turner.
Cylinders and pistons
One of the most important parts in an engine is the pistons. They take on a huge load from expanding gases and temperature. Low-quality standard pistons do not withstand loads well, often have different weights, and the piston rings cannot provide high compression due to their outdated design, this significantly affects the power, and the massiveness and number of rings make the piston very heavy, which prevents the engine from spinning. It is recommended to install forged pistons with imported rings. A good solution would be to install forged pistons from the Ural Wolf motorcycle; they have a convex surface, which will increase the compression ratio and significantly increase engine power.
As for the cylinders, it is preferable to replace them with aluminum ones with a cast iron liner. The thermal conductivity of aluminum is much higher, and effective heat dissipation is ensured. A significant improvement in cylinders is relining. The standard internal diameter of the cylinder liner is 78 mm, and if the volume of the standard engine of 650 cubic meters does not suit you, by replacing the original cylinder liners with liners from Moskvich 412 with an internal diameter of 82 mm, you can significantly increase the volume and, accordingly, power. Select the pistons accordingly for the new diameter.
To combat overheating, a cooling system in the form of installing an oil cooler and by forcefully spraying oil onto the bottoms of the pistons will be useful. To connect the oil cooler, an additional oil pump is needed, since the standard one is very weak. To pump oil through the radiator, it is advisable to install an oil pump from a Dnepr motorcycle. Drive the second pump through an adapter from the standard Ural pump. In order for the additional pump to fit in the crankcase, an enlarged sump is required, which will also have a positive effect on cooling. By slightly increasing the amount of oil in the system, it will be possible to distribute the thermal load, and the new aluminum pan will remove heat even better.
By connecting to the new oil pump an oil line made of a copper or steel capillary tube, which must first pass into the radiator, then cooled oil from it must flow to the inside of the pistons. To do this, the line from the radiator enters back into the crankcase and bifurcates so that the oil supply is directed to the bottom of the piston from the inside. An oil cooler can be purchased at a Japanese motorcycle dismantling shop, and an automatic transmission radiator of the size you need from any car is also perfect.
Latest improvements
If you manage to weld a high-quality frame, then you can assume that most of the work has already been done. The only thing I wanted to add was the angle of the front fork. We do not recommend tilting it more than thirty-three degrees. This value is the most optimal for choppers, because the greater the angle of inclination of the front fork, the worse the motorcycle will handle. In our opinion, 28-30 degrees will be more than enough to make the motorcycle look like a real chopper from the Urals, and at the same time handle well.
The last stage is the final assembly of the motorcycle. The engine and other main mechanisms are installed on the frame. The front wheel and handlebars are finally in place and we can see for the first time what our bike looks like after the rework. But in general, the frame is not the only thing that can be done with a Ural motorcycle.
True motorcycle enthusiasts can put all their soul and money into their custom motorcycle, and end up with a Ural Chopper that will delight them for a long time. Installing and reworking the exhaust system, upgrading the fenders, seats, lighting fixtures are just a small part of what can be changed. When modernizing the appearance, you can fully express your imagination or borrow ideas from ready-made choppers.
Carburetors and ignition
Tuning a Ural motorcycle engine affects all engine systems, including ignition and carburetors. It is recommended to read the information: how to properly configure Ural carburetors. The standard ignition is so outdated that it is not even suitable for everyday driving, let alone anything else. It is desirable to install a microprocessor ignition with the possibility of an automatic advance angle. This article will help you set up the electronic ignition system. Ideally, such an ignition would be installed with a programmable controller with the ability to adjust the firmware. Such ignition systems have another useful feature - speed cut-off. This will prevent over-torque of a heavily boosted engine. Well, for maximum spark strength, in combination with a new ignition, you can use a coil from the Oka or Gazelle. Branded high-voltage wires with silicone insulation and internal resistance are required, for example from Tesla from VAZ 2108. They will ensure an uninterrupted spark in any weather and eliminate the possibility of spark breakdown to ground. As for carburetors, you will need to install Japanese vacuum carburetors with a diffuser diameter of 32 to 36 mm, followed by selection of jets, synchronization and adjustment with a gas analyzer. Tuning on a dynamometer is highly advisable, where you can test different settings and ignition timing and get the most out of your motorcycle tuning!
Conclusion
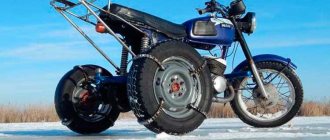
In the next article (or articles) I will tell you in detail about how this Ural enduro motorcycle was created. Overall, I was completely satisfied with the result; Over the course of several visits, no serious deficiencies were identified. Of course, this is not the final version yet; plans include installing “toothy” tires, final painting, installing new rims and maybe something else, as well as changing the oil, piston rings and other repairs. First of all, it is worth installing toothy tires, because... On a regular road motorcycle, the Ural rides very, very poorly in the mud, almost not at all.
Installing motocross tires is a top priority
vote
Article rating
Additional engine modifications
In addition to the above methods of tuning a Ural motorcycle, there are several more secrets. It is possible to install a crankshaft from the K 750 on the Ural engine, which will increase the cylinder stroke to 78mm.
Thus, it is possible to significantly increase the working volume of the Ural engine. It's quite difficult to find, but it's worth it. Another problem with the motorcycle is the tight response to the throttle and slow acceleration. The reason for this is that the flywheel is too heavy, the weight of which is designed for riding with a stroller and for transporting heavy objects.
According to the drawing, it is possible to reduce its weight by a couple of kilograms. Due to the weight reduction, the inertia of the crankshaft will decrease, and the acceleration dynamics will significantly increase. To fully realize the power on the road, the gears of the gearbox must be replaced with 9 or 10 pairs. In conclusion, we would like to note that tuning the Ural motorcycle engine is justified only for racing purposes; for everyday use, such an engine will have a short resource and significant fuel consumption.
Tuning
The opposed two-cylinder engine of the Ural motorcycle has great potential for technical tuning. However, it is recommended to carry out this process only on a new or well-repaired engine.
In addition, its completion should be entrusted only to highly qualified specialists with experience in carrying out such work. This is due to the fact that the process of increasing power affects almost all engine components.
So the following needs to be modified:
- cylinder heads;
- camshaft;
- pistons and cylinders;
- fuel supply system;
- ignition system;
- crankshaft and flywheel.
Having completed the entire scope of work, you can achieve a significant increase in engine power, however, it should be noted that this significantly increases fuel consumption and reduces engine life. Therefore, such tuning is recommended only if the motorcycle is intended to participate in sports competitions. It is not advisable to use it for any other purpose.
External tuning
The original design of the Ural is already impressive, especially if you like the classics. But there is no limit to perfection. Owners of this motorcycle tend to customize the motorcycle according to their personal tastes. Of course, all work to improve the motorcycle can be ordered at the salon, but a real biker will always prefer to do the tuning of the Ural motorcycle with his own hands. The tuning process may be lengthy and require effort, but the result will certainly be worth it.
The following changes are most often made in the appearance of the “Ural” iron horse:
- Handles, mirrors and fairings are changed.
- The seat is made single.
- Get rid of massive “wings”.
- The steering wheel is raised and straightened slightly.
- The footrests are moved forward to make riding more comfortable.
- The original fuel tank is replaced with a streamlined tank. Tanks from motorcycles “IZH-49”, “Planet”, “Jupiter” and “IZH-56” are suitable for the “Ural”. If you have an old Ural model, then you can install a Java-250 tank on it.
- If the owner wants to turn his Ural into a chopper, then the rear wheel should be replaced with a wider one. The optimal size is 130-150. The wider rear wheel requires replacement of the rear frame.
- Parts are chrome plated.
- The clutch and brake levers are replaced with ones cut from a piece of solid metal.
- The muffler is located on the right side.
Of course, each motorcycle owner decides for himself how far he will go to change the appearance of his “iron horse”. The cost of this model is quite high, so if you need a completely modified bike, it is better to buy something more affordable. But if you like the classic Ural motorcycle, this is your choice. Photos of tuning these bikes can be found on the Internet and you can choose the option that you will focus on.
Ural motorcycle tuning
Owners have always liked Soviet-made motorcycles, and tuned equipment even more so.
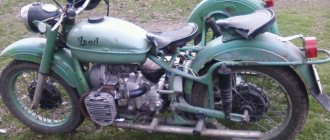
Most of the motorcycles from the USSR are being modernized, and the legendary Ural is considered one of them. This legend was released more than 70 years ago, and during this time the motorcycle received more than one change from the owners. Therefore, today you can see excellent examples of the Urals with all the positive and negative sides.
Improved technical characteristics
The surface of domestically produced engines has many roughnesses. To make the surface smooth, you need to stock up on a file, felt, sandpaper and patience. You can speed up the polishing process by using drill attachments with felt wheels.
Despite the fact that the Ural has impressive power, the owners still strive to improve the performance of their “iron horse”. In order to tune the engine of a Ural motorcycle, you should:
- clean the cylinder head channels;
- replace the original carburetor with the K-301B model;
- install two air filters, parts from Moskvich-412 or GAZ-24 are suitable;
- adjust the synchronization of the carburetor;
- diagnose the correct ignition setting for each cylinder, the advance should be from 40° to 42°.
If everything is done correctly at all stages, engine power will increase to 42 horsepower. Engine power can only be increased in new models or motorcycles that have undergone major overhauls. When tuning an old engine, there is a danger of damaging it.
Installing a homemade muffler will result in failure to pass the scheduled technical inspection .
Tuning a Ural motorcycle requires a lot of time and effort, but the result is definitely worth it. A stylish retro-style motorcycle, customized to suit you personally, is a great option for urban conditions.
Do-it-yourself Ural motorcycle tuning
If you own a Ural motorcycle, but its appearance does not suit you, and you constantly look at foreign handsome men, do not despair. You can improve your vehicle. Most often, they buy a domestic motorcycle just for the shell, and everything else is redone.
Tuning the Ural will take you a lot of time, but it is a very exciting process, and the result will exceed all your expectations.
Before you get started, check out all the proposed upgrades and photos of motorcycles on the Internet.
Having decided, you can begin work. First we redo the rear part of the frame.
- The pendulum needs to be expanded.
- Cut off the seat tubes.
- We weld curved pipes with a diameter of 28 mm, no less. This is not only a beautiful decor, it is also a headscarf amplifier.
- To make the suspension softer, the rear shock absorbers need to be installed at an angle.
- When you put the wide rear wheel in place, make sure that the rubber coupling works without distortion.
- The footrests need to be moved forward, it will be more comfortable for your legs.
- The frame needs to be lengthened by ten centimeters.
- The engine moves backwards.
Perhaps in this case the landing will be incorrect. But for every motorist it is different, individual.
After completing all the work, select a workpiece, perhaps from a stroller, for the rear wing. If you want it to be deeper, you can cut plates from it and butt weld it to the wing.
Let's start working on the tank:
- Use a grinder to remove the glove compartment.
- You also remove the neck and tunnel.
- A wedge is used to cut the top of the tank.
- The two halves are welded at the back. And the neck and tunnel are welded.
- To keep everything sealed, use epoxy resin.