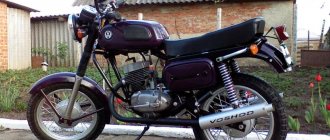
Fans and simply owners of Ural motorcycles own not just a means of transportation, but a thing that shaped an entire generation of bikers. Alas, age makes itself felt and it manifests itself in unpleasant little things. This can be considered the absence of a starter. The problem is not critical, but it causes some inconvenience. Craftsmen who began to adapt a starter from a car to their bike helped solve the issue. Today we will tell you how to install a starter on a Ural motorcycle with your own hands.
Why do you need a starter?
Some models of modern motorcycles are equipped with starters due to the lack of a crank. Here, the presence of a starter is assumed initially. However, in other cases it serves only for the convenience of the rider. There is no need to practice every time before a trip, especially if the valves or ignition are not adjusted.
The Ural, due to its archaic nature, did not even imply the installation of a starter. At the time of the release of the first motorcycles, the starter was a luxury that a Soviet citizen could not afford, and then the design was preserved because of its reliability.
Installing an electric starter on a Ural motorcycle will save you from an overinflated right leg and sudden injuries to the kneecap, so the procedure can be considered as simplifying the life of the rider.
Typical faults
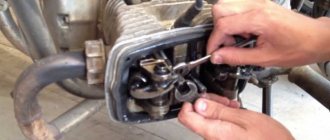
Obviously, malfunctions occur on the most loaded elements of the starting device - the drive and the electrical component. For example, problems often occur in the starter armature:
Other common types of problems encountered with the 4320 starter include:
Before removing the electric motor, it is recommended to carefully check the operation of the battery, the condition of its terminals, as well as the amount and condition of the oil in the engine. You should know that powerful diesel engine starters have one feature - often problems arise one after another, like an avalanche. For example, excessive load on the device leads to overheating of the winding and then short-circuiting the insulation. At the same time, the bushings begin to wear out rapidly, the rotor shaft breaks, the drive and even the flywheel crown are damaged. If the operation of the power circuit is disrupted, this leads to the starter losing its power, and an excessively high current literally burns out the brush assembly and armature commutator due to breakdown.
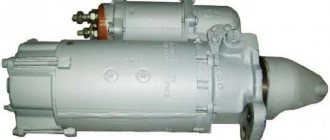
Selecting the ring gear and starter
First of all, we pay attention to the flywheel of the motor, it is the key for further work. Its rotation, when viewed from the gearbox, occurs counterclockwise, which means you need to select a starter that rotates in the opposite direction (clockwise). Here are the models that suit us:
- ST 353;
- ST 367;
- ST 369;
- From VAZ 2110 (21011);
It is also possible to install a starter in the Urals from a number of models suitable for imported cars. The problem with such starters is their high cost, which also applies to modern VAZ car models. Here, choose for yourself what is your priority - the cost of the part or the service life.
Pay attention to the presence of the casing and its orientation. The method of fastening the part and further ease of maintenance will depend on this parameter. Rotating the starter relative to its own axis is not advisable and can lead to its breakdown.
Now you need to pick up the crown. The crown is a gear lining on the flywheel that transmits the rotation of the starter to the engine through a gear transmission. The problem is that purchasing the part is quite problematic. A spare part from the Buran snowmobile, as well as more modern domestic motorcycles “Voyage”, “Cobra”, “Wolf” can be suitable for the size of the flywheel. The size of the teeth of the first ring is 2.5, and the modulus of the last three is 2.2. This parameter must be related to the starter module.
If the modules do not match, there are several options to solve the problem:
- We change the starter ring/gear to one that matches the module.
- We adjust the teeth of the existing starter ring or gear to the module.
- We make the starter ring or drive gear from scratch.
Photo gallery
Photo 1. Parts for the device
Photo 2. Intermediate disk of the crown
Photo 3. Installation of the device structure
Price issue
Speaking of price, we can say that modifying this vehicle is quite expensive. Installing the device will cost from 300 to 500 rubles. A new type of crown can be purchased for 2,000 to 3,000 rubles, and an intermediate disk for the crown can be purchased for 1,000 rubles.
Loading …
Starter fastener
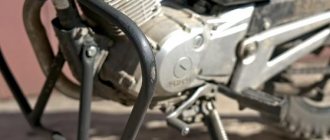
First of all, we determine the place of attachment of the element. The most popular is the upper left side above the flywheel. In this case, we will only be faced with the need to cut out a window for engaging the starter gears. It is difficult to install the starter in the center or on the right side, due to the need to redo a number of engine elements.
For installation, a hole is cut out under the Bendix casing. Next, measurements are taken, and the starter mount is cut out of a 4mm thick sheet of steel. This thickness is necessary to withstand the loads that the fasteners experience during operation of the starter mechanism. In a similar way, you can make not one solid, but a pair of fasteners. This way you can simplify the process of making fasteners, but adjusting the gaps will become much more difficult.
Advice. For greater solidity of the structure, it is best to secure the starter tail rigidly to the motor or grab it with a clamp.
The finished plate is secured with bolts or pinched with argon, then a trial assembly is carried out. Now you need to make sure that the gaps are set:
- the gap between the flywheel gear and the roller clutch is 2-4 mm;
- between the bendix and the crown is 3-7 mm.
Next, the flywheel is rotated, observing the coincidence of the pitch of the bendix and the ring. In this case, rotation of the flywheel is ensured using a kickstarter. Once you are sure that everything is working as expected, you can perform a test turn by unscrewing the spark plugs. If the starter rotates the flywheel without any extraneous sounds, then the plate can be permanently welded with argon.
Important! Welding of the gearbox housing is possible only after dismantling all rubber parts, installing the primary and secondary shafts and securing the cover with 4 bolts.
Electric starter
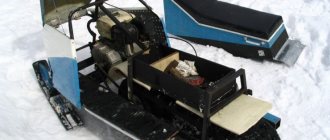
Well, I finally started writing this post.
I’ve long wanted to install an electric starter on my Bolivar, but either I’m not up to it, I don’t want to disassemble the engine, and during the rebuild I want to quickly assemble it and drive it. However, after an unsuccessful trip to Rostov, on the birthday of the Olen bike house, when I turned the crankshaft in Yaroslavl with all the consequences, I decided to finally give myself an electric start during this capital campaign. Despite the fact that the Internet is full of articles on this topic, they are all quite vague, plus I have not seen a single video where a “live” 650cc Ural was started with an electric starter. No, the video is complete, but they show some intermediate stages, like: “here I attached the starter, here I connect the wires to the Akum and it seems like something is turning, but the engine is still half disassembled.” Somehow I got distracted, closer to the topic. In order to install an electric starter, you need to buy a ring gear for the flywheel. Someone is remaking a crown from Buran (in my opinion), but I took a ready-made one, which is installed instead of the last clutch disc. Ring gear Together with the ring gear, a bracket for mounting the starter on the box was purchased. There are two such brackets, on top of the box and on the side. But, since I have a Ural gearbox, and the starter from the side looks, in my opinion, much more aesthetically pleasing, my choice fell on the side mount. Starter mounting bracket As a starter, a tens starter with a 9-tooth Bendix was recommended. But I had a starter from Oka lying in my garage, which, as it turned out, is almost identical to the ten starter, the only difference is in the starter cover. After going around several auto parts stores, I finally found the cover I needed, so with a slight movement of the hand (and unscrewing a couple of screws) the starter from the Oka was turned into a tenth starter, and at the same time, preventive maintenance was done and the gearbox was lubricated. Starter from Oka Difference in starter caps The starter we need Then the fun begins. Using the starter mount as a guide, a window is marked on the engine crankcase and gearbox, after which it is roughly cut out (not to size, of course), followed by a file adjustment to the required dimensions. Approximate window After that, only the ring gear was placed on the flywheel, the flywheel was attached to the crankshaft, a mark was made on the crankcase (taking into account that the flywheel would sit deeper) where the ring gear ends and the flywheel begins. A mark was also made on the starter cover where the bendix ends if it is pulled out to the end, after which the flywheel was removed and the holes were adjusted to finish. Estimation and final hole The centering bosses had to be cut off from the box housing, otherwise the ring gear would rest against them. I had to disassemble the air filter and cut off part of it so that the starter could fit into place. We also made two box mounting studs, which had to be made larger due to the fact that now the starter was also attached to them. After that, the flywheel and clutch assembly was finally installed on the crankshaft, the engine and gearbox were assembled, and the starter was roughly put in place. After fitting, there were small tests to see how the starter turns the flywheel, whether the teeth are torn off, whether there is any misalignment, etc. Starter fitting First tests
After I was sure that everything was going well, bushings were made to secure the starter at the required distance and at the same time press the box. Once the starter was finally secured, a second test was carried out to ensure everything was going according to plan.
Second tests
After this, the final stage of engine assembly began. Since there is no air filter now, I temporarily installed zeros. In the future I will install a starter filter from KBMTS. Final view of the engine Starter filter Well, now, actually, the finale. That's what this whole post was all about. Video of starting a Ural 650cc motorcycle using an electric starter. Engine just after rebuild. New crankshaft from Soviet stocks, aluminum cylinders, AT 78mm pistons, new heads. The video shows the second launch. I didn’t film the first launch, but it started up almost immediately, after which I let it run for 10 minutes, turned it off and decided to make this video. Enjoy!
Starting with electric starter
PS The only thing left is to connect the start button to the remote control via a relay. The remotes I have are not original, they have this button.
Only registered and authorized users can leave comments. Register or log in.
uralmotoclub.ru
Battery and alternator problems
After installing the starter on a Ural motorcycle with your own hands is completed, a couple of unresolved problems remain. First of all, a car starter requires a more powerful battery. The way out of the situation is to install an inexpensive battery on a new mount (from the side of the motorcycle. Everything will look quite rough, but it’s inexpensive.
Another way is to select an imported battery of a similar size with an increased capacity of 18 A/h. You will have to overpay quite a bit, but the appearance of the motorcycle will not suffer.
Finally, it turns out that the original generator is rather weak and is unable to charge a new battery. We’ll answer right away that rewinding will help increase productivity, but it will not be enough for our purposes. What should we do then? There are several options:
- generator from IMZ. There is a cheap model 14.3771, which fits perfectly, even without modifications to our motorcycle. Its biggest drawback is its terrible build quality. The generator often fails. The solution is modern models of the DENSO brand, which are equipped with these motorcycles.
- imported car generator. The problem here is its installation. If you choose to extend the shaft and install it through a faceplate, please note that all work must be performed with high precision. Also, such generators can be installed using a belt drive. The method has a lot of advantages, especially its unpretentiousness. All you need to do is monitor the condition of the belt and check the cavity of the generator cover for dirt every 10–15 thousand.
The disadvantages of such a modification are decreased engine power and increased shaft load. On the other hand, power can be increased in other ways, but engine load cannot be avoided.
Selection options
An electric starter in the Urals is installed after all the technical characteristics of the vehicle have been determined. Often, car enthusiasts take advantage of the opportunity, if available, and introduce models from a donor car - the VAZ 2109 and its modifications.
You can use a product from other foreign-made machines, but it will cost a little more. When choosing a part, you should also take a closer look at the crown of the device. If the diameter and pitch of the teeth do not meet the requirements, then you need to disassemble the structure of the device and remove the axial shaft with gears. Its teeth are worn down. The diameter expands from the inside so that it can be pressed onto the front side of the ground part. Then they are welded to each other.
Installation process
Assembly drawing of the electric start system:
- starter mounting part;
- crown;
- starter;
- clamp;
- starter rear mounting bracket;
- flywheel.
Do-it-yourself installation of the starter on a Ural motorcycle is done at the gearbox (often in the upper part). Installation can also be done on the left side , but in this case you will have to sacrifice the kick starter foot, or reconsider its design.
The first step is to mark the sample of the starter housing and gearbox. Then cut out the marked areas using a grinder or milling machine. Among the possible options for mounting the starter, the three most popular are:
- Using a solid steel or duralumin plate. Purchased or made independently, it must have a central hole and fastenings to the engine housing. The standard gearbox fixing spokes are replaced with elongated ones. When installing a starting device with a plate, washers and nuts should be selected of such thickness that when turned on, the bendex gear fully engages with the flywheel ring and similarly comes out of the clutch when turned off.
- Using two separate or one continuous (semi-monthly) lower duralumin clamp welded to the gearbox. In this case, to avoid deformation, all rubber parts from the gearbox housing must be removed.
- A solid duralumin plate is secured with 2 bolts and welded to the gearbox housing.
With any of these types of fastening, the load on the connecting plate is removed by fixing the rear of the starter to the motorcycle body. Next, with the device attached, the gaps are set for both the roller clutch with the ring and the ring with the starter gear.
Finishing
When the starter position is set, it must be removed in order to finally weld the flange to the gearbox housing. You can do this yourself, but you will need equipment for argon welding. Make sure all the parts are in place and start working. Remember that after welding the metal must cool on its own, since its forced cooling will lead to a significant decrease in the strength of the joint.
After the metal has cooled, assemble the starter on the flange and make sure that its gear does not move away from the ring even under fairly strong loads on the assembly body. Now you can connect the electric starter to the battery - during operation it should create a monotonous sound, and also rotate the gear without blocking or braking. In addition, it is worth checking how easily it engages and disengages with the crown. Unfortunately, installing an electric starter may interfere with the operation of the engine start pedal. Since it is not advisable to completely remove it, it is better to simply change the shape of the part, while maintaining a backup method of starting the motor.
DIY tuning
The starter installation procedure described above requires fairly good skill and special equipment. Therefore, if you do not have an argon welding machine or a lathe, you should find out in advance where you can use the services of professionals of the appropriate profile. All manufactured fastening parts and gears must have minimum tolerances, since the reliability of the installed electric starter depends on this. The starter itself must be in good technical condition - to make sure of this, it is worth checking the bushings and shaft. If all these conditions are met, the electric starter will serve you for many years, providing maximum convenience for starting your motorcycle engine.
Additional work
Since the standard electrical system of the Ural motorcycle, as well as the circuit of most imported vehicles, is not designed to operate equipment with a starter, modifications will have to be made to it. At the slightest drop in ambient temperature, starting problems may arise - the starter will quickly discharge the battery, which will force you to recharge it and subsequently use the pedal. Experienced motorcyclists recommend installing a battery from a Japanese car from the 90s on a two-wheeled vehicle. This battery has compact dimensions and a fairly large capacity - up to 65 Ah.
However, installing a large battery will entail another problem - the generator will not be able to charge such a battery completely, and the starter will again be unable to be used. To resolve this issue, you can use the following technical solutions:
Modifying the electrical network after installing the starter requires a certain amount of professionalism, since if the wires are connected incorrectly or if the insulation is insufficiently wound, you can simply burn the motorcycle.
Since the generator always loses some of its power over time, the starter may stop working again. To avoid such a problem, it is worth cleaning the brushes of the unit every 10 thousand kilometers, adjusting the clearance of its drive mechanism, and also eliminating minor faults. Also, every 5 thousand kilometers, inspect the wiring - if melted areas or breakdowns begin to appear on it, it is worth installing cables with a larger cross-section.