Winter is that time of year when everything around is covered with a “fluffy blanket” in the form of snow. Our country is located in a climate zone where we must be prepared for heavy rainfall every winter. Often snow falls completely unexpectedly and then traffic throughout the city stops.
Fortunately, in big cities there are metro stations where underground trains constantly run, on which you can easily get to anywhere in the city.
The situation is completely different in small towns and villages, where the movement of any transport is not possible during heavy snowfalls.
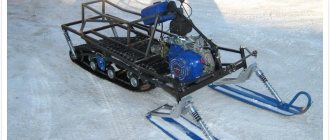
But even from such a difficult situation you can find a way out, namely, move on a snowmobile. Today we will talk to you about how to make a homemade snowmobile with your own hands.
DIY snowmobile
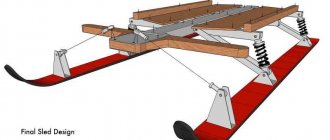
First you need to build the frame. For this you will need:
- Several wooden blocks.
- Drill with all accessories.
- Standard set of bolts and nuts.
- Hand saw.
- Several sheets of sheet iron.
Next, using a drill, you need to secure the sheets of iron on the bars. Afterwards, you can proceed to installing a pre-assembled engine with all the consequences.
We draw your attention to the fact that this vehicle will not be made in factory conditions, which means that you cannot be 100% sure about safe movement on such a unique vehicle. Be extremely careful!
DSA suspension
This suspension is characterized as the first long-travel system that was used in the construction of snowmobiles. To be more precise, it was installed on the F2000 and S2000 chassis. The shock absorbers and springs are located between the levers (arranged in parallel) and the chassis. The inclination of the springs and shock absorbers towards the central part of the snowmobile is maintained. Due to this, the travel of the suspension itself is greater than that of the shock absorber. The shock-absorbing system consists of a snow frame and a trailing arm to which two transverse arms are connected. Levers located transversely must have the same length. There are snowmobile models on which the length of the levers can be adjusted. This adjustment is relevant when it is necessary to overcome an icy section of the route. There is no point in adjusting the length of the levers when moving in deep snow. The disadvantage of this suspension is the lack of controllability of the snowmobile due to the horizontal movement of the skis.
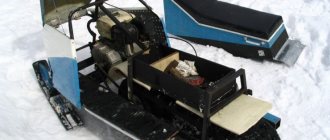
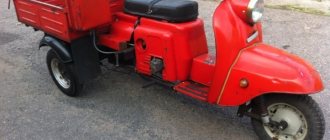
Snowmobile made from the Urals
Now you will learn how to make a snowmobile from the Urals with your own hands. It is worth noting that such a vehicle will be much safer than the previous option. This is due to the fact that 70% of the work will occur with already working parts.
The process of carrying out such work will occur in the following sequence.
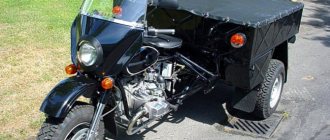
Remove the wheels from the motorcycle, and firmly fix the motorcycle to the frame by welding.
Next, you need to install the motorcycle with the frame on the already prepared snowmobile tracks and attach it to the pins specially designated for this.The entire remaining work process will be aimed at checking the quality of installation of the motorcycle, as well as the tight fixation of all bolts.
Like, such a snowmobile will be extremely effective when covering long distances outside the city in snowy areas. The comfortable steering of the Ural motorcycle will make the process of movement much more enjoyable.
If you are planning to make a full-fledged snowmobile from a walk-behind tractor, then we strongly recommend visiting many engineering sites and chats, where they will tell you how to make a snowmobile from a walk-behind tractor with your own hands, and will also give you a lot of really useful tips.
Types of drives and their design
Are there two drivetrains for snowmobiles? drive on pneumatic wheels and drive on tracks, we will talk about them below in detail.
In the case of wheel drive? Such a snowmobile can conditionally be called all-wheel drive, since both the ski and the pneumatics are support-control and driving. Its rear axle is designed extremely simply: a welded and solid drive shaft instead of the usual axle shafts, two wheels without a differential. This helps to maintain excellent control of the unit on excessively snowy and slippery roads. And to make turns perfect, the ski has two undercuts on the side, made of duralumin, 35 by 35 mm.
The large driven sprocket is welded to the hub, which in turn is mounted on the shaft. A pin-bolt helps her not fly off it. The most important thing: the plane of rotation of the sprocket on the output shaft and the position of this sprocket must coincide perfectly. The brake drum is also mounted there.
To tension the chain, the shaft must move and the housing must be secured to the corner extensions.
Pneumatics? These are cameras taken from the wheels of a tractor trolley, which are put on frame disks and placed in the bandages of conveyor belts. The longitudinal and transverse tires are fastened with bolts, which in parallel serve as lugs thanks to the high protruding rods.
The torque to the engine from the power unit is transmitted via a chain drive with a gear ratio of 3.5, where the sprocket, which is mounted on the rear shaft, has 28 teeth, on the front? 8 teeth. For this type of drive to work ideally, the engine must have a forced cooling system.
To make pneumatic wheels yourself, you need to complete four steps:
- two disks made of metal sheets must bridge each other. Afterwards they are attached to the sleeve, and then the camera is put on them. The latter can be fixed either with pieces of conveyor belt, or with protectors of another chamber;
- jumpers also need to be attached to the disks, onto which the side rings must then be welded;
- when installing the central disks, you will need a spoke made of a metal sheet or pipe;
- the two discs that are mounted on the hub should be similar to the discs of a scooter wheel.
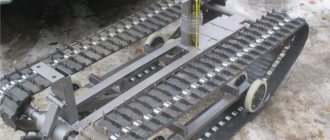
The all-wheel drive track consists of a belt that transmits forces to the driven one from the drive pulley. The body consists of spiral elements that increase its strength and add flexibility when moving. The side faces have a slope that corresponds to the edges of the pulleys, and the width of the top face is ? the width of the stream at the pulley. The axis of the driven shaft is parallel to the engine camshaft, and the driven pulley sits on it.
Belt drive? the most wearable, and the requirements for it should be the following:
- rigidity, otherwise it will simply burst during peak load;
- thickness, which is regulated. Otherwise, it must be replaced;
- The disk that drives the drive will also need to be replaced if signs of excessive wear are noticeable.
You need to choose a belt correctly and responsibly: if it is too short, the load on the drive will be extremely large, and if it is too long? will hang out. In addition, today there is a variable-speed belt, which has its own advantages:
- the belt does not stretch due to rotation of the pulleys;
- the cross section is an indicator of particular rigidity;
- temperature conditions that can be easily maintained by the belt? from -300 to +800 degrees Celsius;
- abrasion resistant;
- He is not afraid of heat or chemicals;
- high gear ratio and throughput;
- uniform load distribution due to resistance to distortions and displacements on the pulleys;
- high-speed transmission is carried out extremely accurately;
- works silently and for a long time.
There are several main rules for operating a belt drive:
- for approximately the first 50 km it is necessary to give half speed;
- the service life of the belt is extremely significantly reduced by the discrepancy between the rotation axes of the driven and driving pulleys or the shaft;
- wears out the gear shift belt at high speeds, that is, the required value? 3500?5000 rpm;
- If the belt is worn out, it means it is slipping somewhere. To correct the situation, you should check the tension of the pulley and either clean it, replace its worn springs, or check the seal of the bearing.
If we talk about drives in the language of motorists, then there is the so-called rear-wheel drive, the technology of which is still new on the snowmobile market, although it has already gained its admirers, because:
- fuel consumption is reduced by 72%;
- traction power increases by 71%;
- The speed of the unit increases by 10%.
Does it have three points of contact? This is the drive axle at the rear, part of the track at the front, and the runners. When distributing weight on any of the axles, it gives its advantages and disadvantages in operation.
On a front wheel drive snowmobile, the top portion of the track is tensioned while the rising portion remains relaxed. However, mention of drives is extremely rare in the description of snowmobiles, and their division into tracked and wheeled? comfortable and familiar.
Making a snowmobile using a chainsaw
A chainsaw is a universal tool for working with large wooden beams that are difficult to deform.
With this tool you can make a real snowmobile.
Let's figure out how to make a snowmobile with your own hands from a chainsaw. First of all, pay attention to the 2nd subtitle of the article, which indicates all the necessary materials for construction. So let's get started:
- Based on the dimensions of the future snowmobile, start adjusting the dimensions of the bars with a chainsaw.
- Next, using a chainsaw, we begin to cut out small parts that will be needed to securely fix the lower support.
- Next comes the same sequence of actions as already written earlier.
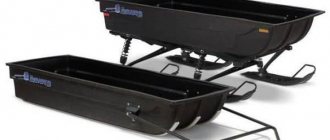
Load capacity
The same goes for carrying capacity. Of course, pike is a rather big fish. Specimens weighing 10-15 kg also feed in winter. And with a good bite from a decent pike, you can pick up 10-20 carcasses of 3-5 kg each during a fishing trip. And this, as arithmetic says, is from 30 to 100 kg of fish.
Another question is that a normal fisherman does not need such a quantity of fish. And the right pike people stop fishing when they have caught enough fish to feed themselves and their family.
In normal times, a pike snowmobile carries two riders and a load of gear. No tents, no food, no attributes of a permanent ice camp. However, if fishing is done with spoons and balancers, then the winter iron weighs no less than the summer one. This means that you can safely put 10 kg on each fishing box.
DIY photos of snowmobiles
How to fish with an elastic band correctly
I’ll tell you straight that even the mention of such gear as an elastic band, like a donkey with a rubber shock absorber, makes me smile nervously and have some semblance of micro-tremors. An experienced psychologist who can read gestures would clearly say that I don’t really like this tackle. And this is the honest truth.