Classification of children's snowmobiles
The electric children's snowmobile runs on rechargeable batteries.
Such power supplies do not require any maintenance other than periodic recharging. Self-discharge is completely eliminated due to the special design of the batteries. Some children's vehicles use gasoline engines as their power source. Different types of motors are installed on such vehicles. Children's snowmobiles with two-stroke gasoline engines are lightweight, easy to maintain, warm up quickly, and can run on cheap fuel. Four-stroke engines make less noise during operation. They have lower fuel consumption and a much longer working life.
Some motors have an air cooling system. It must be used correctly to prevent overheating. The hydraulic cooling system uses ordinary snow.
Injection engines have a number of advantages: stable operation, environmental friendliness and efficiency. They are not reliable and are not recommended for use in field conditions. It is advisable to refuel the engines in children's snowmobiles with unleaded gasoline to reduce harmful emissions and increase engine life.
Upgrading homemade snowmobiles
After riding a simple snowmobile assembled with your own hands, it is impossible to resist thinking about improving transport. First of all, you can reduce the influence of frosty wind. For this, ready-made fairings and windshields are usually used - for example, like the popular Buran:
On short winter days, the light from a motorcycle or car headlight will come in handy more than once. To make the lamp shine, you need a generator. For mini-structures, it is enough to install a bicycle generator driven by a motor gearbox. High-speed devices will require more powerful lighting.
There is no limit to perfection. Once assembled, the snowmobile can be endlessly equipped with new devices for performance, comfort and reliability. Many forums on this topic exist online, allowing you to share your own experience and take into account others’ experience in designing winter transport.
On caterpillar tracks
Track supports are used more often than others, simultaneously performing the function of propulsion. The reason is high efficiency and reliability. This design allows you to reach high speeds while maintaining stability and maneuverability. There are several options for how to make tracks for a snowmobile with your own hands:
- from a conveyor belt;
- from truck tires;
- from driving V-belts.
Plastic or PVC tubes no larger than an inch in diameter, sawn along the axis, must be bolted across the conveyor belt.
Even a child can handle such a lightweight device.
Old truck tires with winter tread can also be used as tracks if you cut off the sidewalls. They don’t need crossbars, but you will have to sweep the edges with fishing line in centimeter increments, otherwise the tire will quickly become frayed.
Drive belts, just like the conveyor belt, must be equipped with lugs. Several parallel belts, 2 or more, are connected to each other by transverse strong lugs, attaching them to the belts with rivets or with screws. The distance between adjacent hooks should be equal to the pitch of the drive sprocket.
Tracks made from conveyor belts or belts are often reinforced with chains
, which increases the reliability and durability of the propulsion unit.
These snowmobiles combine lightness with a reliable drive.
One of the varieties of tracked snowmobiles is a motorized dog, which was named after its resemblance to a sled dog. At the expense of maneuverability, the design was lightened, and the traction force also increased. But this is the most effective towing mechanism in the snow.
To change direction, you need to make significant efforts to shift the center of gravity of the motorized dog.
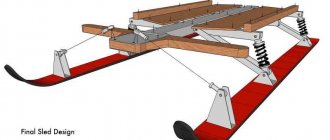
The basic dimensions for assembling a two-seater snowmobile, indicated in the drawing, will help make the ride comfortable. Other sizes will depend on the availability of spare parts and assembly diagram.
When driving, discomfort from headwinds is alleviated by installing motorcycle glass and mudguards for the feet. But it is impossible to completely protect yourself from the cold wind on such transport. For comfort, you need a completely enclosed cabin, which means the weight will increase and a more powerful engine will be required.
A snowmobile with a car engine is designed for long trips over long distances. With heat-insulating body material, the ride is comparable to the comfort of a passenger car.
And the easiest way to achieve comfort is to simply place a rear-wheel drive vehicle on wide supports such as skis, tracks or pneumatic wheel tubes, and also drive the standard wheels to the snowmobile propulsors and attach the front ski to the steering bipod.
During manufacturing, it would be useful to provide a replaceable scheme for replacing wheels with skis and back, if you use spare parts for the conversion.
How to choose the right children's snowmobile: recommendations
Choosing a children's snowmobile is not an easy task. However, it is quite possible to solve it if you initially select the most appropriate model taking into account the parameters.
Child age: for children from 3 to 13 years old
The simplest models are created for children at different rates of development. The main users of these devices are children and teenagers.
Design characteristics of snowmobiles for children
Design features. High-speed models intended for touring may be equipped with additional safety features. The most popular options use modern hand brakes.
Stopping the engine can also be done externally. In this case, a complete stop is carried out by a signal on the remote control.
Ski design: features
Design features of skis: the material from which they are made must be flexible and elastic enough, but at the same time strong enough to withstand all operating conditions.
It is important to consider the presence of all additional elements. In children's models, manufacturers often save on this
The damping system installed here must withstand heavy loads.
Housing material
It is recommended to avoid using elements that are too fragile. Polyurethane components, for example, become brittle at temperatures below zero.
The frame must be made of metal and be resistant to various types of damage and impacts.
Design
Models of children's snowmobiles are quite varied; here it is better to stick to a design that is easily visible in any lighting, as well as color: green, blue, red, orange, etc.
The presence of reflective components is an advantage in the design of the device.
Country of origin
The most reliable, as well as popular and new types are produced in America and Japan. However, you can also find the most budget models.
Manufacturers
Among all the available brands, models from a number of large and well-known manufacturers are considered relevant. Let's take a closer look at some models.
Yamaha
This Japanese manufacturer specializes in creating sports and road motorcycles, but is also quite successful in producing reliable snowmobiles.
The most popular model is the Yamaha SRX 120
with a gasoline engine. The snowmobile is equipped with a single-cylinder engine with a power of 3.5 horsepower and has excellent performance characteristics. An emergency shutdown module is included in the package. The equipment weighs 76 kg, fits easily into a car trailer, is reliable and maneuverable.
Snow Fox
A miniature solution and a budget price make this four-horsepower unit a good choice for a child’s first snowmobile trails. The design of the equipment is standard - with two stable front skis and a rear crawler conveyor.
The light weight of the snowmobile - only 37 kg - makes this choice optimal for family walks
. The budget price provides all the opportunities to purchase a fashionable device for a child.
Arctic Cat F120
A model renowned for its ease of use. Among the options here are heated steering wheel grips and an emergency braking system.
The model is quite massive and stable. It has a weight of 75 kg, a comfortable fit, and a body protected from external influences. The engine is single-cylinder, with a power of 3.8 horsepower.
Taiga RM Lynx
The children's snowmobile Taiga RM Lynx, produced by a Russian manufacturer, has all the advantages of modern motorized technology. It is compact and easy to use. The speed limit is set at 13 km/h
. In addition, he completely copies a similar adult model in appearance. This feature is a very compelling argument for boys who want to be like their parents in everything. The package includes a single-cylinder engine with 6.5 horsepower.
It is up to the parents themselves to decide which type of snowmobile to choose for their child. Almost all serious and modern equipment, regardless of the country of origin, today costs more than 1 thousand dollars. Cheaper models are significantly inferior to their expensive counterparts in class, reliability, and degree of security.
What it is?
At first glance, the design of a children's snowmobile is not too different from an adult's - there is a seat, an engine, and controls necessary for successful operation.
Technologically, certain very important points can also be highlighted here:
- the presence of a height-adjustable steering wheel;
- simplicity, safety and functionality of management;
- soft and smooth operation of the brake mechanism;
- limited engine power, which prevents strong acceleration;
- high stability associated with the location of the center of gravity in models at a low altitude from ground level.
A snowmobile for a child is generally similar to another popular winter device - a snow scooter. Only instead of a mechanical driving force, an electric or gasoline motor is used here. In addition, such models actively use various control options and more reliable brakes that can easily provide a quick stop.
The snowmobile itself is a vehicle designed to travel on snow. It is equipped with special runners that provide stability when moving on snowy roads.
Adjustment of the steering wheel in children's models is provided on an individual basis, which greatly facilitates the use of riding equipment for children of different ages.
All existing versions of snowmobiles produced for children can be divided into several categories, according to their technical characteristics and design features.
Children's snowmobiles with electric drive. They are equipped with a rechargeable battery that can maintain the operation of the equipment for a long time. They are environmentally friendly, low noise, and safe for children of all ages. When stored at home, such equipment does not emit harmful substances into the atmosphere. The battery is easy to replace after use. Such models practically do not require complex or expensive maintenance.
ATVs and all-terrain vehicles are a universal solution for any age. Recommended for year-round use. Hybrid solutions are equipped with a single chassis with replaceable modules. For example, the package may include wheels for summer driving. Rear tracks exist for use as an all-terrain vehicle. There are special skis required when operating in snowmobile mode. Hybrids are produced mainly in gasoline versions.
On gasoline. They are equipped with modern and reliable gasoline engines, are energy independent, but cannot be called environmentally friendly. Such models are recommended for use by teenagers and are equipped with quite powerful motor options.
Let's look at some features of battery and gasoline models in more detail. Electric, environmentally friendly models are most often developed independently or presented as a concept. Can be produced in limited editions. The batteries they use are usually powerful, similar to those installed in a car.
Maintenance-free solutions used in such an energy carrier minimize losses associated with electrolyte evaporation, which also contributes to a significant improvement in the overall environmental friendliness and safety of the equipment.
Gasoline children's snowmobiles are widely represented on the market in versions from well-known companies specializing in the production of motorcycle equipment. Such models are equipped with two-stroke or four-stroke engines and warm up easily and quickly even in the cold. The equipment's maintainability and ease of maintenance make them a good choice for winter skiing.
Gasoline snowmobiles for children typically use one of two types of cooling systems: air and water type. In the second case, the environment acts as a source of cold supply, namely fallen snow.
Model overview
Let's look at several popular children's gasoline models.
- Taiga RM "Lynx" . The first domestic unit of this type, designed for the smallest. This device will not carry more than 40 kg of load, and will not accelerate faster than 13 km/h. In fact, this is just a slightly improved sled, but at the same time very reliable, with a bunch of technical devices. The purchase will cost 80-90 thousand rubles.
- Yamaha SRX 120. Model from a manufacturer that has long established itself as an undisputed leader in the light motor vehicle industry. Everything here is done for the utmost convenience of the little driver - the mechanism is very easy to operate, has an automatic clutch, and even allows you to adjust the rear suspension. The quality and thoughtfulness of the unit are justifiably worth the 150 thousand rubles that are asked for it.
- SnowRunner Max 80. A budget snowcycle, the cost of which in domestic stores starts from a modest 40 thousand rubles. At a low price, it has a decent load capacity - up to 50 kg. According to the manufacturer, the unit is so easy to operate that it is suitable for drivers aged 4 years and older.
Assembly procedure
The procedure for making a simple version of drags looks something like this:
- Using 4 pieces of pipe, a metal frame is made for a rectangular base. Set the dimensions yourself;
- If the design will be used for cargo transportation, it is better to supplement the base frame with special cross members;
- Vertically located racks are mounted to the base;
- The number of racks used depends on the length of the drag itself;
- Basically, 2-4 racks are used on each side;
- Skis are made from pipes, this time plastic. I advise you to level them so that you get flat-shaped skis;
- The pipe, cut in half lengthwise, is straightened with a construction hairdryer;
- The heated plastic is pressed with something heavy to fix the new shape. Wait for the plastic to cool;
- Skids are mounted on the frame;
- It is desirable that the upper part of the ski runners be at the level of the frame and mounted to the edge of the base. Otherwise you will bury yourself in the snow;
- A drawbar and a lock for coupling with a snowmobile are mounted in the front part;
- A sheet of plywood is laid on top of the frame as a flooring.
This is interesting: What to do if you are bitten by a tick: simple recommendations from NTV
Then equip and decorate this variation of drags at your discretion. You can look for ideas on the Internet, or just use your imagination. Nobody limits you here.
I think I managed to answer many questions. If I missed something, comments are open. Write, ask or just share your opinion.
And I have everything
Thank you all for your attention! Subscribe, tell your friends about us and stay with us!. (4 ratings, average: 5.00 out of 5)
(4 ratings, average: 5.00 out of 5)
Polymer pipes are a universal material that is perfect for installing water supply, sewerage and heating systems in a house or apartment. However, in the hands of a home craftsman who has remarkable imagination and an insatiable desire to make something on his own, PVC parts can turn into quite intricate, but no less useful products.
For example, in a snowmobile sled made of plastic pipes, the manufacturing process of which will be discussed below.
You can make a sled from plastic pipes yourself
General rules of constructions
Homemade products for driving on snow are varied in appearance, size, layout, power, and even the principle of movement. But in each variety there are components that provide the properties necessary for snowmobiles, namely:
- Don't fall into the snow.
- Move along the surface with minimal friction and in the desired direction.
Obviously, the probability of sinking into the snow and the friction force depend on the weight of the unit, the contact area, and the shape of the surface of contact with the snow. Of course, the condition of the snow has its influence, but this must be taken into account.
To fulfill its main purpose, the following components are always present in the design of a snowmobile:
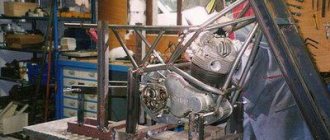
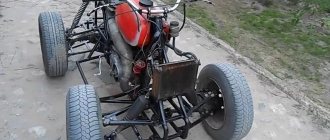
Making homemade products is simplified by the availability of parts from specialized equipment. Often spare parts are taken from Buran snowmobiles or any tools and vehicles with a motor - scooters, motorcycles, walk-behind tractors. The scope for creativity when creating each node is huge. There are many varied and proven solutions for every detail.
Snowmobile assembly instructions
To create a quality pneumatic snowmobile, you first need to think about a forced air cooling system. To create it, you just need to put a special extension with a pulley in two streams on the knee shaft. From this device you need to run belts to the generator and two fan impellers to ensure rotation.
You can quickly carry out these simple operations with your own hands. Next, you can proceed to creating a fuel pump device; it is better to place it on top of the oil pump cover drive; the fuel pump must be connected to the shaft of the oil structure. It is best to use a fuel container with a volume of 30 liters; it must be hung under the frame from the body, near the rear of the axle. An excellent option for a fuel pump would be the device from the ZAZ-965A.
Next you need to install the filter and carburetor. The air filter can also be borrowed from the ZAZ-965A, and the K-127 is suitable as a carburetor. The final stage of the design will be the installation of the ring gear; it must be mounted on the flywheel using an adapter. Don't forget to cover your homemade snowmobile with a hood; a galvanized steel sheet is perfect for this. You can create other elements for pneumatics with your own hands; wheels for it can also be homemade. Let us remind you that for this you will need:
- chambers with low internal pressure (wheels from a tractor trolley can be used);
- frame disks (sizes must be selected individually);
- bandages from transport belts.
Knowing the entire sequence of actions and instructions for constructing a snowmobile, you can quickly and easily make a budget vehicle for snowy roads!
How to make a snow scooter with a chainsaw engine with your own hands
To make a children's gas snowmobile with your own hands, you can take the motor from a chainsaw. For example, common options:
“Friendship” is simple, the device will be without unnecessary details. At the same time, the weight is 12 kg, and the power is small - 1 kW
Another disadvantage is that there are no safety covers, which is especially important for children. “Ural” - the weight is approximately the same (almost 12 kg), while the power is much greater - 3.6 kW. The engine is two-stroke and works even in cold weather. “Shtil” is a saw of medium power, but it is not so noisy
It does not produce strong emissions, which is also important for children.
Required materials and tools
To make a snow scooter with a motor with your own hands, you will need ready-made structures and installations: a gasoline engine, steering wheel, windshield, seat, chassis, shock absorbers. You can take a ready-made backrest for a snow scooter or make it yourself.
For work you need to prepare the following materials and tools:
- Welding machine with electrodes.
- Duralumin pipe D16.
- Bearings: 2 pcs. 16 mm each, 1 pc. – 10 mm.
- Plugs for plastic pipes – 2 pcs.
- Star element.
- Tracks 5 cm.
- Plywood, plastic or fiberglass (sheathing).
- Steel shafts.
- Pipe for frame with a diameter of 25 mm.
- Aluminum profile (letter “P”).
- Profile steel pipe with a cross section of 20*20 mm.
- Fastening elements (nuts, bolts).
Drawings and assembly diagram of a snow scooter
The easiest option is to take a ready-made children's snow scooter and mount the motor yourself. If you wish and have the necessary elements, you can assemble the structure yourself by taking the engine, steering wheel, making the chassis and other parts. You can take a ready-made drawing as a basis.
When assembling products with your own hands, you must follow safety regulations.
Step-by-step instructions for assembling a snow scooter with a motor consists of the following steps:
- First you need to make a frame. Using spot welding, a steel sheet 2 mm thick is connected in the middle of the entire structure. The chain drive shaft will be mounted here, as well as the gearbox.
- A seat is located in the middle of the frame. You can do this yourself - then you can save money on assembling a snow scooter with a motor yourself.
- The support base is fastened with a beam to the front axle crossbars. A water pipe with a diameter of 15 mm or more can be used as a connecting element. Bushings for the steering wheel are welded at the ends, and a stand is mounted in the middle.
- The next stage of assembling a snow scooter with a motor with your own hands is the stand. For installation, use steel corners with sides of 30*30 mm. They are connected by steel crossbars - 2 mm gussets are suitable for this. The motor will be mounted on this rack.
- The caterpillar is taken ready-made, for example, from the Buran snowmobile. The workpiece needs to be shortened by 50 cm. The caterpillar is secured with transport tape. And the gears are made from cardboard sheets 15 mm thick.
- The drive shaft is made of 14 mm thick pipe. The gears are fixed with the upper flange, and trunnions (tips) are welded behind the drive shaft.
- Now you need to attach the scooter motor. You can also do this with your own hands at home. To do this, take a working unit, weld it and mount it to the rear.
- To make sprockets, you need to take two tips, and the right one should be longer than the left one (to make a keyway that will fix the chain drive sprocket). The sprocket is secured with a pre-threaded nut.
- You can also make the snow scooter's steering wheel yourself. To do this, take a ready-made device from a bicycle or scooter. For proper installation, it is necessary to place it on the central axis so that the traction force controls the skis well.
- At the last stage, you can install a windshield, as well as headlights for illumination at night. It is not necessary to install the brakes yourself for a children's snow scooter with an electric motor or a gasoline engine, since the vehicle does not gain high speed. If necessary, you can always brake with your foot or release the gas.
A finished snow scooter with a motor, assembled with your own hands, is in no way inferior to the factory design
Design and principle of operation of an electric snow blower
Compact household snow blowers come in gasoline and electric versions. They differ from each other only in the way they are powered: the first ones run on gasoline, the second ones, respectively, on electricity. Read the article about electric snow blowers.
Principle of operation
The essence of the work of a snow blower is as follows: using a specially rotating device, collect snow, and then, using an outlet chute, forcefully push it in a given direction to the required distance.
Based on this, snow blowers are divided into single-stage and two-stage. The former use only the force created by the auger to push out snow, rotating at high speed. The design of the latter includes a special rotor, which stands at the entrance of the outlet chute and, rotating, pushes out the snow.
This allows the auger to spin at a lower speed, which prevents rapid wear and frequent breakdowns when hit by stones or other hard objects.
An auger is a device that crushes snow and “throws” it inside the snow blower. It is located in the front of the machine, at the bottom and is closed at the top and sides with a bucket body so that the snow is directed directly into the snow blower. The screw is usually made of metal.
It is a durable monolithic device that looks like a drill rig or a screw thread enlarged. Rotating around its axis, it grinds the snow and feeds it inside the snow blower.
Single Stage Snow Blower
If the rotation speed is high (as in single-stage types), then a solid object getting into the auger is likely to cause its breakdown. Therefore, in such cars it is covered with rubber on top (sometimes it consists entirely of rubber).
This feature allows the snow blower to move slightly independently when in contact with hard ground. In two-stage machines, the auger rotates at a lower speed, since it is not the rotor that throws the snow over long distances.
Such snow blowers can not only clear fresh snow, but also cope with compacted and frozen snowdrifts. The surface of a metal screw can be either smooth or serrated.
In addition, the snow blower has an engine, an outlet chute that regulates the direction and distance of snow throwing, wheels (sometimes tracks are used), handles for moving the snow blower by a person, and in the most complex models, a control panel.
More details about email. snow blower, watch the video below:
Snow blowers are divided into self-propelled and non-self-propelled. In the first case, movement is carried out with the help of an engine (more details here), in the second - with the help of the person himself (see Forte QI-JY-50).
Bicycle with engine from trimmer
A homemade bicycle with a trimmer motor is a high-tech vehicle that differs from simple analogues in its high riding speed, practicality and reduced cost due to the use of cheap equipment.
To assemble a motorbike, the following equipment is required:
- the bike is in working order;
- trimmer motor;
- chain;
- tensioner;
- star;
- clamp;
- cable;
- fuse;
- controller;
- exhaust pipe;
- bushing, bolts, washers.
- 2 rubber spacers are attached to the rear wheel: the first - between the spokes, the second - behind them.
- The sprocket must fit the trimmer motor. It is inserted into the bushing, which is located on the outer part of the wheel. A crescent moon is attached to the inside.
- The engine is mounted on the trunk or behind the seat using a clamp purchased or made from a steel plate with your own hands.
- Install the chain on the sprocket and power unit and adjust it with a tensioner. It is not recommended to use belts instead of a chain. Under the influence of friction, they often become unusable and their service life is minimal.
- The throttle handle and the engine are connected by a cable.
- Attach the fuel tank and carburetor.
- The exhaust pipe is welded with a weld seam.
Some craftsmen create a braking system and replace standard wheel tires with non-slip ones. After assembling all the components, be sure to check the operation of the bicycle. The functionality of the mechanism and its own safety will depend on this.
Motor sleigh
Motor sleighs are a foot-powered snow scooter or Finnish sled upgraded with a motor, or are made entirely from scrap materials found in the garage, or purchased at dismantling markets. Main components:
- frame made of metal pipes, welded in the image and likeness of a “finka” sled;
- a pair of old skis;
- engine and gas tank from a brush cutter, walk-behind tractor or chainsaw;
- a caterpillar, or a wheel from a car or motorcycle (a studded wheel from an Enduro motorcycle is excellent) and a chain, if the tire cannot be “tuned” with studs;
- a steering wheel for steering a sleigh, which can be a bicycle steering wheel, a steering wheel from a walk-behind tractor, or one welded by yourself;
- seat (optional): from a bicycle, scooter, or homemade in the form of a bench or stool.
The assembly should begin with the engine, connecting to it a chain, cables and tubes that will serve as the transmission of future snowmobiles. It is best to fix the skis on a low-moving, flat base - on the floor or table. Next, a frame with a steering wheel is attached to the skis, and a motor is installed. Before installing the seat, test the sled to ensure any imperfections are corrected. And the last place to put the seat, if provided.
Cultivator
For motorized tillage, make a cultivator from a trimmer with your own hands. The motor power must be at least 2 liters. With. When using an electric trimmer, you need to stock up on an extension cord so that the production process occurs throughout the entire area.
The main part of a motor cultivator is the nozzle. The rods of garden forks 10-15 cm long are suitable for this purpose.
The production of the part proceeds as follows:
- First you need to flatten the teeth to a width of 1 cm;
- sharpen the cutting blades for the cutters on an emery wheel;
- cut a ring with a diameter of 10 cm from a metal sheet using a jigsaw;
- grind the workpiece;
- Weld 3 cutters to a steel circle at an equal distance from each other.
If there is a reverse thread, the nozzle is screwed on after welding the pipe with the nut.
Motohoe
And also, in addition to a homemade attachment for cultivation, which, when paired with a lawn mower, can easily replace a light walk-behind tractor; You can turn the trimmer into a motorized hoe for weeding.
- To make the nozzle, you will need a thick sheet of stainless steel from which a circle is cut.
- In the center of the circle we make a hole for connecting it to the trimmer, and it is also necessary to drill small holes (selected according to the diameter of the bolts that will be needed later) along the entire plane of the circle.
- We secure the bolts into the holes with nuts.
Such a simple “hedgehog” will help any gardener in the fight against weeds.
Inflatable wheels
In terms of time spent, the second most attractive design after snow scooters and sleds is a homemade snowmobile made from a chainsaw on wide inflatable tubes from truck or tractor wheels. For strength, a uniform layer of liquid rubber is applied to their surface or another flexible and waterproof material is glued. Chains are placed around the circumference at equal distances from each other across the chamber or crossbars are firmly attached to increase traction. Wheel rims can be used for bicycles
, motorcycle or do it yourself.
If the inflatable structure does not have runners, then it will be able to ride on the ground even without snow. Frames can be installed on such all-terrain vehicles along with engines from Izh, Ural or Dnepr motorcycles. The disadvantages of the design are the dimensions, weight and high degree of vulnerability of the wheels, but this does not affect the popularity of high-speed homemade pneumatics.
Brake system
Typically, such a vehicle does not have a braking system, and it is not necessary, since a snowmobile does not develop high speeds, especially a homemade one. Although, if you take this problem seriously, you can build a primitive braking device.
It’s worth immediately noting that a homemade design, no matter what it is, is unlikely to be registered (legalized) with the relevant authorities. And therefore:
- According to the law, a homemade snowmobile does not belong to the category of vehicles. Therefore, its further use, as well as responsibility for the consequences, rests solely with the person who made it. It is better if it is operated somewhere in the outback and does not come to the attention of the relevant services.
- A snowmobile and an amphibious all-terrain vehicle are completely different vehicles, although they have certain similarities.
- Since the engine has low power, it is not advisable to transport cargo with this vehicle. It's better to travel alone.
- To travel at night, you can install lighting (headlights) on your snowmobile. This will increase the functionality of the device and comfort when moving.
Although small, it is a vehicle!
Homemade snowmobile, has rotating elements, gasoline engine. This vehicle can be dangerous under unfavorable circumstances. Do not leave children unattended. Provide clear instructions before use. Particular attention must be paid to the driver’s clothing - it is necessary to exclude untied shoelaces, long scarves and other things that could be “caught” by the caterpillar. Protect the front of the track with additional covers. And it is advisable to install a remote and mechanical “engine jammer” (like on jet skis).
Read also: Why tanks don’t start
Recommendations for use
First of all, you need to take care of safety. All structural elements must be securely connected by welding or fasteners.
It is advisable to inspect the device after each trip. Periodically, you need to carry out independent maintenance, taking into account the following recommendations:
- Treating the bumper and suspension with silicone spray.
- Checking the integrity of all elements.
- Shaking off snow after a trip.
- Storage in a garage, shed or other utility room under a thick cover.
- Before storing for the warm season, the technical product must be washed with a regular cleaning agent, covering the engine with film.
Best electric snowmobile for kids
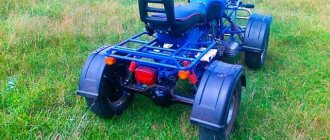
Model ML-50 Snow is the best snow scooter for children under 8 years old. The maximum speed of movement on such transport is 8 km per hour, so the transport is safe for a small child. The ML-50 Snow comes with additional pneumatic wheels, and the electric snow scooter turns into an ATV. The model has simple controls. The transport body is made of impact-resistant plastic. The width of the caterpillar mechanism is 15 cm, so the electric snow scooter moves freely even on a relief surface with a thick layer of snow.
Both suspensions are equipped with shock absorbers, so riding a snowmobile is comfortable for a child. The model has a motorcycle handlebar and an elongated seat that can accommodate 2 people with a total weight of up to 80 kg. Children's transport is equipped with wide fender liners for additional leg protection. The electric snowmobile can be used even in severe frosty weather.
Characteristics
- engine type: battery charged from the mains;
- the engine is equipped with a gearbox;
- maximum speed up to 8 km per hour;
- electric start;
- manual disc brake;
- shock-absorbed suspensions.
pros
- children's transport for active recreation 2 in 1;
- Suitable for children who have no experience driving a snowmobile;
- 2 children can ride;
- withstands extreme temperatures;
- ergonomic steering wheel;
- 2 hours of uninterrupted operation with a fully charged battery.