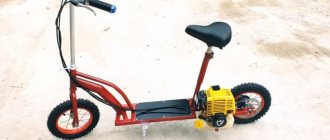
Based on the Ant three-wheeled scooter, you can assemble a full-fledged ATV. These two types of motorcycles have relatively similar characteristics. The only significant difference is the volume of the gas tank, as well as engine power. The Ant engine is equipped with a multi-disc clutch located in an oil bath. Gasoline is supplied by gravity, and a chain drive is also installed. The engine of this scooter is single-cylinder and has a power of 11 hp. With. The gearbox is four-speed, and the drive is supplied to the rear wheels. The gas tank has a volume of 12 liters, and the average gasoline consumption is about 7 liters per 100 km. This allows you to assemble an ATV from Ant, which will have characteristics no worse than the factory models.
So how to make an ATV from Ant? First you need to prepare the necessary parts and components. Most of them come from a three-wheel scooter, but some parts will need to be purchased or taken from a car. Work is most often carried out in a heated garage, where there is high-quality ventilation.
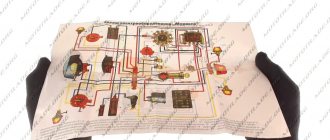
The tool set includes an angle grinder, a welding machine, and a set of hand tools. To assemble an ATV from “Ant” with your own hands, you will need to work out the drawings yourself. You need to create a diagram with an accurate description of all components, thinking through every detail. Drawings of a homemade ATV can also be standard. But before proceeding with the assembly, they need to be considered in great detail.
How to assemble an ATV from Ant?
To assemble an ATV, you will need to complete 9 steps:
- Purchase of necessary components and mechanisms, materials, equipment.
- Welding work, creating a frame.
- Installation of brakes, suspensions, shock absorbers, chassis and wheels on the frame.
- Engine installation, gearbox, drive assembly.
- Installation of the fuel tank.
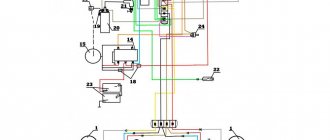
- Creation of an electrical system, installation of turn signals, headlights, battery, dashboard.
- Production of body kit.
- Finishing of the body, possibly the author's tuning.
- Installation of the body and seat.
You can assemble the frame from new pipes or use an old structure. If you plan to make the base from scratch, you should purchase pipes whose wall thickness should not be more than 3 mm. For the spars, blanks with a thickness of 25 mm are needed, and for crossbars and struts - 2 mm.
To assemble an ATV from the Ant scooter, you will need to assemble the pipes into a single structure using spot welding. If all elements are assembled correctly, the welding is complete. You will immediately need to attach the shock absorber lugs to the frame, as well as the levers. The brackets can be welded later, when components and mechanisms are installed on the frame.
To reconstruct a finished scooter frame, you need to remove all components from it. Pipes are built onto the bare frame from which the rear part is removed. After this, you can weld brackets and other small parts to install the corresponding components and assemblies. You will need to move the racks under the saddle 40-45 cm.
The structures of the rear and front trunk are created from a sheet of metal, which also need to be welded to the frame. The metal parts of the structure must be primed and painted.
Selection of systems
The brake system uses new parts or with minimal mileage. It is dangerous to install old brakes. The muffler is removed from the old car or made independently from a pipe. If a frame from another machine is used, it must be securely bolted to the bottom of the motor. The power unit is installed at the rear or front. Experts advise securely attaching the drive and transmission to the frame.
If the frame requires reconstruction, the component elements are dismantled. The front part needs to be extended onto the frame. At the next stage, the components of the frame are welded. When reconstructing the frame of a motorcycle, the seatposts are moved back by 40-45 cm. Racks are cut out of metal and welded, which are then fixed to the frame. The resulting homemade quad part can be painted with any paint.
To make your own frame, use a regular pipe with a wall thickness of up to 3 mm. It is better to make the spars from a pipe with a diameter of 25 mm, and the struts from a 20 mm pipe. The elements are fixed by spot and then solid welding. In a similar way, the ears from the levers and shock absorbers are welded to the frame. It is recommended to fix the brackets when installing other components and assemblies.
Engine
The Ant's lightweight engine makes the ATV maneuverable and controllable, but it is not suitable for transporting cargo. This all-terrain vehicle can be pulled out of the hole almost manually, which is made possible thanks to the presence of a lightweight engine.
The motor and transmission must be inseparable to ensure proper operation of the entire system. It is worth considering that older scooter engines did not have cooling, so it is recommended to add it yourself. You can remove this system, for example, from a VAZ engine.
ATV from "Ant": suspension
The suspension from a scooter can be used as a front or rear axle. The choice is made by the master himself, but the first option is preferable. The rear suspension can be done in two ways:
- Take the rear axle from an old car, and then shorten it to fit the dimensions of the ATV. The disadvantage of this design is its significant weight.
- Cardan-gear type design. A gearbox is mounted on the rear axle, to which the drive is supplied.
An ATV requires an independent suspension that will have high ground clearance. Its levers are fixed to the frame using bolts through silent blocks. The front suspension strut must be inclined, otherwise the ATV may roll over.
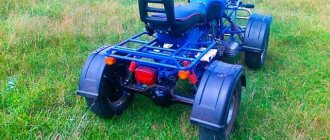
The following spare parts were used to manufacture the all-terrain vehicle:
- 1. Frame from the “Ant” scooter with modifications;
- 2. New engine 157QMJ;
- 3. Shock absorbers from motorcycles;
- 4. Standard reverse gearbox from “Ant”;
- 5. Electrical wiring from the maxi-scooter;
- 6. Electronic instrument panel: speedometer, tachometer, odometer;
- 7. Chain drive - chain and sprockets IZH;
- 8. Wheels - rear from an ATV 23x7x10, front - from a scooter 4x10.
Compared to a 150 cc ATV, this tricycle has certain advantages:
1. Double, not single seat. 2. Significantly higher cross-country ability. 3. The rear suspension is independent wishbone, like that of “adult” quads, and not a solid axle; 4. There is a differential, which ensures turning almost on the spot and excellent handling on hard roads even at high speeds; it is difficult to maneuver on a differential-free “quad”, and at the speed of a cheap quad it is also difficult to control; 5. It is possible to quickly change the transmission gear ratio to adapt to operating conditions, since the drive sprocket is from IZH, and there are a whole series of them with 13, 15, 16, 17, 19, 21 and 22 teeth. 6. There is a small box for 2 baskets for mushrooms. 7. A strong, durable Soviet cargo frame, and not the ever-bending and cracking Chinese one;
Steering, braking system
To create the steering, a steering wheel from a scooter is used, along with which it is advisable to immediately take a fuel tank. The shaft is made from pipes with a diameter of 20 mm, and a travel limiter must be mounted below.
After installing the steering control, you need to remove the corresponding parts to connect them to the lever, pedals and other structural elements.
The main element of safety for the driver and passenger of an ATV is the braking system. It is better to purchase this element new, since a worn-out mechanism cannot be considered reliable. As a last resort, the brakes can be taken from a car with low mileage.
Frame
Creating a case is one of the difficult stages. Suitable materials for this are fiberglass or fiberglass. Sheet metal can also be used, but an artificial body kit will weigh less.
First, a “blank” of the body is cut out of pieces of foam plastic, for which you will need to develop a preliminary drawing. Fiberglass is applied to the prepared form. There will be several layers, so metal fasteners are installed between them for subsequent fixation of the new body kit to the frame. To ensure that each layer is properly bonded to each other, they are additionally coated with epoxy resin. The body needs to be thoroughly dried, and then primed and painted.
After installing all components and connecting the systems, you need to check the functionality and run the vehicle, gradually increasing the load.
Read also: Battery for Toyota Vitz
The ATV perfectly combines the advantages of a motorcycle with its maneuverability and mobility and a mini-jeep with handling, maneuverability and power. But thanks, among other things, to high demand, buying such an SUV from a warehouse costs a lot of money.
To build an ATV with your own hands - what do you need for this, what components and assemblies, tools and materials? Which “donor” vehicle is suitable, from what components should the quad be assembled? Where to start the assembly and in what sequence should all the work be carried out? Let's figure it out!
How to make an ATV with your own hands is a difficult and responsible task, but feasible for a master who has mastered welding and turning. The effort and time spent are paid off not only by large savings, but also by the result obtained - an exclusive, original model of a quadric that no one else has.
Features of assembling a homemade vehicle highly depend on the chosen base - the engine and other elements that are used by the craftsman.
6 best options for a base (“donor”) for those who have set the goal of how to make an ATV.
- Motorcycle "Ural".
- Motorcycle "Izh".
- Motor scooter "Ant".
- Another motor scooter (scooter).
- Car "Niva".
- Oka car.
Most often, some structural elements are taken from a motorcycle, others from a car.
In addition to the parts (components) for the quadric, its creator will need:
- assembly “shop” - a fairly spacious garage equipped with good heating and lighting will be useful in this capacity;
- a set of equipment and tools;
- blueprints.
DIY ATV frame drawings
The false tank has a complex shape. It was not possible to bend it out of hardboard. Therefore, having wrapped the engine with plastic film, I began to fill the space intended for it with layers of polyurethane foam. After each layer, drying is mandatory, otherwise the thick volume of foam may not dry out inside. Filled until the layers went beyond the contour. Finally, after the foam had completely dried, I began to draw out the desired shape with a knife. The edges were smoothed with coarse sandpaper.
Part of the Oka dashboard was used under the instrument panel. I secured it to the blank also using polyurethane foam. Since the foam is large-porous, the pores were filled with gypsum and then processed. When the shape of the blank began to correspond to the intended design and its surface became more or less smooth, I coated the blank with PF-115 paint. Since I was not going to make a matrix for gluing the body kit on the block, but immediately glued the body kit on it, followed by finishing the surface to an ideal state, putting plaster and painting the block could be neglected.
So, the blockhead is ready and to glue a high-quality product, it was required: 10 kg of epoxy resin, 1 kg of plasticizer for it and 1 kg of hardener, 15 linear meters of thin fiberglass fabric, 5 m of glass mat, brushes, gloves. It is highly advisable to wear breathing protection. And the more expensive they are, the more reliable they are. But, as you know, you can’t buy experience, so I gained it in the process of work.
I used transparent tape as a separating layer between the block and the product. The whole idiot covered it with stripes carefully, without any omissions. It only took 1.5 rolls of wide tape.
Preparation for work, tools and equipment
First of all, you need to carefully consider when, where and for what purposes the future ATV will be used - hunting and fishing, motorcycling in nature, transporting goods, etc. It is on this basis that you need to make a choice of a “donor” vehicle, deciding how powerful the engine is needed, what kind of suspension is suitable, what kind of trunk, etc.
The suspensions, like the steering system, must be taken from the car. On the front it is necessary to provide space for installing the gearbox.
Installing an all-wheel drive model requires not only special skills of the craftsman, but also additional labor costs. The alternative is to buy a ready-made all-wheel drive unit - it costs money.
Frame
Making the body is far from the simplest stage of the story called “how to assemble an ATV with your own hands.” Suitable materials are fiberglass and fiberglass; it is easier to make a body kit from the second.
First, you need to draw, cut and construct a “blank” of the body from pieces of durable foam plastic, glued or fastened with polyurethane foam. Then apply several layers of fiberglass on it, coating each with epoxy resin and inserting metal fasteners between them to attach the body to the frame. In conclusion, dry the body thoroughly, then prime, sand and paint.
Front and rear suspension
Homemade ATVs are equipped with front or rear suspension. It is easier to mount a ready-made front suspension from an old motorcycle. You can use other options:
- Rear axle from the car. It must be shortened to fit the parameters of the quadric. The advantage of this method is the presence of a differential. The disadvantage of the bridge is its large mass.
- Cardan + gearbox on the rear axle. An independent suspension with high ground clearance is suitable for an all-terrain vehicle. In this case, the suspension arms are fixed to the frame using bolts.
Stages of assembling an ATV
To create a homemade ATV with your own hands, you need to go through 9 stages of work step by step:
- Acquisition and preparation of everything necessary;
- Welding (alteration) of the frame;
- Installation of suspensions, brakes, chassis, shock absorbers, wheels;
- Installation of engine, gearbox, drive assembly;
- Installation of the fuel system;
- Installation of electrical equipment - turn signals, headlights, dashboard, battery;
- Case manufacturing;
- Priming, sanding and painting the body, (if desired) sophisticated custom tuning;
- Installation of the body and seat.
After the final stage, the finished miracle of home-made equipment will need to be thoroughly tested, gradually making road (and off-road) conditions more difficult.
Gearbox and brakes
If the quad is assembled on the basis of a car, the chain drive is replaced. This greatly simplifies vehicle maintenance. A manual transmission is installed, as it improves maneuverability. The input shafts are directed to the front and rear axles. Wheels can be removed from small cars: Oka, Niva.
The brake system is selected taking into account the mounted wheels. The steering knuckles are removed from the Niva or Oka. To assemble an all-wheel drive model, you will need: car steering, transmission drive and differentials. In this case, the frame is not used. It is better to weld the structure to suit the engine size.
The suspension is also removed from the car. A gearbox is installed on the front-wheel drive model. The next stage is the manufacture of the body. For this you will need fiberglass, fiberglass. Experts advise using the first material, as it is easier to work with.
A drawing is pre-prepared and body elements are cut out from polystyrene foam. To fix them together, glue or foam is used. Fiberglass is glued to the foam. The resulting structure is attached to the frame. The body is well dried, primed, sanded and painted.
Tires of the required size are selected. If the vehicle will be used off-road, it is necessary to create the appropriate ground clearance (distance from the bottom to the surface of the earth). For this, R17 wheels are installed.
The resulting ATV is equipped with turn signals, headlights, a dashboard, and a battery. Electrical equipment is connected according to a pre-designed diagram. For this, wiring and a multimeter are used to check the voltage in the network. The next step is to install the seats. The vehicle is checked for serviceability, and the data displayed on the drawings is compared. A quadric, correctly assembled, is not inferior in technical and operational characteristics to finished vehicles.
Names and essence of the main stages of creating an ATV
- Construction of the supporting frame. Usually, when creating homemade ATVs, photos of samples of which are presented in the article, the frame is made of steel pipes and a metal profile. Often, the frame of an old motorcycle sitting idle in the garage is used as a supporting structure, to which a new supporting base is welded.
ATVs designed on the basis of Oka
For 20 years (from 1988 to 2008) in the vast expanses of our vast homeland, one of the most common cars was the domestic Oka (VAZ-1111, SeAZ-11116). Today, “Oka” is one of the most popular options for vehicles, on the basis of which home-made ATVs are created. In the manufacture of ATVs, the engine, gearbox, wheels and other auxiliary parts of the vehicle are usually used. Direct installation and construction of the ATV based on the Oka car is carried out in accordance with the drawings created by experienced designers. The defining moment when creating an ATV is to formulate the purpose of its use. Based on this, the future owner of the ATV opts for one of the two existing Oka engine options (35 hp and 53 hp).
Read also: Electric spray gun bosch pfs 3000 2 reviews
Tricycle characteristics:
- 1. Engine 157QMJ (same as the 150 cc quadric and maxi scooter) - four-stroke, 150 cc, 10 hp.
- 2. Transmission - CVT with automatic clutch;
- 3. Reverse gearbox from “Ant” - switching with a lever to the left of the passenger;
- 4. Wheels - rear from an ATV 23x7x10, front - from a scooter 4x10
- 5. Dimensions - length 2400 mm, width 1250 mm;
- 6. Weight - about 200 kg;
- 7. Load capacity (driver, passenger and cargo) - 250 kg;
- 8. Maximum speed - depending on the installed sprocket - up to 60 km/h;
- 9. Ground clearance under the gearbox 280 mm
- 10. Mechanical drum brakes.
Made with high quality, with calculations. There is an emergency engine stop button, an ignition switch, a sound signal, all the necessary lighting equipment (headlights, dimensions, brake lights, turn signals), an electric starter, and a 9 Ah battery. The controls are very easy and accessible even to a child. In fact, it is controlled only by the throttle handle. There is no clutch or gear shift. Good muffler.
It drives great through the forest, both on roads and between trees. It rides well on the track both along and across. It drives even in heavy mud - the main thing is not to turn the front wheel with the steering wheel. If the front wheel hits the dirt piled up in front of you, you need to back up half a meter, sit on the back of the seat, turn on the forward drive and sharply give the gas. The device lifts the front wheel and calmly “flies” out of the mud. Able to cross even fire breaks in the forest. This will not work on a rear-wheel drive ATV.
There are no problems with spare parts, since I only put in there what is sold in stores. The frame from “Ant” is completely eternal.
Author of the homemade product: Igor Igorevich.
Popular homemade products on our website
- Restoring the Ant scooter, installing…
- Do-it-yourself tricycle based on the Izh Planet-5 motorcycle
- Homemade ATV with a scooter engine
- Homemade mini car with a scooter engine
- Homemade tricycle
- Homemade all-terrain tricycle
- Homemade tricycle with a walk-behind engine
- Homemade tricycle with Lifan 18.5 hp engine
- Homemade tricycle mini all-terrain vehicle
- Homemade all-terrain tricycle with a walk-behind engine
- Homemade all-terrain vehicle based on GAZ-66
- Homemade all-terrain vehicle based on GAZ-63
- Homemade all-terrain minivan based on GAZ-66
- Homemade retro all-terrain vehicle based on GAZ-66
- Homemade all-terrain vehicle based on VAZ-2106
ATVs designed on the basis of the Ural motorcycle
At the moment, several decades ago, the popular domestic Urals in Russia have been replaced by much more nimble and economical foreign models. In this regard, many people have their recent best “friend” standing idle and rotting in their garages. But not a single Russian person is able to allow good things to go to waste. Therefore, “Urals” are increasingly used to create a type of transport that is relatively new for Russian people. This motorcycle is unanimously recognized by folk craftsmen as the optimal basis for creating an ATV. Homemade ATVs made from it are an order of magnitude more economical and have greater draft power than their factory-made counterparts.
The creation of an ATV based on the Ural consists of two stages: designing the rear part and the front. The use of the Ural gearbox when creating the rear part of the ATV will ensure the design not only strength, lightness, but also simplicity. In the end, the finished product will not be equipped with a differential, which, in essence, can be sacrificed in the name of reducing the time spent on its creation. As for the design of the front part of the future vehicle, it will take much more effort and time than the previous stage. Most of the work is finishing up the front arms of the ATV. This is due to the fact that they should be less rigid than a car, but more powerful than a motorcycle.
ATVs designed on the basis of the Ant scooter
For 36 years, the Soviets organized the production of Ant motor scooters. In total, over the years, 8 models have been produced, differing in gas tank volume and engine power. Today, the Ant scooter is an ideal base for creating an ATV with your own hands. In order to convert the “Ant” into an ATV, you should perform some fairly simple steps: slightly redesign the frame, work on reinstalling the seatposts, and so on. Installing the steering wheel and brakes of the future ATV will require special attention, continuous effort and time. When constructing homemade ATVs, it is strictly not recommended to use a brake system that has previously been used. It would be much safer to buy a new one. At the same time, the steering system can be used from an old Ant scooter or an Oka car. The final stage of creating an ATV from an Ant scooter is installing turn signals, headlights and stops.