DIY scooter with gasoline engine (33cc/4T)
Hello to those who like to make things, I propose for consideration a project for making a homemade scooter. The author used a motor from a gasoline trimmer as an engine for the scooter. An interesting fact is that this engine is four-stroke and needs to be powered with pure gasoline without oil.
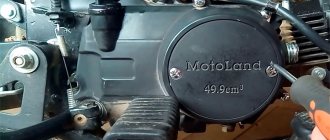
The only problem with such engines is high speeds; to solve this problem, the author used a reduction gearbox from an electric motor. The homemade product accelerates to 40 km, and the motor used here is not the most powerful, only 33 cc. If the project interests you, I suggest you familiarize yourself with it in more detail!
List of materials:
– engine from a 4T/33cc petrol trimmer;– chain drive;– gear motor;– brake system for a bicycle;– throttle handle;– bicycle stand;– small wheels from a children’s bicycle;– an old bicycle for spare parts;– profile pipes;– round pipes; – sheet iron.
Homemade manufacturing process:
Step one. Gearbox installation
The shaft speed of the selected engine is too high, and the torque is weak, since the engine used is not very powerful. To solve this problem, we need a reduction gearbox, which will allow us to obtain high torque and reduce speed. The author found the required gearbox in an electric motor, we disassemble it and remake the gearbox. The drive gear here is made directly on the engine armature, so we cut off a piece of the axle and now it needs to be installed on the shaft of the gasoline engine.
The motor shaft has a splined hole into which the trimmer shaft is inserted. We need to make the diameter of the rod cut from the anchor smaller; for this, the author clamps it in a drill and, thanks to the grinder, sets the desired diameter of the shaft. Well, then we drill a hole in the trimmer shaft, cut a thread for the screw, and make a groove in the installed shaft. As a result, we will not have to damage the engine from the trimmer.
The gearbox itself must be very firmly attached to the engine, since this is where the load will go that the engine will transmit to the drive wheel. We will need to make special brackets; we will fasten them with the screws that hold the gas tank on the trimmer, the clutch cover, and so on. We make the brackets from sheet iron of suitable thickness, bend them, drill holes and weld the nuts.
Step two. We weld the frame
Let's prepare wheels for the scooter; for this we will need wheels from a children's bicycle. We install a disc brake on the drive wheel, and also install a leading driven sprocket, the author has it on a ratcheting mechanism, so that the scooter will coast.
Based on the diameter of the wheels, we decide what length and width the frame will be, and then we proceed to assembling it. The author uses profile pipes as material. We cut and weld, and at the rear of the frame we make a fork for the rear wheel. For this we use two iron plates.
As for the front part, the author decided to use a piece from a bicycle. The frame was cut and the forks were cut to the correct length. We weld the frame at the desired angle to the scooter frame and now we have the entire frame almost ready.
Step five. Installing the engine and brakes
The engine needs to be secured securely; we manufacture and weld mounting ears to the frame. Well, then we fasten the engine with the same screws that hold the gas tank and other engine parts.
Be sure to install the brake; we have already installed the brake disc on the wheel. We weld a mounting plate under the caliper and screw the caliper with screws. That's all, after installing the chain, you can start the engine and see what speed the wheel develops.
Step seven. Painting and assembly
We clean the frame well with a brush attachment for an angle grinder, and where we can’t get to it, we work there with a hand brush. For the frame, you also need to cut out the bottom from sheet iron.
The frame can be painted, now everything looks beautiful, and it won’t rust. You can start assembling, install the throttle handle and connect the rear brake. As for igniting the engine, it is highly advisable to place the switch on the steering wheel so that you can quickly turn off the engine if something happens.
Homemade cars
Homemade automoto equipment
Do-it-yourself tricycle from a scooter (14 photos)
A simple homemade tricycle with a 6.5 hp engine: below is a photo and description of the trike assembly.
Hi all! The idea arose to create a tricycle from a scooter, the design is as simple as possible. The process of making homemade products is shown in these photos:
The rear axle is taken from a VAZ “classic”, the stockings are shortened to reduce the track.
The levers were made from longitudinal rods from the “classics”. I welded ears to attach the levers to the bridge and to the moped frame. The levers were bent by sawing.
I made a platform for installing the engine.
Let's try on a 6.5 hp Lifan engine, with a 2:1 reduction gearbox and a centrifugal clutch.
The front part and fork with the front wheel are from a scooter.
A chain drive goes from the engine to the rear axle.
The shock absorbers are also taken from a scooter.
The tricycle is assembled and working. I secured the plastic covering. I filed it where necessary. All that remains is to make protection for the chain and fender liners.
Watch the video:
Source
Tuesday, February 2, 2016
Electrical diagram of a Chinese 4t scooter 139qmb
Chinese scooter wiring diagram
Ignition wiring diagram for 4t scooter 139qmb.
In scooters with alarms, problems with ignition occur when the relay responsible for turning off the ignition fails. I had such a case. The scooter stopped starting. Using a brute force method, I replaced everything from the generator to the spark plug and the switch and ignition coil, but the spark never appeared. It turned out that the contacts of the same relay in the signaling system had burned out. To exclude this option, you need to remove one connector (the one with two wires) from the switch. On one wire relative to ground, the high-voltage winding of the generator should ring 350-450 Ohms. On the second one, ground-to-ground should ring when the ignition is off and not ring relative to ground when the ignition is on. This way you will prevent the alarm from breaking when you look for the reason for the lack of spark.
Connection diagram for a generator and a standard voltage regulator for a Chinese scooter
Checking the high voltage circuit
Malfunctions of the high-voltage circuit, often leading to complete or partial (interruption) failure of the ignition system, are mainly associated with damage, contamination or breakdown of the spark plug cap housing or breakdown of the insulation of the high-voltage wire.
As I already said: the current generated by the secondary winding of the ignition coil is very high and there are frequent cases when the current supplied to the spark plug makes its way around through cracks in the cap body or a layer of dirt, dust, or cracks in the insulation of a high-voltage wire. Which leads to complete failure of the ignition system. These malfunctions occur very, very often and in most cases lead to complete or partial (interruption) failure of the ignition system.
In order to check the high-voltage circuit, do the following: Unscrew the cap from the high-voltage wire; insert a thin nail or piece of wire into it; bring the nail to the metal motor housing at a distance of 2-3mm (This is important! The distance between the end of the wire and the motor housing must be 2-3mm, otherwise you will screw the switch) and turn the motor
- If a spark appears, it means the cap is broken - replace it with a new one.
- If there is still no spark, the high-voltage wire may be broken or damaged.
We check the high-voltage wire using a similar principle: Unscrew it from the coil and screw in any other piece of insulated wire instead (the wire must be insulated! Otherwise it will screw you up so hard it won’t seem like much!) wire, bring it to the engine housing at a distance of 2-3mm and turn the engine .
- If a spark appears, it means the insulation is broken or the central core of the high-voltage wire is broken - replace it with a new one
- If there is no spark, then by the elimination method the ignition coil is faulty - replace it with a new one
Ignition circuit components
The ignition circuit is an important part of the scooter's electrical system, without which it simply will not work without proper assembly. The circuit includes a coil, spark plug, switch, generator, CDI ignition module
The latter looks like a small block, on one side it is plastic, on the other it is filled with compound. It is for this reason that when a unit fails, it is completely replaced without trying to disassemble it.
The CDI module has outputs for connecting five conductors. It is usually located quite close to the battery, can be mounted on the scooter frame or have a special cell. Most often, the CDI unit is located closer to the bottom of the vehicle, so it is not easy to reach. Without this element the system will not work.
Relay regulator
The relay regulator is colloquially called a stabilizer. This element is needed in order to rectify the voltage and stabilize it to the required level, which is suitable for the operation of the scooter’s electrical appliances. In Chinese and many Japanese models you need to look for it in the front of the vehicle, usually under the fairing. During operation, the radiator of the part becomes very hot, so it is placed where it can receive air cooling.
During operation, the generator produces alternating current, which is supplied first to the relay-regulator, and then moves on. The relay converts alternating voltage to direct voltage, in addition, it stabilizes the voltage to 13.5-14.8 Volts. If the voltage is less, the battery will not be able to charge; if it is more, there is a high risk of failure of the electrical system.
The regulator usually has 4 wires. They differ in color; in a standard diagram, the green wire is always ground. Red is under constant voltage. White supplies the regulator relay with the voltage supplied by the generator: this is alternating current. The yellow wire also goes from the generator to the relay regulator. The relay converts the voltage, turning it into a pulsating one. After this, the voltage goes to lighting fixtures, which are the most powerful consumers. Some models have an illuminated dashboard, additional lighting, running lights or other types of suspension. All this is powered by the same wire.
It is impossible to stabilize the voltage that powers the lamps. It can only be limited using a relay regulator to a level of 12 V. Even when operating at low speeds, the generator produces an excessively high voltage, which is not suitable for operating lamps and other lighting devices. If the relay-regulator is faulty, the dimensions or lamps that will be turned on at that moment may burn out.
However, the device itself is not particularly complex. If you disassemble it, inside you can find a printed circuit board, an electronic circuit with a BT151-650R thyristor, a diode bridge for which 1N4007 diodes are used, one powerful 1N5408 diode, in addition, there are wiring elements that include the following: low-power SMD transistors, capacitors electrolytic, zener diode and various resistors. It is this simplicity that leads to the fact that the relay often cannot withstand heavy loads and breaks. Therefore, it doesn’t hurt to have a spare one and carry it with you: it changes quickly.
Electrical wiring
Properly connected wiring made from quality wires is important in any vehicle. You can buy a ready-made one or assemble it yourself, but it is recommended to follow the colors, this will help you figure out what goes where if repairs are necessary.
Ignition switch and its features
All of the above elements of the ignition system are combined into one system, which is controlled using the ignition switch. This part has a key for convenience. Essentially this is a switch that can be placed in different positions.
Most often, the lock has three operating positions, since it is universal for a large number of equipment, but two positions are usually used in circuits. The first position causes the red and black wires to short, allowing voltage to flow from the battery into the electrical circuit. Afterwards you can use the starter and start the engine. The second position, on the contrary, interrupts the circuit, which leads to the battery being disconnected and the engine turning off. If the lock is faulty and you need to start the scooter, you can simply connect the two wires together.
What is this design?
Essentially, a walk-behind tractor is a modern version of a horse. When living in a village, it is an indispensable unit.
It often happens that it is not possible to drive a tractor onto a personal plot to plow the land due to its large size. The walk-behind tractor is capable of working in the most inaccessible places and even processing plots measuring one square meter.
One of the main advantages of this device is its minimal fuel consumption. As a rule, a full tank with a volume of 4.8 liters is enough for half a day of work, and sometimes more. Considering that many types of work on the land have to be done with your own hands, such a unit is indispensable in agriculture. Digging, hilling, surveying, planting and digging up potatoes can be safely entrusted to his steel shoulders, saving a lot of time and effort.
Such a factory-assembled device costs from 30 to 200 thousand rubles, ranging from Chinese manufacturers to powerful diesel engines from BMW and Toyota. A cheap Chinese option can fail at any moment, and purchasing a unit from famous companies is expensive. It is much easier to use old equipment as a donor and, having purchased some spare parts, assemble the walk-behind tractor with your own hands. It will be cheaper even than the Chinese version.
Work that can be performed using such a device:
- Transportation of goods, maximum load 250-300 kg. To do this, a trailer with a seat and space for transported weights is attached to the hitch of the walk-behind tractor.
- Plowing and harrowing using a milling cutter, cultivator and harrow.
- Planting both potatoes and any other crop.
- Fertilizing the soil.
- Hilling.
- Harvesting potatoes.
With a wide selection of optional equipment, this unit can be used for sweeping, drilling and snow removal. To install one equipment, you will need a hitch, while the other is connected directly to the gearbox.
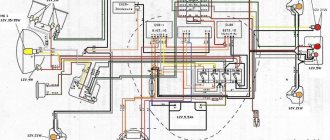
Delta moped wiring diagram china
The electrical circuit diagram of Chinese scooters is shown in the figure:
As with other electrical connections, there is a common wire on all cube mopeds. In this diagram it is the negative tire running along the entire body. The corresponding battery terminal is also connected to the scooter's frame, ensuring that each electrical component's ground is in constant contact with the power source.
Electrics and electrical equipment of a scooter
The main components in the 4t moped circuit are:
- central locking;
- battery charging source – generator;
- voltage limiter;
- spark formation and control systems;
- control elements for headlights, brake lights, turns;
- fuel level indicator in the tank.
Depending on the modifications and dimensions of the scooter, the instrument panel may include a tachometer - a device for monitoring the number of engine revolutions.
All of the listed nodes of the general scheme perform a strictly assigned role. Failure of at least one of them leads to the cessation of operation of the connected devices. Therefore, monitoring the serviceability of the main elements must be done every certain period for the purpose of prevention.
Generator
Owners of 50cc who are familiar with the design of the scooter will immediately understand the purpose of this device. It produces an alternating electric current that powers the moped when the engine is running. But the second main task is to charge the battery while working. That is, the battery ensures the operation of the devices when the engine is turned off, and then the generator takes on this task.
The connection is made according to the following principle. There are several wires coming from the generator. The negative tire is attached to the frame of the scooter. There is alternating voltage on the white wire, which is immediately sent for rectification and stabilization.
In the electrical circuit, the yellow wire powers the low and high beam lights. Additionally, a Hall sensor is located in the generator housing. Its task is to generate impulses to control sparking. It is not electrically connected to the generator; it is connected to a white-green and red-black wire. The sensor is connected to the CDI block.
Types of tuning
The first type of scooter tuning is styling, that is, making changes to its appearance and design. Currently, there is a huge assortment of different parts for styling: lights on each side, frame fairings, turn signals, various body kit options, mirrors, parts for changing the frame structure and many other useful devices. Naturally, you can rebrand your appearance using such diversity with your own hands.
The second type of tuning is making changes to the engine and ignition system of the vehicle. This process includes increasing the volume and modernizing the cooling system.
The third type is changes relating to the scooter’s transmission and chassis. We include here tuning the brakes, gearbox, suspension, clutch, and variator.
Two ways to start a moped with the ignition key
First, you need to make sure that there is gasoline in the gas tank. Now you need to put the moped on the stand and turn the ignition key to the “on” position (sometimes marked in English with the letters “on”). If everything is done correctly, the panel should light up and the needle on the speedometer will rise and fall. Then fold back the kickstarter foot and press it sharply with your foot, continue until the engine starts. This method of starting a moped always works; for the most part it is used when the battery is very discharged. Also, after winter, the moped needs to be started only with a kickstarter, since the battery could have lost a lot of charge.
The standard way to start a moped
If there is gasoline in the tank and the battery is normal, then starting is usually done with an electric kickstarter. Be sure to turn the ignition key to the “ON” position, then hold down the brake handle, and only then can you press the start button. Do not release the brake until the engine starts.
Walk-behind tractor: device
The thematic unit is a wheeled chassis on which an engine with a power of up to 14 hp is placed. The motor is powered by diesel or gasoline to set the chassis speed through the gearbox.
As a result, the user of the walk-behind tractor effortlessly pushes the equipment forward, holding it by the handles. The latter houses the start and speed buttons.
The chassis of the walk-behind tractor consists of two wheel axles with thick tires. In winter, it is better to equip tires with chains so that the unit does not slip on snow and ice.
But for better maneuverability on wet ground, it is recommended to replace axles with tires with metal lugs.
An alternative option is a caterpillar track. But then the question arises: “how to make tracks on a walk-behind tractor with your own hands and what materials and means to use for this?”
To make themed caterpillars, enthusiasts use:
- Conveyor belt and links cut from a profile pipe;
- Split tires from cars and other transport equipment.
What is a voltage regulator used for?
The relay regulator stabilizes the voltage of the scooter generator at the required level, not allowing it to increase or decrease the value above or below the norm. This prevents on-board voltage surges from going beyond the established limits (depending on the boards this is 12-14 V) and ruining the work of consumers whose service life is designed to be no more than 13 V.
That is, this part takes on the impulses that arise during the operation of the scooter (turning on the headlights, the starter button) and transfers the resulting thermal shock to itself. In this case, all the heat that could settle on the contacts is generated in it and removed through the device.
Moped manufacturers install charging relays with different parameters on scooters and select them individually for each. Depending on the regulator circuit, the connectors also differ. Chinese models usually have 5 terminals (male), while Japanese models have 4.
How to check PP with a multimeter on a moped?
The relay regulator on a Chinese scooter is checked using a multimeter with a voltmeter function. For this purpose, a simple DT-830 (or equivalent) is usually used. It is better to carry out diagnostics and measurement of output voltage with the device removed.
Verification algorithm:
- You need to unscrew the fairing with the central phase and find on the frame a device with 4 wires: red, green, yellow and white.
- Then start the scooter and check the voltage at idle: measure it between the green and red wires, setting the multimeter to the maximum value of 20 V.
- If the multimeter display shows a figure of 14.6-14.8 V, this is normal. For stabilizers on Chinese mopeds, this is the operating standard voltage. If at idle the multimeter shows a value of 15-16 V, this is a high voltage indicator. This indicates a malfunction of the relay regulator.
- Then you need to check the voltage supplied to the lighting lamps. An alternating voltage is supplied to the central low beam (high beam) lamp, so the multimeter should be switched to the alternating current measurement mode with a parameter of 20 V.
- Next, we measure the voltage between the green and yellow wires (green is the general electrical network of the moped). If the multimeter shows a network voltage of up to 12 V, then the electrical appliances are operating without additional load.
- If at idle this value is 16 V or higher, and with a sharp increase in engine speed it jumps to 25 V, the device does not stabilize the voltage and, therefore, does not work. With such readings, the device must be replaced with a new one.
Using a multimeter, they check the relay regulator on a Chinese scooter.
In order to make a measurement, you need to:
- switch the device to the “KiloOhm” mode and remove the regulator;
- then place the probes on the first pair of terminals (AB). The tester should show a value of no more than 18 kOhm;
- after that, we change the position of the probes on the terminals in the opposite direction (VA) and measure the voltage again - the arrow on the device should show 0;
- then we install the probes on the next pair of terminals (SD) and measure the readings on this pair;
- swap the probes (DS) and measure the indicator again;
- the remaining measurements have no contact and are not checked. The indicator when checking them should be zero.
In this way, regulators are tested on popular Japanese models with small engine volumes from brands such as Honda (Leard, Dio, Tact), Suzuki, Yamaha.
Replacing a faulty relay regulator on a scooter is not difficult.
We adjust the contactless ignition system
The contactless system operates through a sensor, switch, primary and secondary ignition windings. When the rotor with magnet closes the sensor, it sends a signal to the commutator, which, in turn, begins to accumulate current from the generator and transmit it to the primary winding. At this moment, high voltage appears in the secondary ignition winding. Its purpose is to ignite the spark. If there are any malfunctions listed above, adjustment is carried out by simply aligning the crankcase and ignition marks; to do this, remove the valve cover. The next steps are:
- We disassemble the crankcase in accordance with the technical description for your car.
- A mark is made on the rotor and crankcase at the dead center position of the engine in a place convenient for viewing.
- By rotating the crankshaft, we achieve a spark, make a mark on the crankcase relative to the mark made on it in the MTD. The difference between these marks on the crankcase is the ignition timing.
- Unclench the stator mounting bolts and set the advance angle corresponding to the technical documentation.
It is important to ensure that two of the three holes in the gear for the chain are at the level of the cylinder, and the remaining one is above the plane in which the cylinder and the mentioned holes are located. The alpha moped has a reliable ignition system, but it can also break; you should not put off this breakdown and ride on a faulty moped
You just need to try setting the ignition. You can set the ignition yourself if you have special tools and minimal skills. If this is not the case, then it is best to contact a specialist.
The Alpha moped has a reliable ignition system, but it can also break; you should not put off this breakdown and ride on a faulty moped. You just need to try setting the ignition. You can set the ignition yourself if you have special tools and minimal skills. If this is not the case, then it is best to contact specialists.
Where to start assembling a motorcycle with your own hands?
You can also create wheel rims with your own hands. Still, why “reinvent the wheel” if many compatriots know from practice how to make a motorcycle from the Urals or Dnieper MT, using the frame, engine and electronics of the latter. By adding other unique nodes to them, you will clearly get an iron horse that is unlike any other.
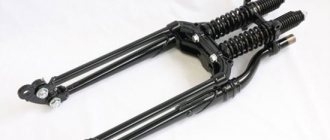
Having installed an extended fork (preferably adapted for a front disc brake), homemade traverses (created using a steel sheet with a thickness of several tens of millimeters), the bike’s handlebars are mounted using brackets. The brackets are also used to mount the rear shock absorbers. They are considered a secure base for holding the seat back. Here you can fix various panniers and the trunk of the bike.
How to assemble a complete homemade motorcycle
Also make sure that in the future your homemade bike can be placed on a leg as easily as possible when parked. For these purposes, it is better to choose a side knife, which is mounted on the left side member of the frame and has the ability to easily recline in the presence of a spring.
The steering wheel should be attached not only to rear-view mirrors, levers, cables, but also to various electrical appliances, which can be purchased together with the body in many places. The devices that look most beautiful are those placed in chrome-plated boxes/cylinders.
You need to know how to make a motorcycle with your own hands as correctly as possible even before installing the throttle handle on the steering wheel. The latter should be made with small turned rubber rings.
Don’t forget about installing turn indicators on your homemade bike. Their absence on a motorcycle can lead to various dangers on the road. You can supplement the classic set of lighting devices (headlight, stop, turn signals) by installing small flashlights near the front headlight. Additional safety will be provided by installing safety arches on a homemade iron horse.
It is important to remember: when making a motorcycle with your own hands, make sure that in the future you will be able to register it with the road control authorities. Any major changes in the design of the bike must be registered with the traffic police/traffic police.
Backlight
An excellent option for adding individuality to your scooter is to install additional lighting. The most common type of implementation of such an event is the installation of LEDs. The main positive point in this process is the minimum energy consumption that is necessary for the operation of the diodes. They can also be mounted on wheels. And on the dashboard, and even on the headlights. The LEDs under the bottom of the scooter look no less original. At night, they can be used to additionally illuminate the road. And it will be easier for other road users to see the scooter rider.
A good option for external tuning is to replace the front headlight with a more advanced and brighter one, which together with the installed LEDs will look very impressive. Many scooter owners immediately after purchasing a vehicle try to replace the factory mirrors with darkened or tinted counterparts.
There is no need to be afraid of experiments, especially now, when you can find any structural element or part on store shelves. But you shouldn’t forget about a sense of proportion.
Source
Method for Alpha mopeds, Japanese mopeds and scooters
The method is to disable the switch, but it only works on scooters and mopeds from Japanese and, sometimes, Chinese manufacturers.
To disable it, you will need to remove the ignition switch protective shield. Under it there are 4 wires according to the standard, white, black, red and green - these wires supply power. The remaining wiring is the switch; after disconnecting it, the moped can be started using the kickstarter.
Attention! Be careful as removing this wiring may turn off all other wiring on the moped (turn signals, headlights, etc.)
You can see more about this method in the video:
Tuning options
It's no secret that changes to the appearance of a scooter are made in order to give individuality to the exterior, as well as to make traveling on a scooter more comfortable. As already mentioned, tuning can be divided into several types: external and internal. Using the first option, changes are made to the characteristics of the vehicle, thereby improving its driving properties; in the second case, they give the appearance additional elegance and uniqueness.
How to set the ignition on a Honda Dio When choosing, pay attention to the presence
Ignition on Audi Alexander Category: Setting the ignition of the Audi 80 is carried out according to 3 marks: Then, designed specifically for asphalt, the car, along with certain basic cars, began the new era of parquet jeeps. For the base we took the Honda Civic, and the name of the car itself stands for Comfor. 2 Honda Dio 27 fit the ignition coil. How to set the ignition Look at the color of the commutator wire, you can find it in the commutator connector.
Remove the protective cap from the ignition switch. Select the wires that go to the ignition switch.
The wire that matches the color of one of the wires that goes to the switch is the wire silencing the scooter. It remains to determine the purpose of 2 wires - from the electromagnetic sensor and from the supply coil.
The black wire with a red stripe is usually from the electromagnetic sensor, the second is from the supply coil. The ignition timing on the scooter does not start. Honda Dio 27 won't start Video.
How to set the ignition on a Honda Dio scooter
Scooter ignition system, diagram, operation, clearly, in simple language - accessible to beginners. Knowing the principle of operation. Elsheep-Team Honda Accord 8. In any case, it is positioned that way.
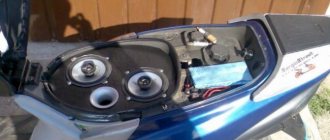
One of the standard configurations has a very extensive audio system.
How to correctly adjust the ignition on a VAZ Most car owners who have a VAZ car may have encountered difficulties associated with the correct operation of the engine. A common problem is that turning the engine key starts it, but the engine does not respond correctly to idle ignition.
How to start a moped from a pusher
While there are two main ways to start an engine, there are many other options as well.
With a rope
The first step is to get to the generator, which is located on the back side, in any way that is harmless to the equipment. We find the impeller there - you need to wrap a rope around it 5 times clockwise, to do this you can tie a knot at the end of the rope and insert it from the very beginning between a pair of blades. And then you will need to pull it hard, you may not succeed the first time, so most likely you will have to make several attempts.
You can learn more about this method from the video:
From the pusher
People have the opinion that if a moped has a CVT, then it cannot be started in this way. In fact, this is just a myth; experts have carried out tests many times - nothing bad will happen.
For this method to work, you need to get to the clutch bell; to do this, carefully remove the protective cover of the variator. Next, we will need to lock the bell and clutch together. This is done as follows: take the nut from the variator protective cover, and then insert it with force so that it is fixed there. To implement this method you will definitely need an assistant. He will push the moped, and you must press the variator strap at the right time during acceleration, so you will be able to turn the wheel. When the engine starts, the nut will fall to the ground by itself, so you won't lose it - no need to worry about that.
Manufacturing stages
Making a tricycle from a scooter with your own hands begins with cutting the bicycle frame. It is most convenient to cut metal using an angle grinder with a cutting wheel. The mounting points for the bearings are drilled with a crown. Then comes the time to form the frame, and after that you will need to make a plate that will attach the engine to the frame. An alternative solution is to use moped and bicycle parts.
The very first step in this option is the manufacture of bearings and mounts for the rear axle. Such fastenings are usually a pair of brackets. To prepare them, steel plates are used, cutting grooves that exactly match the diameter of the axis. They provide a pair of holes where the bearings are secured. When making a homemade tricycle, only one pipe is taken from the bicycle, which previously ended in an axle with pedals.
The points where the welds will pass are cleared of paint in advance using an angle grinder. The next step is to assemble the rear frame segment, which holds one axle and the motor. Some amateur craftsmen simply weld plates and square pipes. It is worth noting that you will definitely have to work on a lathe. This is necessary to secure the sprocket and brake disc.
If you don’t have your own machine, or there are fears that instead of improving the machine, the opposite effect will occur, you should contact an experienced turner. The sprocket is usually taken from motorcycles or mopeds. Its value is directly proportional to the speed that the tricycle must develop, as well as the engine power.
A hole must be bored in the sprocket, the size of which exactly matches the diameter of the axle.
The next step is installing the brake pad. Hydraulic brakes are most often used. You will have to place a strong plate under the pad, welded on the disc side. At the front, a classic bicycle brake is usually used, complemented by a metal cable.
Next steps:
production of exhaust system;
installation of seats, exhaust pipe and electrical components;
When analyzing the drawings, you should first of all pay attention to the circuit diagram of the tricycle. The main parts and layout of the device are shown here. And here are some sizes:
the distance between the centers of the rims is 1.23 m;
Let's summarize:
- If power (pulse) is supplied to the coil, but there is no spark, we check the ground and the high-voltage circuit.
- If everything is in order with the ground and the high-voltage circuit, then the coil is faulty.
- If there is no voltage (pulse) at the coil terminals, measure the voltage at the switch.
- If there is voltage at the switch terminal, but there is no voltage at the coil terminal, it means there is no ground on the coil or the wire connecting the coil to the switch is broken - we look for ground or break and fix it.
- If there is no voltage on the switch, then the switch itself or the generator, the induction sensor of the generator or something else is faulty.
That's actually the whole technique. I've been testing coils using this principle for several years now. And it only takes me a few minutes to complete a complete check with almost one hundred percent accuracy. Of course, this technique may seem complicated to many of you, but in fact it is not entirely true. The main thing is to understand the principle, the rest will follow.
Motoblock based on Izh engine, it’s real
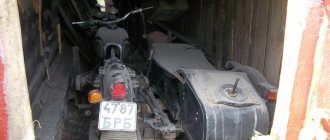
5 years ago I made a walk-behind tractor based on the Izh Planeta-3 engine, with a gearbox from Murovya. I thought for a long time after the snowmobile, there was no money, but I had to work in the field, so I came up with an idea and did it in 2 months, because almost everything was at hand. When fishing, running errands, and in the field, he became my indispensable assistant. Transport speed reaches 70 km per hour, I had to learn how to drive.
Radosneg wrote: based on the Izh Planet -3 engine,
With (forced) cooling or without?
Cooling is forced through ignition, I’ll lay out everything in detail, the design structure will be clear from production, if anyone likes it, of course. This spring there were cold winds, I hardly used any air during cultivation. As in the transport version, it is also not needed.
I made this walk-behind tractor to order, here the cooling is better visible, a simple impeller from the stove, side turbulence with a conical air supply, the chamber drive is from pulley to pulley.
Radosneg wrote: Forced cooling through ignition
I just saw one with an engine from a disabled woman in Izhevsky. Works fine. But in the first photo it’s simply not visible. By the way, how strong is he?
The scheme is suitable for Minsk, Voskhod, Ant engines, there are design changes when installing the engine, but everything can be solved, Izh has proven itself to be the best. You can’t put me on a simple low-speed walk-behind tractor anymore, I try to drive more quietly in front of the traffic police, and up to 50 km per hour is a completely manageable speed. Initial up to 5-6 km per hour. Loading capacity of the trolley is up to 500 kg. Made from 2 old tarsion strollers. I was afraid that the tarsions wouldn’t hold up, but in vain, after 5 years all are still intact. Smooth ride, minimal shaking.