In the summer, for many people, a scooter or a moped? an indispensable means of transportation. It is inexpensive and quite easy to maintain. Unlike a motorcycle, it consumes less fuel. However, with the onset of winter, a moped is less useful. There are many who come up with the idea of making a snowmobile out of a moped or scooter with their own hands. Some even manage to ride a scooter in the summer and install a caterpillar track in the winter. To achieve this, the parts must be easy to install. Let's look at how to make a snowmobile-moped with your own hands.
Main parts of a moped
First, let's look at the main parts of this technique. In other words, let's take our future scooter apart, so to speak, and find out its main elements so that making a moped is easy.
Engine
It is clear that without a good engine you cannot go far on a scooter. In this case, it is usually installed on the D-6 power unit. Recently, chainsaws have also become very popular, from which a homemade moped is made. In the video instructions you can see in detail how to do this. Chainsaws will be discussed in more detail below.
Exhaust system: forward flow
It is necessary to carefully consider a high-quality exhaust system so that the muffler does not have a negative impact on the power unit with which homemade mopeds are equipped, but, on the contrary, helps to quickly get rid of the remaining air-fuel mixture. A direct flow made by yourself will be what you need.
Suspension: pendulum fork
A pendulum fork that looks much better than other versions of this part of the scooter. The fact is that a large number of varieties of forks can be made, but any expert will confidently tell you that nothing is better than a pendulum one, nothing has been invented yet. As you know, this part of the scooter bears the hardest work. It is the fork that takes the brunt of the impact when going over various bumps, and generally uneven sections of the road. This is a kind of suspension on which the driving characteristics depend. Thanks to the pendulum fork, you can achieve stability of the scooter on any road.
Snowmobiles based on "Minsk"
Let's start with the smallest representative of the domestic motorcycle industry - the Minsk motorcycle. Although it is equipped with a 125 cc engine, it is quite capable of acting as a snowmobile, and craftsmen “manage” to make two types of snowmobiles out of it.
The first type is wheel-ski. Structurally, nothing much changes in the motorcycle, but the wheels are removed from it. Instead of the front wheel, a wide ski is installed.
Moreover, it is done very simply - take a pipe as a stand, and attach the ski to the front fork using a fastening element and the wheel axle shaft. At the bottom, a wide metal strip with a wrapped limber is attached to the rack on a hinge.
Regarding the rear of the snowmobile, it is somewhat more complicated here. A module is made that is mounted in place of the rear wheel.
Read also: How to weave rubber bands on a loom for beginners
In addition to the frame, the design of the module includes a rear axle from UAZ, but slightly modified. The driven gear of the bridge is replaced with the rear sprocket of the IZH motorcycle. The drive to the bridge is carried out through an intermediate shaft, but it still remains a chain drive.
Tubes from the PTS-2-4 trailer are used as wheels, but for reliability, the sidewalls of the tube are reinforced with tire sidewalls. To make it lighter, the discs are made of welded rods, and the camera is secured to them using belts.
A snowmobile based on Minsk is capable of reaching speeds of up to 45 km/h.
The second type of snowmobile from “Minsk” is tracked. Moreover, in front, a ski is again used, attached to the fork. A module is also installed at the rear, but consisting of a frame and two shafts attached to it.
The front shaft is equipped with sprockets. Two large sprockets drive the track, and a small sprocket drives the shaft. The rear shaft is equipped with rollers. A caterpillar made of V-belts and plastic strips is stretched between these shafts.
The drive is carried out via an intermediate shaft. The tracked version of the Minsk can already accelerate to 50 km/h. And these are just two of many types.
Engineers and designers did a good job on the Izh Junker motorcycle, one of the most beautiful models of domestic production.
The Jawa 350 motorcycle was quite popular among the people, let's take a look at its technical characteristics.
How I made a subframe for a moped. | Topic author: Avinoam
Started with this
Pavel (Myrddin) Then like this
Pavel (Myrddin) The process of bending professional pipes at home...
Pavel (Myrddin) Prepare two pieces, TRY ON THE MOPEDS!!!
Pavel (Myrddin) TRY ON EACH DETAIL INDIVIDUALLY!!!! (moped designs are different)
Pavel (Myrddin) Something is being drawn)))
Pavel (Myrddin) Now that’s something.
Pavel (Myrddin) I took the footrests from the Carpathians and cut off the folding mechanism itself...
I tried it on and cut it off from the original ones at the bend, welded it, they became a little longer than the original ones.
Pavel (Myrddin) I went over it with a grinding wheel, removed all the bumps and burrs, prepared it for painting...
Pavel (Myrddin) Hung the frame and painted it in two layers...
Pavel (Myrddin) This is what it looks like now... THE TEST WAS DONE 10 KM, pressed down to 83-85 km/h (according to my speedometer) no complaints, rides smoothly on the legs, vibration is not transmitted from the engine
Pavel (Myrddin) Well, the dimensions themselves, BUT!!!! EACH MOPED HAS ITS OWN DIMENSIONS, SO YOU CAN CONSTANTLY TEST EVERY DETAIL!!!! (in place of the corner (85) you can do something else, I did what I had on hand)
Pavel (Myrddin) GOOD LUCK TO EVERYONE!!!
Pavel (Myrddin) R.S. If anyone is interested in the price of this work? 1 kilogram of transparent...the very next day (February 23) was jointly destroyed))
Iskander (Zalika) Pavel, what did you attach it to near the steering column, post a photo?
Pavel (Myrddin) Seryoga, This is what it looks like near the steering wheel....the arches are there too.
Iskander (Zalika) Pavel, how would it be fashionable to make a thread to the steering rack itself?
Pavel (Myrddin) Seryoga, didn’t understand the question?
Pavel (Myrddin) Seryoga, there is a mount under the arches...why do anything unnecessary?
Iskander (Zalika) Pavel, well, if you do it to the steering wheel, it would seem to strengthen the frame at the site... isn’t it?
Tags: How to make a snowmobile from an alpha moped
Snowmobiles made from motoblocks
The design of snowmobiles made from walk-behind tractors is much simpler, regardless of the walk-behind tractor model.
In them, a gear drive ensures the rotation of two wheels. Therefore, to make a snowmobile, it is enough to install wide rollers with snow hooks instead of standard wheels.
Some craftsmen go further, installing tracked modules on the drive shafts, which are three rollers mounted on an axle on which a caterpillar is mounted. The leading roller is usually the middle one, so it is made geared, and the other two are guides.
Read also: Hair dryer for welding PVC film
Here we consider only the most popular types of snowmobiles based on domestic motorcycles, as well as walk-behind tractors. Although there are much more varieties of snowmobiles.
You can find out how to choose the correct track length for a snowmobile in our article.
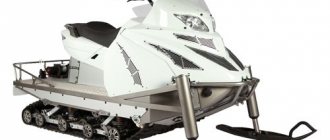
Children's snowmobile Polaris 120 INDY, an excellent model for beginners who enjoy active recreation.
Manufacturing
Making a snowmobile from a scooter with your own hands is not that difficult. No special adjustments to the original design are required. In this case, it will be possible to easily replace tracks with wheels and back when the weather changes. It is recommended to take tracks and driven sprockets from Buran snowmobiles. Additionally, a pair of wheels from a children's scooter and a pair of medium-sized wheels from any cart (with the addition of roller bearings) are used.
The fact is that scooters by default allow travel at a speed of 40 to 60 km/h, and on first-class roads. When driving in snowy areas, the load on the engine increases. Excessive speed is also a source of risk.
Next, focusing on the main wheel disk, cut out the brake drum and splines for the drive shaft. A small-diameter disk is secured by first punching a hole in the drum with a drill. Making homemade hooks helps prevent the caterpillar from slipping off the wheel and sliding during movement. They are obtained using PVC water pipes. Such hooks have to be inserted into the holes of the caterpillar.
Then they take flat roofing iron and prepare a bandage of a suitable diameter. Hooks are fixed on such a bandage using furniture bolts. Fasteners must be placed at a constant distance. The pitch is determined by the placement of the holes. A soft star is made on the basis of a simple wheel.
The frame is obtained using a metal angle and square pipes. The dimensions of the frame and its parts must be selected independently. At the same time, they take into account what kind of scooter the snowmobile is based on and what kind of caterpillar is used.
Usually there are 2 levels of freedom of movement. No matter where the scooter leans when moving, 100% of the ski plane remains exactly on the snow. It is worth taking care of installing a wide support platform for the feet and a small decorative shield under the front fork. Recommendation: For long trips in winter, you will definitely need a windshield. Typical scooter body kits will have to be redesigned because they do not tolerate extreme cold well and are susceptible to snow accumulation in the “pockets.”
Additionally, a casing is installed to protect the caterpillar. It is formed from polycarbonate, plexiglass or other synthetic materials. The side part of the casing is cut out carefully. The workpiece is transferred to a large sheet, which turns out to be the wall of the matrix. We fix the plastic corners with hot glue around the perimeter at equal intervals.
Then the fiberglass fabric is cut into the required fragments. All joints are coated with plasticine. You need to keep the matrix for about 24 hours.
Next, you should consider making a snowmobile from a Chinese scooter with a 50cc engine.
In this case:
- the frame is made of steel profile 50x50;
- the drive is taken from the expanded wheel;
- the caterpillar cart is formed from a profile and corners taken from a school desk;
- Silent blocks from Zhiguli are used as hinges;
- slimes are made from a thick water pipe (plastic);
- To obtain skis, extenders for snowmobiles are used.
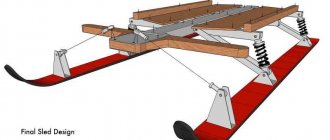
There is no particular point in installing engines of 150 cc or larger. They are really needed only by people going on long tourist trips or engaged in hunting and fishing professionally. This is what a drawing of a homemade tracked snowmobile frame looks like. The width in the frontal plane is 0.7 m, and at the rear - 0.4 m. The height reaches 0.5 m, and the total length is 1.25 m.
The following drawings can be taken as a starting point:
- frame length – 1.47 m;
- distance between wheel axles – 1.27 m;
- width in the rear plane - 0.74 m.
Necessary parts for manufacturing
You can make a snowmobile with your own hands from almost any scooter or moped. The main thing is that the transport must be powerful enough. Also, every frame is different. Accordingly, the dimensions of the caterpillar, sprockets and frame for the caterpillar drive may differ. You can figure out for yourself what is best to use in your particular case.
In order to make a snowmobile from a moped with your own hands, you need to purchase a driven sprocket for a caterpillar track from “Buran”. Can two pairs of rubber wheels be used as additional track rollers? one is larger and the other is smaller. They can be removed from a cart or children's scooter, or purchased similar ones in a store.
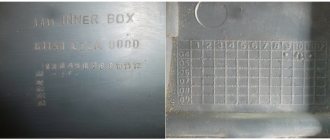
Container
A motorcycle storage container is a sealed metal box that is quite mobile (can be moved if necessary) and sealed. All the pros and cons in one bottle. Yes, it’s easy to install a container in your local area, but intruders can also do this - that is, take and drag away your container along with the motorcycle inside. Airtightness, on the one hand, seems like a plus - it protects against weather conditions, but in reality, the lack of ventilation can contribute to improper humidity, condensation, mold, etc. Ventilation is an important point when storing a motorcycle for a long time.
Winter
Summer
Pros: the container is easy to install and move by yourself, protects from snow and rain.
Cons: not heated, not ventilated, not very reliable.
Operating a scooter in winter
The scooter is not intended for use in winter. Therefore, before use, it is necessary to prepare it: wash it from hard lumps of dirt and fill the tank full, otherwise the moped will jam while riding, and the gasoline will run out ahead of time, since in winter any equipment consumes more fuel.
All moving parts of the scooter, except the brake disc, must be lubricated with engine oil before riding in winter - this will allow you to control the scooter and detect a malfunction in time. There are also special liquids that can be used to protect scooter rubber from corrosion, frost and brittleness. They are usually sold in cans.
Another danger of winter trips around the city is the salt that is sprinkled on the road surface. It corrodes the paint and metal parts of not only scooters, but also cars, and additional wiping and treatment with a solution is necessary to protect against damage.
To ride a scooter steadily in winter, you need to change the tires, since regular tires are not designed for snow and ice, but there are also options for winter tires. The installed tires for difficult driving on snow require a pressure 0.3 atmospheres lower than the summer one. Due to strong temperature changes, rubber constantly changes its density and hardness, which can lead to ruptures of the cylinders. To prevent this situation, you need to use special sprayers and wash the disc before and after each trip.
Mini scooter: advantages
An electric scooter, first of all, has an important advantage over other models - this product is literally based on the “sit down and go” principle. There is no need to turn on the ignition, start the vehicle with an electric starter, or dial the required number of revolutions with the throttle. It is enough to turn the key once and press the “gas” - a soft start, smooth acceleration and, most importantly, silent movement, which neither mopeds nor bikes can boast of.
The rechargeable battery has an approximate service life of three years. It will take 4-8 hours to charge the battery to 100%. This is enough for a 100-120 km trip. And due to the minimal number of friction parts, the mini-scooter can serve its owner for a long time.
To summarize, we can highlight the five main advantages of this product:
- Silence.
- No need for fuel costs.
- There is no need to change the oil.
- Excellent acceleration dynamics.
- Safe riding a la “bike”.
The photo below can convey in all its glory the beauty of such a thing as a mini-scooter - it is a very compact and convenient form of transport.
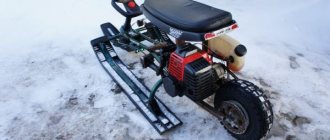
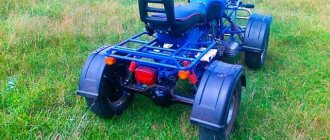
I made a homemade snowmobile with a moped engine: showing the design
A simple homemade snowmobile made with your own hands from spare parts from a moped. Below is a photo and description of the snowmobile design.
To make the simplest homemade snowmobile you will need an old moped, welding and some scrap metal.
The frame is made of profile pipe, the frame is installed on support skis. It’s better to buy ready-made skis, after all, skis are the basis of a snowmobile, but if that doesn’t work out, you can make your own from duralumin.
The motor mount is also redesigned to fit a wider snowmobile base. Here you can get by with ordinary metal corners and arc welding. A drive wheel with lugs is also easy to make yourself. The transmission of rotation from the motor to the wheel is chain. Do not try to make huge lugs; if frozen soil gets under the lug of a homemade snowmobile at the moment of full throttle, there is a high probability that the chain will break.
You can make a muffler yourself.
The moped launcher is being converted to a manual start. All the same, in felt boots it is impossible to start it by pulling the crank with your foot.
A box welded under a seat on a homemade snowmobile is good for storing keys and spare parts.
As you can see, making a homemade snowmobile with your own hands in the garage is quite simple. This snowmobile develops quite good speed on packed snow and ice. Great homemade product for winter trips!
Source
Recommendations
It is worth considering that ready-made foreign samples most often have to be modified and modified. The thing is that they are not designed for deep snow. One of the most affordable engine “donors” are the powerful Ural and Druzhba gasoline saws. You can also use a Stihl saw as a base, which is slightly more advanced than previous samples. In addition, it is easier to find spare parts for newer engines.
It is useful to remember that a snowmobile with a chainsaw engine cannot carry large loads. In most cases, such structures are designed for one seat. But they are great for children. For driving at night, it is recommended to use headlights. They will also help out in bad weather.
Particular attention should be paid to the gearbox. In many ways, the reliability of the vehicle as a whole depends on it. The sprockets are secured to the track shaft with a nut.
You just need to make a suitable thread. They work in a similar way with the shaft and its sprockets.
How to make a snowmobile from a scooter with your own hands
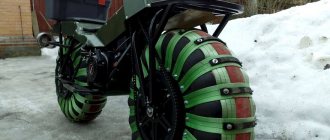
Dear visitors to the “Self-Made Friend” website, today we will look at one of the options for assembling a snowmobile from a scooter with your own hands. Mainly that no fundamental changes have been made to the design and the scooter can be easily converted from a snowmobile into an all-terrain vehicle) A moped or scooter is an excellent and moderately economical means of transportation, both in the city and in rural areas. This type of transport is especially popular among teenagers, because it is an intermediate link between a bicycle and a real motorcycle) With the onset of cold weather, motorcycles are placed in the garage and remain there until spring, but not in our case, because a scooter is made into an excellent snowmobile for fishing trips)
The ski is borrowed from a children's snow scooter; a metal guide is installed at the bottom so that the snowmobile feels stable on the road. The ski also has a floating position, that is, when tilted, it remains flat on the snow.
The track protection is made of fiberglass, the fork also has a decorative lining and a fairing in case of long trips with headwinds. The author made special supports for the legs.
And so, let's move directly to the assembly itself.
Materials
Tools
Step-by-step instructions for assembling a snowmobile from a scooter with your own hands.
A kart wheel is used as a leading star. The wheel is fitted with a metal band with teeth made from PVC pipes secured with furniture bolts. The driven star is from a Buran snowmobile, with wheels from a trolley added to the sides. Wheels from a children's scooter were used as support rollers.
Assembling the caterpillar and installing it on the scooter. The track protection is made of fiberglass.
Ski fastening and facing. Ski from a children's snowmobile. Testing a snowmobile on loose snow.
Source
How to make a homemade snowmobile, options from a scooter
In good weather, a motorcycle scooter with a small engine capacity has always been in demand not only among young people, but also among adults. Because it was distinguished by its ease of operation, lightness and good speed. But unfortunately, when cold weather sets in, due to the small diameter of the wheels, riding a scooter becomes very uncomfortable, and in snowy weather, even wearing winter tires is completely unrealistic.
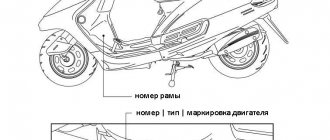
Having studied various motorcycle magazines, it was noticed that there are caterpillar movers on sale; they can be installed instead of the rear wheel, which will lead to the transformation of the motorcycle into a snowmobile.
If you have like-minded people in this matter, then it is best to take a track from the Buran snowmobile (photo 1); it will work perfectly, since one track will produce 4 suitable for a scooter. The cost will be 2.5 times cheaper than tracks taken from a motorcycle. But for one scooter it will cost too much.
Snowmobiles IZH
Let's move on to middle class motorcycles - IZH. The common types of snowmobiles that are made from these motorcycles are the same wheeled and tracked.
In fact, snowmobiles based on the Minsk and IZH are even structurally similar. However, often instead of a ski in front, a wheel made of a tube with tire beads is used.
But in this case, the front fork is redesigned, since such a wheel is much wider than the standard one. Although you can use the same ski.
As for the tracked version, the difference usually comes down to the size of the track itself, and as a result, the track module.
Scooter and tricycle made from a chainsaw
Chainsaws, as mentioned above, are very popular among home craftsmen. They are distinguished by their light weight and dimensions, and in terms of power they are what you need. Today on the Internet you can watch many video tutorials on how to make a tricycle, scooter or moped from a chainsaw. More often mopeds and scooters are made from the Druzhba chainsaw. An old bicycle is also taken, onto which all the parts are installed, including a forward flow muffler.
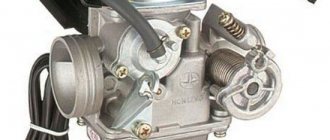
Muffler
It is the forward flow muffler that becomes almost the main feature of making a homemade scooter, because you need to know some of the secrets of its installation. The forward flow muffler was originally invented for sports cars. A forward flow muffler in itself already increases the power of a scooter engine.
Final decision
Touring enduros can be divided into two types. The former feel great in off-road conditions and cope excellently with any conditions on the road, but are less comfortable when driving on the highway. The latter, on the contrary, are comfortable, but can fail in difficult areas.
There is always some dualism in choosing such a motorcycle. As a rule, almost any route consists mainly of driving on the highway, and only some, although often the most beautiful places, will have to be driven off-road, which may turn out to be quite passable under normal weather conditions. Therefore, you should decide what is better: to endure inconvenience during the main route, but easily pass difficult places, or to drive comfortably along the highway and “sweat” through difficulties.
How to make a snowmobile
You can make a snowmobile from different vehicles that are in the garage.
From a motorcycle
You can make a snowmobile from a motorcycle using different models. The most popular are IZH and Ural. The advantages of such a rework are that no special changes need to be made. If the product is in good condition, you can even keep the original frame.
The conversion technology is as follows:
- Make a rectangular frame from metal pipes or appropriate corners. Its optimal dimensions are 150*43.5 cm.
- In addition to the IZh motorcycle, it is necessary to make a steering beam. It is made from metal corners. The optimal dimensions are 50*50*5 mm. Additionally, the beam is sheathed with metal plates.
- After this, it can be installed horizontally on the drilling machine. Treat the connection area. Do the same with the frame. In these places you need to make special grooves for reliable fixation. Additionally, attach a corner to the front frame.
- Now you can attach the seat for motorcyclists.
- You need to make holes in the side members.
- A channel must be placed between the front and middle parts of the frame to strengthen the structure.
- Regardless of whether the snowmobile is made from a Ural or another model of motorcycle, it is necessary to select a track sprocket and rubber band in advance. The optimal dimensions are 220*30 cm with a thickness of no more than 1 cm.
- Before installation, it is recommended to cover the track with nylon, which will allow the material not to delaminate during operation.
- Now you can move on to the transmission. It consists of two parts. The first, the front axle, is the drive axle. It is made of a tubular shaft, a track sprocket and a roller. The second is the rear axle. It is made from a caterpillar drum and a tubular shaft.
- You need to complete the snowmobile manufacturing process by welding sheet metal skis.
When converting a motorcycle into a snowmobile, it is important not to change the steering system. In the final product, this part must perform its original functions
The principles of modification are the same, they do not depend on the vehicle model. But the snowmobile from the Ural motorcycle will be heavier.
From Zhiguli
The design of the car is characterized by simplicity, ease of operation and high maneuverability. To make it you need to follow the instructions:
- Frame assembly. It's better to make it from pipes. The frame consists of front and central beams (steel pipes with a diameter of 5 cm), two lower diagonal elements (bent pipes with a diameter of 3 cm) and a rear strut. Welding is used to fix the elements.
- Installation of steering columns. To do this, you need to place two bushings on the front beam.
- Fixing the axle shaft. It is located on the rear frame; first you need to weld the body under it. It is made from a metal pipe with a diameter of 6 cm. Secure the axle shafts using bushings and electric rivets.
- Installing a car engine. First you need to make the front and rear fastening units on the central beam of the frame. First they need to be placed on the engine itself, and only then welded to the frame.
- In a homemade snowmobile, you can install large diameter wheels or skis made of sheet metal. In the first case, the rear and front wheels need to be connected in pairs with a metal pipe. At the same time, make grooves in the hub for the bearings, which are subsequently secured with spring rings. Additionally, install a spacer between the bearings.
- Install a sprocket on each wheel depending on the expected maximum speed. This snowmobile can be used at any time of the year. For a snowy winter, a design in which the front wheels are replaced with skis is suitable.
- Installation of the steering system. It is taken whole from a car, for example, from a Zaporozhets, or a motorcycle. The choice depends on personal preference. In the first case, gas, clutch and brake pedals are additionally installed. The gearbox is controlled using a lever and a rigid rod.
- Installation of a snowmobile cabin, the role of which is played by the car body.
Front and rear suspension
Homemade ATVs are equipped with front or rear suspension. It is easier to mount a ready-made front suspension from an old motorcycle. You can use other options:
- Rear axle from the car. It must be shortened to fit the parameters of the quadric. The advantage of this method is the presence of a differential. The disadvantage of the bridge is its large mass.
- Cardan reducer on the rear axle. An independent suspension with high ground clearance is suitable for an all-terrain vehicle. In this case, the suspension arms are fixed to the frame using bolts.
To prevent the ATV from turning over while driving, it is recommended to tilt the front suspension strut. The shock absorbers are from Izha. If you have the financial opportunity, it is better to install gas-oil shock absorbers with pumping. They provide suspension adjustment based on the road surface.
The steering system of an ATV is similar to that of a car. A steering wheel or motorcycle handlebar is installed. Some experts advise combining 2 types:
- motorcycle handlebars, shaft and lever at the top;
- parts of the steering system from the car are below.
You can make the steering shaft with your own hands. For this, a pipe with a diameter of 20 mm and a wall thickness of 3 mm is used. You will need to install a travel stop at the bottom of the part.
Do-it-yourself children's snowmobile from a scooter
The design of the scooter does not need to be significantly changed. This will allow, with minimal effort and time, to return the standard equipment of the vehicle to its place at the end of winter and use it again in the warm season.
If you do not have lathes and milling machines to make the necessary parts, you can buy ready-made ones, or use those that are found in your garage or at a car dismantling site. Also, you can make some elements yourself using simple tools and a welding machine.
In a store that sells spare parts for snowmobiles, I bought a driven sprocket for a Buran snowmobile track. I bought two more wheels from a standard Chinese scooter for children and two small rubber wheels with roller bearings from a cart. The gear ratio in the scooter transmission is designed for operation of this vehicle on good roads at speeds of up to 40-60 km/h. When driving on snowy roads, the load on the engine will increase, and its power may not be enough, and a speed of 40-60 km/h on snowy and slippery roads is generally dangerous. Therefore, I changed the gear ratio, replacing the drive wheel of the scooter with a wheel of a smaller diameter from a sports go-kart. To do this, I had to cut out a brake drum with splines for the drive shaft from an old dented drive wheel disk of a moped and drill holes in it for attaching a wheel disk of a smaller diameter (photo 2)
To prevent the caterpillar from slipping and sliding off the wheel while moving, I made special hooks (photo 3)
made of plastic water pipes that fit into holes on the track. It is almost impossible to select a rubber tire so that its circumference is a multiple of the whole number of pitches of holes on the track. I made a bandage of the required diameter from a strip of roofing metal, on which, using MB furniture cap screws with a large head, at an equal distance from each other, with a step corresponding to the location of the holes on the caterpillar, I secured the hooks (photo 4)
.
The bandage was put on the wheel and attached to the tire using the same bolts (photo 5)
.
I made an improvised soft drive sprocket for the caterpillar from an ordinary wheel.
I made the driven sprocket by connecting with M8 bolts a ready-made plastic drive sprocket of the Buran snowmobile with two rubber wheels from a trolley with roller bearings. A stud with M10 thread fits the axle (photo 6)
The crawler frame was made using metal corners and square pipes (photo 7)
. I do not give the dimensions of the frame and its various parts, since those who want to repeat the design will be guided by the brand of their scooter and the dimensions of the track they have chosen.
For my moped, I purchased a special ski from a motorcycle kit, but an ordinary wide homemade wooden ski or a plastic one - from a children's snow scooter "Argamak" - is quite suitable, but you must attach a metal skate (undercut) to the bottom so that the scooter does not lose weight on a slippery road. control. The ski is attached to the front fork of the scooter through a special rack and has two degrees of freedom of movement, due to which when the scooter is tilted to the left or right, the entire plane of the ski remains on the snow.
The plastic body kit of a scooter is very fragile in the cold and also has pockets. The snow that gets into them melts in the garage and then freezes, thereby increasing the weight of the scooter. I decided to make a minimal cover over the track, a wide platform for the feet and a decorative shield for the front fork, and for long trips in cold and windy weather I installed a windshield.
It’s not difficult to make a caterpillar casing from fiberglass yourself, but before gluing the casing, you need to make a matrix. From a suitable size piece of plexiglass, polycarbonate or any other plastic, we cut out the side of the future casing (photo 19)
We place it on a larger sheet, which will serve as the other wall of the matrix, and use hot glue to attach plastic corners along the perimeter of the sidewall.
Now we cut off a strip of thin and flexible plastic, equal in width to the future casing. We assemble the matrix by attaching the previously cut sidewall, bottom and large panel to the corners with glue. We coat the joints of the parts with plasticine. Thus, a matrix was obtained for gluing the caterpillar casing.
Then we cut the fiberglass into pieces of the required size and, coated with epoxy resin, place them tightly in the matrix. After a day, we disassemble the matrix and remove the resulting casing. All that remains is to cut off the excess fiberglass along the contour and paint the product.
Making a snowmobile from a motorcycle with your own hands | Motoblocks and agricultural machinery
Of course, motorcycles can be divided according to cross-country ability, but who can be called a champion....... and the winner in terms of cross-country ability can be called a little-known type of motor vehicle - pneumatic: a type of motorcycle with huge tires. Such motorcycles (and they are made of nickel) are quite popular in difficult areas of our planet: the tundra, the far north, etc.
Due to their huge size and ultra-low pressure inside (about 0.2-0.3 atmospheres), they provide a wide contact patch and, as a result, low pressure on the ground. That is why a pneumatic vehicle is capable of driving not only through any mud, swamp and snow, where there is nothing for other vehicles to “catch”, but even to swim.
Pneumatics are the most environmentally friendly type of ground wheeled transport - they do not destroy grass cover. Nature will especially highly appreciate this quality when used in the North, in the tundra, where the “scars” from any tracked or wheeled vehicles do not heal for years.
For those who are tight on money for a new snowmobile, but have their hands in the place, a motorcycle turned into a wheeled snowmobile is a panacea for all transport ills. In addition, pneumatics, in comparison with the most common snowmobiles on tracks in hard-to-reach regions, have a lot of undoubted operational advantages. The most significant thing is low fuel consumption and all-season use. Another important “plus” is a guarantee of safety during winter driving on ice in water bodies: if you get into an ice hole, you won’t drown.
A little about the variety and design
There are two- and three-track pneumatics. Three-track ones are the simplest - in their design, more than half of the “stuffing” of the motorcycle is preserved. The fact that this is really simple is confirmed by the fact that in the North all existing brands of domestic motorcycles and even mopeds are converted into pneumatics. The front fork stays are replaced by two pipes with strongly spread lower ends so that a large wheel fits between them. On some, they leave the fork with the “native” motorcycle wheel, but attach a ski to it (in this case, the further forward the ski is placed, the better the cross-country ability on soft snow). It's easier. However, in this case, the pneumatic tire loses its buoyancy, as well as the ability to ride in the summer. Instead of a standard pendulum, an axle with two wheels is installed at the rear. Theoretically, it is possible to make a pneumatic with one wheel at the back (like a regular single motorcycle), but only stuntmen could ride such a device.
Also interesting: Chemical reconnaissance vehicle UAZ 469РХ - dudakov_ru - LiveJournal
The cameras are wide, they seem to be under-inflated, because everything that rests on them is constantly “floating” - the design reacts completely inadequately to obstacles. Therefore, maintaining balance on a two-wheeled caracat (from someone’s light hand this ironic nickname was assigned to pneumatics) is very difficult. Although judging by the photo, “Kulibin” solved the problem - he put skis on the sides!
As an option, a pneumatic circuit with a front ski instead of a wheel! So, the two rear wheels are mounted on the same axle. In the simplest designs they are always rigidly connected to the axis. Due to this, high throughput of the device is achieved. But serious problems arise in corners. More precisely, on slippery soils (snow, mud, swamp) there are no problems, since one wheel slips freely. But on dry surfaces it is difficult to make a turn along a small radius: resisting the maneuver, the rubber is greatly deformed and wears out faster. You will get rid of this if you install a differential, for example, from “Ant”. Unfortunately, its design does not include a locking device, and this is a big disadvantage when driving on “steep” off-road conditions. Many do-it-yourselfers solve the problem simply: they always make only one wheel leading, which is quite enough when driving on hard, dry surfaces. And when the ground grip of the chamber is not enough, the second wheel is also firmly fixed. To do this, a special pin (or bolt) is inserted into the hub and axle.
1. Pneumatic with intermediate gear. 2. All-wheel drive pneumatic with a “breakable” frame. 3. Pneumatic “4x4” with differential from “Ant”. 4. Pneumatic with a differential from “Ant”, turning due to the braking of the wheels. The ideal option is to use a bridge from the Kovrov four-wheeler “ZDK-175 4ShP”. Its design provides reduction gear, reverse gear and differential lock. However, buying such a bridge is quite difficult, and its cost is probably comparable to the price of a new motorcycle. Due to the fact that the wheel diameter is almost twice as large as that of standard motorcycle wheels, the transmission ratio will have to be increased. There are three ways to do this: install the above-mentioned “Zidov” bridge, in which there is a reduction gear; make a driven sprocket of “huge” dimensions (with the number of teeth 70-100). Or introduce an intermediate downshift. It is extremely simple: a shaft on two bearings and a pair of sprockets. Most designers follow this path. All power transmissions in such a transmission are carried out by chains. Often, combine harvester chains with an unusually large pitch for motorcyclists are used for this - 25.4 mm. By summer, the three-track pneumatic is usually converted back into a regular motorcycle.
Double-track pneumatics are made with four, less often six-wheeled ones. Their cross-country ability is significantly higher than three-track ones. This is understandable: the more wheels (in some models they are all driven), the easier it is to overcome the resistance to movement. But you have to pay for higher cross-country ability - such a device has little in common with a road motorcycle, it cannot be a transformer - you cannot turn it into a two-wheeled motorcycle by summer. This is a serious car: with a completely homemade frame, most of its components are homemade. Few four-wheeled pneumatics retain the motorcycle riding position and controls. Most have car comfort: seats with backrests and a heated cabin.
Some designers increase the buoyancy of cars: they make the hull airtight, install a propeller or an additional outboard motor.
Turning of double-track pneumatics is carried out like an automobile (with the front wheels) or by means of a “breaking” frame. Less common are tractor-like turning patterns - with the braking of wheels located on one side of the vehicle. Pneumatic suspensions are most often absent - their role is played by the cameras themselves. The vertical deflection of the chambers can reach up to 150 mm, which is equivalent to the travel of the suspensions. However, for driving at high speed over rough terrain, energy-intensive suspensions are still far from unnecessary. Tubes from all-terrain trucks or agricultural trailers are used as tires on pneumatics (it’s not difficult to understand why not bicycles). The “squarer” the chamber is in cross-section (that is, the closer the ratio of the chamber width to the bore diameter), the better. As practice has shown, the best cameras are from airplanes and helicopters. They are made from rubber of the best composition. The quality of their manufacture is also significantly higher: the thickness of the walls of these chambers is the same at all points. If aircraft cameras cannot be obtained, home-made cameras are content with products from ordinary trucks, and they are paired - attached side by side to each other.
It is not difficult to make disks (framework) for attaching any cameras. They are attached to the disks with belts, usually with a conveyor belt from agricultural machines. There are also specially designed ultra-low pressure wheels. They are a tubeless thin-walled tire with a mechanically fastened sidewall to a special disk. They also use wheels from the Arctictrans association - with light, thin-walled corded tires. The wheels have a small tread and are therefore more durable. One thing is bad: such wheels are rarely found on sale, and their price is high, so they are difficult for DIYers to obtain. No matter how you look at it, there is no such thing as perfect
There is no such thing as perfect in technology. Pneumatics also have disadvantages. The first and most important scourge of “crooks” is the fragility of the cameras. The large dimensions of the wheels and the absence, as a rule, of a differential make these cars clumsy, and the low pressure in the chambers deprives the driver of precise control. When driving at above-zero temperatures, dirt and water flying from the wheels are annoying - it’s not at all easy to cover such large wheels with wings. Therefore, it is better not to drive on public roads with pneumatic tires. The cross-country ability of a pneumatic in deep snow is still worse than that of a tracked snowmobile (at least the Buran). Only all-wheel drive 4- and 6-wheeled designs can compete with Buran in cross-country ability.
A little history
The human desire to increase the cross-country ability of a motorcycle is as old as the motorcycle itself, but the most successful version of its implementation - designs on ultra-low pressure tires - appeared relatively recently. It is difficult to say exactly who and where built the first pneumatic. But as an option, we can consider the apparatus of Tula father and son Vladimir and Vyacheslav Laukhin to be the first to be “lit up” in the press. In the early 80s, living in Tula and not having a scooter was considered bad manners. He was in the Laukhin family. The head of the family attached two cameras from a farm trailer to his semi-homemade “Ant” in place of the rear wheel, and a plywood ski in front. On this all-terrain vehicle, the inventors plowed through suburban swamps, fields, and frozen ponds. There were some incidents: more than once at night, truck drivers, not figuring out where the road was in the dark, drove onto a slightly snow-covered track from an “Ant” all-terrain vehicle and... ended up in arable land. They say they were looking for an inventor to punch them in the face... Like ripples on the water, rumors about a miracle device spread in all directions. The idea of the people's "rogue" was picked up and the magazine "Modelist-Constructor" began to "promote". All-Union Society of Inventors and Innovators, DOSAAF. From 1984 to 1991, all-Union competitions for home-made pneumatic all-terrain vehicles were held. It is curious that at the second such competition, held in Arkhangelsk, many DIYers gathered with their devices made... from plywood. In appearance they looked more like boats than land vehicles. The motorcycle engine drove two pairs of rear balanced chamber wheels from the GAZ-53. The front wheels were suspended on a transverse balancer. These are the six-wheeled caracats that appeared before the eyes of amazed journalists.
And also interesting: LADA Niva Legend 5 doors. – Technical characteristics – Official LADA website
Long-distance runs across the North have become widely known. After them, the number of pneumatic ones increased sharply. By the end of the 80s, in the Arkhangelsk region alone there were 11 thousand of them, and in total there were about 100 thousand of them in the North. Naturally, with such a surge of interest in pneumatic all-terrain vehicles, attempts were made to produce them in series. In Neftekamsk, pneumatics were produced for several years, based on Voskhod. About 800 of them were collected. Later, in Zelenodolsk, at the Sergo Plant, several hundred three-wheeled motorcycles were made based on the liquid Izh Jupiter. The general decline in motorcycle production in the late 90s again transferred the production of Russian pneumatics to private garages and sheds. Recent years in the north have been marked by some surge of interest in cars with ultra-low pressure tires. The main reason is that the North needs environmentally friendly transport that does not destroy the tundra. However, a modern pneumatic is no longer the same as it was 30 - 34 years ago.
The driver and passengers are in a comfortable cabin, and high driving performance is achieved by an effective suspension and a large number of wheels (usually six), made using special technology. Yes, this is more like a car. But life was given to him by a motorcycle…….
Video: Homemade snowmobile from village craftsmen
In winter, using motorcycles with factory equipment is almost impossible.
The only ones that can somehow move on snow cover are motorcycles equipped with side trailers, and the drive wheel is re-shod with rubber with deep tread.
But even then, it is not possible to use such motorcycles on all surfaces.
On uncleared roads, it is sometimes possible to travel only on snowmobiles. But not everyone has the opportunity to purchase a snowmobile, and it is not always economically feasible.
In this case, “skillful hands” come to the rescue. After all, it is quite possible to convert an ordinary wheeled motorcycle into a full-fledged snowmobile, and even no special intervention in the design is required.
Therefore, in summer such a motorcycle can be used for its intended purpose, and in winter it can be converted into a snowmobile.
It’s clear that it’s unlikely that anyone would agree to remake expensive sports or touring bikes, but it’s quite possible to remake domestic “hard workers”.
Next, we’ll look at how you can make a snowmobile from the most common Soviet motorcycles - “Minsk”, IZH, Ural. We will also consider walk-behind tractors as a snowmobile, which have now become very popular in homestead farming.
engineer's blog
when I was fifteen years old, and I was saving up for a brand new moped, I lived only with this dream...
Eh, it was time! One day, almost by accident, I came across a “assemble it yourself” kit, which consisted of parts of a “Verkhovina” moped scattered across two garages. The story of its appearance is shrouded in a magical fog for me, but one day, walking from school, I remembered about it and gave the idea to my friend Seryoga. “Shouldn’t we build a moped, Seryoga?” - that’s roughly how this whole mess started. On the same or almost the same day, Seryoga and I made an audit to study the issue, taking out parts similar to parts from a moped from different corners of the garages.
Everything that was similar was collected, carefully studied by inquisitive minds, and twirled by the hands of novice engineers. A serious shortage of many important parts was revealed; for this reason, the assembly, to our regret, was postponed 'for later'. Nowadays it is no longer possible to reconstruct all the incredible adventures about how the missing parts were obtained, but then there was so much missing! Starting from studs, nuts, gaskets, piston rings, to the throttle handle. But for some reason, there were some elements in abundance. For example - a generator magnet (it was mounted on the same axis with the connecting rod and clutch), two ignition units, a bucket with clutch parts.
So, one day there was enough of everything, and the Assembly began! None of us had assembled or even seen this moped assembled before. But when has this stopped real engineers, even beginners?
Turning various parts in our hands and trying to find logic, we connected detail after detail. And finally, the main element of the system was assembled! The engine is not without difficulty installed in its place in the frame, secured with three bolts. Then the circuit, generator, electrics, carburetor... And finally, the fuel hose from the gas tank is connected!
I must say that in the end the instructions - the passport - helped a lot, which was read several times before assembly and carefully stored in a pile with spare parts. The most important part is nutrition and regulation!
After all the manipulations, we started the moped engine! It was a victory, definitely!
And it doesn’t matter that we haven’t learned how to drive, change gears, the clutch isn’t adjusted, all these were little things! Seryoga and I got on this moped together! And with their heads held high, they went to visit him and show off to the whole village.
It was then, after some time, that I could touch the moped engine a couple of times a day by touch and with my eyes closed. And there were always reasons for this - either the oil was leaking, or the clutch was not working well (we missed an important part of the clutch - they didn’t put a special bushing in the release mechanism, which I later fixed by changing the locking disc several times). And then the very fact that the brainchild we assembled worked, drove and beeped caused us wild delight!
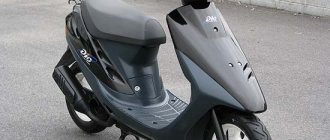
I don’t remember what kind of “verkhovina” model I had then. There are no photographs of the moped itself. But it had enough features for a moped. This is what he looked like:
Tricky ignition with a powerful spark and simple adjustment, two gears switched by a handle on the steering wheel, kickstarter, reliable mechanical drum brakes, trunk (it could easily hold my brother or a bag of potatoes!), piston with two rings, 2.2 hp engine, speedometer ( I never found a cable for it), a large gas tank. The tank was enough for a week of everyday summer riding! If you turn off the fuel supply while driving, you could easily drive more than a kilometer on the contents of the carburetor! As we later measured, it was possible to accelerate on a moped to 60-70 km/h!
Naturally, an inquisitive mind and playful little hands could not be satisfied with simply rolling back and forth. At that time I was already actively interested in electronics, and the first radio receiver, assembled on a sheet of getinax with a surface-mounted assembly (3 transistors, mp42B!), which I brought to school, was my pride and the envy of the whole class. At the same time, I got my friend Kostya hooked on amateur radio.
The first tuning of the moped was the TURN SIGNALS. We then had two Ural motorcycles, and in front of them were other motorcycles, simpler ones. And there were a lot of spare parts and simply unnecessary parts from them. It was not sporty to simply make turn signals on a relay from another motorcycle; invention and information from articles in the radio magazine were used. Using my favorite logic (k561la7 or k155la3, I don’t even remember) a multivibrator was assembled, which previously worked according to a similar circuit in different devices, from a traffic light to a flashlight with variable brightness. The multivibrator controlled the relay, and the turn signal system was turned on with a switch on the steering wheel. Not particularly difficult, but I already had another source of pride (I assembled it myself!). And it’s okay that soon the generator’s power became catastrophically insufficient for all my electronic gadgets, but it was safety and convenience. The Verkhovina moped then became a real designer for me.
The next stage of modification or tuning was the brake lights. An unremarkable stock taillight has been transformed into a small technological miracle. Instead of the original headlight, a headlight from some kind of motorcycle, with two lamps, one of which was double, fit perfectly. When braking, it turned on very brightly, and at night it was bright enough to ensure visibility while driving.
As I wrote above, in addition to pleasure, I had to put up with or constantly correct some design flaws. For example, if you actively use the clutch, but sometimes there is no other way, then you have to often change clutch parts. The most reliable thing about it was the discs! Not a single disk was damaged during operation! But in such a seemingly simple unit, everything else changed and often. A basket with a gear, a release sleeve, a fixing ring... There was even a not entirely successful attempt to weld it tightly (the file rules, it really helped!). The gearbox was probably the simplest and most reliable system in a moped engine. However, she also presented surprises. Adjustment is on the verge of jewelry, since stretching cables and adjusted minimum gaps between the teeth are incompatible!
Either a reliably engaged 'neutral' or correct gear shifting. Only one thing.
In our village it was quite possible to observe all facets of human society. Naturally, it could not be done without crime. Garages were robbed, fields were seized, equipment was stolen. And there were also plenty of just gopniks who could simply take away a “ride.” Fortunately, the society was small and everyone knew everything about everyone. The local police figured out the ghouls one or two times. If you wanted. Naturally, the next and most important stage of modding a moped was protection against theft. Innate humanity (or dad, or the fear of getting an invigorating charge yourself, I don’t know what) didn’t allow me to bring the 220 directly to the various parts of the gate, so the only option left was additional protection to the garage barn lock in the form of mathematics.