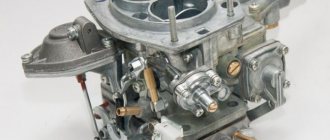
Carburetor design K 65
To adjust the carburetor of the K 65 model, you first need to become familiar with its structure. The supply and maintenance of fuel level occurs according to the following scheme. Through the fitting, fuel is supplied to the valve with an elastic locking washer. This block rests on a tongue that communicates with the floats. They are made of plastic and interconnected. The floats rotate freely along their axis.
If there is more fuel, its excess is drained through the drainage hole from the float chamber. Model K 65 (carburetor) heats up during operation. At the same time, so that the pressure in the chamber does not increase, it is connected to an unbalancing channel.
The next system that needs to be considered in the K 65 carburetor circuit is the dosage device.
Eliminating overflow in the carburetor
A lot can be written about how to eliminate carburetor overflow. Our resource decided not to describe each method of solving a problem separately, but to present how to act when it appears, clarifying all the details. In general, the repair procedure is as follows:
First, you need to check all components that can be checked without removing the carburetor, and then repair them or replace them if a problem is identified. Such elements of the fuel system include: gasoline pump (disassembled, the integrity of the diaphragms and other elements is checked); check valve (its appearance is examined and integrity violations are identified);
carburetor gaskets (check for gasoline leaks at their locations); solenoid valve (to check, just unscrew the valve and connect it to the network; if after 30-120 seconds the needle has not moved out a few millimeters, the unit requires replacement). If no problems are identified, the carburetor is dismantled.
After removing the carburetor, you need to: First, check the operation of the throttle valve and the integrity of the needle diaphragm; Secondly, disassemble the unit, checking the integrity of gaskets, jets, their O-rings, floats, locking needles and other elements, the failure of which can cause overflow; Third, clean and bleed all carburetor fuel passages. Naturally, when problems are identified, they are eliminated, the part is reassembled and put into operation.
At the same time, before installing the carburetor, it is important to set it up correctly. Everything related to setting up the carburetor is individual for each unit, so we will not focus on this. Note that in some cases it is enough to adjust the mixture quality screws or the size of the jets, and in some cases you will have to “play” with the level of the float chamber or the position of the diaphragm needle.
Well, at the last stage, if the measures presented above did not produce results, all that remains is to take the carburetor or take the entire faulty vehicle to a specialist. Do not forget that the carburetor is a very complex device, so sometimes only a professional can handle its repair.
In general, dealing with a carburetor that overflows gasoline is not so difficult. The main thing in the analysis process is to act taking into account your knowledge and the provisions presented above. We hope today’s material answered your questions. Good luck with the repairs and on the roads!
Dosing system
The components of the dosage system are the main fuel jet, atomizer, air supply channel and throttle needle.
The entire system operation process occurs according to the following scheme. From the float chamber, fuel enters the atomizer through the main jet. Under the influence of liquefaction, it rises along the gap between the throttle needle and the nozzle. At the exit from it, the fuel is mixed with air, which entered through the hole in the atomizer body through the channel.
The K 65 carburetor has the following engine control system. The throttle needle can be set to one of five positions. This ensures that the engine operates at medium speeds. But at the highest power, it should be taken into account when tuning that the carburetor of the K 65 model determines the fuel consumption by the throughput of the main fuel jet.
There is a lock washer installed under the fuel pipe. It secures the nozzle.
We recommend reading:
Assembly and disassembly instructions, repair tips
Greetings to all!
Extended advice is required from those who at one time had extensive experience in operating the “Ant” or “Tulitsa” scooter, or the “Tula” motorcycle.
The story is like this.
There is a homemade tractor.
— initially it was equipped with a new engine from a Tulitsa scooter, which worked successfully for 12 years. Instead, a used engine from a TULA motorcycle was installed. It differed from the scooter one in having a box and a petal valve, as far as I know. I don't know about other differences.
Idle system
Another important system that must be taken into account when adjusting the K 65 carburetor is the idle speed device.
The presented system consists of a fuel pipe, an air channel, an idle hole, mixture quality and quantity screws, and a transition hole.
When the engine operates at low speeds, an emulsion is formed. This occurs by raising the fuel through the tube under the influence of vacuum in the mixing chamber. The fuel is combined with air, which enters through the channel. The K 65 carburetor assumes that the emulsion exits at low speeds only through the idle hole.
As the speed increases, the vacuum in the hole area increases. The same emulsion also begins to flow through it. So the fuel supply increases as the engine speed increases.
Which carburetor can be installed instead of the original one and why?
Today, thanks to the influx of Chinese spare parts in our country, the question of choosing an alternative carburetor for a scooter disappears by itself. PZ 26-27 carburetors from Chinese engines with a volume of 110-150 cm3 will fit well on the Ant scooter, but only with replacement of the jets (main and idle). You will also have to make a flange to attach the carburetor to the engine cylinder. At the bottom of the carburetor there is a recess with a drain hose that can touch the clutch release lever.
To install the carburetor, you will need to warm it up and bend it to the side, taking into account the squeeze. If this option does not suit you, you can simply make a longer pipe (see figure). Then the lever will turn freely without touching the carburetor. In addition, you will need to select a pipe for the air filter.
This is what a PZ 27 carburetor installed on an Ant scooter looks like instead of the original K65G
Fits into place like a native one
An accelerator pump comes as a bonus to the PZ 27 carburetor. Of course, it will be of little use on a motor scooter, so you don’t have to bother with installing an additional cable.
Carburetors with a large diffuser diameter PZ 30 or Jikov from the Java 638 motorcycle, despite laudatory reviews on the Internet, are unsuitable for installation on scooters. Carburetors with a large diffuser diameter should be installed only on forced high-speed engines. When installing such a carburetor on a standard engine, even with the selection of the necessary jets, you are unlikely to be able to set up a stable idle speed.
Engine starting and heating system
In search of an answer to the question of how to adjust the K 65 carburetor, you should familiarize yourself with the engine starting and heating device.
On carburetors K 65S and K 65V, a starting device with an autonomous drive is installed, on K 65G and K 65Zh - with a cable drive (found in motorcycles "Dnepr", "Ural"), and for K 65I, K 65D - a corrector-heater (often used in IZH brand mopeds).
A starter with an autonomous drive includes a plunger, a trigger, a needle, a protective cap, channels, a control rod, a fuel well and holes. The normal position of the device is considered closed.
The cable-driven starter is very similar to the previous version, with the exception of the presence of a rod. The position of the plunger is adjusted by a cable.
The corrector-enricher is characterized by a functioning system in which fuel enters the starting device from the float chamber. Fuel consumption is limited by the jet. The Soviet K 65 carburetor often has such a device. IZH can serve as an example of such motorcycles.
Repairing the carburetor of the Mole walk-behind tractor
The carburetor of the Mole walk-behind tractor was produced in Soviet times. Despite the fact that the Soviet industry was famous for its high level of performance and reliability, this carburetor still had several flaws. To understand them, you first need to completely analyze it into its components:
- Remove the cover by unscrewing the bolt on it. Underneath we find a gasket made of gas-resistant material, as well as a spring that needs to be pulled out.
- We take out the damper located there, under the cover.
- On the reverse side there is a float chamber, which also needs to be unscrewed. We remove the gasket.
- Then you need to remove the float by removing the pin from the corresponding hole. There is a special needle under the float, which also needs to be removed. On it we find a small elastic band, which under no circumstances should be lost, so we carry out all manipulations very carefully.
- We unscrew the fitting under which the gasoline filter is located.
- Then you need to remove the jet. After this, we need to pull out absolutely all the “internals” located in the carburetor body.
Such disassembly is necessary, because we gain access to the internal contents, which are considered the most problematic.
In other words, we turn this screw, but the mixture does not change, it remains constantly the same.
To change this, you need to make some repairs to the carburetor located inside the Mole walk-behind tractor. The main cause of problems with mixture adjustment is one circumstance. The fact is that inside the carburetor there is a special channel that runs to a tube located in the center of the carburetor.
A bulldozer is a tracked or wheeled earth-moving machine that belongs to the class of special equipment. Monster bulldozers are the largest in the world of special-purpose vehicles.
The market of our country offers products from a large number of world-famous manufacturers of snow removal equipment. It's all about the legendary German snow blower Huter.
In this pipe, in theory, there should be a through hole connecting this very channel. The problem is that on some factory units this pipe is installed askew, which leads to the fact that the channel and the hole on the pipe do not match.
There are cases when this hole is completely absent on the pipe, or it is of insufficient diameter. To carry out repairs, we need to perform several sequential steps:
We unscrew both adjusting screws. Please note that the screws have different tapers - the mixture quality screw has a larger taper. To pull out the pipe located inside, we need to slightly heat the part that is located outside
To do this, you can use a small fire on a gas stove, or heat it with a regular lighter. We warm it until we can hold the case in our hands. After that, we insert the pin into the hole where the cover fastening bolt was located. Using a hammer, carefully hit the inserted pin until the pipe pops out. As practice shows, the hole is drilled only on one side of the pipe, i.e. it's not end-to-end
We need to make a symmetrical hole on the other side of this tube, or modify the one that exists. If there is a second hole, but it is smaller in diameter than the first, then we need to sharpen it a little. To do this, we use a regular round needle file and bore the edges of the hole. Then we install the tube in its original place. This must be done in such a way that the through hole on it and the hole on the channel coincide exactly. Before inserting the tube into place, you need to slightly heat the carburetor body again so that it fits into place without problems. We insert the tube into place and, using the same pin that we used to push the pipe out, we insert it into place. We knock lightly so that the pipe does not go far inside - on the back side we should see a hole located just above the through hole, which should coincide with the channel. You need to make sure that the hole is strictly in the center. We take a thick wire and insert it into the channel hole. If everything is done correctly, then the wire should freely pass further through the through hole on the pipe and come out of it as a continuation of the carburetor channel. If the wire gets stuck, then you need to tap the pin a little more, pushing the pipe a little further. Next you need to reassemble the carburetor in reverse order.
That's the whole process of necessary changes in the carburetor design. Thanks to them, the adjusting screw fully fulfills its responsibilities for changing the quality, which, in fact, was required of it.
Installation and configuration
Before adjusting a new K 65 carburetor, it must be installed and adjusted.
First you will need to remove the carburetor cap. The throttle spring holds the needle through the lock. It has one round and two shaped holes. A round slot located in the center serves to attach the throttle cable. The T-shaped hole is necessary for attaching the propeller rod.
Having installed the carburetor on the engine, a cable is connected to the throttle, and the cover is secured.
Use the throttle to raise the throttle and check whether the diffuser opens completely. These actions should be performed several times. The diffuser should open and close freely without jamming.
Next, use a screw to raise the throttle so that a gap of 3 mm appears between its bottom edge and the diffuser generatrix.
If the K 65 device (carburetor) has a corrector, it should be removed as an assembly and the cable should be attached to the piston. After this, you should install the unit in place.
Next, you should adjust the position of the stops of the cable sheaths so that their free play is 2-3 mm.
The screw must be tightened until it stops, then loosen it by 0.5-1.5 turns. The fuel hose is connected to the fitting. Fuel should not leak at the connection points.
Then the peak starter turns and the crankshaft rotates 3 turns. The ignition is turned on and the start is made. After warming up, the starter or corrector can be turned off.
Motor scooter Ant: adjusting the clutch with your own hands
Like any other equipment, the “Ant” scooter can break down and need repair. But thanks to its structure, repairs can be done independently.
The “Ant” clutch is one of the weak points of the scooter, which needs frequent adjustment and cable replacement.
Carefully observe the clutch, as problems can be divided into 2 main causes:
- The clutch drives. In this case, problems are possible:
- the cable has become unraveled, rusted or bent;
- adjusting nuts are too tight;
- large free play of the lever;
- crooked discs.
- The clutch is slipping. Possible reasons:
- The cable has become unraveled, rusted or bent;
- The adjusting nuts need additional tightening;
- There is no free play of the lever;
- Crooked discs.
In any case, if there are problems with the clutch, you need to check the condition of the cable :
- If upon visual inspection it is not bent or damaged, then it is worth lubricating it with oil. To do this, you will need a mixture of gasoline and oil, diluted one to one. Using a syringe, pour this mixture into the casing.
- If the cable is bent or damaged, then there is only one way out - replace it with a new one.
If necessary, we proceed to check and adjust the clutch nuts.
Instructions for adjusting the clutch nuts:
- Unscrew the locknut of the adjusting screw;
- Using a screwdriver, slightly unscrew the adjusting screw;
- We twist it back until you feel that it has rested against something;
- We tighten the locknut;
- We look for the clutch lever on the steering wheel - press it, at the same time watch the pressure plate. It should not come off lopsided. If it comes off, then use a screwdriver to adjust the corresponding nuts until the disk moves perpendicular to exactly the axis of the basket
- On the engine, we look for the clutch lever free play adjustment bolt - tighten it so that the free play is 5-10mm.
Adjusting the fuel level
Adjusting the K 65 carburetor begins with setting the fuel level. To do this, turn the device over and remove the bottom of the float chamber. Next, replace the distance from the connector to the line that divides the float into two parts.
This distance is usually 13 mm with a possible deviation of 1.5 mm in both directions.
If the size on the carburetor does not fit into these frames, you should bend the float tongue in the desired direction.
It happens that the K 65 carburetor is configured correctly, but it begins to “overflow.” This means that the float has leaked.
Testing this theory is easy. You need to fill the bath with warm water and immerse the float in it for a minute or longer. If bubbles appear, the float is faulty.
Adjusting the ignition timing
We install the piston at the top dead center (TDC), insert the bore gauge of a caliper into the spark plug hole, extend the bore gauge until it rests on the bottom of the piston, remove the caliper from the hole and extend the bore gauge to the plus side by 3.5-4 mm and fix the resulting value with a locking screw.
Turn the engine a little clockwise, insert a caliper into the spark plug hole, turn the engine counterclockwise until the piston touches the bore gauge.
If you have an indicator, then the matter becomes much simpler: fix the indicator in the spark plug hole, reset the scale to zero, turn the fan clockwise until the indicator pointer reads 3.5-4 mm.
We insert tissue paper between the contacts of the breaker, unscrew the adjusting bolts, move the contacts along the grooves in a clockwise direction (to the right), as soon as the paper falls out, we fix the contacts with the bolts.
Adjusting mixture enrichment
Before starting adjustments, be it the carburetor model K 65 of the Ural, Dnepr motorcycle, Buran snowmobile or other vehicles, the engine should be warmed up.
Then the minimum stable idle speed is set. To do this, use the screw to lower the throttle. Afterwards you need to increase the number of revolutions to the maximum possible. The screw is rotated in one direction or another.
Slowly the speed is again reduced and increased. This should be done 2-3 times.
After the manipulations, you should check how the engine reacts to the position of the throttle. To understand how to set up the K 65 carburetor, you need to determine the required level of enrichment of the fuel mixture for the engine.
To do this, carry out such an experiment. The throttle opens sharply. If the engine stalls, then the mixture should be enriched. To do this, turn the mixture quality screw 1/4 or 1/2 turn.
A stalling engine when the throttle is closed sharply indicates the need to make the mixture leaner. In this case, the mixture quality screw needs to be adjusted by 1/4-1/2 turn.
Popularity [edit | edit code]
“Ant” gained popularity already during the years of the USSR, since in fact it was the only small truck available. In rural areas it has been widely used and is used for small household transport. This type of scooter is still popular as of 2022, although its production was discontinued 25 years ago. The advantages of a motor scooter are its high load capacity, fairly high strength, and good cross-country ability, especially after installing B-19 wheels (from tractor rakes) or modern ones from light ATVs. Spare parts for the Ant continue to be produced by various companies, including in China, although their quality has dropped significantly. “Ant” continues to be used both for its intended purpose and as a base for various homemade products: tricycles, ATVs. Motor scooter units are also popular, for example, the “Ant” reverse gearbox is in demand among home-made people who build various all-terrain vehicles “caracats” on low-pressure tires.
Adjusting the quality of the mixture in operation
Adjustment of the K 65 carburetor under operating conditions is carried out by moving the metering needle relative to the lock. This should be done in a certain order.
The dosing needle is set to the middle position. To lean the mixture, the lock moves upward. At the same time, the gap between the dispenser cone and the wall of the atomizer becomes smaller.
Moving the lock down will result in a richer fuel mixture.
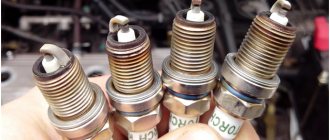
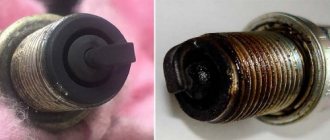
The color of the spark plug electrode insulation will indicate the need for adjustment. You should pay attention to it after 30 km. Under normal operating conditions, its whitish color indicates a poor mixture. A dark brown insulator with traces of soot indicates the need to lean the mixture.
More video
How to set electronic ignition on a VAZ 2107 carburetor video
How to change the ignition switch on a Chevrolet Niva video
How to prepare a dog for an exhibition yourself video lessons from scratch
How to set tags on alpha video
How to start a moped without an ignition key video
How to set the ignition on a VAZ 2106 using video tags
How to check a spark plug with a multimeter video
The electrical circuit of the Ant scooter is quite simple and does not contain heavy components. It is used for three main tasks:
- Ignition of the air-fuel mixture in the cylinder. Due to this action, the piston moves, transmitting torque to the flywheel.
- Starting a cold and warm engine.
- Supplying current to lighting fixtures and signal signs (turn signals, parking lights, brake lights).
Ant's electrical equipment is a system with one wire , and the second is the body of the moped itself. All equipment has excellent insulation, eliminating the possibility of short circuits and harm to the driver. Maintenance of electronics on a motorcycle consists only of regular cleaning of the terminals. However, to find the problem, you need to keep a tester at hand. He will accurately determine the problem that is preventing the operation of electrical equipment.
Adjusting the carburetor of the Ural motorcycle
For an example of adjusting the K 65 carburetor, you can consider this procedure on a Ural motorcycle.
First you need to remove the air leak. Next, use a flat-head screwdriver to unscrew the screws. The K 65 carburetor of the Ural motorcycle requires unscrewing the screw 1 turn.
After this, you need to set the play on the cables. It should be the same and equal to about 3 mm.
After warming up the engine, begin to tighten the idle speed screw to the minimum stable speed. Then use the mixture quality screw to find the maximum speed. The procedure is repeated twice. The carburetor is adjusted.
Chinese models
Adjusting the carburetor of a Chinese chainsaw, for example, Carver, is carried out in almost the same way as factory models.
There are the same three main adjustment screws L, N, T. Sometimes such models have the ability to adjust the idle speed. But as a rule, employees of specialized services and owners of such saws claim that it is not always possible to set up a high-quality Chinese chainsaw right away. For classic Chinese models, screw L should be loosened 1.5 turns from the maximum value. Screw H must be loosened one revolution from the maximum. Idle speed is adjusted in the same way.
Any chainsaw is equipped with a two-stroke single-cylinder carburetor engine. Early models of chainsaws were equipped with contact ignition, but now almost all manufacturers use electronic ignition, so there is no need to constantly clean the contacts and adjust the gap between them.
The air-fuel mixture to operate the engine is mixed in the carburetor. Using a special damper, you can manually lean or enrich the fuel mixture for a specific purpose - for example, for cutting hard wood.
Both the health of the engine and the performance of the chainsaw directly depend on the good technical condition of the carburetor. Let's take a closer look at how a chainsaw carburetor works.
Carburetor synchronization
After tuning, the K 65 carburetor (Ural) must be synchronized. This can be conveniently done using a tachometer. In the absence of such equipment, synchronization can be performed using the speedometer.
To do this, place the motorcycle on a stand and start the engine. 4th gear is set. Remove the cap from one of the spark plugs and adjust the speedometer reading to 50 km/h. The gas handle is fixed with a bolt.
One cylinder turns on and the other turns off. The length of the cables is adjusted using fittings. At the same time, they achieve the same speedometer reading.
When removed, the spark plug cap must be grounded and shorted to the ground of the motorcycle. In this way you can adjust the Ural carburetor.
How to adjust the carburetor on a Druzhba-4 chainsaw
Adjusting the carburetor of the Druzhba-4 chainsaw is required when the engine starts to work incorrectly - it stalls at idle, does not pick up speed when gas is applied, and “fails.”
To access the adjusting screws of the KMP-100 carburetor, you do not need to remove the housing cover; they are always open and accessible. There are no screw markings on the carburetor body, like on modern chainsaws. The first screw, which is located closer to the cylinder, regulates the fuel supply at low and medium speeds. The second screw is the main screw, it regulates the fuel supply at maximum speed
Required Tools
A screwdriver (minus) is required for operation. If desired, you can use an electronic tachometer. It will show the number of revolutions before and after adjustment.
General adjustment algorithm
The carburetor is adjusted in different ways. The simplest and most effective is ongoing adjustment during operation.
Lots of gasoline - spin
- The engine is warmed up for 5-10 minutes.
- If in the “full throttle” mode the engine operates as if idling (does not develop speed due to excess gasoline in the fuel-air mixture), the second (farthest from the cylinder) screw is tightened clockwise 1/4 turn.
- If the engine begins to work better, tighten it another 1/4 turn. If the engine starts to stall when the gas is fully applied, the screw is unscrewed back.
Low on gasoline - unscrew
If the engine stalls in the “full throttle” mode (there is not enough gasoline in the fuel-air mixture), the adjustment begins by unscrewing the second screw by 1/4 turn and testing the operation of the engine. If it gets better, unscrew it some more until the engine begins to “choke” and run as if idling at full throttle. Then the screw is tightened back.
After adjusting the second screw, check how the engine operates in the transition from idle to medium and maximum speed. If there are dips, unscrew the first screw 1/4 turn and test changes in engine operation.
As a result, the optimal operating mode of the engine is found through such trial regulation.
Adjusting the idle speed on the Druzhba-4 chainsaw is done using a screw located on the gas handle. Its position determines how far the throttle valve in the carburetor is open at idle.
Idle speed is adjusted based on two requirements:
- The engine should not stall.
- The chain should not spin.
Adjustment in a different sequence is possible. The screws are first tightened to the end, then unscrewed by 0.5 - 3 turns (different sources indicate different numbers of turns).
The video shows a simple and understandable process for adjusting the KMP-100 carburetor on the Druzhba-4 chainsaw from the screws position “tightened completely and then turned out”:
For beginners, we recommend watching a more detailed video about adjusting the KMP-100U carburetor of the Druzhba-4 chainsaw. The author of the video tells everything that is useful and everything you need to know. Just a whole step-by-step guide from A to Z.
Step-by-step algorithm
- Unscrew the fastening screw.
- Remove the fuel hose.
- Unscrew the top damper cover.
- We remove the carburetor.
- Remove the membrane cover to adjust the level. You need to unscrew 6 screws in a circle.
- Let's half the body and assess the condition of the membrane, it must be intact - this is the main thing, cracks, scuffs, and tears are not allowed.
- We evaluate the performance of the mechanism responsible for the operation of the valve.
- We blow through all the holes and clear out any debris if there is any.
- We set the level by adjusting the height of the tongue; it should be on the same edge as the body.
- If everything is done correctly, then by applying, for example, a ruler, you will see that the tongue and the edges of the body are on the same level.
- We unscrew the screw with the needle from the central jet and assess its condition, clean everything from dirt, if there is any, blow it out in any case. The screw located above, also visible in the photo, is responsible for idle speed; it also needs to be unscrewed, the condition assessed and blown out with air.
- This completes the cleaning, put everything back together in the reverse order and put the carburetor back on the chainsaw.
- Don't forget to replace the air filter and pump up the fuel before starting.
- Let's try to start the chainsaw.
Possible nuances and problems
In any case, when tightening the screws all the way, you need to remember the number of turns made for each screw. This will make it possible to return to the original adjustment if suddenly the chainsaw, adjusted according to the recommendations, does not start at all.