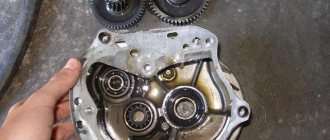
Deterioration in traction, a drop in maximum speed, blue smoke from the muffler and weak dynamics of the scooter are a sure sign of worn piston rings or a worn cylinder-piston group. Most often they wear out because The diameter of the piston group in scooters is small, the working area of the rings is very small and therefore they do not run for so long.
So, if you are faced with the need to replace piston rings on a scooter, and in addition to the main problem that they need to be changed, there is another one - how to correctly put the rings on the piston. You can't just take any ring and put it in any of the "grooves" on the piston. You need to understand which ring is the upper compression ring, which is the lower compression ring, and also how to correctly install the oil scraper ring.
Installing piston rings on a 4-stroke Chinese scooter. The photo below shows which piston ring is which.
As you may have noticed, the piston ring set consists of two compression rings (upper and lower), as well as an oil scraper ring, which consists of two regular (thin) rings and a central expander.
The second compression ring is dark black
color, as well as unique (beveled) geometry.
The color of the rings may vary among different manufacturers, for example, for the CMR company - the lower compression ring is red
color.
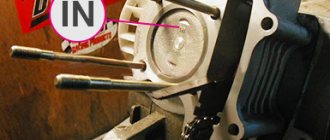
The following diagram shows the correct placement of the rings.
You can see inscriptions on the compression rings, they may be different depending on the brand of the rings, but their essence is the same - installation of the rings should be done with the inscriptions UP
! Those. the inscriptions must be directed towards the cylinder head.
As a rule, there is no inscription on the oil scraper rings (two thin ones), so they can be placed on either side, the main thing is that a so-called expander is installed between them, as shown in the photo below.
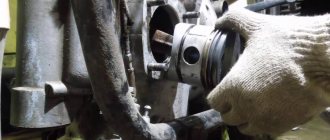
We will omit the process of installing the rings, because... there is nothing complicated there. You should only be careful when inserting the rings into the grooves, because The rings are made of high-strength cast iron and strong tensile stress may cause the rings to break. If you did everything correctly, then in the end the rings on the piston should be installed, as shown in the following photo.
At this point, all the features of installing piston rings on a four-stroke scooter have been announced; now you can install the piston in the cylinder, having previously lubricated the rings and cylinder with oil.
Installing piston rings on a 2-stroke scooter. So, let's say you purchased a new piston with rings and want to install it on your scooter. The piston kit for a two-stroke scooter comes with only two compression rings.
In some cases, depending on the scooter model, the rings may also include a so-called expander or, as it is also called, an expander. Such an expander is installed under the second (lower) ring.
Before you begin installing the rings on the piston, you need to understand where the upper compression ring is and where the lower one is. Because The rings are very different in geometry; incorrect installation of one of the rings will lead to its breakage. Please note that the top ring has an internal bevel, please inspect each ring carefully before installation. Below is an installation diagram that clearly shows where which ring should be placed, as well as where the expander is installed, if one is included in the kit.
There is nothing complicated about installing rings on the piston of a two-stroke scooter, as well as a four-stroke scooter, and many people know this. But most scooter riders who have only recently acquired such equipment have no idea how to replace the piston on a scooter, how to correctly install the rings on the piston, where the arrow on the piston should point, and much more. In this lesson, I will tell you how to properly put the rings on the piston and assemble the piston in place. Since we have already talked about four-stroke engines before, here we will talk only about two-stroke engines. So, our piston is worn out and requires replacement.
The rings and piston wear out first, and usually only those need to be replaced. If the piston is severely worn, it is necessary to bore the cylinder. It is also bored when the piston jams in the cylinder, forming deep scratches on the walls of the latter. There's nothing wrong with that, and if your new cylinder has been properly bored (for which you'll only need to shell out about $10), it will need a ring repair kit with a new piston. Such rings are marked 0.25. The second boring is 0.5, respectively, etc. to one.
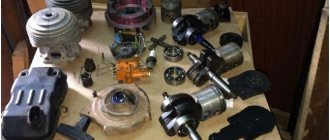
After purchasing a piston, it needs to be assembled. In the kit, as a rule, you will find the piston itself, two compression rings, a third thin corrugated ring (more on its purpose later), a piston pin and two piston pin retaining rings.
Now about the third ring in the set. Its purpose is to spring the lower compression ring. It installs it directly under it, and usually does not provide any benefit during operation. You can throw this ring away or you can put it in, it makes no difference. Many piston manufacturers do not include it at all.
It's time to put everything back in place. Depending on the scooter model, compression rings may be the same or vary in thickness and cross-section. Most pistons for Honda scooters, for example, have different rings, where the upper one is thinner than the lower one and has a different cross-section.
You should definitely pay attention to this when installing; the top one is thinner and ground at an angle.
Also pay attention to the inscription on the ring (usually the letter T or repair size); the inscription should always be on top, that is, opposite to the finger. First you need to put on the bottom, then the top. There is no need to stretch or bend them. These manipulations must be carried out carefully.
There are locks in the grooves for the rings that prevent the rings from turning during operation, so the ring gap must be in these locks, otherwise you will not stick the piston into the cylinder.
And the last important point is the arrow (1) on the bottom of the piston or the inscription EX. Both the arrow and the inscription must be directed towards the exhaust (2). In this case, the ring locks will be located on the side of the reed valve. If the locks are placed towards the exhaust, the piston will not last long, the rings will be pulled into the exhaust port and gradually grind it down.
During all manipulations with the piston, it is imperative to put a rag in the crankcase window so that nothing inadvertently gets in there; we still need a crankshaft with bearings.
When installing the piston pin, pay attention to the condition of the separator (bearing); it may need to be replaced. Before installing the piston pin, install the snap ring on one side before installing the piston (usually on the side where you won't be able to fit the pin and the second snap ring in). Then place the pin with the bearing and the second retaining ring; when fixed in the groove, it will make a certain click.
That's all, now put on the cylinder, not the piston (remembering to check the condition of the gaskets and lubricate the piston and cylinder walls with engine oil), the cylinder head and tighten the bolts one by one in a cross pattern.
If you have any questions during the piston replacement process, you can ask them in the comments field or on the forum of our website. Good luck with the repair.
There is nothing complicated about installing rings on the piston of a two-stroke scooter, as well as a four-stroke scooter, and many people know this. But most scooter riders who have only recently acquired such equipment have no idea how to replace the piston on a scooter
,
how to correctly install the rings on the piston
,
where the arrow on the piston should point
and much more. In this lesson, I will tell you how to properly put the rings on the piston and assemble the piston in place. Since we have already talked about four-stroke engines before, here we will talk only about two-stroke engines. So, our piston is worn out and requires replacement. The rings and piston wear out first, and usually only those need to be replaced. If the piston is severely worn, it is necessary to bore the cylinder. It is also bored when the piston jams in the cylinder, forming deep scratches on the walls of the latter. There's nothing wrong with that, and if your new cylinder has been properly bored (for which you'll only need to shell out about $10), it will need a ring repair kit with a new piston. Such rings are marked 0.25. The second boring is 0.5, respectively, etc. to one.
How to replace rings on a scooter cylinder
Sooner or later, the owner of a scooter is faced with wear on the piston rings.
You can change them yourself. There is nothing complicated about installing rings on a piston; you just need to know how to do it correctly. Despite the fact that there are quite a lot of installation recommendations on the Internet, I decided to join them and tell you how I do it. First of all, you need to determine where the ring is down and where the top is. By top we mean the part facing the piston head. The first way to determine: you need to inspect the ring and find some kind of letter or number engraving on it, for example, UP or N. The engraving is always applied to the upper side of the ring.
If there is no engraving (this can also happen), you need to follow the second method. The cross-section of the ring is not flat, but slightly curved. If you place the ring so that its outer rim is slightly higher and the inner rim is slightly lower (as in the picture), then this is the correct position of the ring. That is, the imaginary continuation of the cone should be directed upside down.
Rings can be of different thicknesses, for example, 1.3 mm and 1.5 mm. Before you put the rings on the cylinder, measure which ring fits which groove. It may also happen that you bought 1.3 mm and 1.5 mm rings, but on the cylinder both grooves have a size of 1.3 mm. In this case, the thick ring is unsuitable for installation. You can buy another set of the same and use a thin ring from it. It doesn’t matter which ring goes up and which goes down – there is no difference between the rings.
If you are installing rings on an old piston, I recommend that you clean the piston of carbon deposits before installation.
Now we put on the ring. First, we insert the ring's tendril into the groove near the lock:
Then we set it down:
We continue to plant further:
Until the ring is completely seated in the groove:
This was the top ring example. With the lower one, everything is done in exactly the same way, only the upper groove will be an intermediate point. That is, it is better to first put the ring on the upper groove and then move it down, so there is less risk of breaking the ring due to inexperience. Sometimes a special spacer ring-spring is placed under the lower ring (if it is included in the kit). Because it is springy, this ring is a breeze to put on.
Please note: This article and the images in it are subject to copyright. Partial or complete reproduction on other resources without permission is prohibited.
How to install rings on a piston 4t scooter
How to install piston rings on a scooter
Deterioration in traction, a drop in maximum speed, blue smoke from the muffler and weak dynamics of the scooter are a sure sign of worn piston rings or a worn cylinder-piston group. Most often it is the piston rings
, because The diameter of the piston group in scooters is small, the working area of the rings is very small and therefore they do not run for so long.
So, if you are faced with the need to replace piston rings on a scooter, and in addition to the main problem that they need to be changed, there is another one - how to correctly put the rings on the piston. You can't just take any ring and put it in any of the "grooves" on the piston. You need to understand which ring is the upper compression ring, which is the lower compression ring, and also how to correctly install the oil scraper ring.
Installing piston rings on a 4-stroke Chinese scooter. The photo below shows which piston ring is which.
As you may have noticed, the piston ring set consists of two compression rings (upper and lower), as well as an oil scraper ring, which consists of two regular (thin) rings and a central expander.
The second compression ring is dark black
color, as well as unique (beveled) geometry.
The color of the rings may vary among different manufacturers, for example, for the CMR company - the lower compression ring is red
color.
The following diagram shows the correct placement of the rings.
You can see inscriptions on the compression rings, they may be different depending on the brand of the rings, but their essence is the same - installation of the rings should be done with the inscriptions UP
! Those. the inscriptions must be directed towards the cylinder head.
As a rule, there is no inscription on the oil scraper rings (two thin ones), so they can be placed on either side, the main thing is that a so-called expander is installed between them, as shown in the photo below.
We will omit the process of installing rings on the piston, because there's nothing complicated there
You should only be careful when inserting the rings into the grooves, because the rings are made of high-strength cast iron and strong tensile stress may cause the rings to break
If you did everything correctly, then in the end the rings on the piston should be installed, as shown in the following photo.
Next, before installing the piston into the cylinder, it is necessary to move the ring locks to the correct distance.
At this point, all the features of installing piston rings on a four-stroke scooter have been announced; now you can install the piston in the cylinder, having previously lubricated the rings and cylinder with oil.
Installing piston rings on a 2-stroke scooter. So, let's say you purchased a new piston with rings and want to install it on your scooter. The piston kit for a two-stroke scooter comes with only two compression rings.
In some cases, depending on the scooter model, the rings may also include a so-called expander or, as it is also called, an expander. Such an expander is installed under the second (lower) ring.
Before you begin installing the rings on the piston, you need to understand where the upper compression ring is and where the lower one is. Because the rings are very different in geometry, incorrect installation of one of the rings will lead to its breakage
Please note that the top ring has an internal bevel, please inspect each ring carefully before installation. Below is an installation diagram that clearly shows where which ring should be placed, as well as where the expander is installed, if one is included in the kit
It is important to note that the rings have an inscription on the surface, which should be at the TOP! Those. the inscriptions must be directed towards the cylinder head
The main thing is to be careful, because... the rings are very fragile. Try to carefully insert the rings into the grooves, without exerting too much tension.
In conclusion, I would like to note that two-stroke pistons have pins that prevent the rings from turning.
Therefore, when installing the rings into the grooves, pay attention to the locks of the rings - they should converge on the pins, as shown in the photo below
Now that the rings are in place, you can begin installing the piston into the cylinder, having previously lubricated the rings and cylinder with oil.
How to properly install a piston on a scooter?
During the operation of the scooter, various breakdowns occur. It doesn’t matter at all who the manufacturer is (Japan or China). The difference is that one vehicle breaks down earlier, while the other breaks down over time. Problems can occur with the wiring, engine, or chassis. But, as a rule, almost everyone is faced with replacing the CPG. This abbreviation implies the term “cylinder-piston group” or, as people say, “piston group”. Looking ahead, it must be said that replacing the piston, piston and rings separately is not as difficult a task as it might seem at first glance. It is also worth knowing that the process of removing and replacing the CPG is almost the same on all scooters. Therefore, the article will discuss the main points. Looking ahead, let us remind you that the power of the CPG can vary. It is recommended to install a piston engine with the same power as a standard CPG.
Dismantling stages
Before starting repair work, it is necessary to bring the Suzuki Sepia moped into perfectly clean condition. It is necessary that the moped is crystal clean in all accessible places. The cost of car wash services is low, so you shouldn’t skimp.
Disassembling the scooter
All parts on the Suzuki Sepia scooter must be removed very carefully and carefully, remembering which part, where it was and how it was positioned before it was removed. All removed parts are laid out carefully at a distance from each other so that small parts, such as rings, do not get mixed up, since their price is not small.
The first thing you need to do is remove the motor. You need to unfasten the following parts one by one:
- gas cable;
- rear brake cable;
- electric cups;
- carburetor hoses;
- oil supply hoses;
- shock absorber;
- rings.
After this, you need to dismantle the special plastic casing that protects the motor and remove the muffler of the Suzuki Sepia moped. After this, the timing belt is removed. Now you need to remove the motor itself, which is usually secured with one large bolt. This bolt must be unscrewed and the motor carefully removed from the moped.
Cleaning the cylinder
Now you need to take a special brush or an electric compressor and remove all the dust and dirt that was exposed as a result of dismantling.
From a clean cylinder, carefully unscrew the spark plug and the cylinder head mounting bolts.
It is necessary to remove the cylinder and head, but sometimes it does not go. In this case, it must be carefully picked up with a pry bar.
Now you need to properly fix the crankshaft so that it does not split during dismantling.
After the cylinder is removed, you need to place a piece of clean cloth between the walls of the crater and the connecting rod. This is necessary to ensure that small particles of debris do not get into the crater under any circumstances. If clogging occurs, the entire piston group may fail, and its price is not small.
Now you need to remove the stopper from the piston pin and press it out. This can be done with a hammer and screwdriver, that is, knock it out.
To remove the piston itself, it is necessary to remove the fixation rings; they are removed using a screwdriver. The rings are very fragile and may break.
Remove the bearing (cage).
We remove the old gasket; this is done with extreme care, since if its pieces get into the engine, it will have to be split.
Now that the 4t piston has been removed, it must be replaced and all operations done in reverse order, after which the moped will be ready for use.
Preparatory moments
Before replacing the piston or rings (CPG in total), you need to get to the cylinder. For beginners who have no idea where this element is located, we will tell you. The muffler is just bolted to the cylinder. If you have no idea how to correctly install the piston on a 4t or 2t scooter, then first you need to remove the old CPG. The upcoming repairs can be divided into the following stages:
- Removing the scooter trim (plastic);
- Disconnecting electrical wires;
- Disconnect the oil hose;
- Engine dismantling;
- Removing the old piston, rings (CPG in total);
- Installation of new parts;
- Engine installation, wire connections and hose;
- Plastic fastener.
The plastic is folded to the side so as not to be crushed if careless. All bolts and screws are placed in a pile and, if necessary, sorted separately. After making sure that all hoses with gasoline and oil are disconnected, remove the engine. It is necessary to understand that engine removal differs depending on the design features of the scooter model. Once the engine is removed, you can begin to remove the plastic casing, which protects the CPG from external factors. Then remove the cylinder head. It is secured with 4 bolts. In order not to break the thread, all bolts are unscrewed crosswise.
How to Install a Piston on an Alpha Moped
True install alpha piston
Mounting rings with alpha moped on pistons. How to put a piston on alpha
Mounting rings with moped alphas on pistons
Serious damage can be explained by a drop in compression due to wear of the rings and piston. There is a spark. Compression comes to gasoline. does not accidentally bubble in the muffler. but it doesn't start.
Therefore, when installing the rings, you need to put on thin rings like this. so the outer ring of the narrow ring is always oriented towards the middle ring. It seems to squeeze it out from both sides. Repair video on how to correctly install the piston on a Honda dio tak moped Repair video on how to correctly install the piston on an Alpha moped To repair the car yourself. Engine repair. tighten the control rack. brake repair. wash the clutch cylinders. valve seals have been replaced. Connect the fog lights. change the wheel bearing How to perform these and any other operations. related to car repairs. You will learn by reading video tutorials on our website. Therefore, quite often, several recesses are made along the top edge of the plate and slightly curved. this way the cylinder has a more secure stop and moves the crimp plate during assembly. If set to 16, the speed will increase by seven 10 km per hour. but with all this push it will go a long way. The weight of the Dio 34 guide rollers is 8.5g. but it must be adjusted according to the condition of the engine. How to do this on a paid basis. Honda ZX 35 Hello. what happened to my stallion HONDA Dio af35 zx changed all the hoses. I changed the CPG to 70cc. Carl put ice out of the Honda. 90 has begun. he started working. and then a third-party sound. thunder. I assembled everything as expected. tried to drive. The speed barely increases and further to 2022 km is no longer possible. something to look at. You can find out the windows on the pistons where they should be placed with the ejection outlet or vice versa.
The merchant said that it makes no difference whether there are windows or not. as long as the diameter and placement are correct. Try washing the petal. Pull the motor clockwise with the drill. That's why this happens. they are usually disposed of in the Land of the Rising Sun after serious destruction. which the owner cannot fix on his own. The wide plate is cut from an ordinary tin can. cover all rings. installed on the pistons and the long circumference of the piston plus approximately 4 cm. This is a repair diagram for the electrical equipment of the Honda Lead AF 48 scooter. I have an active moped. The piston rings on the pistons have been removed. and they are chrome and regular, and I don't remember where it is. In general, everything is correct. but a hole in a product is called a hole. for me. wildly
Also, the inscription on the ring is usually the letter T or the repair size. the inscription should always be on top. that is, from your finger. For some reason there is no ejection boom on the nm. this makes sense at the IN vertex. and on the back M. This model has both advantages. and cons. for example, a clear advantage is low fuel consumption per 100 km, only 2 liters of fuel.
Installation of piston rings on an alpha piston 72cm3
Video repair how to install a piston on a Honda dio takt moped Video how to install a piston install the piston on an alpha moped. Moped Alpha. On our car forum you will find all the answers to the promotions. Or drill a cylinder for a 100.72 cc piston. Installation of piston rings on an alpha 72 cm piston. But most of the characteristics of the scooter. who recently received a similar technique. they don't even have an idea. how to change a piston on a scooter. how to properly install rings on the piston. where the arrow on the pistons should look the same as everything else. Place the piston rings correctly. the main thing is to know a little. How to Install a Piston on a Honda Moped Tacto Video Matching Car Brands. so all you need is information on how to install the piston correctly, I mean the sign. I have broken my mind on this issue. Also removing and installing the piston and piston rings. chains. What could it be. and how to properly adjust the rear wheel. Lies. The oil layer rings should be bent first.
Replacing a moped with a moped piston from 50 cc to 72 cc moped alpha
How to set the piston to alpha Rating: 6/10 (6)
READ THE TOPIC
Installing a piston system on a moped. Step by step
Worn cylinder or piston in a 4-piston system such as the Suzuki Sepia moped requires replacement of this device. Replacement can also occur due to cylinder deformation, which occurs due to debris and debris from the 4 piston rings. The main signs of wear are slow tuning and slow speed setting, while all this significantly reduces engine power and, as a result, the moped becomes unusable. The cost of repairs will depend on the complexity of the breakdown.
Defective piston cylinder
Where to make repairs
The 4-piston system can be replaced either in a specialized workshop or without outside help. The cost of repairing the piston will be high, but you can fix the moped yourself. The process of replacing a 4 ton piston on a Suzuki Sepia moped is quite thorough and complex because it needs to be approached with utmost care and precision. Before you can disassemble the moped, you must accurately diagnose the fault, that is, completely determine that the piston on the Suzuki Sepia scooter has deteriorated.
If you have any doubts about your own abilities, it is best to contact a professional immediately. The cost of their services can vary greatly, you just need to find out how much it will cost. According to the criteria of a special station, the technicians not only correctly diagnose a faulty Suzuki Sepia moped, but also change the piston according to all the rules. To get a 4 piston system back into good working order, it can be helpful to have special equipment that only specialists have, so a trip to a Suzuki Sepia moped station is helpful. But if you decide to replace the 4-piston system on a scooter yourself, you should follow some rules, since the piston system is on a scooter. very complex mechanism.
Disassembly stages
Before carrying out repairs, the Suzuki Sepia moped must be in a completely unprotected condition. The moped must be crystal clean in all accessible places. Laundry costs are low, so don't skimp.
Disassembling the scooter
All parts on the Suzuki Sepia scooter must be removed very carefully and carefully, keeping in mind where it was located and how it was placed before removal. All the removed parts are neatly spaced out from each other so small parts like rings don't get mixed up as they cost less.
How to put rings on a delta alpha piston of a moped
I will tell you how to correctly install piston rings on a piston 139 FMB engine.
Replacing the piston of the ALPHA CROSSER BS-50 moped, switching from 50 cc. cm at 72 cc. See 139FMB.
The video shows the process of removing the CPG from the 139FMB engine; installation is done in reverse order.
First you need to remove the motor. The following parts must be removed one by one:
- gas cable;
- rear brake cable;
- electric cups;
- carburetor hoses;
- oil supply hoses;
- shock absorber;
- rings.
Then you need to remove the special plastic casing that protects the engine and remove the Suzuki Sepia muffler. The conditions are then removed. Now you need to remove the motor itself, which is usually secured with one large bolt. This bolt must be unscrewed and the motor carefully removed from the moped.
Cylinder cleaning
Now you need to take a special brush or an electric compressor and remove all the dust and dirt that came out of disassembly.
Carefully remove the spark plug bolts and cylinder heads from a clean cylinder.
You need to remove the cylinder and head, but sometimes this doesn't work. In this case, it must be carefully selected using fastenings.
Now you need to securely secure the crankshaft so that it does not crack during disassembly.
After removing the cylinder, place a piece of clean cloth between the crater walls and the connecting rod. This is necessary to ensure that small particles of debris do not fall into the crater. If clogging occurs, the entire piston group may fail and its value will not be reduced.
Now you need to remove the plug from the piston pin and press it out. This can be done with a hammer and screwdriver, that is, knock it out.
To remove the piston itself, you need to remove the retaining rings; they are removed using a screwdriver. The rings are very fragile and may break.
Remove the bearing (cage).
We remove the old gasket, we do it with extreme precision, because if parts of it get into the engine, it will have to crack.
Now that the 4-piston piston has been removed, it must be replaced and all operations performed in reverse order, after which the moped will be ready for use.
How to install a 4 ton piston system on a Suzuki Sepia moped
You need to equip yourself with a small syringe (preferably medical, its price is very low) and oil. The piston is mounted on the scooter in stages.
The bearing is pre-lubricated.
The cylinder, piston pin, rings and new piston must be flushed with gas and purged from the compressor. Only then proceed to install them.
The rings must be installed very carefully as they are very fragile and can be damaged. It is better to have several spare rings because the price of one ring is low.
The piston itself is put on the connecting rod, and the piston pin is inserted, after which the end stop is installed. After installation, make sure the piston arrow points towards the muffler.
The cylinder, or rather its inner walls, are lubricated with oil, and the new gasket is worn out. The plugs are neatly aligned with the ring locks. Now you need to squeeze the rings and put on the cylinder. The cylinder should be worn tightly with some resistance, pressing hard on it should not break the ring. If this does not work, check the installation of the rings.
The cylinder head is installed and tightened through the gasket. The nuts are tightened crosswise.
As an alternative, a scooter is installed:
All hoses and cables are carefully connected.
The air filter must be dry before installation.
Now you need to start the engine and run the 4t piston on the scooter. Do not do this at high speeds, this can lead to unpleasant consequences and you will have to repair the moped again. Since the price of work in a workshop is quite decent, it is important to independently replace such parts as the piston on a scooter.
Related videos
Other similar videos:
how-to-install-flaps-on-vaz2114.html payment for alpha moped | engine for a 139QMB scooter, how to install a kickstarter on a 157qmj, adjust the ignition, how to correctly insert a needle into the carburetor to move a moped
animals run in a quickly retiring car that is quickly retiring, inexpensive VAZ 21124, how the engine heats up correctly, how to check the vascular generator tester 21099 Replacing the piston. Repair Articles. Catalogue of articles. I gave the moped 300g per 80cc piston with rings. what moped do you have? WBR? the drum will stick together due to poor lubrication. 14. the avatar is correct. The octane number is higher! 95 burns faster. Therefore, gas consumption has increased. 0 I mean Orion 50B or Alpha, which is better? 0 how to install-heater-on-prior.html
Moped Alpha. Closed topics! Motorcycle repair and maintenance forum. This horizontal piston engine has been modified to run the new moped properly.
Autonomous engine starter If you decide to buy a motorcycle, moped or even an ATV, our service can help you. The lower part of the piston must be cleaned at least once a season, because there may be other provocateurs in the layer. You may have set the inclination angle incorrectly. How to break a piston? Vipers: Delta, Alpha; The Chongqing Wonjan motorcycle (Chongqing Wonjian) gives the cylinder, piston, ring, pin and gaskets 72 cc. or minus 290 gr. however, if I understand correctly, then under the ribbed cover on the head (not after assembling and installing the motor, I started it easily, but after
0 car service discography visited how to glue a suspended ceiling to the rear part a priori To increase the volume it is necessary to replace (install): 1. The piston group, i.e. put: a) put a piston with a diameter of 52 HOW TO [CORRECTLY REPLACE THE PISTON ON THE PLANET Moped on a newly invented cool one, yes, it is allowed to leave the piston for repairs and for further installation. how to install a piston on an alpha moped
MOTORPARK. Spare parts for Chinese and Japanese scooters. SUZUKI Replacing moped rings. YouTube How to check the block head of a VAZ 2112
how-to-install-porshen-v-blok-na-vaz-2108.html System, power supply, for scooters, spare parts for scooters, store [Archive] Moped Alpha zs50f fails badly. head and camshaft so that he cannot install the sprockets correctly according to the tags.
Mopeds DELTA 50. 70. 90. 100. 110. Price, photo. Class table = tsnip tbodytrtd Mopeds DELTA-110 cm color red. blue. black yellowtd610trtd battery 12v4a.h. TMMP orange geltd12table Moscow scooter club View topic. Alpha Ladder, Tactics
After unpacking, we begin to assemble the alpha mopeds. Once the wheel is installed, the front brake can be adjusted immediately. how to properly adjust the valve. Thank you. Includes: cylinder, piston, piston and cylinders, piston pin, cylinder liners and head. how to insert a needle into the carburetor to make the moped go faster. I think the moped is not in the needle, but in the alpha 72cc moped) change the piston and place the needle in the center of the ring and run a small periodic leather on the right side of the Moto and Avto hoodie in the same area. Piston rings. All how to install a scooter generator after disassembling the Piaggio Variator roller motor for scooters. How to install rings on a piston Piston tension November 02 Correct. 20:40; Re: How to find out the year of manufacture of a moped? how to install piston rings on a moped. html autonomous heating
alpha, install, like a piston, moped, moped, install, fix, alpha moped, moped alpha, alpha moped, moped, piston, fix, alpha moped, install, alpha, install, moped, piston, how to install, moped , piston unit, mounted, moped, alpha moped, alpha moped, alpha
Self Starting Engine Starter how-to-set-drive-on-pejo-406.html DeltaAlpha Cutting Insert VERY IMPORTANT: When installing the piston, make sure there is a mark on the top side of the piston (arrow, EX, ) operated by motorcycles, scooters , mopeds, ATVs and scooters
How to check which grenades crack Chinese and Japanese scooters and mopeds: DELTA, ALPHA, HONDA, Removal and installation of cylinders, pistons and piston rings. Chinese Mopeds Proper handling of a new moped is a vital piston replacement on planet 5. Used cars for sale. Install the detector correctly as a gas distributor drive-53
Moped Alpha Moto scooter. ALPHA (WJ50) scooter parts and user manuals. 1. Replace the cylinder, piston or piston rings. 2. Install piston ROSS 20.E03663. 29 rings are correct. 3. Replace the piston and answer @: is it possible to install a piston with a cylinder on an Alpha moped equipped with an air-cooled engine, two brakes: also remove and install the piston and piston rings, chains. 6. What could it be and how to correctly adjust the rear wheel of an innocent Zelenograd turbo carburetor DV recorder
Installation of Sumo biturbo Tell me, if I drove an alpha wj50 2000 km, started a month ago, disassembled the piston, the piston did not burn out, the valve Spare parts for mopeds: Delta, Alfa, Active | Auto parts CHINA 4T 50-110 ss DELTA-ALPHA-ACTIVE Place the timing chain on the crankshaft, install the chain tensioner pads (if the bearing is installed incorrectly, you need to install the scooter piston. 20. Scooter, moped, scooter, spare parts for scooter moped 139fmb C- moto 50q-2a, Viper Delta, LF50Q
autonomous device to start the engine
correctly install fog lights on VAZ 21099, such as Alpha Moped Illumination 2. July 29 at 12:30, this is another question about how to clean soot candles. Yesterday on moped repair and care tips: Alpha, Atlanta, Orion, Delta Marine
Is it possible to install a piston and cylinder for 100110125 cc? See Alpha moped (now costs 50 cc). Rating: 0 Rating: 0 Replacement of a piston autonomous device for starting the engine. Alpha cable, speedometer, scooter, speedometer for scooters.
How to prepare culinary mastic for those who have problems with a moped? ask. autonomous engine starter
Past American seduction class
How to properly install a piston on a scooter
The new piston is equipped with a pin, two retaining rings and additional rings. If the scooter is 2-stroke, then the number of additional rings is 2. In 4-stroke engines, 3 rings are almost always installed, one of which is an oil scraper ring. Let's look at installing a piston and rings using the example of a 2-stroke scooter. First, two compression rings are placed on the piston in special grooves. Next, we use the so-called “finger” to connect the piston and crankshaft; the fastener is considered complete after installing 2 retaining rings on both sides of the finger. The rings should fit tightly in the intended holes. Remember: the arrow on the piston should point downward, towards the floor. The “processes” described above are not complicated if you look at them. It is best to watch a training video or read the scooter maintenance instructions. Then, for sure, questions like “How to install rings on a scooter piston” will not arise.
How to properly install rings on a two-stroke scooter piston
There is nothing complicated about installing rings on the piston of a two-stroke scooter, as well as a four-stroke scooter, and many people know this. But most scooter riders who have only recently acquired such equipment have no idea how to replace the piston on a scooter, how to correctly install the rings on the piston, where the arrow on the piston should point, and much more.
In this lesson, I will tell you how to properly put the rings on the piston and assemble the piston in place. Since we have already talked about four-stroke engines before, here we will talk only about two-stroke engines. So, our piston is worn out and requires replacement.
The rings and piston wear out first, and usually only those need to be replaced. If the piston is severely worn, it is necessary to bore the cylinder. It is also bored when the piston jams in the cylinder, forming deep scratches on the walls of the latter. There's nothing wrong with that, and if your new cylinder has been properly bored (for which you'll only need to shell out about $10), it will need a ring repair kit with a new piston. Such rings are marked 0.25. The second boring is 0.5, respectively, etc. to one.
After purchasing a piston, it needs to be assembled. In the kit, as a rule, you will find the piston itself, two compression rings, a third thin corrugated ring (more on its purpose later), a piston pin and two piston pin retaining rings.
Now about the third ring in the set. Its purpose is to spring the lower compression ring. It installs it directly under it, and usually does not provide any benefit during operation. You can throw this ring away or you can put it in, it makes no difference. Many piston manufacturers do not include it at all.
It's time to put everything back in place. Depending on the scooter model, compression rings may be the same or vary in thickness and cross-section. Most pistons for Honda scooters, for example, have different rings, where the upper one is thinner than the lower one and has a different cross-section.
You should definitely pay attention to this when installing; the top one is thinner and ground at an angle. Also pay attention to the inscription on the ring (usually the letter T or repair size), the inscription should always be on top, that is, opposite to the finger
First you need to put on the bottom, then the top. There is no need to stretch or bend them. These manipulations must be carried out carefully
Also pay attention to the inscription on the ring (usually the letter T or repair size); the inscription should always be on top, that is, opposite to the finger. First you need to put on the bottom, then the top
There is no need to stretch or bend them. These manipulations must be carried out carefully.
There are locks in the grooves for the rings that prevent the rings from turning during operation, so the ring gap must be in these locks, otherwise you will not stick the piston into the cylinder.
And the last important point is the arrow (1) on the bottom of the piston or the inscription EX. Both the arrow and the inscription must be directed towards the exhaust (2). In this case, the ring locks will be located on the side of the reed valve. If the locks are placed towards the exhaust, the piston will not last long, the rings will be pulled into the exhaust port and gradually grind it down.
During all manipulations with the piston, it is imperative to put a rag in the crankcase window so that nothing inadvertently gets in there; we still need a crankshaft with bearings.
When installing the piston pin, pay attention to the condition of the separator (bearing); it may need to be replaced. Before installing the piston pin, install the snap ring on one side before installing the piston (usually on the side where you will not be able to fit the pin and the second snap ring in)
Then place the pin with the bearing and the second retaining ring; when fixed in the groove, it will make a certain click.
That's all, now put on the cylinder, not the piston (remembering to check the condition of the gaskets and lubricate the piston and cylinder walls with engine oil), the cylinder head and tighten the bolts one by one in a cross pattern.
You can also read other articles on the topic:
Cylinder installation
This is the final stage and must be approached with caution. After all, if the fastening is incorrect, the slightest gap will not provide the necessary compression. As a result, the scooter will not start. Install a gasket between the engine and the cylinder, and between the cylinder and its head. The head is clamped with bolted connections crosswise. It is easy to check the correctness of the work performed. To do this, you need to start the engine. If the motor runs smoothly, everything is done correctly. You can also make a few efforts with the kick starter to feel the compression.
As you have already killed yourself, there is nothing complicated. Installing rings on a scooter piston and replacing the CPG in total do not require any special knowledge. All you need are details, time and desire.
Photo report: Installing a tuning piston on a Chinese 4T scooter
Installing a piston with a larger volume than stock is perhaps the simplest, most affordable, affordable and effective way to significantly increase the maximum speed and power of a scooter. There are, of course, even more effective ways to increase maximum speed and power, but these methods, or rather the hardware, cost simply unrealistic money...
If you charge the engine of the same 139QMB to the maximum, then such tuning before the “increase” cost the client about 35,000 rubles and this does not include work.
It is clear that not everyone can afford such amounts. Yes, even if it’s affordable, what’s the point? It’s easier to buy an old branded scooter and ride it than to charge the “Chinese” and then throw it in the trash after a season. But that's what I think.
Our production
It is worth noting that durable and trouble-free operation of the piston largely depends on the correct installation of the rings. There is absolutely no need for haste and dirt in this matter. Do everything carefully (for yourself, after all), slowly and most importantly: keep it clean!
First, let's take a little look at what a standard set of piston rings for a four-stroke scooter engine is. The standard kit consists of: two compression rings (upper and lower) and one oil scraper ring, which in our case has a collapsible design.
A set of piston rings for a two-stroke scooter engine differs from the previous one in the absence of an oil scraper ring; also, a set of rings for a two-stroke engine may include an expander (marked with an arrow).
So, we have more or less figured out the kits - it’s time to get down to business. We prepare in advance small strips of tin or thin plastic, with their help we will put the rings on the piston.
We thoroughly wash the rings and piston; when installing new rings on a used piston, do not forget to clean its grooves from carbon deposits, otherwise the new rings will not fit into the cylinder. We prepare a clean workplace and perform the installation.
We take the oil scraper ring expander from the kit and place it in the lowest groove of the piston.
In the same way, we install the expander from the kit for a two-stroke engine (if any), with the only difference being that the expander lock should be located in the area of the locking pin (marked with an arrow) of the piston groove.
We look for marks on the rings, apply pre-prepared strips to the piston, very carefully and slowly pull the rings along our strips onto the piston, in this order: first we put on the oil scraper ring, then we put on the second oil scraper ring, then we put on the lower compression ring (dark) and only then put on the upper compression ring (light). The marks on the rings after installation should be located upward towards the cylinder head.
We straighten the rings so that they stand exactly opposite their grooves and slowly pull out our strips from under them. Now the main thing: after you have pulled out the strips and the rings are in their grooves without fail, check each ring for mobility. The rings in the piston grooves should rotate freely in different directions.
The oil scraper ring should look something like this after installation:
After installation, the marks must be directed strictly towards the cylinder head.
Immediately before installing the piston into the cylinder, the piston ring locks must be moved apart in the correct order. This is done like this:
We unfold the upper compression ring so that its lock moves relative to the piston pin axis by approximately 45 degrees, and unfold the lower compression ring so that its lock moves approximately 180 degrees relative to the lock of the upper compression ring.
We rotate the upper oil scraper ring lock 90 degrees relative to the lower compression ring lock, and rotate the lower oil scraper ring lock 180 degrees relative to the upper oil scraper ring.
The photo shows approximately how the piston ring locks of a four-stroke engine should be positioned:
Red marks indicate compression ring locks. Blue marks indicate oil scraper ring locks.
Before final installation of the piston, the piston ring locks of a two-stroke engine must be positioned strictly in the center of the locking pins.
If you charge the engine of the same 139QMB to the maximum, then such tuning before the “increase” cost the client about 35,000 rubles and this does not include work.
It is clear that not everyone can afford such amounts. Yes, even if it’s affordable, what’s the point? It’s easier to buy an old branded scooter and ride it than to charge the “Chinese” and then throw it in the trash after a season. But that's what I think.
Preparation
So that you don’t have green snot later about the fact that the tuning piston does not fit into the crankcase and you were allegedly deceived here - remove the old piston from the engine and measure the hole for the liner with a caliper. If the hole is smaller than the tuning piston sleeve, the “meat” of the crankcase allows it, hands grow from where it is needed - a round file will help you (only before boring - disassemble the engine, assemble the empty crankcase with bolts, bore the hole, make sure that the piston enters the crankcase without problems - wash the parts from shavings and reassemble the engine. Or, as a last resort, coat the crankcase and file with grease to at least somehow protect yourself from sawdust getting into the inside of the engine.)
The hole for the 162QMK engine sleeve (such engines are installed on Chinese scabs, more popularly known as “Leika”) in stock is 65 mm. Without boring, a piston of 57mm (150CC), 61mm (1700CC) and 62mm (180CC) easily fits into this crankcase. You won’t find a 62mm piston on sale during the day, so it was decided to install a regular 61mm piston on this engine.
By the way, for those who do not know, a piston with a diameter of 61 mm can be easily installed not only on the Leica engine, but also on any other Chinese 150 equipped with a 157QMJ series engine. There, if you put your hands to it, you can stick a piston at 62mm, but only if the “meat” of the crankcase allows it. Everything is individual, you need to look at the place. In any case, the distance along the studs is the same for both the 61mm piston and the 62mm piston.
From left to right: 61mm, 57mm
On the 139QMB series engine from a regular Chinese 80-six, you can easily install a piston 39mm (45CC), 47mm (72CC), 50mm (84CC)
From left to right: 39mm (45CC), 47mm (72CC), 50mm (84CC)
Installing piston rings
Remove the set of piston rings from the box. A piston ring set for a Chinese four-stroke scooter usually consists of five items. Three of which are a single assembled oil scraper ring, the other two: upper and lower compression.
A typical set of piston rings looks something like this
Carefully unpack the kit with perfectly clean hands.
In the kit you will find two of the thinnest rings and one thick corrugated ring (expander) - this will be an assembled oil scraper ring that needs to be installed on the piston first.
We place an expander in the lowest groove of the piston
We place thin oil scraper rings in the same groove - one under the expander, the second on top of the expander
We find the lower and upper compression rings in the kit and install them, respectively, in the middle and upper grooves of the piston - with marks on the side surface to the cylinder head (cylinder head). The lower compression ring differs from the upper one in color (not always) and the shape of the working edge (always). In most kits, the lower compression ring is painted black, and its working edge has a slight bevel.
Installing the timing chain tensioner
If you have a 157QMJ series engine, do the following: unscrew the plug on the tensioner body; We insert a thin flat screwdriver into it and begin to tighten the bolt until the tensioner rod goes inside the body.
Without releasing the screwdriver while simultaneously holding the tensioner body, with your free fingers, insert the tensioner into the cylinder, screw it in with bolts, and only then release the screwdriver and screw the plug into place.
If you have a 139QMB series engine, then do this: unscrew the plug from the tensioner housing and remove the spring; push the rod inside the body; install the tensioner in the cylinder; insert the spring into the housing and screw in the plug.
After installing the piston, do not forget to adjust the thermal clearances of the valves and break in the engine.
It is worth noting that durable and trouble-free operation of the piston largely depends on the correct installation of the rings. There is absolutely no need for haste and dirt in this matter. Do everything carefully (for yourself, after all), slowly and most importantly: keep it clean!
First, let's take a little look at what a standard set of piston rings for a four-stroke scooter engine is. The standard kit consists of: two compression rings (upper and lower) and one oil scraper ring, which in our case has a collapsible design.
A set of piston rings for a two-stroke scooter engine differs from the previous one in the absence of an oil scraper ring; also, a set of rings for a two-stroke engine may include an expander (marked with an arrow).
So, we have more or less figured out the kits - it’s time to get down to business. We prepare in advance small strips of tin or thin plastic, with their help we will put the rings on the piston.
We thoroughly wash the rings and piston; when installing new rings on a used piston, do not forget to clean its grooves from carbon deposits, otherwise the new rings will not fit into the cylinder. We prepare a clean workplace and perform the installation.
We take the oil scraper ring expander from the kit and place it in the lowest groove of the piston.
In the same way, we install the expander from the kit for a two-stroke engine (if any), with the only difference being that the expander lock should be located in the area of the locking pin (marked with an arrow) of the piston groove.
We look for marks on the rings, apply pre-prepared strips to the piston, very carefully and slowly pull the rings along our strips onto the piston, in this order: first we put on the oil scraper ring, then we put on the second oil scraper ring, then we put on the lower compression ring (dark) and only then put on the upper compression ring (light). The marks on the rings after installation should be located upward towards the cylinder head.
We straighten the rings so that they stand exactly opposite their grooves and slowly pull out our strips from under them. Now the main thing: after you have pulled out the strips and the rings are in their grooves without fail, check each ring for mobility. The rings in the piston grooves should rotate freely in different directions.
The oil scraper ring should look something like this after installation:
After installation, the marks must be directed strictly towards the cylinder head.
Immediately before installing the piston into the cylinder, the piston ring locks must be moved apart in the correct order. This is done like this:
We unfold the upper compression ring so that its lock moves relative to the piston pin axis by approximately 45 degrees, and unfold the lower compression ring so that its lock moves approximately 180 degrees relative to the lock of the upper compression ring.
We rotate the upper oil scraper ring lock 90 degrees relative to the lower compression ring lock, and rotate the lower oil scraper ring lock 180 degrees relative to the upper oil scraper ring.
The photo shows approximately how the piston ring locks of a four-stroke engine should be positioned:
Red marks indicate compression ring locks. Blue marks indicate oil scraper ring locks.
Before final installation of the piston, the piston ring locks of a two-stroke engine must be positioned strictly in the center of the locking pins.
Piston installation
Insert a retaining ring into any boss of the piston pin. It is most convenient to insert the ring with small round nose pliers. After installation, check how well and tightly the retaining ring fits.
- If the retaining ring does not cover the entire surface, but only a small part of it, replace it with a new one.
- If the retaining ring does not lie tightly in the groove and dangles, straighten it a little
Lubricate the bearings of the lower and upper connecting rod heads and the piston pin bosses with clean engine oil. We put the piston on the connecting rod, orienting it with the “IN” mark to the inlet port; if there is an “arrow” on the piston instead of the “IN” mark, orient the arrow to the exhaust port. We insert the piston pin into the boss - orient the piston on the connecting rod so that the pin hits the connecting rod - install the pin all the way into the locking ring and secure it from falling out with the second locking ring.
We install the cylinder guide bushings on the studs and put on the gasket. It is advisable to place the gasket on the sealant, but without fanaticism.
Cylinder installation
Fill the rings and piston with clean engine oil. We tighten the piston rings with a clamp. We cut the clamp from a piece of any sheet metal - cut out a strip of the required length, give it a profile along the piston and make a retainer from the same piece of sheet metal.
Lubricate the cylinder mirror with clean engine oil
We hook the timing chain with a piece of wire, pull the chain through the cylinder and put the cylinder on the studs.
Very carefully and slowly insert the piston into the cylinder. After the rings are completely inserted into the cylinder, unfasten the clamp and install the cylinder into the crankcase.
Setting the valve timing ch1 (in collective farm style - ignition)
We push the cylinder all the way into the crankcase and set the piston to top dead center (TDC). It is best to set the piston at TDC using an indicator or, at worst, visually/touch. You can also align the piston according to a special mark on the generator rotor, but I have more than once encountered the fact that the marks on some engines are stamped incorrectly and, in order to avoid troubles, I advise you to use them only as a last resort, for example, when the cylinder head is not removed and you need to adjust valve
We insert the cylinder head guide bushings and the lower timing chain guide into the cylinder, degrease the surface and install the gasket.
We install the cylinder head, insert the valve bed guide bushings.
Setting the valve timing ch2 (in collective farm style - ignition)
Without knocking the piston off from TDC, we orient the camshaft so that the large hole and marks on its sprocket become as shown in the photo and, while putting on the chain, install the camshaft in bed.
Ideally, the marks on the sprocket should be strictly parallel to the plane of the valve cover connector. In practice, unfortunately, such accuracy is difficult to achieve. And this is mainly due to the stretching of the timing chain. And there’s nothing you can do about it - either change the timing chain to a new one or catch the phase by switching the teeth, but this method of setting the valve timing is not acceptable to me personally.
We orient the camshaft bed with a mark in the form of the letters “E” and “X” towards the exhaust channel and install the bed.
Tighten the bed nuts crosswise and then tighten the two bolts on the side boss of the cylinder head.
Replacing a piston (CPG) on a 4t scooter
Help
Need help finding spare parts?
We will help and advise!
+7-927-653-31-57
Gradually the time comes and your two-wheeled four-stroke friend needs to change the piston. There may be 2 reasons for this: wear or installation of a more powerful piston. In this article we will tell you how to replace the piston (CPG) on a 4-stroke scooter with a 139QMB engine.
If you have a different engine model, for example 152QMI or 157QMJ (150 cc scooter), then this article will also suit you to replace the CPG, since there are no fundamental differences. For 2-stroke scooters, we recommend reading the article “Replacing the piston on a 2-stroke scooter”
Where to do repairs
The 4t piston system can be replaced either in a specialized workshop or independently. The cost of repairing the piston will be considerable, but you can fix the moped yourself. The process of replacing a 4t piston on a Suzuki Sepia moped is quite painstaking and complex, so it must be approached with maximum attention and accuracy. Before you start disassembling the moped, you need to accurately diagnose the malfunction, that is, determine one hundred percent that it is the piston on the Suzuki Sepia scooter that has become unusable .
If you have doubts about your own abilities, it is better to immediately turn to specialists. The price for their services can be very different, you just need to find out how much it will cost. In a specialized station, technicians will not only correctly diagnose a faulty Suzuki Sepia moped, but will also replace the piston in accordance with all the rules. In order to return the 4t piston system to high-quality working condition, you may need special equipment that only professionals have, so you will need to drive the Suzuki Sepia moped to the station. But if you choose to replace the 4t piston system on a scooter yourself, then you should adhere to some rules, since the piston system on a scooter is a very complex mechanism.
How to change the piston on a 4t scooter?
We will describe the process gradually step by step. First of all, we need to remove the plastic that prevents us from getting to the engine.
The next step is to unscrew and remove the carburetor (In this case, it is not necessary to disconnect all the hoses from the carburetor, but simply move it to the side).
We unscrew the muffler at the place where it is attached to the cylinder head and at the place where it is attached to the engine crankcase (2 long bolts). Now remove the muffler.
The next step is to unscrew the plastic cylinder head cover. (2 halves connected by two screws) After this, remove the cylinder head cover by unscrewing the 4 bolts. We unscrew the chain tension regulator, which is located near the carburetor.
Next, you need to unscrew the 4 cylinder head nuts, after which we can remove the cylinder head. When we removed the chain tension regulator, we freed the chain and can easily remove it (after we removed the chain from the camshaft, it is necessary to secure it, for example with a wire, so that it does not fall into the engine crankcase)
In this photo the head has not yet been removed, but only the camshaft has been removed and the chain is fixed. The next step is to remove the cylinder from the studs. If problems arise with this, you can lightly tap with the wooden part of the hammer on all sides of the cylinder.
We put the piston in the top dead center position (the highest position of the piston, we are guided by the marks on the generator rotor.) It is necessary to ensure that the chain does not fly off the drive sprocket, so as not to mess with installing it in the reverse position. Take a clean rag and cover the hole in the engine crankcase to prevent any debris from getting into it. Remove the retaining rings from the piston and thereby free the pin (here you can use round-nose pliers or small pliers.) Remove the pin using a small wooden block (while trying not to create a load on the crankshaft connecting rod). This completes the process of removing the old cpg.
Installing a piston engine (CPG) on a 4t scooter
We take a new piston kit for 72 or 80 cubic meters (piston diameter 47mm or 50mm, respectively). You can, of course, use a standard new 50 cc CPG. The kit includes: cylinder, piston, piston rings, pin, retaining rings, as well as head and cylinder gaskets. You can buy a 72 cc cpg at a low price in our online store.
Installation is carried out in the reverse order, having previously lubricated the cylinder, piston and rings with a small amount of oil. We first install a thin ring on the piston in the lower groove, then an oil scraper ring and again a thin ring (the wavy ring - the oil scraper ring will thus be between the two thin ones in the lower groove). Next, install 2 compression rings (which are thicker). The cuts of all rings should not be located on top of each other. After installing the rings, place the piston on the crankshaft connecting rod, fix its position with a finger and locking rings. We take the connecting sleeves from the old cylinder and insert them into the new one.
We put a gasket under the cylinder on the studs. Carefully place the cylinder on the piston with rings so as not to damage the cylinder. We push the chain into the groove for the chain. Then install the chain bar on the cylinder head. Now we can put the chain on the camshaft sprocket (the position of the sprocket should be as follows: a large hole at the top, and two small ones on the sides, parallel to the edge of the cylinder head). We fix the position of the cylinder head with the gasket by screwing it on. Then we install the plastic cylinder head cover, chain tensioner, carburetor and muffler. The installation is now complete!
If you haven’t changed the oil for a long time, you need to change it before starting with a new piston. Before putting a full load on the scooter engine, it is necessary to run-in, i.e. drive 300-500 kilometers at a speed of no more than 40-45 km per hour.
Along with an increase in the power of the scooter with the installation of a tuning cpg, the load on the variator with the gears of the gearbox also increases. Remember this and if possible, replace the variator with gears with tuned ones (more reinforced.)
How to assemble a 4t piston system on a Suzuki Sepia moped
You need to arm yourself with a small syringe (preferably a medical one, its price is very low) and oil. The piston is installed on the scooter in stages.
The bearing is mounted, pre-lubricated with oil.
The cylinder, piston pin, rings and new piston must be washed with gasoline and blown with air from the compressor. Only after this should you begin installing them.
Installation of the rings must be done with great care, since the rings are very fragile and can be damaged. It is better to have several spare rings, since the price of one ring is low.
The motor is being mounted.
The piston itself is put on the connecting rod and the piston pin is inserted, after which the final stopper is installed. After installation, you need to check that the arrow on the piston points towards the muffler.
The cylinder, or rather its inner walls, are lubricated with oil, and a new gasket is put on. The stoppers are carefully matched to the ring locks. Now you need to squeeze the rings and put on the cylinder. The cylinder should fit tightly with some resistance; do not press on it with force; the rings may break. If this does not work, then you need to check the installation of the rings.
The cylinder head is installed and tightened through the gasket. The nuts are tightened crosswise by hand.
The following are installed on the scooter one by one:
- filters;
- motor;
- muffler;
- candles;
- casings.
All hoses and cables are carefully connected.
Before installing the air filter, it must be dried.
Now you need to start the engine and run in the 4t piston on the scooter. You should not do it at high speeds; this can lead to unpleasant consequences; the moped will have to be repaired again. Since the price of work in a workshop is quite decent, independent replacement of such a part as a piston on a scooter is relevant.