A lubrication system for engine parts is needed to reduce friction between them (and therefore reduce wear) and remove heat. Lubrication is carried out with motor oils, the thin film of which formed between the rubbing parts separates them from each other. A lack of oil in any place can cause local overheating, scuffing, and even welding of parts together.
Mineral oils (obtained from petroleum by distillation), synthetic and semi-synthetic are used to lubricate engine parts of Nexus scooters.
A gear-type oil pump driven from the engine crankshaft circulates oil in four-stroke engines. In addition to the pump, the lubrication system contains an oil filter, valves (return and safety) and lines in the form of channels (tubes and drillings in parts).
Lubrication system of four-stroke scooter engine:
- pallet;
- oil intake;
- oil pump;
- oil filter;
- safety valve;
- front disc brake;
During operation, the oil becomes contaminated with wear products from engine parts and soot particles that have penetrated into the crank chamber through the gap between the piston and cylinder. To capture these particles, an oil filter located in the discharge line is used.
Lubrication system elements:
- filler neck with dipstick;
- oil filter housing
The principle of operation of a scooter carburetor
The carburetor design of a 4t scooter is not very complicated. The basic principle of its operation is as follows: a certain amount of fuel and oxygen enters the float chamber of the device, where they are mixed in the required proportions and supplied to the combustion chamber of the engine.
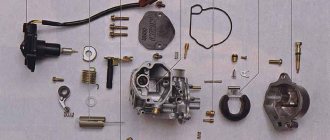
The design of a 4-stroke scooter carburetor may vary slightly depending on the model, but in general it is the same for all types of carburetors. The float version of products is most often used. It is distinguished by the presence of a float chamber in which fuel is mixed with air, after which the finished mixture is fed into the cylinder. In order for air to enter the fuel in the required proportion, the carburetor includes the following elements:
- Jets.
- A needle that meters the supply of oxygen.
- Spool.
- Throttle valve.
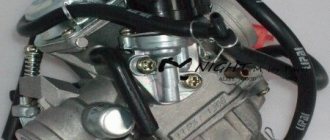
Sometimes the design of a 4t carburetor on a 50cc scooter includes an element such as an accelerator pump. It works in tandem with a starting mixture enricher. These devices help the scooter engine to work correctly and start in damp and wet weather. The correct operation of the motor depends on the coherence of the devices, so it is important to pay attention to their settings.
1 – starting enrichment, 3 – float, 4 – float chamber, 5 – main jet, 6 – carburetor heater, 7 – throttle with needle
Scooter starter booster
Most often, scooters are equipped with an electric starting enrichment; on older models you can find a manual one. The task of this device is to create the right mixture in order to start the engine after a long period of inactivity.
Starting enrichment device
The carburetor has an additional channel for connecting the enricher. If the device is automatic, the channel opens itself when you try to start the scooter and closes as the engine warms up. If the enrichment is manual, you need to close its valve yourself. The operating principle of the device is as follows:
- Inside the housing there is an element heated by electricity, which pushes out a needle that blocks the fuel channel.
- After the engine is stopped, the needle will be retracted.
Float chamber device
Mixing of fuel with air in the carburetor occurs with the participation of the float chamber; Thus, the finished fuel, saturated with the required amount of oxygen, enters the combustion chamber, where it explodes and sets the scooter in motion.
Float chamber device
From the gas tank, fuel enters the carburetor through special pipes. But mixing cannot occur in them, so first the fuel ends up in the float chamber, and only then it is enriched with oxygen and further moved. To ensure that gasoline does not flow continuously, but in the right quantity, the carburetor is equipped with a special system with a float and valve. When the chamber is full, the float rises and the valve blocks fuel from entering the carburetor; when the float is lowered, the flow of fuel resumes.
How to change the quality of the fuel mixture
For all scooter engines, it is important to receive fuel with an adjusted ratio of gasoline to air. A lean mixture leads to improper operation of the engine, a drop in power and overheating of the engine, while a rich mixture leads to an increase in consumption and the formation of soot.
Adjustment operations are performed by changing the position of the quality screw and moving the throttle needle.
Turning the screw to the right causes the mixture to become richer, and unscrewing in the opposite direction causes it to become leaner. The same happens with the needle: when the needle is raised, the mixture becomes richer, and when lowered, it becomes poorer. The integrated use of both methods allows you to achieve optimal results during setup. However, not all carburetors have this feature, so, as a rule, one of two options is used.
Why adjust the carburetor?
Carburetor adjustment may be required in the following cases:
- The spark plugs are serviceable, but do not work very well; their color has changed to black or yellowish.
- The engine does not provide the required power
- Scooter won't start
- Fuel consumption has increased excessively.
All these problems in most cases are caused by an insufficiently enriched or, conversely, overly enriched mixture with oxygen, and they can be corrected by correctly adjusting the carburetor.
The settings, regardless of whether you have a 2t or 4t scooter, have three phases and are made as follows:
- Idle speed adjustment
- Setting the fuel level
- Adjusting the quality of the mixture.
On some carburetor models there is no screw that adjusts the fuel quality, so you have to disassemble the carburetor to change the position of the needle.
The idle speed adjustment is carried out after the engine has warmed up: this takes no more than 15 minutes. For this purpose, the design provides an idle screw. It allows you to make the engine stable by selecting the desired idle speed. When the screw is tightened, the speed will increase, and when it is rotated counterclockwise, it will decrease.
Maintenance Procedure
Scooter motors are manufactured in different volumes. The most common are 50 and 150 cubic meters. The gas distribution system has both 2t and 4t options. The differences between the models are minimal, so maintenance of 2 and 4 stroke 50cc mopeds is carried out according to the same principle.
- Carburetor adjustment at idle speed. The scooter starts and its operation without load is analyzed. The assessment is carried out based on the evenness of the strokes and the stability of the engine speed.
- The position of the screws for the quantity and quality of the mixture is adjusted.
Due to the relative lightness of the structure, adjustment is made with two control bolts. If stable operation cannot be achieved, it is necessary to remove the unit and carry out deep cleaning and adjustment.
Important: before servicing the carburetor on a 4t and 2t scooter, you should make sure that the piston group and ignition system are in good condition. Otherwise, the adjustment will have no effect.
Removal
Because of the way it works, the carburetor is attached directly to the intake manifold. The fuel line and air duct are connected to it. All removable hoses are removed from the body and the part is exposed.
The starting enrichment is switched off. The fastening bolts are unscrewed with a spanner wrench, and the entire assembly is pulled out.
Installation is in the reverse order.
Carburetor cleaning
An excellent cleaning method is to blow out the internal channels with compressed air from a compressor. For this, a special gun with a pointed tip is used.
During operation, plaque forms on the surfaces of the carburetor. This is due to the quality of gasoline. Most of the dirt stops in the fuel filter, but some gets into the intake tract.
To remove deposits, you can use either a solvent or a special liquid for cleaning carburetors. It is also suitable for scooters. The advantage of using it is that the cleaning agent is under pressure and is able to penetrate into the most inaccessible channels.
The scooter carburetor has rubber gaskets. To avoid exposing them to cleaning mixtures, it is recommended to insulate these parts in advance.
When cleaning the intake mechanism of a scooter, it is not recommended to use fluffy rags. Their threads can get stuck in the carburetor components, which will lead to additional difficulties.
Idle speed adjustment
An indicator of proper operation of the carburetor on a scooter is a stable idle. The absence of “floating” speeds and confident operation indicate a prepared mixture inside the combustion chamber.
For this purpose, there is a screw on the device that is responsible for dosing fuel when the scooter is operating without load.
Some carburetors do not have adjustment bolts. In this case, you need to adjust the idle mode using a needle and floats in the fuel chamber.
The scooter is started and allowed to run for a few minutes. This is necessary for better evaporation of gasoline inside the intake manifold and its mixing with air.
After warming up, turn the idle screw until the engine becomes stable. The criteria for correct adjustment are:
- the scooter maintains stable speed indicators;
- there is no engine tremors or failures in operation;
- the carburetor confidently switches to power gain mode (when over-throttled) and back.
Sometimes the scooter refuses to respond to idle adjustment. This behavior indicates additional problems in the intake system.
Mix quality
The two main components in the operation of any internal combustion engine are air and fuel. The force from their combustion pushes the pistons and forces the vehicle to move.
But simply mixing these substances is not enough. You can achieve maximum energy output only by maintaining the correct proportion of components. In a carburetor, this procedure is called adjusting the quality of the mixture and the entire operation of the 50cc scooter depends on it.
There are three types of air-fuel mass:
- poor;
- rich;
- optimal.
Maintaining the correct mixture ratio in the carburetor is vital for reliable engine operation.
Mixture control diagram
First, you need to start the scooter and warm it up. After setting the temperature, you should proceed according to the following algorithm:
- The mixture quality screw is tightened until it stops.
- Loosen the adjusting bolt one and a half turns counterclockwise.
- Start the scooter, tighten the screw a third.
- If the speed increases, turn it a quarter.
- We adjust until the speed stops falling.
This scheme allows you to configure all types of motorcycles.
- — Before adjusting, you need to check that the air filter is clean and soaked in engine oil. How to clean the air filter, read the article: Scooter maintenance.
- — If the rubber cuff on the quality screw is torn, then it can be replaced with a cuff from the quality screw of the classic Lada carburetor.
- — On Suzuki Sepia models, lets 2,
In the latest models of Honda Dio 34 everything is simpler. The carburetor has only one large screw, which is used to regulate the XO. The small one on dio 34 is located under the plug.
What is the carburetor of a Chinese scooter and its capabilities, disadvantages, tuning
The carburetor circuit of a Chinese scooter is, in principle, standard and suitable for both 2t and 4t engines. The design of the carburetor allows certain actions to be taken to improve its performance, however, if the engine is two-stroke, the efforts will not make sense.
The simplest approach is to replace the carburetor with a more advanced one, for example, with an accelerator motor, if you have a fairly old version without it. Most often, simple tuning is limited to replacing the main fuel jet, this is especially true for engines with low power. Replacing the nozzle helps to increase the fuel channel and, due to this, add a little power to the engine.
Cooling system
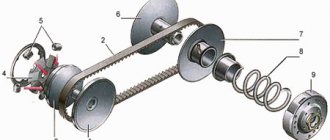
All Nexus scooters are equipped with a forced air cooling system. It is needed to prevent jamming and damage to parts due to overheating, which causes excessive expansion of the piston, as well as disruption of lubrication conditions. Since the motor of all scooters is covered with a casing and is located under the seat in the rear, the flow of oncoming air cannot effectively cool it. Therefore, a fan impeller is used, mounted on the right side of the engine on the generator rotor. This centrifugal fan forces air under a casing that covers the outside of the cylinder and cylinder head.
Cooling system details:
- fan impeller;
- casings
Design and connection of a Yamaha scooter carburetor
The Yamaha Jog scooter is one of the most popular on the Russian market: this is explained by the simplicity and reliability of the model, and its affordable price. The carburetor design of this scooter is standard, so you can figure it out using the description given above. However, when installing it, inexperienced owners may encounter some difficulties, which we will help you sort out.
Carburetor of a Japanese scooter Yamaha Jog
The device is worth considering in more detail. This will help you understand not only how to adjust the carburetor and use it correctly, but also how to connect it correctly.
- A starter enricher is attached to the carburetor body: it is small in size and housed in a plastic case. It has two bolts with rubber seals. The enricher is powered via a 12 V battery. This device is used to start the engine when cold, as it allows you to automatically enrich the mixture with oxygen.
- The fitting is connected to the fuel supply hose coming from the gas tank tap.
- If the enrichment unit needs to be removed, you will need to not only unscrew the bolts, but also disconnect the electric valve, to which there are only two wires.
- The mixing chamber has a special cover to which a bolt is attached. If you unscrew it, you can get to the throttle valve. This allows you to check whether the throttle cable is connected, and also to get to the needle that regulates the level of fuel and air supply. If the carburetor needs cleaning, you will definitely need to remove the throttle.
- The enrichment connector has two wire outputs, the yellow one is connected to the generator, the green one goes to ground. In principle, if you reverse the polarity, nothing will happen and the device will still work.
- For the enricher to operate, voltage must come from the battery. When the element inside the device heats up, the needle will extend.
- A special fitting is connected to the air filter, and there is a rubber elbow between them.
- There are several screws on the carburetor body with which you can adjust the idle speed and mixture quality.
- The float chamber is screwed from below and has 4 mounting bolts.
- There is an additional fitting for oil supply: it is the smallest.
- The second fitting is needed for communication with the atmosphere; you do not need to put anything on it.
- The third one is connected to a gas hose. It goes to the gas tank vacuum valve.
Preparing for adjustment
The carbs installed on 2-stroke engines are almost similar in design. Whether it is a motorcycle or a scooter, the carburetor is similar. In particular, this also applies to the settings of the needle that regulates the quality of the fuel assembly.
Before you start adjusting the needle, you need to check how the air filter works. It is important to test to see if there are any problems with the exhaust system. It is equally important to check how the attachments are installed, whether there are any fuel leaks, etc.
It is especially recommended to inspect the jets. They often become clogged, and the quality of the fuel assemblies leaves much to be desired.
Needle grooves
The adjustment algorithm looks like this.
- First you need to level the fuel level in the carb chamber. The float lift is set according to the specific manual. Remember that the correctness of the setup determines the correct actions in the future.
- Pay attention to the operation of the vehicle when the throttle is closed. Particularly focus on the XX mode. The fact is that this particular mode functions in almost every shutter exposure.
- XX must be adjusted using jets of the appropriate type, using a fuel assembly quality/quantity screw. The jet sits on the carb body; there is no need to specially open access to it - just remove the float chamber.
Interesting point. The quality screw is made of brass and is installed outside the carb, on its left side. The screw that regulates the quantity of fuel assemblies is located above the quality regulator.
Further.
- It is necessary to establish a stable XX cycle with the help of a fuel assembly quality regulator. You need to rotate from position 0.
- At the same time, adjust the idle speed.
Carburetor design (video)
For clarity, we suggest watching a video instruction about the design of carburetors and the principle of their operation:
Knowing the structure of the carburetor and understanding what needs to be connected where, you can easily disassemble, reassemble, clean and adjust it yourself, regardless of what brand and model of scooter you have, with some skill. All these procedures will not take much time and will help you save money on car services. The ability to carry them out will help you out when the engine does not want to start.
Idle speed: settings features
Adjusting the Suzuki Sepia carburetor is impossible without using the idle speed. It regulates the number of revolutions, where when the screw is tightened, the speed indicator increases and the wheel spins independently without the throttle. When you unscrew the idle screw, the scooter will start only when you add more revolutions with the throttle. It is advisable to adjust this jet last, that is, first adjust the quality of the mixture, the needle in the throttle valve, and, if necessary, the air screw, and then adjust the idle speed.
Setting the gasoline level and the correct position of the float in the chamber
A correctly adjusted fuel level in the float chamber does not allow the spark plugs to get wet and the engine to stall. In the chamber where the floats and jets are located, there is a valve that provides fuel supply. The correct position of the floats determines the closing or opening phase of the valve and prevents fuel overflow in the carburetor. The position of the floats is changed by slightly bending the fastening bar.
Gasoline level is monitored with the engine running using a tube made of transparent material attached to the drain point and raised up. The gasoline level should be a few millimeters below the flange mounting of the cover. If the level is insufficient, remove the cover and adjust the needle firing phase by slightly bending the metal antennae.