Photo report: Disassembling the engine (LK139QMB) of the Pioneer Flagman scooter
One “beautiful” autumn morning, the engine (LK139QMB) of the Pioneer Flagman scooter, which until that moment had been regularly transporting its owners (there were several of them) to work for two years, finally uttered several dying sounds “ordered to live a long time” right in the middle of the road.
Attempts to somehow revive it did not bring the desired result, which is not surprising if you take into account the degree of its wear and tear... Therefore, like it or not, it will not be possible to “put this “Chinese” on its feet without serious repairs. This engine will be interesting for us because we will be able to approximately estimate the service life of its parts, and therefore the quality of workmanship.
It is worth noting: this scooter was used in very harsh conditions, on bad roads and was serviced occasionally, which of course leads to a significant reduction in service life. And one more point: Pioneer brand scooters are characterized by simply disgusting build quality and manufacturing, so everything said in this article regarding engine life will only apply to the engine of a Pioneer Flagman brand scooter.
There was no particular point in carrying out an accurate diagnosis of the condition of this engine, since it had been burning oil for a long time, was snotty, had trouble starting and pulling, and its appearance suggested a major overhaul, so it was immediately removed from the frame and laid down on the table for further disassembly and checking all parts for acceptable wear.
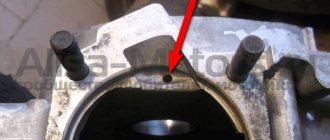
We unscrew the cooling casings and the generator impeller. The bottom of the engine on the generator side is covered with a thick layer of oil, as it turned out later: the reason for the oil leakage lay in a cracked plug (marked with an arrow) of the oil filter.
Remove the piston and cylinder head. The piston of this engine was as expected from the very beginning: it was in a very worn condition and unsuitable for further use. The cylinder head did not cause any particular complaints about its condition, with the exception of burnt-out valves.
Unscrew the bolts on the cover.
We tap the cover with a wooden mallet and remove it from the engine, without losing the guide bushings (marked with arrows).
We clamp the oil pump drive gear with our fingers and unscrew the nut.
Remove the oil pump drive gear from the axle and unscrew the last bolt (marked with an arrow) that tightens the crankcase.
We tap the crankcase with a wooden mallet and separate it into two halves, without losing the guide bushings (marked with arrows).
Remove the timing chain from the drive sprocket and pull the crankshaft out of the crankcase half. The crankshaft of this engine showed no signs of life, the lower connecting rod bearing was practically jammed, so there was no point in checking its continued suitability for further operation with measuring instruments.
The timing chain is extremely worn, look at how much deflection it has.
From the side of the variator cover, unscrew the bolt on which the upper timing chain guide is secured. This bolt is tightened with very great force and you may not be able to unscrew it so easily, so in such cases try to remove it with an impact screwdriver.
The upper guide has a strong deflection, which is a consequence of the strong stretching of the timing chain, plus the working surface in one place was rubbed down to the metal base, and in the second place the peeling of the coating is clearly visible. This guide is not suitable for further use.
This is the result. For two years of operation and 9300 km. In principle, you shouldn’t expect more from the “Chinese”; the wear of parts for such a mileage is quite predictable, with the exception of the crankshaft. The crankshafts on these engines last 18-20 thousand km or more, unlike this example.
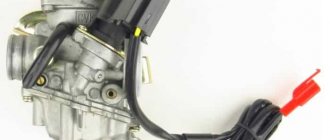
4t scooter carburetor design
Let's start studying the operation of the carburetor with the accelerator pump
The accelerator pump is activated only when the throttle is sharply opened, when sharp acceleration needs to be achieved from the scooter, the carburetor systems have some inertia and cannot respond to the throttle in a timely manner, so to avoid failure when the throttle is sharply opened, the designers have implemented The carburetor is an additional module that injects a portion of fuel at the right moment, which allows you to smooth out the characteristics of the engine during dynamic acceleration.
Disassembled accelerator pump
Acceleration pump drive
Accelerator pump channels
General structure of the carburetor
Carburetor without top cover
Never try to stretch the spring; its force is strictly calibrated.
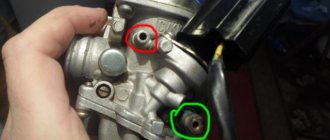
Idle fuel quantity (quality) screw
The “quality” screw is assembled, when reinstalling the screw, follow the correct order of installing the O-rings, first install the spring, then the aluminum washer and the rubber O-ring.
To ensure greater engine efficiency, an idle cut-off system was introduced into the carburetor; this system turns off idle when it is no longer needed, which ultimately has a positive effect on the overall efficiency of the engine.
In the carburetor, to control the operation of the idle air shut-off system, there is a special channel through which the vacuum is transmitted to a membrane which, using a rod, opens or closes the valve, thereby turning off or turning off the idle air system.
Increasing the volume of a motorcycle engine from 50 cubic meters to 110. From 139FMB to 152FMH. Part 2
In continuation of my previous post.
Yes, I changed the title to include the correct engine model. After all, the work took place more than a year ago, and I simply don’t remember such trifles, and Googling led me to what turned out to be the wrong engine coding. Therefore, I had to crawl down and look at the documents for the model and engine number.
Therefore, this size is for control.
And by the way, from the above fact of possible standardization of crankcases, a second nuance follows: this is the diameter of the seat for the crankshaft.
It fit me just perfectly, as if it was supposed to be there.
Assembly is the opposite of disassembly, with the exception of preparatory, cleaning, and fitting work.
I'm not commenting on this...
One more piece of advice: REMEMBER HOW THIS FUCK STANDED!
I probably took the engine apart two more times because of the kick starter mechanism. I really don’t remember how it should be there and what needs to be done, so remember it and if something doesn’t work out, then look at how it should be on the Internet.
YES! This FUCKING clamp must go behind this FUCKING bracket for the gear to retract, or whatever it is supposed to do there. I took photos, but I don’t remember why, well done of course.
This is the gear indicator switch. I recommend cleaning it and checking the contacts.
And I took this photo apparently to once again remind you that remember the sequence and correctness of the details. For example, cylinder centering bushings (both bottom and top) and a rubber seal for the oil channel. Little dirty tricks that cost me a huge number of nerve cells and disassembly and reassembly of the motor.
But actually, there’s nothing particularly complicated. One cylinder, zero problems.
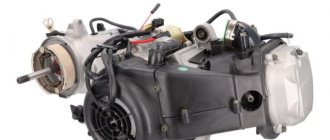
This is what it looks like assembled.
Knowing what kind of vibrator it was, the fasteners were screwed onto an anaerobic thread lock of medium fixation. Plus pulling all the elements along the second or third circle with a moment.
And this is what it looks like after installation.
By the way, it also fits neatly into the frame)
I didn’t do much running-in, it’s a waste of time to break-in there. I had it heat up and cool down for a couple of cycles, heat up and cool down, I rode from the garage to the stall and back in a calm rhythm, and the next day I rode it quite normally.
And by the way: you can do it with a passenger too. Well, more precisely as a passenger) Of course, it takes away his agility, but he drags himself along quite well and is lucky, you know.
I don’t know about the consumption, I haven’t measured it exactly. He's kind of funny there anyway.
Financial result:
For the entire box that was in the previous post, I spent something like 8-9 thousand or so, I don’t even remember. It took one day of time... And in general, after the purchase, to put it in order, I only spent about 10 thousand: movement with the engine, oil, reinforced front brake hose, normal mirrors and stars. Considering its cost and all the expenses, you actually get much more emotions.
Thanks for reading and interest, peace to all!
Possible duplicates found
Please tell me, here’s my personal selfish interest: I’m lazy to get category A licenses, but I can sit down with my B for 50 cc. Can sellers of striped sticks identify such alterations? Not exactly the subject, but the butt stool.
And now there are a lot of mopeds, with the correct marking 139 something there, but with a 72 and 80 cc piston installed, with the coveted 49.5-49.9 cm3 stamped on board.
PS I myself, too, don’t want to open it yet. But in case it doesn’t work. Buy fifty dollars for now, drive it, and then decide whether it’s worth it, or, what the heck, keep driving the car.
The description says 120kg, about fifty dollars. But it seems to me that there is more CPG there.
Here it is, but it already says 110cc.
But the 1P39 engine is specified
Many stores sell mopeds with a clean CPG of 49.5 cm3, and use a spare CPG of 72-110 cm3 (I don’t know if it’s possible to put a 110 cm engine on the 139), or they immediately install an enlarged one (with 49.5 knocked out) and the original one in the box as a set.
These are mopeds