To adjust the carburetor on a 125 pit bike, you first need to check the color of the spark plug. Ideally, the color of the candle should be dirty orange. The second option is more suitable for an experienced pit bike owner. When you start to let off the gas and you hear shooting, this will mean that the mixture is not of the proper quality. And if, when you sharply press the gas pedal, the engine seems to be choking and there is no correct pickup, this also means that the mixture is of poor quality.
The idle speed is adjusted using two screws: a quality adjustment screw and a quantity adjustment screw. If the quality screw is on the diffuser side, then it regulates the fuel supply, and if on the air filter side, it regulates the air supply accordingly. Initially, we set the minimum stable speed using the quantity screw, i.e. your pit bike should almost stall, then we slowly begin to rotate the quality screw. We should hear maximum revs. After the number of maximum revolutions has been found, we begin to turn the quantity screw, setting the optimal speed for the engine.
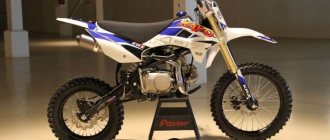
Pitbike Kayo 125
Kayo 125 is one of the best-selling pit bikes on the domestic motor market, as well as the closest competitor to the Irbis TTR 125 model.
Light motocross motorcycles or pit bikes are gradually gaining popularity in our country. This is mainly due to Chinese manufacturers. In terms of price/quality ratio, Chinese models fully meet the expectations of their “riders”; this is confirmed by the Kayo series of motorcycles.
The Chinese company Kayo has been producing pit bikes since 1999. Having gained popularity and respect at home, the company entered the international market and is increasing production volumes every day. Currently, Kayo produces more than 30,000 motorcycles a year, and the model line includes more than 25 different modifications, designed not only for riding on regular roads, but also for participating in competitions.
EXECUTION ORDER
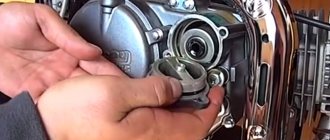
1. Remove the air filter 2. Remove the automatic starter cover (see Fig. Keihin carburetor parts). 3. Turn the choke lever all the way counterclockwise and lock it in this position. 4. Push the rod (see Fig. Keihin carburetor choke lever) of the pneumatic drive in the direction of the arrow until it stops. 5. Measure the starting gap of the air damper with feeler gauges. It should be (5.6±0.15) mm. 6. If necessary, adjust the gap by bending/compressing and extending/unclamping the lever fork
Adjusting the throttle opening of the second chamber of the Keihin carburetor
1 – lock nut;
2 – limit screw of the throttle valve of the second chamber
Reasons why a carburetor may leak
Gasoline often drains through the shut-off valve, which is located at the bottom of the carburetor. If you notice a leak in time, you should immediately close the tap located immediately under the gas tank of your motorcycle immediately after arriving at your destination. This problem can especially often arise on a Chinese moped, since Chinese carburetors are not of high quality. Other causes of carburetor leaks look like this:
- The carburetor is simply clogged and should be cleaned;
- Loose connection between carburetor and manifold. Usually it's a matter of the spacer between these elements;
- The floats in the carburetor need to be adjusted;
- Gasoline leaks through the heat-insulating gasket;
- Fuel may leak through the carburetor cap;
- The carburetor is leaking through the fitting.
Each case must be analyzed in detail, but first the carburetor must be removed.
How to adjust the PZ 19 carburetor on an Alpha 110 cc moped
Adjustments
Hi all! In this article I will tell you how to adjust the carburetor on an Alpha moped. But first, I’ll tell you why a carburetor is needed.
The carburetor is needed to make the right mixture.
What is the correct mixture is 1 part gasoline and 15 parts air. With this ratio, the mixture turns out to be the most explosive, the greatest power is obtained, and acceleration becomes better.
Third stage
Let's move on to the final part - adjusting the carburetor of the Ural motorcycle. Now you need to adjust the main dosing system. It consists of throttle valves, needles and main fuel jets. The bottom line is that due to the variable cross-section of the carburetor needle, directly proportional dosing of fuel occurs depending on the amount of air passing through the carburetor diffuser. Make sure that the carburetor needles are straight and the holes for them in the throttle bodies are not worn out. Replace the spark plugs with new ones or clean the old ones. Ride a motorcycle at a constant speed of 70 km/h for 10 minutes. Stop, turn off the engine, unscrew the spark plugs and, according to the photo below, determine the correct adjustment:
- This is the color of the candle when properly adjusted. As you can see, the brick color of the spark plug insulator is due to correctly tuned carburetors.
- If the candle is black, this is a sign of a rich mixture. Therefore, we lower the needles in the carburetors by one notch (initially they should be installed in the middle position).
- If the candle has white carbon deposits, raise the needles by one notch.
If, after moving the needles one notch, you cannot achieve a brick shade of the candle, try setting it 2 notches lower or higher, depending on the color of the insulator. As a result, we will get the correct mixture at constant engine speeds when driving along the highway.
It is important to know: if the spark plugs have black soot with a shine, perhaps the cylinder-piston group of the motorcycle is worn out, and the spark plugs are simply splashed with oil. It is worth thinking about repairs as soon as possible.
In this article we looked in detail at what it is to adjust the carburetor of a Ural motorcycle. Correctly setting the carburetors on a Ural motorcycle is the key to good engine performance.
Motorcycle repair
Our service is an authorized service center for pit bike manufacturers such as Kayo, Apollo, YCF, and many years of experience working with other brands allows us to repair pit bikes of any complexity!
Our knowledge and experience give us the opportunity to use only proven spare parts and offer our customers the quality of motorcycle repair work that is not inferior to the manufacturer’s requirements.
PitBikeMarket's mechanics have extensive experience, tools and have been trained at brand representatives. In addition to repairing pit bikes, our specialists can conduct a warranty examination of purchased pit bikes, on the basis of which they can offer you replacement components under warranty. *
PRICE LIST FOR SERVICES
ARTICLES AND NOTES ABOUT PIT BIKE REPAIR
Restoring a pit bike (from the city of Sterlitamak) part 2
Restoring a pit bike (from the city of Sterlitamak) part 1
Restoring threads!
Proper chain tension!
Repairing a pit bike after an accident
The customer focus of our service department employees allows our clients to receive high-quality repairs, even if this requires a non-standard approach. You can always get advice by phone regarding repairs and operational issues. Prices for work have no hidden costs, and consumables (cleaning products, specialized lubricants, thread lockers, cleaning materials, etc.) are already included in the price. As an example of our approach: when performing work on setting up and cleaning pit bike carburetors, it is necessary to replace the gaskets, which is also included in the price. We do not use sealants to save money!
In addition to standard repair work indicated in the list, we are ready for individual projects. Frame welding, manufacturing of shock absorber bushings and wheel axles, etc.
If you are planning to purchase a pit bike on the secondary market, we are ready to offer: comprehensive diagnostics with the visit of our specialist + on-site repair calculation, and it is also possible to pick up the purchased pit bike and deliver it to the address or for repairs. If you have already purchased a used pit bike, we are ready to carry out comprehensive diagnostics, maintenance and preparation for operation.
You can return your pit bike to Trade-in and on the same day ride a new pit bike from the PBM store and receive the first maintenance as a gift. It is also possible to go out to evaluate the pit bike on site or by phone + e-mail; preliminary assessment on line.
In the future, PBM service will mean a lot of loyalty programs, a community of pit bike lovers, a personal account and technical support for your equipment. PBM service is a motorcycle evacuation - we will not leave you alone with a broken motorcycle.
* only for equipment purchased from PBM.
** On-site repairs do not include transportation costs. Transport costs are equal to 1,500 rubles, provided the distance is no more than 30 km from Moscow and does not include the evacuation of equipment. Departure with evacuation of equipment is equal to 3,000 rubles, provided that the distance is no more than 30 km from Moscow. Travel outside the aisles 30 km from Moscow, as well as evacuation from hard-to-reach places (a drowned ATV in the forest) are negotiated individually.
Why do you need carburetor adjustment at all?
For stable operation of the ATV, it is necessary that the engine receives the optimal amount of fuel mixture corresponding to its speed range. Otherwise, the following problems may occur:
- Difficulties with the factory, the engine constantly stalls.
- Weak power characteristics, sluggish response to the throttle trigger.
- Poor dynamics when accelerating from the bottom, accompanied by spontaneous jerks when moving.
- Dips observed mainly during overclocking.
- High fuel consumption.
- Excessive formation of carbon deposits on the walls of the combustion chamber and, as a result, overheating of the engine.
What needs to be done in this case:
- Adjust the idle speed using the mixture quality screw and the number of revolutions.
- Adjust the quality of the mixture using a needle.
- Adjust the fuel level.
Important! Make adjustments only when the carburetor is cleaned inside and out, and when the engine is warmed up to operating temperature.
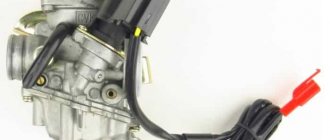
Design and adjustment of keihin 2 (Kaihen, Keihin)
Keihin carburetor parts
1 – pneumatic drive of the throttle valve of the first chamber; 2 – bracket; 3 – pneumatic drive of the throttle valve of the second chamber; 4 – accelerator pump; 5 – locking plate; 6 – cover; 7 – diaphragm spring; 8 – diaphragm; 9 – vacuum block EPHH; 10 – adjusting screw for the amount of mixture; 11 – protective cap; 12 – adjusting screw for mixture quality (composition); 13 – idle air jet; 14 – idle fuel jet; 15 – idle emulsion tube; 16 – air jet of the first chamber; 17 – threaded plug; 18 – accelerator pump rod; 19 – sealing ring; 20 – main fuel jet of the first chamber; 21 – air damper pneumatic drive; 22 – gasket; 23 – float; 24 – needle valve; 25 – float axis; 26 – accelerator pump drive lever; 27 – carburetor cover; 28 – traction; 29 – automatic starting device; 30 – accelerator pump nozzle; 31 – main fuel jet of the second chamber; 32 – air jet of the second chamber; 33 – emulsion tube of the second chamber; 34 – emulsion tube of the first chamber; 35 – thermostat of the throttle valve of the first chamber; 36 – thermal pneumatic valve
Keihin carburetor vacuum connections
1 – cold start valve; 2 – pneumatic drive of the throttle valve of the first chamber; 3 – automatic starting device; 4 – vacuum block EPHH; 5 – pneumatic drive of the air damper; 6 – thermostat; 7 – carburetor; 8 – vacuum switch for gear selection indicator; 9 – exhaust gas recirculation valve (only with automatic transmission); 10 – vacuum tank; 11 – valve; 12 – pneumatic drive of the throttle valve of the second chamber; 13 – brake booster hose pipe; 14 – vacuum corrector of the ignition distributor; 15 – thermostat of the throttle valve of the first chamber; 16 – thermal pneumatic valve; 17 – bypass valve
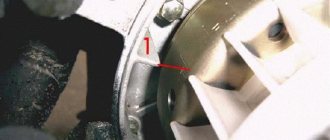
Location of jets on the Keihin carburetor body
1 – main fuel jet of the first chamber; 2 – accelerator pump nozzle; 3 – main fuel jet of the second chamber; 4 – air jet of the second chamber; 5 – idle air jet; 6 – idle fuel jet; 7 – air jet of the first chamber
Adjusting the throttle opening of the first chamber of the Keihin carburetor
Squeezing the lever with pliers.
1 – throttle drive lever of the first chamber;
2 – rod of the pneumatic drive of the throttle valve of the first chamber
Unbending the lever using a screwdriver.
1 – throttle drive lever of the first chamber;
2 – rod of the pneumatic drive of the throttle valve of the first chamber
PLEASE READ THE MANUAL CAREFULLY.
Thank you for choosing a motorcycle of our brand!
During the production of this vehicle, all existing and current laws and regulations regarding noise and environmental impact were observed.
Before starting operation, you must carefully familiarize yourself with the structure of the motorcycle and all its controls. It is strongly recommended to treat the motorcycle with care, performing its maintenance in full accordance with the recommendations of the manufacturer. Strictly follow the maintenance regulations. In addition, it is necessary to follow the recommendations regarding breaking in the motorcycle, as well as fully comply with the recommendations for conducting a pre-ride inspection of the motorcycle and other types of maintenance.
WARNING!
Teens may not have the skills necessary to operate a motorcycle safely. Persons under 16 years of age must operate this vehicle strictly under the supervision of an adult, even after completing a training course.
The height of a teenager riding a motorcycle must be sufficient for him to touch the ground with his feet while sitting upright on the motorcycle. He must have sufficient physical strength to lift a motorcycle lying on its side.
A teenager driving a motorcycle and his parents must perfectly know the structure of the motorcycle, be able to use all the controls and know their purpose. They should also read this manual thoroughly before operating it.
To ensure your child's safety, ensure that proper maintenance is followed and that your child understands the importance of thoroughly inspecting the motorcycle before riding.
WARNING: Remember, your dirt bike is not intended for public roads.
The motorcycle of this model is intended to transport exclusively the driver.
The established restrictions on motorcycle loading and the design of its saddles do not allow for the safe transportation of passengers.
EXECUTION ORDER
1. Remove the carburetor. 2. Unscrew the limit screw, having first unscrewed the lock nut so that it moves away from the stop. Then screw it until it touches the stop and turn it another half turn. Tighten the locknut and secure with a drop of paint. 3. Adjust idle speed
Keihin carburetor mixture quality (composition) adjustment screw
1 – screw for adjusting the quality (composition) of the mixture;
2 – throttle control lever of the first chamber;
3 – air damper pneumatic drive
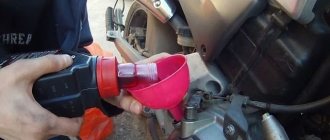
Fuel level in the float chamber
The next step is to set the correct fuel level in the float chamber. I do it like this. (The carburetor is in a vertical position.) We have a fuel supply hose, I start blowing into it and start closing the float. The moment I feel that air no longer passes into the float chamber is the moment the fuel supply to the chamber is closed. At this moment, the float must be in a strictly horizontal position (the carburetor is vertical). If this condition is not met, bend the float tongue. We also make sure that the shut-off needle does not allow fuel to pass through when closed and that there is no exhaust on it.