If you have encountered the malfunction of your scooter, then you probably already had to work with the carburetor, which, as experience shows, is a very difficult procedure. Many scooters have different carburetors and we will look at one of them, the Yamaha Jog Carburetor.
Expensive scooters with powerful engines have complex carburetors, so cleaning and disassembling them can be difficult. But many people use small-capacity scooters, one of them is the Yamaha Jog, and this particular scooter has a very simple carburetor, the system of which is understandable even to the most inexperienced. There are several tips for adjusting the carburetor, but the most important is the fact that the process itself should only take place on a well-warmed engine. This is necessary so that the engine then operates at the required speed when it is hot, and not during cold idle time.
Adjusting the Yamaha Jog Carburetor
Many scooter owners are faced with the problem of how to adjust the carburetor.
At first glance, this may seem like a very difficult task, but the carburetor of the Yamaha Jog scooter has a design that even a beginner can figure out. Adjusting the carburetor of a Yamaha scooter is not performed on a cold engine. The best option is to adjust the carburetor after the trip, while the engine is still warm, or to pre-warm it. The operating mode of a cold engine will affect the quality of carburetor adjustment.
Carburetor adjustment should be carried out if the condition of the spark plugs is suspicious, if the engine does not pull or constantly stalls. There may be several problems. This includes the quality of the mixture supplied to the engine, contamination of the air filter and carburetor channels, and problems with the spark.
The first step is to flush the carburetor and blow out all the channels, and, if possible, replace the spark plug. The air filter should also be cleaned or replaced. After all physical problems have been eliminated, we move on to regulating the quality of the mixture. The plaque on the old spark plug indicates how correctly or incorrectly the mixture is adjusted.
If the candle is white, the mixture is poor. This may result in faster engine wear. If the candle is black, on the contrary, the mixture is rich. This means additional fuel costs and clogging of channels.
Disassembly of the carburetor should be performed in a certain order:
- Step 1 - it is necessary to stop the flow of gasoline into the carburetor. To do this, disconnect the fuel hose, open the drain hole and drain the gasoline into a previously prepared container.
- Step 2 - unscrew the mixture quality screw. Next, unscrew the throttle screw.
- Step 3 - remove the spring, diffuser and throttle itself.
- Step 4 - remove the starting enrichment.
- Step 5 - remove the float chamber.
The carburetor is assembled in the reverse order of disassembly. The carburetor should be disassembled if there is a suspicion that the channels are clogged. A sign of clogging is jerking, popping noises in the carburetor, and the engine may have difficulty starting.
The first thing to do is start the engine at idle speed. If the design does not provide for such revolutions, they can be set using the revolutions screw. Using the same screw, we increase the speed to maximum, while simultaneously turning the mixture screw to maximum. We reduce the speed by turning the screw and turn the mixture screw ¼ turn and observe how the engine behaves, if there are any failures in operation.
If the problem is not solved, turn the mixture screw another ¼ turn. When turning the mixture screw, you should not forget about adjusting the idle speed.
More detailed adjustment can be made using the spool needle. If excessive fuel consumption occurs, the needle should be lowered one notch and then the speed should be adjusted again. If the engine “does not pull”, the needle must be raised one notch, and then the speed must be set again.
As practice shows, no matter how deep a beginner has knowledge, he will not be able to accurately adjust the carburetor the first time. Accuracy comes with experience.
Despite the fact that the Yamaha Jog scooter has a slightly different design than scooters from other manufacturers, the principle of operation remains the same. Therefore, adjusting a Yamaha carburetor should not cause difficulties for people who have experience adjusting other models.
You can see in more detail how to adjust the carburetor of a Yamaha Jog scooter in the video.
[sc:ads5]
Source
Diagnostics
Before installing the air filter, turn on the ignition and jerk the kickstarter foot several times until the engine starts.
If it does not start, then the most common reason is that the cold start system is malfunctioning.
We check this way: cover the carburetor hole with your fingers to maximally enrich the mixture with gasoline, and continue to push the kickstarter.
If the engine starts and the speed does not drop during operation, then look for the reason in the cold start system.
If the cold start system is working properly, then after starting the engine the speed will rise and gradually, within 10 minutes, begin to fall. On a warm engine, gradually unscrew the large screw (amount of mixture) until the speed drops to medium, confident idle.
At the same time, drops of gasoline should not splash or pour out of the carburetor.
If gasoline splashes out of the air supply hole, this indicates a malfunction of the reed valve in the engine. Then the valve needs to be removed and cleaned or replaced with a new one.
And if gasoline leaks out, this indicates a high level of gasoline. Adjust the float level and ensure the needle valve is sealed.
A simple and effective way to adjust the carburetor (Views: 2)
Alexander Kr.
The mixture is rich. Composition 12:1. The spark plugs will be black when idling for a long time (when trolling, for example). I won’t say anything about CO.
—- Message added at 12:54 —- Previous message posted at 12:44 —-
Can you give an example? It seems like this has never happened.
And further. A feature of adjusting the carburetor at XX (in carburetors only XX is adjusted with screws) is the dependence of the mixture composition on both the position of the quality screw and the position of the quantity screw. Therefore, the adjustment technique is not the same.
Attachments
Alexander Kr.
Thank you for enlightening me about ejection.
The instructions in the attachment are as incomprehensible as most service manuals for some reason. First, the need for adjustment is assessed and the adjustment itself is made in response to a sudden release of gas. But this is true if the mixture was lean. What if you're rich? The engine will respond normally to gas. So, is everything okay? Secondly, it is not clear which way to turn and what should happen. If you don't understand how to adjust, you can wind it in the wrong place.
I suggest turning it so as to create a deliberately lean mixture, so that it is clear that it is lean (the revolutions have dropped, the engine stalls). Then create a rich one, and so that the person understands that it is now rich (the revs have dropped again, now from excess fuel). Then it will be clear at what position of the screw the mixture is optimal.
—- Message added at 17:45 —- Previous message posted at 17:36 —-
I wrote incorrectly about the Suzuki service manual. The second position of the screw is when the speed decreases again.
Alexander Kr.
afgan-nsk
Here is a very clear description of the adjustment.
Author fanatic
At Yura’s request, I am sharing my own experience in adjusting the mixture for idle speed without the use of special equipment, using the speed drop method.
This method is applicable to Japanese carburetors (I have not tried it with others), where the quantity of fuel supplied is regulated by the XX quality adjustment screw. In addition to the XX adjustment screw, there is also an XX jet. The jet is used for coarse adjustment of the mixture to XX, and the adjusting screw is used for fine adjustment (works within the same caliber of XX jet).
A little theory - we know what proportion of air and gasoline releases the most energy during combustion (which is equivalent to the most complete combustion of the mixture). From a scientific point of view, the ideal proportion is 14.6:1, that is, 14.6 portions of air to 1 portion of gasoline. Having this ratio, we have minimum fuel consumption with maximum power. The only negative is the high heating of the engine, which is not a problem for engines with efficient (water) cooling, but often causes controversy among owners of air blowers or racing machines. The latter often adjust the mixture at a ratio of (about) 12:1, which increases consumption but the engine heats up less (a rich mixture burns at a lower temperature). Well, a lean mixture causes even greater overheating of the engine; the difference in the flame temperature of the optimal mixture and the lean mixture can easily reach 500 degrees (the optimal combustion temperature is around 850 degrees, if I’m not mistaken).
Now more specific. Since the optimal ratio releases maximum energy, it means that the engine running on such a mixture will produce maximum revolutions for the current throttle position. And accordingly, deviation from the optimal settings will cause a drop in speed. Which is what we will use.
Before adjusting, you need to make sure that the engine is absolutely in good working order and that the difference in compression of the cylinders (if you have a lot of them) is small. Otherwise, with a noticeable difference in compression, the idle will be unstable and will float, which will not allow us to adjust the mixture by ear. Moreover, attempts to tune such an engine by ear usually lead to a significant enrichment of the mixture at idle, because Such an engine will only run smoothly on a very rich mixture. Well, in the case of multi-cylinder engines, you also need to synchronize the carburetors.
Then we start the engine and give it time to warm up. If you have an air vent and it’s summer outside, then take pity on it and point a fan at it ????
We make sure that the exhaust manifold is not poisoning (we pass our hands around all the connections and seams, air vibrations will be noticeable) and that the engine does not suck in air between the cylinder and the carburetor (for example, we spray WD40 on the outside of the intake pipe, look at the reaction of the engine. If nothing has changed — there is no air leak).
We set the idle speed according to the manual with a screw that limits the throttle stroke (without touching the mixture adjustment screws at idle), for mono-cylinders this is enough, for multi-cylinder engines it may be useful to reduce the idle speed to a level when the engine is still running smoothly, but you can already feel that there is a little more - and it will stall.
Then we turn off the engine, and counting the revolutions, tighten the XX adjustment screw all the way, counting the revolutions. When the screw is tightened to the end, we do not force it under any circumstances! As soon as the effort increases, we stop immediately. We write down this value in a notebook, unscrew the screw back to its original position, and start the engine.
Now for the actual setup.
Stage one is a rough check.
It consists of twisting the needle half a turn, and then unscrewing it one turn.
This is needed to roughly assess the validity of the current setup. If, when tightening the needle, the speed dropped, and then increased when unscrewing, then the current setting is poor. If it’s the other way around, it makes you rich. If the behavior of the motor has not changed much, then most likely we are close to the optimal setting.
Stage two.
It is necessary if at the first stage it turns out that the mixture is lean/rich. If not, move on to the third.
Now we need to turn the screw in the direction that causes the speed to increase. We turn it very smoothly, giving the engine time to react to the change in the mixture. The task is to catch the moment when the revolutions stopped increasing (we record the number of revolutions), and then when they began to fall (we also record).
If we tightened the screw, and when turning the screw the speed only increased (and fell only on the last half-turn, for example), this means that the XX jet is of too large a caliber and prepares a mixture that is too rich, which cannot be corrected with the XX adjustment screw. In this case, you need to reduce the caliber of the XX jet.
In the opposite case, when we unscrew the XX adjustment screw and the revolutions grow and grow, until the thread runs out (be careful, the screw may fall out!), then the XX jet is too lean, you need to increase the caliber. Usually, already at 7 turns from the fully closed state, you can tell that a larger XX jet is needed.
Stage three - fine tuning.
We will assume that the XX jet we have is suitable, and therefore by turning the XX adjustment screw we can catch the maximum speed, and by rotating in one direction or the other, cause a drop in engine speed. Everything should be obvious here. When the speed starts to drop when cranking, this means that the mixture is already too lean. When they start to fall off when unscrewing, the mixture is too rich. And the truth is in the middle. Since we record at how many revolutions this or that change in behavior is observed, we use a simple arithmetic operation to calculate how much we need to turn the screw from one of the positions to get to the golden mean.
For example:
— initial position of the adjustment screw XX = 3.5 turns.
— when twisting, a drop in speed is felt at 3.0 revolutions. When unscrewing - at 4.5 turns. Therefore, the middle between them is at 3.75 rpm. Which is what we are exhibiting.
Note 1
For air-cooled engines, and especially when driving in the city in the summer, it makes sense to shift the adjustment to the rich side. We unscrew the screw until the speed drop is felt, and tighten it back a quarter turn. As a bonus, the engine at idle with a rich mixture is quieter, smoother and “tastier” ????
What happens to be abused by sellers of motorcycles and cars with “tired” engines...
Note 2
The range of rotation of the mixture adjustment screw at idle between drops in engine speed from a lean/rich mixture is different everywhere (and I don’t know what it depends on). There were engines where from a lean to a rich mixture there was one and a half turns (and in this range the behavior of the motor did not change), there were engines where this “flat” section accounted for 3.5 turns of the XX mixture adjustment screw.. But the principle is the same everywhere. We find the position of the screw at which the revolutions begin to fall from leanness, then from enrichment, and calculate the seridine. If the drop in speed occurs too close to the limit position of the screw (or does not happen at all), we change the jet.
Note 3
It is most difficult to use this method on multi-cylinder engines due to their good balance. This method always worked on mono and bi-cylinders, but on 4-in-line, and even with a variation in compression, it was almost impossible to adjust. It turned out only if the compression was smooth, the synchronization was done 5 minutes ago, and the engine idle speed was lowered to the limit, that the slightest change in the mixture of any of the carburetors was immediately reflected in the speed.
Well, if someone has previously turned the carbs and they are configured differently, plus they are out of synchronization (and synchronizing the carbs with a mixture of XX which is configured in some way is also not an obvious task) - then the tuning process turns into a long iterative procedure.
Another way to check the idle mixture setting
Recently, while tinkering with a motorcycle, it dawned on me that I forgot to add another “makeshift” method for assessing the idle mixture quality settings to the article. The idea is as follows - it is known that when the throttle is closed, an engine running on a lean mixture slows down the speed, and one running on a rich mixture drops speed very quickly, with a dip, after which the idle levels off. This is what we will use to check.
On a warm engine, we accelerate sharply and briefly so that the engine spins up to half the working zone (if the red zone is from 8, then we try to spin up to 4 thousand), immediately closing the gas. With the mixture correctly adjusted, the revolutions will drop in about a second, drop immediately to idle, and then the engine will run smoothly.
If the mixture is lean, then the speed will hang in a high zone, and then, as if reluctantly, drop to idle, and the idle will be uneven.
And if the mixture is rich, then the idle will drop sharply with the speed sagging below the stable idle, after which it will smoothly level back.
Another point worth paying attention to is that the needle is raised too high, which will over-rich the mixture at the beginning of the opening of the knob, which can give the impression of an over-rich mixture at idle. When accelerating, the engine will grab the rich mixture and the speed will then drop with a sag, although if you check it later with a gas analyzer, the mixture at idle will be normal. The following symptom helps to detect this puncture - at the beginning of opening the throttle, the engine seems to rest slightly, and then quickly spins up. It’s as if something is preventing it from passing the 2 thousand rpm zone (approximately for a monocylinder with red from 8). If you have such symptoms, you can also try to completely tighten the mixture adjustment screw to XX, and if this symptom remains, the problem is most likely in the position of the needle or its wear.
Source
Reasons for adjustment
They say there is no smoke without fire. This folk wisdom also applies to our case. There is no need to get into the carburetor unless there is a reason to do so. What reasons could there be? Here are the main ones:
- the spark plug always floods;
- The engine runs intermittently and stalls.
Also, carburetor adjustment is necessary when using low quality gasoline for a long time or the air element is dirty. Let's move directly to adjusting the Yamaha Jog carburetor.
First, thoroughly clean the carburetor.
We pay special attention to all channels where gasoline is supplied. If you have already gotten around to repairing the carburetor, then at the same time you can change the spark plug
In addition, we reproduce the replacement of the air element. After the above steps, we proceed to adjustment. Pay attention to the old spark plug, it can “say” a lot. White candle - a mixture of white, black and rich. This leads to excessive fuel consumption and channel contamination.
How to clean the carburetor on a moped - step-by-step instructions
Cleaning is necessary if a lot of dirt and condensation has accumulated. To ensure that this procedure is not necessary, it is advisable to disconnect and disassemble the carburetor. If it is clogged, it is useless to perform adjustments.
First, turn off the fuel supply valve, then you need to disconnect the fuel and drain hoses from the carburetor.
Next, you need to disconnect the inlet pipe from the carburetor, then unscrew the throttle valve cover and remove it from the carburetor. Now the part is held in place only by two bolts, which can be unscrewed with a 10mm wrench. That’s it, the carburetor has been removed. It is advisable to disassemble it on a white table so as not to lose small parts.
Next you need to disassemble the carburetor. First, unscrew the bolts located on the carburetor body. After this, the protective cover will be removed.
Next, the float chamber is pulled out; it is held on one pin, which is removed from the grooves. It can be removed without using tools. Together with the camera, a small cylindrical part with a cone-shaped tip will be removed - a shut-off needle, which is held between the float and the fuel supply channel
It is important to ensure that it does not fall on the floor and get lost.
Now, using a screwdriver with a straight bit, unscrew the jets, the idle speed adjustment bolt and the mixture quality screw.
The unit is disassembled, you can proceed to cleaning. First, attach the tube attachment to the aerosol canister for cleaning.
The accumulated liquid is poured out of the carburetor cap, then the internal cavity is treated with a cleaning aerosol. The jets are treated in the same way; the aerosol tube can be lowered into the recesses and holes. Then all the internal cavities will be cleaned, and all the accumulated dirt will come out. An aerosol with a nozzle can be used to treat all other carburetor openings.
Small holes need to be blown out so that there is no dirt there.
The cleaned parts are wiped dry with a cloth; it is important to wait until the applied aerosol has completely dried. Then assemble the carburetor in reverse order
It is difficult to make a mistake during assembly, since all the parts differ in size and are placed only in certain holes.
Disassembled carburetor of an Alpha moped
When installing a float chamber, first attach an element that shuts off the fuel supply through the hole near the jets. A pin is connected to the camera mount, after which the entire structure is placed on the socket. Next, the cover is mounted and the bolts are tightened. Tighten the mixture quality screw one and a half turns, then tighten the idle speed screw.
It is recommended to spray the assembled carburetor to keep it clean on the outside. Next, the part is put in its original place, first the fuel hose is connected. Then you need to open the fuel valve and wait a few seconds until the fuel fills. You can now start the engine, but it may not start or may be too loud. This means that adjustment is necessary.
You can learn more about how to clean the carburetor on an Alpha moped from this useful video:
Trouble-shooting
What to do if you had to face such problems? Let's go in order. You need to start with the air filter - if there are no problems with it, then proceed to the next steps.
Fuel tap problem?
If gasoline constantly flows from the fuel supply hose, even when the vacuum hose is removed, then the valve is faulty. It simply does not work, but is always in the open position. In this case, the tap must be replaced with a new one.
If, when you remove the vacuum hose, gasoline stops flowing, then the reason is a constant vacuum - you need to climb into the cylinder head.
Locking needle
Provided the faucet is in good working order, you can play the shut-off game. How to get to the needle of a scooter or moped?
- To remove the carburetor, you need to disconnect the air filter; hoses suitable for it; unscrew it from the intake manifold and remove the throttle cable.
- Next, use a Phillips screwdriver to remove the float chamber housing.
- Assess the condition of the shut-off needle and float antennae.
- If necessary, replace the needle and bend the float antennae. If the needle is in good condition, then its seat should be thoroughly washed and blown out.
- Reassemble everything and install it on the engine.
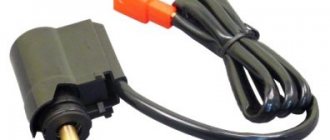
Vacuum accelerator (if all else fails)
In addition to the locking needle, Chinese scooters are also equipped with a vacuum needle (vacuum accelerator). This device also works from a vacuum hose connected to the “carb”. This needle has 5 (usually) adjustment positions. When the scooter accelerates, the vacuum opens this needle and more fuel is supplied to the combustion chamber.
Vacuum accelerator in a Chinese scooter
The system is correct, however, everything breaks down. Over time, none of the needle positions produces results. This problem can be solved simply by removing or cutting the vacuum hose (not the one to the fuel tap)! And the engine no longer overflows - miracle of miracles.
The principle of operation of ignition in a 4-stroke scooter engine
Modern scooters are equipped with contactless systems. They are considered the most reliable and easy to use, do not require complex connections, and provide a constant good spark on time. However, the setting is still important; even the presence of a spark does not always allow the fuel mixture to ignite, since its power also plays a role.
The main reasons for the operation of the ignition system are quite simple: its task is to create a spark to detonate the fuel mixture. If this does not happen, you need to carefully examine each node and find out why the spark disappeared.
- In order to check whether there is a spark at all, you need to unscrew the spark plug and apply it to the engine ground; this can be done using metal objects that are not covered with paint. You cannot hold it with your hand: if there is a spark, it can give you an electric shock, and the discharge reaches 40,000 volts, which the coil creates.
Broken ignition is the cause of engine failure
An incorrectly configured or faulty ignition often causes engine failure. It would be wrong to immediately climb into the cylinder and examine the insides of the scooter, especially since this will not solve the problem. Before touching the ignition system, you need to check for other reasons why the scooter may not work.
- The simplest thing is the lack of gasoline in the tank. Quite often, owners forget to refuel their vehicle, and such a trivial reason can be overlooked.
- The carburetor may be clogged, which prevents the formation of a mixture suitable for driving.
- The carburetor needs to be cleaned regularly, so it doesn't hurt to check whether fuel is flowing from it into the cylinder. It is possible that the fuel pipe is clogged. The jets and other parts of the device may become clogged with debris, which causes little fuel to flow or, conversely, the engine does not have enough air, and therefore it does not start.
- The scooter may also refuse to start if the fault is caused by spark plugs. They may be wet or not produce a normal spark. It is advisable to have a spare set and check with it. In any case, the spark plug needs to be unscrewed and inspected.
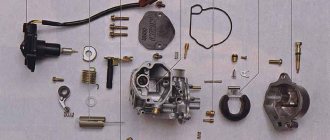
Yamaha Jog Carburetor Disassembly
- First you need to disconnect the gasoline hose, after preparing a separate tank of fuel.
- Next, you need to remove the main screws - the throttle and the mixture quality.
- The next step is to remove the main parts - throttle, diffuser and spring.
- It is also necessary to remove the starting enrichment and float chamber.
Below is a diagram of the parts of the Yamaha Jog carburetor, shown in disassembled form.
If you have disassembled the carburetor, then you need to clean the channels and other parts. Cleaning a standard carburetor is discussed in this article: how to clean a carburetor. But what kind of adjustment is needed for this carburetor?
To watch online, click on the video ⤵
Yamaha Connect a 5 wire switch to a 6 wire generatorRead More
Connecting a Yamaha Jog (3kj) switch when there is no sparkRead more
How to connect wiring to a spark Yamaha jogRead more
How to make a simple spark wiring: YAMAHA JOG VINO SLIDER AEROX and other 2t mopeds!Read more
Very Simple Test of CDI Scooter Alternator.Read More
How to check a removed scooter generator and magneto induction sensorRead more
Scooter wiring basics/a couple of yamaha jog wiring tipsRead more
Removing the Yamaha jog generator. Read more
Switch. How to remove the cutoff on a Yamaha jog. Increasing engine speed. Increase speed.More
Switch 5 BM YAMAHA 8 pinRead more
Generator stator Yamaha JOG 50 51 coils, 5 wires EVO. More details
✅