It's easy and interesting to communicate here. Join us!
Now, if everything is in order on the other one, remove the ignition from that engine and put it on yours and you will find out what the problem is, the armature has nothing to do with it, only the brushes can be the cause.
The ignition has nothing to do with it, it’s a completely different system! The brushes must be clearly pressed by the springs against the contact rings of the armature. You can simply check the armature with a light bulb - 12 volts should pass through it. The three stator windings are connected at one end together and are also connected by a light bulb. We disconnect the wires and the relay connector - 5 minutes and everything is checked! On ignition - the red light is on - that means the armature is intact and current is flowing to it, start up - the lamp goes out - charging has begun. If the relay is alive and everything is ringing, everything should work, everything is very simple. Well, check the wires again. Good luck, guys! I worked in a television studio, and over the course of 15 years I repaired hundreds of them, take a closer look and that’s all.
Akum Jupiter 5 is not charging, what could it be?!
Previously in the same section:
- Registration of self-propelled gun // 1st December 2012 // 3
- winter season // 17th November 2012 // 6
- I need a bike for a photo shoot))) // 15th November 2012 // 6
- Carbs // 14th November 2012 // 3
- Maybe someone else is not so lucky? // 31st October 2012 // 6
There are 13 comments left on this post.
brushes. Relyushka, generator, if the indicator lamp for generator operation is on and goes out after starting, then this is the relay that is covered under the ass
yes, it was so dim... but now it doesn’t even light up... not the headlights, nothing more, just the dimensions when you turn the key...
I also think because when I turned the steering wheel the instrument panel was on and now it doesn’t even light up, but before that it was as if the headlights were on, you turn on and no matter what, the signal works and starts...
In general, the communicator is on fire and is shorting out...
where does it close if the charge switch wanders, you won’t be sure that it is it
yes, what else?! I looked at everything and there is no short circuit... it worked before, I didn’t touch it now, my Akum connected it, the finger burned.
MY MOTORCYCLE
The problem with 6-volt motorcycles is the electrics. Let me put it briefly - complete crap (sorry). I encountered it myself and am still suffering. There’s no way I’m switching to 12-volt on my boxer.
In this article, the author explained the main problems and how to deal with them. Everything applies to motorcycles with this type of electrics.
First of all, by external inspection, make sure that all the wires are securely fastened, the tips are not oxidized, the battery is charged, and the indicator lamp for the generator is working properly. It would be useful to open the cover of the relay regulator and check the condition of the contacts.
Have a diagram of your motorcycle.
Let's get started.
a) When the engine is not running and the ignition is on, the indicator light on the headlight lights up with a low glow. Check the battery charge level. Check the reliability of the connection of the electrical wire contacts in the battery - central switch circuit, as well as the condition of the central switch contacts, the warning lamp holder and the battery terminals for oxidation. Remember: have you recently tightened any long screws or self-tapping screws in the generator area that could cause a short circuit?
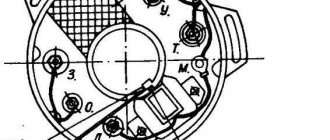
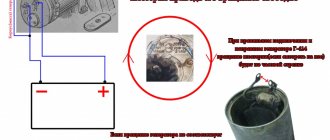
b) The control lamp lights up at all engine speeds with an even glow. First of all, check the operation of the generator, for which connect the “W” terminal of the generator to “ground” and connect the lamp to the “I” and “W” terminals for 6 volts. If while the engine is running (do not rev too much - it won’t take long to burn the lamp) the lamp does not light up or burns with a weak glow, then the generator is faulty, and in this case it is necessary to check:
1. Ease of moving brushes in the brush holder. In case of jamming, clean the brush holder. (Brushes are a special topic: if you have changed them, check them with an Avometer/multimeter; their resistance should be about 1 ohm; now brushes with a high carbon content and a low graphite content are on sale, their resistance is 20-30 ohms - they are not suitable , definitely throw it away. We try using a drill, a VAZ-classic, and grind it first.)
2. Presence of contact between the brush and the current-carrying wire—external inspection. If necessary, replace the brush.
3. Presence of contact between the brushes and the commutator, no hanging of the brush in the brush holder on the wire - external inspection; if there is no contact due to excessive wear, replace the brush. (A brush is considered worn out when worn by 1/4 of the length, i.e. up to a size of 11 mm .) do not forget that the brush connected to the “I” terminal is isolated from ground.
4. Condition of the surface of the collector - external inspection; if the surface of the lamellas is dirty or oily, wash the collector with gasoline or clean it with glass sandpaper. (I insist with glass sandpaper)
5. Check the serviceability of the generator stator excitation coils with an avometer/multimeter. If there is no avometer, disconnect the wires coming from the bundle from the terminals “M”, “I”, “W” of the generator, without removing the output wires of the excitation coils from the terminals “I” and “W”. Disconnect the output wire of the excitation coils (an additional resistance that is available on motorcycles with an IZH-56 relay-regulator) from ground. Then connect one terminal of the battery to the generator terminal “I” or “W”. Connect any motorcycle lamp in series to the second terminal of the battery, and the second contact of the lamp to the free terminal “I” or “W”. If the lamp does not light, it means that there is a break in the excitation coils (usually due to the lack of contacts at the junction of the excitation coils). It is necessary to check the connections of the coils and, if necessary, solder them.
If there is no break in the field windings, i.e. the lamp is on, then it is necessary to additionally check that the field windings are not shorted to ground. To do this, connect one terminal of the battery to the “ground” of the generator, and the second - through the lamp to the “I” or “W” terminal. If the lamp does not light, then there are no short circuits and the generator stator is working. If the lamp is on, then you should find the location of the short circuit. To do this, remove the stator from the engine and re-check the absence of a short to ground of the stator coils using the above method. If the short circuit is eliminated after removing the stator, it means that it was caused by contact of the generator mounting screws with the field coil due to insulation failure or contact.
Author: Matvey Semyonov (https://vk.com/avtomotosam) and a little adjective))))))
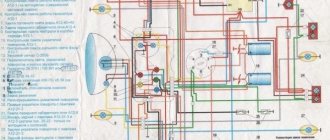
Wiring diagram Izh planet - 5, how to determine the malfunction
While easily fixing mechanical failures, motorcyclists experience difficulties if the electrics fail. It’s completely in vain, the wiring diagram of the planet Izh 5 is not complicated, it’s easy to figure out.
There is no need to have special stands and equipment for repairs. A minimum knowledge of electrical engineering and a simple avometer (tester) is enough; even often you can get by with just a test lamp.
We will tell you in more detail about the main electrical wiring components and possible malfunctions. Finding a broken wire or damaged insulation is easy (for example, a bad contact always gets hot).
In this case, we look to see if there is a spark at the coil output and at the output at the spark plug contact. Now in detail about the main wiring components of the Izh Planet.
Generator
The heart is the generator (sometimes called a magneto, but they were never used on Izh Planet). Three windings produce alternating current. For excitation, an additional coil is used instead of a permanent magnet. Therefore, it is impossible to jump start a motorcycle with a completely dead or missing battery.
Possible breakdowns in this unit:
- Breakdown or breakage of coils. It is checked by measuring their resistance of current-carrying conductors and insulation. If the generator is damaged, it will become noticeably hot.
- Failure of the diode bridge - the output voltage will differ significantly from the nominal level or be absent.
- Failure of the voltage regulator. Although the electrical circuit includes short circuit protection, it happens that the automation does not work and most often the output transistor burns out.
Battery
The battery in the motorcycle is low-power. The motorcycle does not have a starter, so its task is only to supply voltage to the ignition system and the generator excitation winding during starting. Thanks to the battery, designed for 12 volts, a stable start of the fifth Planet is ensured; up to the third model, the wiring was 6 volt, and the ignition was not always clear.
Possible battery malfunctions:
- Mechanical damage - housing, plates, leakage of electrolyte.
- Loss of electrolyte density is determined by measurements using a hydrometer.
- The short circuit of the plates in the banks is detected by measuring the resistance.
- It is possible that the connection is not correct, minus not on the body (frame) of the motorcycle - all the electronics will not work.
Ignition system
The ignition chopper is used to ignite a spark at a certain point in the piston stroke. In early modifications of the electrical wiring of Izh Planet 5, contact was mounted, later electronic.
The main malfunctions of this unit:
- Burning of breaker contacts is determined visually.
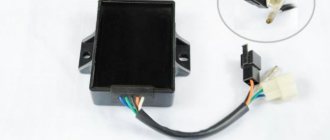
- Failure of a sensor or switch elements - the easiest way to detect it is to use the method of installing a known-good unit. The lubrication system sensor valve is also checked using the same method.
- An incorrectly set ignition timing is visible from the fuzzy operation of the engine. It can be eliminated by adjustment using special probes.
The ignition coil increases the voltage to several kilovolts so that the discharge can ignite a spark at the spark plug electrodes. The secondary winding is made of a fairly thin wire; most often it burns out. Although a breakdown between the turns or onto the housing is also possible. The same troubles can (but less often) happen to the primary circuit. Everything is revealed using resistance measurements.
Headlight and alarm lamps
Regular incandescent lamps are used; it is not difficult to find a burnt coil.
Switching elements
These include switches (high-low, turns, engine stop, etc.) as well as brake and neutral sensors and the ignition switch. You can easily “ring” them with a tester, finding out which contact group is not working.
As can be seen from all of the above, the wiring on Izh Planet is without any special secrets or complex elements, all its parts are easily diagnosed and repairs should not cause difficulties.
Now we advise you to watch the video, which shows in detail and clearly the assembly of the Izh Planet 5 circuit.
Current wiring diagram of IZH Planet 5 and its problems
The wiring diagram of IZH Planet 5 is not complicated, and it is quite possible for a person, even with little experience, to independently check its serviceability and carry out repairs. It is enough to know the principle of operation and its main problems, which owners of the IZH P5 motorcycle often encounter.
How to wire IZH Planet 5
Most of the Planet 5 motorcycles in use today are equipped with a contactless ignition system. This makes it possible to use the motorcycle even without a battery - but the lights and direction indicators will not work.
Some owners remove the battery themselves or remove the main fuse if the electrical circuit is damaged and there is no time or desire to deal with it.
But, according to current traffic regulations, the operation of a motorcycle with such malfunctions is prohibited, and therefore the Planet 5 wiring must always be in perfect condition.
The IZ wiring diagram is designed for a voltage of 12 Volts, not 6, which should be taken into account by the owner of the motorcycle. The circuit uses the metal frame of the motorcycle as the negative wire: all wires have a positive charge, and their short circuit with the frame is often the main cause of wiring failure.
Maintenance
The owner can independently perform some maintenance procedures:
- check the motorcycle generator if the battery loses charge;
- set the gap between the breaker contacts;
- adjust the quality of the sound signal.
The need to inspect and adjust the wiring arises if:
- the motorcycle moves in the rain for a long time, as this causes oxidation of the contacts;
- a motorcyclist rides in an area with a lot of vegetation that damages wiring;
- The driver rides in snow in winter, which can stick to electrical wiring parts and damage them.
Self-check of the Planet 5 motorcycle generator in case of loss of charge
The cause of loss of charge in the IZH Planet 5 battery is most often a breakdown of the generator.
To check it yourself you need:
- multimeter device;
- straight screwdriver.
Step-by-step instruction
The following steps must be followed:
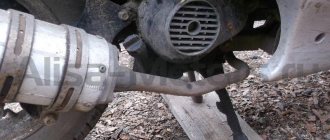
- Disconnect the wires from the battery and remove the generator cover.
- Disconnect the top 5 wires from the generator, first unscrewing their fastenings. In order not to mix up the wires during assembly, it is worth marking them.
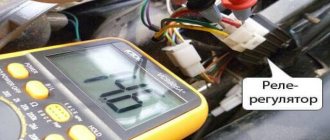
- Measure the winding resistance using a multimeter in ohmmeter mode. To do this, you need to touch the body with one probe, and the other should be connected in turn to the 3 wires of the winding. There should be no short circuits, as indicated by the inscription on the multimeter screen.
- Test the resistance between the stator contacts: you need to touch them one by one with the multimeter probes. The value on the screen should be 8 ohms.
The presence of a short circuit in the 3rd stage or a discrepancy in the indicators in the 4th will indicate problems with the generator.
Photo gallery: stages of checking the IZH Planet 5 generator in case of loss of charge in pictures
How to correctly set the gap between the contacts of the breaker?
In order to set the gap between the breaker contacts, you will need:
- straight screwdriver;
- wrench 10;
- candle key;
- probe 0.4 mm thick (+/– 0.05 mm).
Next, you need to follow the steps sequentially:
- Place the motorcycle on a stand and place the gearbox in neutral.
- Remove the right crankcase cover and unscrew the spark plug.
- Using a 10mm wrench, grab the generator rotor mounting bolt and turn the crankshaft to a position where the contacts are as far apart as possible.
- Loosen the screw securing the contact.
- Place the probe between the contacts and adjust the tightening of the eccentric screw until the probe passes the contacts with little resistance.
- Tighten the contact fixing screw.
Photo gallery: adjusting the gap between the breaker contacts
Troubleshooting the audio signal and improving signal quality
Poor sound signal quality is mainly caused by improper adjustment.
The following tools will be needed for setup:
- wrench 7;
- a simple screwdriver.
Changes made by owners
The unreliability of individual components and flabby wiring on IZ Jupiter 3 forced the owners to delve into all the intricacies of the updated elements.
And the first thing that caused numerous complaints were changes in the primary circuit of power supplies:
- Accumulator battery;
- Generator.
In addition to the ignition systems and lighting circuits of the towed module: a cargo-passenger car. In most cases, the reason for the refusal was a banal manufacturing defect.