Rear light for Voskhod with ultra-bright LEDs. Sent by kadet.
Starting spark delay device. Sent by kadet.
Article on installing a battery on ZiD motorcycles. Sent by kadet.
An article on making an air filter from oil filter elements. Sent by kadet.
Article on the manufacture of progressive suspension for the ZiD-50. Sent by kadet.
Diagram of a universal turn signal relay. Posted by Morgan.
Conversion of the 6 volt generator G-427 into a 12 volt one. Sent by SlavaR.
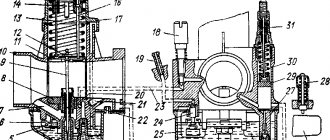
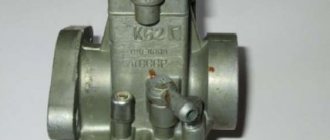
The design and principle of operation of the K65 carburetor. Sent by kadet.
The design and principle of operation of the K62 carburetor. Sent by kadet.
The design and principle of operation of the Jikov carburetor. Sent by kadet.
Marking, dimensions and applicability of bearings. Sent by cadet.
Technical characteristics of motorcycles Voskhod, Izh, Sova. Sent by cadet.
Off-road ZDK-200 2ShP. Test, description, characteristics. Sent by cadet.
Mokik ZiD 50-01 with a Chinese Lifan engine. Characteristics, test. Sent by cadet.
Tests of Kovrov ATVs with a 50 cm3 engine. Sent by cadet.
Photos of vintage motorcycles produced by Kovrov. Sent by cadet.
Marking of oil seals, table of their interchangeability. Sent by cadet.
Oil tests for 2T engines, oil characteristics. Sent by cadet.
History, repair and diagnostics of contactless ignition. Sent by kadet.
Article on installing a car signal on Voskhod. Sent by cadet.
An article on disassembling and repairing the front fork of the K-175 and Kovrovets. Sent by cadet.
Article on repairing the ZiD-200 engine of the Owl motorcycle. Sent by cadet.
Article on repairing an alternator. Sent by cadet.
Article on replacing the right crankshaft bearing without disassembling the engine Posted by kadet.
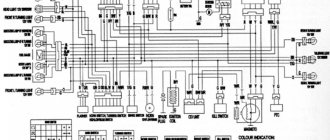
Electrical diagram of the ZiD-200 motorcycle. Sent by kadet.
Diagram of the switching-stabilization unit (BCS) 1MK211. Sent by kadet.
Transmission
During transmission repairs, the following work may be required:
- Adjusting the clutch, replacing its disc and bearing;
- Clutch drive repair;
- Replacement of gearbox bearings;
- Repair of switching module parts;
- Restoration or replacement of gearbox gears.
Most of them require high qualifications and are difficult to do at home. The exception is the repair and replacement of drive mechanisms. So, sometimes there is a need to restore the splines for the gearbox foot, replace the clutch cable or its jacket, or adjust the clutch. These works are carried out without disassembling the crankcase.
Repair and operation of the Voskhod motorcycle are closely interconnected due to the age of the model. However, with the proper approach to organizing and carrying out repairs, the motorcycle will remain your faithful friend and assistant for a long time.
We have selected useful articles on motorcycle care. Disassembly of the power unit is very detailed in Voskhod. Preparation for winter and storage. Timely lubrication and replacement of engine oil. High-quality care for an iron horse prolongs its life and preserves its characteristics in their original form. Therefore, you need to constantly look at the instructions and manuals.
Motorcycle engine Voskhod 3M single-cylinder, two-stroke with a volume of 173.7 cubic centimeters. The cylinder diameter is 61.7 millimeters. The piston stroke is 58 millimeters. The maximum power in kilowatts is 9.9, and in horsepower it is 13.5.
To remove and install the cylinder head of the Voskhod motorcycle, it is necessary. Remove the high voltage wire cap from the spark plug. Unscrew the four nuts.
Preparatory work for removing the cylinder and piston. Open the saddle lock and place the saddle on the stop. Close the petrol tap and disconnect the petrol hose.
In order to remove the clutch basket of the Voskhod-3M motorcycle, the forward gear and the starting mechanism, it is necessary. Drain the oil from the gearbox housing through the drain hole located in the bottom of the crankcase.
The right engine cover of the Voskhod covers and protects several important systems of the Voskhod motorcycle. The reason for removal may be not only malfunctions, but also simply correct engine maintenance provided by the manufacturer.
Necessary work to remove the gearbox seal of the Voskhod road motorcycle. Remove the clutch release rod. Bend the section of the control washer bent onto the edge of the nut, then unscrew the nut (left-hand thread).
Purpose
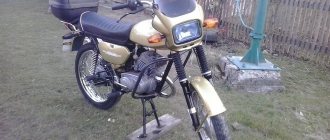
The Voskhod-3M motorcycle was developed in several configurations. There were even versions for agriculture, which were equipped with a device for transporting products. However, due to the discrepancy between the gearbox and the number of speeds for off-road driving, this model did not find widespread use.
In the modern world, the units in question are rarely used for their intended purpose. Basically, “3M-Voskhod” is popular among collectors as one of the representatives of rare Soviet equipment. Owners who were able to keep this equipment in working order use it as a reliable vehicle that is not afraid of difficult road sections.
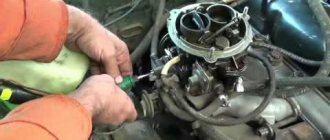
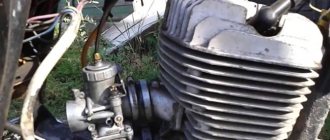
Ignition and carburetor
It is these two components that, as a rule, determine the stability of the engine. Often, interruptions in the crankshaft rotation speed, loss of traction, and difficulties starting the engine are associated precisely with their malfunctions. Repairing the ignition and carburetor usually comes down to adjusting them. Setting the ignition includes setting the gap between the coil core and the sensor magnet within 0.295...0.305 mm. The piston ignition timing should be 3.5-5 mm to top dead center.
Adjusting the carburetor is somewhat more difficult. If you are repairing a Voskhod-3M motorcycle, then you will have to deal with the K65V carburetor, and the main tools will be the quality and quantity screws included in its design. Using the first, you can lean or enrich the mixture - change the proportion of fuel and air entering the cylinder. The second determines its volume per working cycle. With the standard setting, the quality screw is screwed in completely and then unscrewed half a turn. Then the rotation of the quantity screw achieves the minimum stable speed and the quality of the mixture is re-adjusted. Finding the optimal adjustment balance is a search for maximum traction and stability with minimum fuel consumption.
GENERAL INFORMATION
The charger UZS-P-6/12-6.3 UHL 3.1 “Rassvet-2”
is intended for charging and recharging batteries of passenger cars and motorcycles.
The Rassvet-2 charger produces a charge with a stabilized current in any of two modes:
In manual mode - charge 6 V and 12 V lead-acid batteries. In automatic mode - charge and recharge 12 V lead-acid batteries.
The Rassvet-2 charger has electronic protection against short circuits at its output and incorrect (polarity) connection to the battery terminals.
In addition, “Rassvet-2” allows you to determine the degree of charge of the battery, the serviceability of the battery, and the polarity of the battery terminals if there are no markings on them.
Charger UZ-12-6 UHL3.1 “Rassvet-2M”
Designed for charging and recharging serviceable acid-acid batteries of passenger cars with a rated voltage of 12V and a capacity of 40-75 Ah.
The device charges rechargeable batteries in a mode close to the “constant voltage” mode, which ensures their safety and durability. The Rassvet-2M charger has short circuit protection for electrical circuits.
Technical characteristics of chargers “RASSVET-2” and “RASSVET-2M”
DAWN-2
| DAWN-2M | ||
| Rated supply voltage, V | 220 | |
| frequency Hz | 50 | |
| Rated voltage of batteries being charged, V | 6 and 12 | 12 |
| Charging current in “4A max” mode, A – maximum – minimum | — | 4,5 1,0 |
| Charging current in “6A max” mode, A – maximum – minimum | — | 6,5 2,5 |
| Rated current value, A | 6,3 | — |
| Current adjustment is smooth, in the range, A | 0,1 -> 6,3 | — |
| Operating temperature range | -10 to +40 | |
| Overall dimensions, mm | 267x142x112 | |
| Weight, kg | 3,2 | 3,2 |
| Electricity consumption, kWh, no more | 0,16 | 0,12 |
.
Site dedicated to motorcycles Voskhod - Pressing out the right crankshaft bearing.
WITHOUT ANY WORRY
Craftsmen always keep some tricks in stock with which they can use an unconventional method to repair or replace a part in a matter of minutes. Let's say, many people know how much trouble replacing the right crankshaft main bearing will require. If you follow all the points in the operating instructions, then you will spend at least half a day on this operation: for now, remove the engine from the motorcycle, while you halve it... Then, again, installing the engine in the frame is a nightmare!
Everything happens much easier if you know... that you don’t need to do any of this - neither remove, nor install, nor half. And we’ll teach you how. Take a regular tool and, in addition to it, a narrow chisel, a sharpened pin or a powerful screwdriver.
Engine diagram
For Voskhod motorcycles, the engine size was the same. It was 173 cm3. In general, all bikes from this manufacturer had the same single-cylinder engine with two power strokes and an air cooling system. The very small volume of the engine produced 10 horsepower and over time, modifications to the engine began to produce power of 14 hp.
If you discover a malfunction and it is related to the operation of the engine, do not put off repairs for a long time. Exacerbating the problem will result in unexpected costs. There is no need to be afraid to overhaul the engine. Not only disassembly, but also assembly of the Voskhod engine is very simple.
Before repairing, carefully inspect the motorcycle for wear or broken parts. After inspection, clean the engine from dirt. It is better to wash it thoroughly with a cleaning agent. Since the main engine problem is the crankshaft bearings, seals and gaskets, let’s consider the process of repairing them:
- First, let's look at installing the crankshaft bearings. To do this, it is necessary to install retaining rings in the pallet halves. Then, using mandrels, insert the main bearings. If you have not done such repairs before, the Voskhod engine diagram will help. The crankshaft moves into the new bearings with force, which creates additional load on the ball bearing axle when moving.
- Insert the crankshaft into the left side of the pan. To prevent the connecting rod from rotating, secure it, otherwise there is a risk of bending it.
- Turn the motor over. We put a pin on the nuts and screw the resulting element onto the studs.
- Pressure must be created on the bearing from the inside. Any bushing that fits the size will do for this. If you choose the wrong size, it will come off and disrupt the operation.
- Once the bearings and bushing are securely installed, we move on to the crankshaft. Tighten it at a distance of no more than 3-4 millimeters from the crank chamber partition.
- Now take a thin rod and move it between the crankshaft and the crank chamber until it passes without much force.
- Remove all fat from the surface of the pan. We lay new gaskets and connect the halves of the pallet to each other, putting the second part on the axle.
Approximate norms for adjusting electrolyte density, g/cm3
| Required electrolyte density in battery g/cm3 | Real electrolyte density, g/cm3 | |||||||||||||||||||
| 1,15 | 1,16 | 1,17 | 1,18 | 1,19 | 1,20 | 1,21 | 1,22 | 1,23 | 1,24 | 1,25 | 1,26 | 1,27 | 1,28 | 1,29 | 1,30 | 1,31 | 1,32 | 1,33 | 1,34 | |
| 1,24 | 254 | 220 | 201 | 181 | 158 | 133 | 105 | 74 | 40 | 0 | 24 | 47 | 68 | 87 | 105 | 112 | 138 | 153 | 167 | 181 |
| 1,26 | 290 | 275 | 159 | 241 | 222 | 200 | 176 | 149 | 119 | 84 | 45 | 0 | 23 | 44 | 63 | 82 | 99 | 115 | 130 | 145 |
| 1,28 | 342 | 330 | 316 | 301 | 285 | 266 | 246 | 223 | 198 | 169 | 136 | 97 | 53 | 0 | 21 | 41 | 59 | 77 | 93 | 108 |
| 1,30 | 396 | 385 | 374 | 362 | 348 | 333 | 316 | 242 | 277 | 253 | 226 | 194 | 158 | 115 | 63 | 0 | 20 | 38 | 56 | 72 |
To the left of the bold line: after removing the indicated volume of electrolyte, it is necessary to add the same amount of electrolyte with a density of 1.40 g/cm3.
To the right of the bold line: after removing the specified volume of electrolyte, you must add the same amount of distilled water.
6.3.2. After the battery has finished charging, disconnect the power cord 9 from the network and the load cables from the battery.
6.4. Charging and recharging a 12 V battery in automatic mode:
6.4.1. Install handle 5 according to the instructions in the previous section. 6.4.2. In automatic mode, charging current is supplied to the battery cyclically. The duration of the current cycle is 5..35 s. During the flow of current, indicator 7 lights up. Between current cycles there is a dead pause, during which indicator 7 does not light up. As the battery charges, the pause increases from 0.5...1 s, when the battery is discharged to 50% - to 0.5...2 minutes, and 6 more at the end of its charge (battery charge is 95...100%). 6.4.3. If after charging for 0.5...2 hours (depending on the state of charge of the battery) the pause does not increase, then this is a sign of a faulty battery
how to adjust fuel consumption in a K62V carburetor. Sunrise 3m
The quality adjusting screw is fully tightened, and then unscrewed half a turn or a little more. After starting the engine, warm it up to normal temperature.
By rotating one quantity screw, the minimum stable engine speed is achieved, by rotating the other (quality screw) the mixture is leaned until interruptions occur. After this, turning the quality wing, enrich the mixture until the engine begins to operate stably. Now, turning the screw from which the adjustment began, reduce the speed and find a new position for the quality screw and repeat this until a minimum but stable engine speed is achieved.
The correct idle speed adjustment is checked by sharply opening and closing the throttle. If the engine stalls when the throttle is opened suddenly, you should enrich the mixture by turning the quality screw a quarter or half a turn. If the engine stalls when the throttle is closed abruptly, the mixture is leaned out by turning out the same quality screw by the same amount.