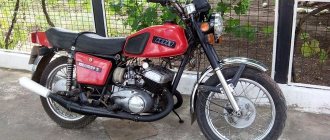
Jupiter 5 is one of the most successful creations of Soviet motorcycle production. Today, like 30 years ago, the device is often found on the streets of both remote outbacks and large cities, and, in most cases, the owner prefers to handle its maintenance independently.
The carburetor, being one of the most important components of any motor vehicle, is subject to intensive use and increased wear. Considering the great age of some models, replacing this module very often becomes an inevitable condition for extending the life of the unit.
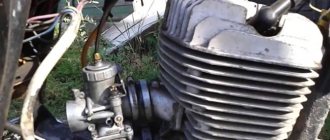
The motorcycle is equipped with Izhevsk carburetors K-62D, K-65D, K-68D , or the Czechoslovak model Jikov-2928SE . There are few differences between the first two options: the design of the top cover; enrichment jet diameter; needle fastening (K-65D comes with a nozzle). The K-68D differs from its predecessor:
- Enlarged diffuser.
- A round (not square, like the K-65) damper.
- Lateral (more convenient for optimization) location of the idle screw.
- Threaded (for quick needle adjustment) top cover.
Which carburetor is better to install on IZ Jupiter 5? As you can see, the 68th model is more convenient to maintain , however, experienced motorcyclists note that it often contains defects, for example, in the form of the absence of a hole that improves the formation of the fuel mixture.
Jikov-2928CE is considered a higher quality carburetor, but also more difficult to operate and repair. Therefore, when choosing this option, you should prepare for possible difficulties, for example, when searching for replacement jets, because their size is much smaller than those from Izhevsk.
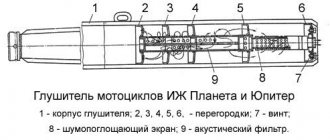
Rice. Carburetor K-62:
1 — idle fuel jet, 2 — main fuel jet; 3 — float chamber, 4 — sprayer; 5 — float axis, 6 — float lever bushing; 7 — air channel, 8 — nozzle, 9 — dosing needle, 10 — body; 11 — throttle, 12 — needle lock; 13 — throttle spring; 14 — throttle lift limiter (removed after engine break-in); 15 — throttle control cable, 16 — rod with idle speed adjustment screw (lowering the throttle); 17 - cover; 18 — idle speed adjusting screw, 19 — fuel inlet fitting, 20 — adapter hole, 21 — idle speed emulsion channel; 22 — drainage hole, 23 — idle air channel, 24 — locking needle with washer, 25 — float, 26 — corrector emulsion channel; 27 — dosing needle; 28 — float stopper, 29 — plunger, 30 — plunger spring, 31 — corrector control cable
How to install a carburetor
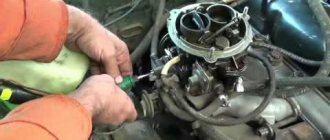
Before installing the carburetor on IZ Jupiter 5, make sure it is completely clean and all parts are present. First, remove the carburetor cover with the three-hole throttle body. The round hole located in the center is intended for placing and fixing the needle, the shaped one, located on the side of the cutout, is for attaching the cable coming from the throttle handle, the T-shaped one is for installing the screw rod. The new carburetor on the IZH Jupiter 5 has a limiter located in the cover, which is removed after the break-in period.
After fixing the carburetor to the engine, a cable is attached to the shaped hole of the throttle and the cover is tightened. The throttle is checked for the ability to fully open the diffuser and not jam in all positions of the throttle stick.
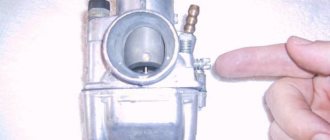
Next, the fuel line is connected to the fitting. The joints are checked for the slightest leak, after which the starting device is opened.
Apply a few light presses on the claw, then start the engine normally. After checking the functionality of the device and the uniformity of fuel distribution on a warm engine, the ignition can be turned off.
How to adjust carburetor on Jawa 638
The motorcycle is equipped with Izhevsk carburetors K-62D, K-65D, K-68D, or the Czechoslovak model Jikov-2928SE. There are few differences between the first two options: the design of the top cover; enrichment jet diameter; needle fastening (K-65D comes with a nozzle). Many people have a question about carburetor adjustment. In this video I tried to explain in an accessible and “on-the-finger” way...
I PUT A JIKOV CARBURETOR ON IZH JUPITER 4!
The K62 carburetor has two adjusting screws, with which you can change the idle speed, and a needle, by changing the position of which, you can change the property of the mixture (enrich or lean it). When we raise the needle, we enrich the mixture; when we lower it, we make it leaner. Adjusting the quality of the mixture is carried out by walking 2-3 km (at a speed of about 60-70 km/h) and looking at the spark plug. If the candle is covered with the working mixture (the candle is oily, dark brown or black), we lower the needle; if it is too dry (the color is white, light straw), we raise it. But this is just part of the adjustment; each time you need to set the carburetor idle speed. In this video I installed a Jikov carburetor, and the motorcycle started going faster! Well, see how I installed it in...
Carburetor "Ikov" Java, design review and overhaul.
We repeat, the propeller produces air, although some people think that this propeller is designed for fuel. Therefore, by tightening the quality screw, we close the air flow, that is, we enrich the mixture. As was said, this screw provides air in all positions of the damper, and therefore at idle speed of the crankshaft. Playlist carburetors. .
Adjusting the float chamber Java 638
After fixing the carburetor to the engine, a cable is attached to the shaped hole of the throttle and the cover is tightened. The throttle is checked for the ability to fully open the diffuser and not jam in all positions of the throttle stick. Adjusting the fuel level.
IZH Jupiter on LK Owl and IKOV carburetor
Before installing the carburetor on IZ Jupiter 5, make sure it is completely clean and all parts are present. First, remove the carburetor cover with the three-hole throttle body. The new carburetor on the IZH Jupiter 5 has a limiter located in the cover, which is removed after the break-in period.
adjusting the float chamber ikov jawa
At the same time, we agree that the candles used are those recommended by the manufacturer! A light brown or dark gray color should be considered normal: it indicates that the candle is not overheating, but at the same time it is heated quite strongly and this ensures its self-cleaning from fuel and oil combustion products. When the position of the needle is selected, it will be possible to talk about the greatest efficiency of the carburetor: to achieve it, the needle must be lowered one notch.
Carburetor Jikov
At the bottom of the carburetor, a cover is attached with two bolts, which is the body of the float chamber. The float chamber plays a critical role in engine operation; with the help of float 6 and needle 7, it automatically regulates the fuel supply to the carburetor to a certain level, which in turn affects engine operation. Level in the carburetor float chamber.
CARBURETTOR from JAVA on IZH. I'M SHOCKED…
Install the assembled carburetor onto the engine through a standard gasket and secure with nuts, tightening them evenly to avoid deformation of the flange.
Improvement of the IKOV carburetor for sharpness, for IZ Jupiter
CE is considered a higher quality carburetor, but also more difficult to operate and repair. Therefore, when choosing this option, you should prepare for possible difficulties, for example, when searching for replacement jets, because their size is much smaller than those from Izhevsk. guys, this is just an experiment, if you don’t mind the carb)
Carburetor adjustment Izh Jupiter 5
Adjusting the IZ Jupiter 5 carburetor is the simplest, but at the same time the most important process. Whether it is K-62, K-65 or K-68, you must first warm up the engine to operating temperature, and then perform a sequential series of actions :
- Set low but fairly stable engine speeds by rotating the screw that adjusts the throttle position.
- By changing the position of the idle screw, set the engine to maximum speed.
- Repeat these steps 4-5 times, gradually reducing engine speed.
- Check with sharp jerks that the adjustment is correct.
The carburetor on the IZ Jupiter 5 should be adjusted so that there are no jerks and the engine does not stall in the event of sudden opening and closing of the throttle. In the first case, you should enrich the fuel mixture by turning the idle speed screw ¼-½ turn clockwise. In the second, turn the screw in the opposite direction.
You can also adjust the carburetor on IZ Jupiter 5 in operating modes. Depending on weather conditions and the technical condition of the engine, the metering needle can be moved up to enrich the mixture and down to obtain the opposite effect.
The design and principle of operation of the IZH Jupiter 5 carburetor
As mentioned above, the IZH Jupiter 5 motorcycle was equipped with a K-65D carburetor from the factory. It is float-type, gate type with variable vacuum. This means that the vacuum parameters in the carburetor diffuser are not constant and depend on the height of the throttle valve with the needle. Such carburetors are designed for leisurely, quiet driving over rough terrain and when driving with additional cargo (cradle, trailer).
The main components of the K-65D carburetor include the following components (see figure):
- main fuel system: flat throttle valve (9), mixing chamber (6), throttle needle (19) with lock (17), nozzle (3) and main fuel jet (1). On the carburetor cover (15) there is a quantity screw (throttle lift adjustment, 14), a guide and screw for adjusting the throttle cable (12), a throttle limiter for engine running-in (11);
- idle system. These include: quality screw (18), idle jet (4), idle system adapter hole (21), idle system emulsion channel (22), idle air channel (23);
- corrector system: starting device needle (31), corrector fuel nozzle (29), plunger spring (33), corrector control cable (34), starting device emulsion channel (26);
- float chamber. It consists of a cover (2), a swinging plastic float (25) with a valve mechanism for locking the fuel channel (seat-28 and locking needle-24). To force the chamber to fill, there is a float stopper (30) and a drain hole (27) is provided to remove excess fuel from it.
The carburetor works on the principle of a spray gun. Due to the difference in pressure in the engine crankcase and the environment, fuel is sucked through the atomizer into the mixing chamber, where it is mixed with air. As the crankshaft speed increases (the throttle rises), the pressure at the outlet of the mixing chamber decreases, but the air flow speed increases, due to which the fuel supply increases.
For the correct dosage of fuel at different engine operating modes, a conical-cylindrical needle is used in the carburetor. Due to this, when the throttle is raised, the needle in the atomizer changes the flow area, which allows you to maintain the required vacuum parameters.
To allow the engine to operate at idle speed, there is an air channel in the diffuser on the intake side. Passing through it, the air mixes with the fuel entering through the idle jet. As a result, the finished mixture enters the space behind the throttle. Thus, the engine maintains a minimum stable engine speed.
Carburetor K 65. Design, adjustment.
K65 is not much different from the usual K62.
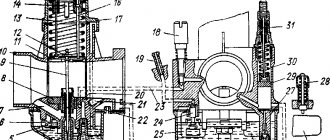
But this is precisely at first glance, since modernization affected not the form, but the content. And you will be convinced of this when, together with us, you examine the structure, principles of operation and adjustment of the new device shown in the figure. First, let's talk about the design and operating principles. It all starts with the supply system and maintaining a constant fuel level. Through fitting 20 it reaches the fuel valve 15, which is equipped with an elastic lock washer. The valve rests on a tongue 18 connected to plastic floats 17, which are interconnected and rotate freely on an axis 16. If for some reason the fuel level rises, its excess is drained from the float chamber through the drain hole 32. So that when heated, the pressure in the float chamber The chamber was not enlarged; it is connected to the atmosphere by unbalancing channel 31.
The main dosing system consists of a sprayer 5, a main fuel jet 6, a throttle needle 7 and an air supply channel 8. Fuel from the float chamber through the main fuel jet 6 enters the sprayer 5, rising under the influence of vacuum along the gap between the sprayer and the throttle needle 7. At the exit from the atomizer, it is mixed with air entering through channel 8 through the hole in the atomizer body. The throttle needle ensures engine operation at medium speeds and can be set to one of five positions. At maximum power modes, fuel consumption is determined mainly by the throughput of the main fuel nozzle.
Reliable fastening of the atomizer is ensured by a lock washer 14 installed under the fuel pipe 9. The idle system consists, in turn, of a fuel pipe 9, an air channel 10, mixture quality screws 11 and mixture quantity 27, idle hole 12 and transition hole 13. When the engine is idling, under the influence of vacuum in the mixing chamber behind the throttle, the fuel rises through tube 9 and mixes with air entering through channel 10. The resulting emulsion, with a slight opening of the throttle (at low speeds), exits only through hole 12. With further lifting of the throttle and increasing revolutions, the vacuum in the area of hole 13 increases and the emulsion also begins to flow through it. Thus, the fuel supply increases as the speed increases.
The main system for starting and warming up the engine. On carburetors of different modifications, different systems of enrichment devices are used: on K65S and K65V - a starting device with an autonomous drive; on K65G and K65Zh - with cable drive; on K65I and K65D - corrector-enrichment. Let's look at them in that order.
The starting device with an autonomous drive consists of a plunger 37, a guide 35, a return spring 36, a starting device needle 39, a sealing rubber 38, a protective cap 29, a control rod 40, as well as channels 33 and 34, a fuel well A and hole 41. Normal position devices are closed. In this case, the needle 39 with the rubber seal 38 blocks the fuel channel, and the side surface of the plunger 37 blocks channels 33 and 34. To turn on the starting device, you need to lift the rod 40 up and turn it approximately 90°. In this case, the extrusions on the rod will come out of the grooves of the guide 35 and will be fixed at its upper end. The plunger will rise, opening channels 33 and 34 and fuel channel 48. Under the influence of vacuum, fuel from well A will enter the cavity under the plunger, mix with air and be fed into the mixing chamber in the form of an emulsion. The volume of fuel in the well is sufficient for a high one-time supply at the time of start. After starting the engine, the fuel level in the well decreases and the composition of the mixture becomes leaner.
To turn off the starting device, you need, of course, to turn the rod back approximately 90 degrees, after which, under the action of the return spring 36, the plunger will take its original position. The starting device is protected from dust and dirt by a rubber cap placed on the spring guide 35. A cable-driven starting device is similar to the one described - but it does not have a rod 40, and the position of the plunger 37 is adjusted by a cable connected to the shifter. The corrector-enricher differs in that fuel enters it directly from the float chamber (there is no fuel well A). Fuel consumption is limited by jet 43. With the plunger fully raised, the greatest enrichment of the mixture necessary to start the engine is achieved. As the plunger is lowered, the mixture becomes increasingly lean as the gap between the needle 42 and the channel wall decreases. When the plunger is completely lowered, the needle with rubber seal 38 closes the fuel channel 48.
An additional starting device (float stopper) is used at air temperatures from +5 C and below. Using it requires no explanation. Having examined the design and operating principle of individual systems, we can now move on to issues of operation and adjustments. Before installing the carburetor, you need to remove its cover 2 with the throttle assembly. The cover is a rather complex subassembly on which the throttle lift screw 27, guide 28, gasket 26, throttle lift limiter 30, throttle 21 and its spring 24, and protective cap 29 are installed. Screw 27 is connected to the throttle by a rod. The throttle spring 24 simultaneously holds the needle 7 through the lock 22.
This is interesting: What happened to the Zotye T600 after operating for 35,000 km
The U-shaped brass throttle has two shaped holes and one round one. The latter, located in the center, serves to install and fasten the needle, the shaped one on the cutout side is for fastening the throttle cable, and the T-shaped one is for attaching the rod of the screw 27. The radial cutout on the throttle wall, facing the air filter, provides the necessary vacuum in the area sprayer.
There is a limiter 30 inside the cover - it is recommended to remove it after the break-in is completed. After installing the carburetor on the engine, you need to attach a cable to the throttle and secure the cover to the carburetor. After this, lift the throttle using the throttle and check whether it opens the diffuser completely. Do this several times to ensure that the throttle is not stuck in any position and that the diffuser closes and opens completely. Using screw 27, raise the throttle to a position where a gap of 2-3 mm appears between its lower edge and the diffuser generatrix.
If the carburetor has a starting device or a corrector, you need to unscrew part 35, remove the corrector assembly and attach the cable to the piston 27, and then install the unit in place. Adjust the position of the stops 28 of the sheaths of the throttle and corrector drive cables (if the latter is present) so that they have a free play of approximately 2-3 mm (this is done so that when the steering wheel is turned, the position of the throttle or corrector does not change).
Screw screw 11 until it stops, and then unscrew it 0.5-1.5 turns. Attach the fuel hose to fitting 20. Make sure that fuel does not leak at the connection points and open the starter or corrector. If, due to weather conditions or the individual characteristics of the engine, it is necessary to use a float quencher, it is better to do this while simultaneously opening the throttle fully, then the efficiency of the reception increases. Smoothly pressing the kick starter, turn the crankshaft 2-3 turns, turn on the ignition and start vigorously. After starting and warming up the engine, the starting device or corrector must be turned off. In conclusion, let's talk a little about carburetor adjustments - every motorcyclist has to deal with them from time to time.
It makes more sense to start by setting the fuel level. To do this, you need to turn the carburetor over, remove the bottom of the float chamber and measure the distance from the plane of the connector to the line dividing the float in half (the mark from the mold connector). This distance should be 13±1.5 mm. If the size of your carburetor does not fall within these limits, you need to carefully bend float tongue 18 in one direction or another.
One more note in passing. If during operation the carburetor suddenly begins to overflow, you need to check whether the float is leaky. To do this, immerse it in a bath of hot water for at least a minute. Bubbles will appear - the float is bad, if not - everything is fine.
Before starting the adjustments that will be discussed later, the engine needs to be warmed up. After this, lowering the throttle with screw 27, set the minimum stable idle speed, and then, slowly rotating screw 11 in one direction or another, increase the speed to the maximum possible. Again, use screw 27 to try to reduce them, and then use screw 11 to raise them as far as possible. These operations sometimes have to be repeated 2-3 times.
Now check how the engine responds to the throttle. If, when the throttle is opened sharply, it stalls, tighten the mixture quality screw 11 by 1/4-1/2 turn (the mixture will become richer); if the engine, on the contrary, stalls when the throttle is suddenly closed, screw 11 needs to be unscrewed by the same amount (the mixture, naturally, will become leaner).
The quality of the mixture is adjusted in operating modes by moving the dosing needle 7 relative to the lock 22. You should start from its middle position. When the lock is moved upward, the mixture becomes leaner (of course: the needle lowers, and there remains a smaller gap between its cone and the wall of the atomizer!), when the lock is moved downward, it becomes richer. The criterion for needle movement can be the color of the insulator of the central electrode of the spark plug. If after a run of approximately 30-40 km in normal operating mode it has a whitish color, the mixture is too lean and the needle needs to be raised at least one notch; if the insulator is dark brown, with traces of soot, the mixture needs to be made leaner by lowering the needle.
Finally, if the motorcycle does not reach maximum speed, you should replace the main fuel jet with a different one with a larger calibrated hole.
Adjusting the carburetor of the IZH Jupiter motorcycle
Setting up Peker carburetors on the IZH Jupiter 5 motorcycle is carried out as follows. First, we check the tightness and integrity of the air filter. Then we check the serviceability of the ignition. After this, we proceed to adjustment, the algorithm is as follows:
- remove the carburetor from the engine. Using measuring probes and an adjusting screw on the carburetor cover, set the distance between the lower edge of the mixing chamber and the throttle valve to approximately 1.5-2 mm. We tighten the mixture quality adjusting screw (18) completely and turn it back 1 turn;
- unscrew the 2 screws at the bottom of the carburetor and remove the float chamber cover. Turn the carburetor over so that the floats drop and close the fuel channel. We measure the distance from the edge of the carburetor connector to the middle of the float (press mold line). It should be 13 +1.5/-1.5 mm (see figure). If the distance does not correspond to the norm, we achieve the required length by bending the float tongue in one direction or another;
- install the carburetor in place. Start the motorcycle and warm up the engine for 5-7 minutes. To make things go faster, use a fuel enricher (corrector). Using the mixture quantity screw at the top of the carburetor, set the minimum stable engine speed. By unscrewing the mixture quality screw (gradually by 1/2, 1/4 turn), we look for the moment to reduce the crankshaft speed (at first the speed will increase and then decrease). By screwing in the mixture quantity screw again, we achieve a reduction in the crankshaft speed, and using the quality screw we again find the optimal position. These steps must be repeated until the minimum stable crankshaft speed is found. Correct adjustment should also be checked by sharply turning the throttle lever. When the engine stalls when opened sharply and picks up speed poorly (dips), the mixture needs to be enriched by slightly tightening the quality screw. If, on the contrary, the engine stalls when the gas is released, the quality screw needs to be unscrewed a little. After this, use the quantity screw to set the minimum engine speed. Attention! The adjustment screws must be turned slowly and gradually by 1/2, 1/4 turns. After each operation, we wait for the engine to “adapt” to the new settings;
- Later, the correct adjustment can be checked by the color of the central electrode of the spark plug. Before this, you should ride a motorcycle for 10-15 kilometers on the highway. The normal mixture is a brick-colored electrode. Carbon deposits on the spark plug indicate that the mixture is too rich. While a too whitish color indicates its excessive impoverishment;
- When operating a motorcycle in different meteorological conditions, the mixture composition is changed by moving the position of the throttle metering needle. So, at a temperature of +30 ºС, the needle must be lowered by one division, thereby depleting the mixture. At -15 ºС the needle should be raised 1-2 notches.
A few words about setting up the Jikov-2928CE carburetor. The idle speed setting here is similar to that of the K-65. The only differences are in the location of the adjusting screws. In Jikov they are conveniently located on the side of the carburetor (the one that is screwed in at an angle is responsible for the height of the throttle valve).
The fuel level in the float chamber should be 9 ± 1 mm. Due to the design features of this carburetor, adjusting the composition of the fuel mixture to reduce the dip when opening the gas sharply is done by moving the throttle needle up (on the K-65 in this case, we turn the quality screw).
Adjustment video
To understand the basics and nuances of adjusting the carburetor of the IZH Jupiter motorcycle, we recommend watching an interesting video. The author tells in detail how to adjust the K68 carburetor on the IZH Jupiter 4 motorcycle. He shows and talks about all the nuances and features.
How to Adjust the Carburetor on Izh Planet 5
How to install and adjust the carburetor on Izh Jupiter 5
Jupiter 5 is one of the more successful creations of Russian motorcycle production. Now, like 30 years ago, the device is often found on the streets of both remote outbacks and large cities, and the owner almost always prefers to service it without the help of others.
The carburetor , being one of the important components of any motor vehicle, is subject to intense use and excessive wear. Taking into account the great age of some models, replacing this module very often becomes an inevitable condition for extending the life of the unit.
The bike is equipped with Izhevsk carburetors K-62D, K-65D, K-68D , or the Czechoslovakian model Jikov-2928SE . There are few differences between the first two options: the design of the top cover; enrichment jet diameter; needle fastening (K-65D comes with a nozzle). The K-68D differs from its predecessor:
- Enlarged diffuser.
- A round (not square, like the K-65) damper.
- Lateral (more convenient for optimization) location of the idle screw
. - Threaded (for quick needle adjustment) top cover.
Which carburetor on IZ Jupiter 5? As you can see, the 68th model is more convenient to maintain , however, experienced motorcyclists note that it often contains defects, for example, in the form of the absence of a hole that improves the formation of the fuel mixture.
Jikov-2928CE is considered a higher quality carburetor, but also more difficult to operate and repair. Therefore, when choosing this option, you should prepare for possible difficulties, for example, when searching for replacement jets, because their size is much smaller than those from Izhevsk.
Similar news
Rice. Carburetor K-62:
1 - idle
, 2 — main fuel jet;
3 — float chamber, 4 — sprayer; 5 — float axis, 6 — float lever bushing; 7 — air channel, 8 — nozzle, 9 — dosing needle, 10 — body; 11 — throttle, 12 — needle lock; 13 — throttle spring; 14 — throttle lift limiter (removed after engine break-in); 15 — throttle control cable, 16 — rod with idle speed adjustment screw (lowering the throttle); 17 - cover; idle speed adjustment screw , 19 — fuel inlet fitting, 20 — adapter hole, 21 — idle speed emulsion channel ; 22 — drainage hole, 23 — idle air channel ,
24 — locking needle with washer, 25 — float, 26 — corrector emulsion channel; 27 — dosing needle; 28 — float stopper, 29 — plunger, 30 — plunger spring, 31 — corrector control cable
Carburetor to the Planet, or how to distinguish a fake.
Hi all! After a long time, a good opportunity arose to talk about the K68 carburetor, and today I want to touch on the K68I carburetor, installed on the Planet 5 and Jupiter 5 motorcycles. There are, again, many myths and rumors about what the diffuser should be like, what the original K68 should look like , how to distinguish it from a fake of narrow-eyed friends from overseas, etc. The first thing I would like to note is that when compared with any Japanese analogue, and as it turns out they exist, it is quite primitive and terrible to set up. How many headaches and nightly thoughts before bed he brought me about how to set it up, and why it doesn’t work... Closer to the topic... The other day, after reading smart articles on the forums, I found a good article on how to distinguish a carburetor K68I from a Chinese fake. For general development, carburetors (Russia) are considered today one of the best offers on the market for motorcycles IZH Planet 5, as well as IZH Jupiter 5. So, the carburetor was ordered by me and delivered to me by the valiant Russian Post in 5 days, where I ordered I can give you a PM. The carburetor came in this form
On the box of the product itself, as well as on the product itself, there is the inscription “Made in Russia”; it’s up to you to decide whether this is a plus or a minus, but compared to my Chinese K68I, it’s still a plus. Also on the box there are instructions on how to check the product for authenticity, I checked, the carburetor is original. Also in the box, in addition to the carburetor, was a gasket and instructions with very useful information about everything related to the product itself. Setting, characteristics, etc.
But most importantly, my cat Kuzma approved the purchase, this, I think, is the main thing =)
Why so many photos? You will understand later. And so, let’s get started with the replacement, I didn’t bother removing and installing, it’s not difficult, and there’s information on the Internet on almost all forums, and that’s not what the article is about, but let’s continue. And so here are the photos of my Chinese “Kashka” and the original one. (In the first photo the original is below)
And so the differences:
1. Inscription. On the original it is clear, not blurry like on a fake, as well as the font size, on the original it is larger, the inscription language is ENGLISH.
2. Casting quality. It is also different, made with great passion for counterfeiting.
3. The color of the float chamber gasket should be BLACK.
4. The new “Pekarovsky” carburetor has transport cables, which are removed after installation; the Chinese fake does not have them.
5. Diffuser. In the original it is 32 mm, in my Chinese it is 30.5 mm, and this, for a minute, is a big difference, affecting primarily the power.
6. The diameter of the mixing chamber, in the original it is exactly 31.5 mm.
It seems that I have indicated everything, if I forgot something, I will definitely add it. I would also like to mention that even this original carburetor forced me to modify it a little, because there was a “bump” at the place where it adhered to the intake manifold, which is clearly visible in the photo above; I removed it with sandpaper. These problems are not very common, but they do occur. + Finally, I would like to wish everyone to be more vigilant when purchasing these products; there are a lot of, I repeat, a lot of Chinese feces on the market that do not allow your steel friends to work normally, not to mention the good ones characteristics, at least normal. Good luck to everyone, full tanks and smooth roads, take care of yourself!
Tags
- K68
- K68I
- Carburetor
- Fuel system
- Planet 5.
How to install a carburetor
Before installing the carburetor
on IZ Jupiter 5, make sure it is completely clean and all parts are present.
First, remove the carburetor cover with the three-hole throttle body. The round hole located in the center is intended for placing and fixing the needle, the shaped one, located on the side of the cutout, is for attaching the cable coming from the throttle handle, the T-shaped one is for installing the screw rod. The new carburetor on the IZH Jupiter 5 has a limiter located in the cover, which is removed after the break-in period.
Similar news
After fixing the carburetor to the engine, a cable is attached to the shaped hole of the throttle and the cover is tightened. The throttle is checked for the ability to fully open the diffuser and not jam in all positions of the throttle stick.
Next, the fuel line is connected to the fitting. The joints are checked for the slightest leak, after which the starting device is opened.
Apply a few light presses on the claw, then start the engine normally. After checking the functionality of the device and the uniformity of fuel distribution on a warm engine, the ignition can be turned off.
Carburetor adjustment Izh Jupiter 5
Adjusting the IZ Jupiter 5 carburetor is the simplest, but at the same time the most important process. Whether it is K-62, K-65 or K-68, you must first warm up the engine to operating temperature, and then perform a sequential series of actions :
- Set low but fairly stable engine speeds by rotating the screw that adjusts the throttle position.
- By changing the position of the idle screw, set the engine to maximum speed.
- Repeat these steps 4-5 times, gradually reducing engine speed.
- Check with sharp jerks that the adjustment is correct.
Adjust the carburetor
on IZH Jupiter 5 it should be done so that there are no jerks and the engine does not stall in the event of sudden opening and closing of the throttle.
In the first case, you should enrich the fuel mixture by turning the idle speed ¼-½ turn clockwise.
In the second, turn the screw in the opposite direction. You can also adjust the carburetor Depending on weather conditions and the technical condition of the engine, the metering needle can be moved up to enrich the mixture and down to obtain the opposite effect.
Similar news
Recent Entries
Replacing Bearings on a VAZ 2110 Generator
Replacing a generator bearing on a VAZ-2110, 2111, 2112 The main generator malfunctions include wear of the brushes, rotor commutator, failure
Replacing the Radiator of the Kalina Stove with Air Conditioning
What is the category of license for a snowmobile?
How to Clean the Radiator of the VAZ 2106 Heater
Categories
Test Drive
Kia Niro EV debuts at Busan Auto Show in Korea
Get your free dealer pricing information by filling out your contact information! Long-distance EV competition heats up as Kia announces
Adjusting the K62 carburetor
The carburetor is one of the main components of a motorcycle, which affects the operation of your bike’s engine. Its correct adjustment affects how it starts, runs, and engine power. The second element is the ignition system. In this article we will talk about adjustments that can be found on motorcycles Minsk, IZH Jupiter and Planet, Voskhod.
To adjust the idle speed on the K62 carburetor there is a “quality screw”. This screw supplies air even when the throttle is closed. We repeat, the propeller produces air, although some people think that this propeller is designed for fuel. Therefore, by tightening the quality screw, we close the air flow, that is, we enrich the mixture. If we unscrew the screw, the mixture becomes leaner. As was said, this screw provides air in all positions of the damper, and therefore at idle speed of the crankshaft. Therefore, the quality screw belongs to the idle air regulator. At this moment, it significantly affects the operation, but if the gas is at medium or high speeds, then the influence is not large, but it is present. So, it all comes down to the fact that the idle speed is adjusted, and this automatically affects all engine frequencies. Now, after a short introduction, let’s talk about the idle speed adjustment itself. To keep things simple, let’s talk about adjusting K62 K carburetors and similar ones for Minsk and Voskhod motorcycles. But by analogy, the adjustment of all types of carburetors is the same, so it will also work on IZH and other motorcycles.
Remember that carburetor adjustment always takes place on a warm engine. When the warm-up is done, we begin the adjustment. First, tighten the quality screw to the maximum and unscrew it halfway - one turn. Next, we start the motorcycle and lower the throttle completely with the upper idle screw, then, by unscrewing it, we achieve the minimum stable speed. Next, by unscrewing the quality screw little by little, we achieve maximum speed; when, after further unscrewing, the speed drops, we screw it back to the same maximum and stability. It turned out that we set a stable idle speed at these minimum speeds. But the idle speed is most likely too high, so we lower the throttle with the upper screw, achieving even lower speeds. We tighten it down to the very minimum, when at even lower crankshaft speeds the motorcycle begins to stall. Having established the minimum at which the motorcycle still works, we repeat the procedure again with the quality screw. By screwing in and unscrewing the screw we achieve stability. Then we lower the damper again, making a higher minimum of crankshaft revolutions and so on until the crankshaft begins to operate at the lowest frequencies. When we have completed the adjustment, we can check the idle for stability. To do this, take and sharply turn the throttle to maximum and look at the speed at which the revolutions increase. After increasing, we sharply lower the gas and listen to the engine again. If the idle speed adjustment is done correctly, then with such a sharp increase and decrease in gases, the motorcycle engine should listen to the throttle at the moment and also sharply increase and decrease the crankshaft frequencies. When the engine lags, it means the adjustment is slightly incorrect. In such cases, you can try to do everything all over again, but you can simply add or reduce air at idle. If, with a sharp increase in gas, the engine does not respond immediately or even stalls, it means that the screw should be tightened 1/4-1/2 of a turn. In case of poor performance in cases of sudden release of gas, the screw must be unscrewed 1/4-1/2 turn.
In principle, the adjustment can be completed here. As you can see, there is no particular difficulty here. The main thing is to do everything right.
Mostly motorcyclists suffer with carburetors due to complete misadjustment of the motorcycle. You should first carefully check the ignition and spark plug (it is advisable to install a new one). If the motorcycle is old, then worn out rings will affect performance and make it difficult to install the correct idle. If the whole point is in the development of engine parts, here you need to listen and adjust, since the specified rules will fit, but not completely.
You can also add that the K36 carburetors and other models are very similar in adjustment. The screws are basically the same, only their placement may differ. Therefore, having learned how to adjust the K62 carburetor, you will definitely be able to make adjustments in another model………
based on materials from blog-moto.ru
Adjusting the K62 carburetor: 17 comments
Hello! Please tell me, I have a Minsk 125, it’s a Pakko (original, new), it’s not in use, it works fine, that is, the idle is normal, it picks up speed briskly, but as soon as you start to move out of place, it doesn’t pull well, or it may even stall, you just need gas open more than halfway. The quality screw is screwed in completely, but if you unscrew it by 1-1.5 rpm, you won’t be able to move it at all - the engine will stall. The spark is normal, the ignition is set correctly, the needle is in the middle position. Please tell me what’s wrong, this is the first time I’ve encountered such a problem?
Did you use the carburetor before or did you just install a new one?
I have an Izh P3 Minsk ignition that runs on a choke and doesn’t hold idle, and when you move from place to place, it’s like a splash, you add half the gas, then it goes, what’s wrong?
started a long time ago? CARBURETOR K 62? HOW DID YOU WORK BEFORE?