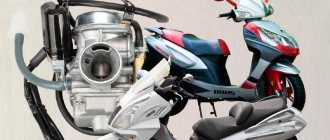
Jupiter 5 is one of the most successful creations of Soviet motorcycle production. Today, like 30 years ago, the device can often be found on the streets of both remote hinterlands and large cities, and in most cases the owner prefers to leave it alone.
The carburetor, being one of the most important components of any car, is subject to intensive use and greater wear. Considering the advanced age of some models, replacing this module very often becomes an inevitable condition for extending the service life of the unit.
The motorcycle is equipped with Izhevsk carburetors K-62D, K-65D, K-68D or the Czechoslovak model Jikov-2928CE. There are several differences between the first two options: the design of the top cover; enrichment nozzle diameter; needle caps (K-65D comes complete with a nozzle). K-68D differs from its predecessor:
- Enlarged diffuser.
- The shock absorber is round (not square, like the K-65.
- Lateral position (more convenient for optimization) of the idle speed screw.
- Top cap with thread (for quick needle adjustment.
Which carburetor is best for IZH Jupiter 5? As you can see, the 68 model is more convenient to use, however, experienced motorcyclists note that it often contains defects, for example, in the form of the absence of a hole that improves the formation of the fuel mixture.
Jikov-2928CE is considered a higher quality carburetor, but also more difficult to operate and repair. Therefore, when choosing this option, you need to prepare for possible difficulties, for example, when searching for replacement jets, because their dimensions are much smaller than in Izhevsk.
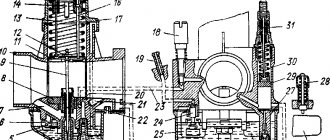
Rice. Carburetor K-62:
1 — inactive fuel jet, 2 — main fuel jet; 3 — floating chamber, 4 — sprayer; 5 — float axis, 6 — float lever bushing; 7 — air channel, 8 — nozzle, 9 — dosing needle, 10 — body; 11 - suffocation, 12 - needle block; 13 — accelerator spring; 14 — throttle lift limiter (removed after starting the engine); 15 — throttle control cable, 16 — rod with idle speed adjustment screw (when lowering the throttle); 17 - cover; 18 — idle speed adjustment screw, 19 — fuel intake fitting, 20 — adapter hole, 21 — idle speed emulsion channel; 22 — drain hole, 23 — idle air channel, 24 — shut-off needle with washer, 25 — float, 26 — emulsion corrector channel; 27 — dosing needle; 28 — float, 29 — piston, 30 — piston spring, 31 — corrector control cable
Description of carburetor pz 30
The peak of mass popularity and popularity of motorcycle technology in domestic spaces occurred in the 70s and 80s of the last century. Mopeds “Riga”, “Verkhovyna”. Light vehicles “Minsk”, “Voskhod”, “Kovrovets”. Motor scooters “Tourist”, “Tulitsa”, “Ant”. Heavy stroller models “Ural”, “Dnepr”, “Izh”. The cult dream of the reckless drivers “Jawa”, “CZ”.
A serious problem with most models was the power supply system:
- high fuel consumption (the cheap price of gasoline eliminated the problem);
- “dips” when the throttle is turned sharply, especially at medium and high speeds;
- constant need to adjust the carburetor depending on the load.
The beginning of the 90s changed the political map. The iron curtain fell. Mechanical engineering was going through a difficult period. The market began to fill with imported used two- and three-wheeled units, mainly from the Indo-Chinese region. Enterprising compatriots organized a flow of spare parts to support imported foreign rubbish. Internet trading has started. Carburetors became available for engines with a volume of 150 - 200 cubic centimeters.
The pz 30 carburetor is produced by Chinese machine manufacturers for mass-produced middle-class motorcycles.
The mixer, traditionally copied from the design of the famous Japanese company Keihin PD, has undergone some changes:
- walls are strengthened;
- the diffuser cross-section has been increased;
- accelerator pump installed.
Externally, the PZ 30 carburetor resembles an inverted capital letter “T”, with a volumetric cover fitted at the bottom - a float chamber.
A horizontal passage with one flange (inner diameter is 30 mm) through a sealing gasket is seated on two studs and screwed to the engine cylinder. The other side (42 mm cross-section) is connected by a rubber curved pipe to the air filter.
Three holes from the channels are drilled into the chamber from below:
- idle speed (closer to the flange);
- transitional regime;
- main fuel supply.
The internal throttle valve, mounted on an axis piercing the walls of the chamber, rotates within an angle of 90 degrees to three fixed positions (fully closed, slightly open at an angle of 30 degrees, completely open), and changes the amount of air flow.
A cable is inserted into the vertical pipe to control the fuel supply throttle valve, which contains an adjustment needle.
The end of the 2022 season was marked by an amazing discovery in the field of Chinese nanotechnology. After another rebuild, the original PZ30 refused to accept the throttle valve into its bowels. Long story short, one of the two components, either the throttle body (unlikely) or the hole where it fits, suddenly isn't cylindrical anymore. I took the damper out, but I couldn’t push it back in. The end of the season, it was not there - I thought, I sanded the damper and pushed it into place. I made it safely to the end of the season, but the understanding that this should not be the case did not leave me. And so, on cold winter evenings, after reading a lot of forums (hands-on and not so much), I bought a brother of my PZ30, burdened with an accelerator pump complete with a double throttle cable for 2000 rubles. They write all sorts of things on the forums and, having prepared for all sorts of difficulties, I climbed into the bowels of the moped. The new carb categorically refused to replace the old one. The accelerator pump rested against the frame, the exhaust manifold, and so on. People on the forums were sawing something, planing it, boiling it, pressing it with a hammer in order to shove the unfortunate man into the bowels of the motorcycle. I smoked, smoked, filed for half a day, but did not achieve anything meaningful. The next day I went to a motorcycle store and the seller, thanks to him, after rummaging through different boxes for half an hour, found me an intake manifold of unknown purpose (450 rubles) identical in fasteners to the original one, but different in shape and design. If the original one was a solid cast pig, then it turned out to be rubber, with aluminum flanges. It was successfully fitted to the engine, the heat-insulating gasket was thrown out as unnecessary, a new carb was attached to it, but a new misfortune occurred - the outlet of the airbox did not coincide with the inlet of the carb, and besides, the shitty trunk of the shitty airbox burst after painful manipulations. It was decided to remove it altogether and install a different air filter. Here I came across another miracle of Chinese engineering - it looks like the Chinese first put the airbox into an unfinished frame, and then finish welding it. In general, in order to pry the plastic box out of the frame, I had to cut off the left ear of the plastic fastening, use two pry bars to pry the box out of the frame, and weld the ear back. (Maybe it can be removed by removing the pendulum and everything that is screwed to it, but I had no intention of saving it.) After rummaging through the garage trash, I found two crooked hoses from the cooling systems of some cars - one with an internal diameter of 42 mm, the second with an external diameter 42 mm. From these two squiggles on clamps I assembled a crooked pipe, onto the end of which I put a 42 mm foam rubber zero (450 rubles). When installing the gas tank in place, I noticed that with its middle part it slightly rests on the upper part of the carb, but fortunately the manifold is flexible and these couple of millimeters are easily compensated for. When everything grew together, I tried to start the moped. I must say that usually, after a long period of parking, it was quite problematic to start it from the starter, and from the kick it was generally unrealistic. I twisted the throttle a little to spray gasoline into the intake, pressed the starter button and the engine came to life literally with half a kick. I added a little idle speed with a screw on the side and that was it. With the new carburetor, the moped starts up just perfectly in every possible way, it reacts instantly to a sharp opening of the gas, and does not try to stall, as was the case with the old carburetor. Due to weather conditions, I did not carry out sea trials, but I hope everything will be fine on the move. To summarize, we can say that the budget for the event was approximately 3,000 rubles. In addition to wrenches and screwdrivers, I needed a grinder and a semi-automatic welding machine. Access for servicing the air filter is simply amazing. Well, if you are thinking about such a modernization of your ZR200 - think carefully - can you? Good luck to everyone and the opening of the motorcycle season soon!
The principle of adjusting the PZ30 carburetor
The purpose of the setting is to optimize gasoline consumption, stable engine operation at various speeds:
- The fuel supply in the float chamber is created by setting the immersion level of the floats located on a metal rocker. By bending the fastening tongue, it is necessary to achieve a horizontal position, parallel to the edge of the case. The elevated state will increase the percentage of gasoline and will contribute to the creation of a rich mixture. Recessed floats will reduce the amount of fuel and impoverish the composition.
- Regulation of the mixture in various modes of the power unit.
Stable idle speed and stable low engine speeds are determined by:
- quality screw position,
- cross-section of the hole in the idle jet.
The jet marking is written on the cover body. Tightening the quality screw clockwise leans the fuel mixture. Unscrewing - enriches.
At medium speeds, the throttle valve moves within 25% - 75% of the total stroke. Steady operation is created by the position of the needle. Five annular grooves are applied to the needle at the blunt end. A washer with a cut, initially snapped into the middle groove, determines the vertical position of the needle. To reduce the fuel in the mixture, the washer is moved closer to the edge. The opposite transfer enriches.
High speeds are critical to the size of the jet. Changes in climatic parameters dictate the replacement of the jet. The parameters increase - the jet should be reduced.
How to install a carburetor
Before installing the carburetor on IZ Jupiter 5, make sure that it is completely clean and all parts are in place. The first step is to remove the carburetor cover with the three-hole choke. The round hole in the center is designed to install and fix a needle, profiled, located on the side of the cutout, to connect the cable coming from the throttle handle, T-shaped to install the rod to the live one. The new IZH Jupiter 5 carburetor has a limiter located in the cover, which is removed after the break-in period.
After attaching the carburetor to the engine, attach a cable to the shaped hole of the throttle valve and tighten the cap. The throttle valve is checked to ensure that the diffuser is fully open and not blocked in all throttle positions.
The fuel line is also connected to the fitting. The joints are checked for the slightest leak, after which the trigger is opened.
Press the head lightly several times, then start the engine normally. After checking the operation of the device and the uniformity of fuel distribution on a hot engine, you can turn off the ignition.
Adjusting a removed pz30 carburetor
After the break-in run, it is advisable to perform preventive maintenance of the fuel system.
Important note. The carburetor contains many small parts. It is logical to prepare, spread a clean cloth for storing the removed spare parts.
Step-by-step instruction
- Close the tap on the fuel tank. Carefully pull off the fuel hose and drain the residue into a clean container.
- Unscrew the top cover, remove the twisted, leaf springs. Remove the cylindrical valve. Pull out the accelerator cable and move it to the side together with the cover.
- Disconnect the accelerator pump control cable.
- Remove the air duct.
- Unscrew the fastening nuts on the cylinder. Remove the carburetor.
- Unscrew the three fastening screws of the bottom cover. Inspect the roof from the inside. Remove possible plaque and debris. Wipe with a soft cloth soaked in gasoline.
- Turn the carburetor over. Using an awl, push out the axle and release the bracket with the floats. Disconnect, ideally clean the needle. Rinse and wipe the seat. Check the free movement of the needle.
- Place the needle on the middle protrusion and restore the bracket back.
- Make sure the flat surface of the floats is parallel to the line of the carburetor body. Raised floats cause a lack of fuel, submerged floats cause excessive consumption. Changing the horizon of the floats is done by bending down or up the protrusion in the middle of the bracket. During seasonal maintenance, they unscrew, clean, and change the jets. Screw on the lid.
- Observing from the side of the flange, use the spring-loaded idle screw to slightly open the main air damper by 1 mm. Using a stretched tube, tighten the mixture quality adjustment screw until it stops, and unscrew it 1.5 - 2 turns.
- Install the carburetor on the motorcycle. Start and warm up the engine. Continue setting the modes, turning the attached hose in the direction of enriching the mixture.
Carburetor adjustment Izh Jupiter 5
Adjusting the IZ Jupiter 5 carburetor is the simplest process, but at the same time the most important. Whether it is K-62, K-65 or K-68, you must first warm up the engine to operating temperature, and then perform a sequential series of actions:
- Set low but fairly stable engine speed by turning the throttle adjustment screw.
- By changing the position of the idle screw, bring the engine to maximum speed.
- Repeat the previous steps 4-5 times, gradually reducing engine speed.
- Check for correct adjustment by making sharp clicks.
Adjust the carburetor on the IZ Jupiter 5 so that there are no shocks and the engine does not stall if the throttle suddenly opens and closes. In the first case, it is necessary to enrich the combustible mixture by turning the minimum screw ¼-½ turn clockwise. In the second, turn the screw in the opposite direction.
It is also possible to adjust the carburetor on IZ Jupiter 5 in operating modes. Depending on atmospheric conditions and engine specifications, the metering needle can move up to enrich the mixture and down to achieve the opposite effect.
Hi all! After a long time there was a good opportunity to talk about the K68 carburetor, and today I want to touch on the K68I carburetor installed on the Planet 5 and Jupiter 5 motorcycles. Again, there are a lot of rumors about what the diffuser should be like, it looks like the original K68 should be, how to distinguish him from narrow-eyed fake friends from behind the mound, etc. The first thing I would like to note is that compared to any Japanese equivalent, it is apparently quite primitive and terrible to set up. How many headaches and nightly thoughts before bed led me to how to install this anyway and why it doesn’t work. Closer to the topic. The other day, after reading clever articles on the forums, I found a good article on how to distinguish a K68I carburetor from a Chinese counterfeit. For general development, carburetors (Russia) are today considered one of the best offers on the market for motorcycles IZH Planet 5, as well as IZH Jupiter 5. So, the carburetor was ordered by me and delivered to me by the valiant Russian Post in 5 days, when I ordered, I can say pm. The carburetor arrived in this form
On the packaging of the product itself, as well as on the product itself, there is more or less the inscription “Made in Russia”, but compared to my Chinese K68I this is still an advantage. Also on the box there are instructions on how to check the authenticity of the product, I checked that the carburetor is original. Also in the box, in addition to the carburetor, there is a gasket and instructions with very useful information about everything related to the product itself. Setting, function, etc.
But most importantly, my cat Kuzma approved the purchase, this, I think, is the main thing =)
Why are there so many photos? You will understand in the future. And so, let’s start replacing, I didn’t remove and install, it’s not difficult, and there is information on the Internet on almost every forum, and the article doesn’t talk about it, but we’ll continue. And here are photos of my Chinese “Kashka” and the original. (The first photo shows the original below)
1. Registration. The original is clear, not blurry, like a fake, as is the font size, the original is larger, the writing language is ENGLISH.
2. Casting quality. This is also another thing made with great passion for counterfeits.
3. The color of the float chamber gasket should be BLACK.
4. The new Pekarovsky carburetor has support cables that are removed after installation; the Chinese counterfeit does not.
5. Diffuser. In the original it is 32 mm, in my Chinese it is 30.5 mm, and this, for a minute, is a big difference, which affects, first of all, the power.
6. The original diameter of the mixing chamber is 31.5 mm.
I think I’ve outlined everything, if I forgot something, I’ll be sure to add it. I also want to clarify that even this original carburetor forced me to modify it a little, since there was a “roughness” at the junction with the intake manifold, clearly visible in the photo above, I removed it with sandpaper. These stalls are not very frequent, but still friends meet and work normally, not to mention those good characteristics, at least normal ones. Good luck to everyone, full tanks and smooth roads, take care of yourself!