Carburetor for a scooter - which one to choose, how to adjust
The function of the carburetor in the scooter mechanism is to prepare a combustible mixture for the engine. Therefore, the level of engine performance quality is determined by the composition of the combustible mixture. The options for the development of this process are either operation is normal, or the engine will stall, and the mixture in the engine may detonate. When determining the standard indicator of the resulting mixture, they are guided by the standard ratio of air and gasoline equal to 15 parts of air to 1 part of gasoline. Measurement is carried out by weight. You will not be able to perform this measurement yourself. At the same time, there is no need to attribute the violation of the optimal mixture to the weather, since the quality of the mixture changes slightly depending on the air temperature.
Choosing a separate carburetor does not make much sense when purchasing a scooter or moped. A carburetor on a scooter, also according to the site prokarbyrator.ru, like a carburetor on a moped, is installed by the manufacturer. If we are talking about the cost of components when replacing parts during repairs, then a carburetor for a 50 cc scooter (also known as a carburetor for a 50 cc scooter) costs approximately from 500 rubles to 2500 rubles; carburetor for a scooter 50 cubic meters 4t in the range of up to 2400 rubles.
Optimizing the quality of the combustible mixture in a working unit is carried out through adjustment.
Adjusting the fuel level
The final stage of setup is to check the gasoline level in the chamber. The procedure is simple, but the subsequent operation of the engine depends on its correctness.
The fuel collects in the float chamber. Its volume is checked using a transparent tube. The required parameter can be found in the documentation for the scooter.
The top part of the carburetor is removed. The gasoline level should be just below the low level of the cap. If the readings differ, it is necessary to adjust the stroke of the locking needle by bending the antennae. Having set the desired range, the unit is assembled, the scooter is started and allowed to run for several minutes. After this, the level is checked again.
If the value is saved, the adjustment can be considered completed. The correct setting is checked by sea trials.
How to remove and clean a scooter carburetor
In order for a scooter engine to operate correctly and steadily and to develop good power, it needs a high-quality working mixture of air, gasoline and oil (if we are talking about a two-stroke engine). This mixture is prepared in a carburetor by mixing the components in certain proportions. And such an important device as a carburetor must be clean in order to work well.
It is recommended to carry out the cleaning procedure for a scooter carburetor at least once every 1-2 thousand kilometers. What are the signs of dirt in the carburetor? First of all, unstable engine operation. That is, vagaries when starting the engine, as well as instability at idle - the scooter can simply stall when stopped.
When I first bought a scooter, cleaning the carburetor seemed no easier to me than assembling and launching a rocket into space. However, having plucked up the courage and got down to business, I was surprised to find that it was very easy to do.
In order to remove and clean the carburetor on a scooter, you will need the following tools and fluids:
- 10mm socket wrench with universal handle and extension
- Phillips and slotted screwdrivers
- tassel
- bath
- gloves
- protective glasses
- aerosol carburetor cleaner
- petrol
Since I prepared in advance to make a report, I will show everything in as much detail as possible.
How to remove a carburetor from a scooter
First you need to remove the seat compartment (toilet) of the scooter by unscrewing the 4 bolts that hold it. On the Honda Tact you will also need to unscrew the oil tank cap.
Now you need to remove the air filter. To do this, you need to unscrew the screw of the clamp securing the cuff to the carburetor, as well as 2 10-point bolts securing the filter housing itself to the engine. You will have to use force to pull the rubber seal of the filter housing off the carburetor.
Next, disconnect the gas hose and oil hose. To do this, you need to squeeze the loops of the clamps and pull off both hoses.
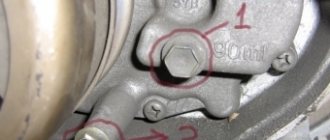
Take the 10mm wrench again and unscrew the near bolt securing the carburetor to the inlet pipe.
Now we go to the interior of the scooter and unscrew the second bolt.
So, by this point we should have both hoses disconnected and both carburetor mounting bolts unscrewed. Now remove the carburetor, unscrew the throttle cover and remove the throttle.
The carburetor is almost free. All that remains is to remove the plastic protective cover of the starting enrichment (it simply snaps on) and unscrew the two screws holding the clamping bracket of the enrichment.
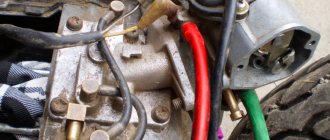
The carburetor has been removed. That's how dirty it is - oil, sand, dust.
Before unscrewing the carburetor, the outside of the carburetor must be thoroughly cleaned. This is best done with gasoline and a brush. Pour some gasoline into the bath and clean the body.
After cleaning, you need to twist and shake the carburetor so that all the gasoline pours out of it. You can also unscrew the screw of the drain hose (transparent tube) and drain the gasoline through it.
How to disassemble a scooter carburetor
Now let's start disassembling the carburetor. It is better to do this either at home or on a wide table or some fairly large plane, because there are small parts in the carburetor that can get lost.
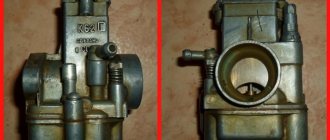
Unscrew the two screws of the float chamber and remove the cover.
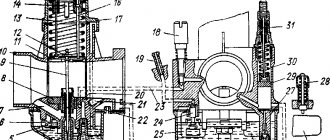
Here we see the structure of the carburetor: a black float, two jets (idle and main), as well as a shut-off needle on the petal. We take out the float axis and remove the float with the needle. Don't lose small parts.
Now you need to unscrew both jets with a slotted screwdriver.
So, the carburetor is disassembled. There is no need to unscrew anything else.
How to clean a scooter carburetor
To clean the insides of the carburetor, it is most convenient to use a special aerosol cleaner. And of all that I have tried, the best is from ABRO. It’s a little more expensive than, for example, VELV or KERRY, but it cleans more efficiently, and its tube is thin (a thick one simply won’t fit into the jets), and the sprayer doesn’t jam.
Attention! Eye protection is required! Because according to all laws, the cleaner will definitely get into your face. It stings your skin and just burns your eyes with hellish fire, it’s very painful.
Maintenance Procedure
Scooter motors are manufactured in different volumes. The most common are 50 and 150 cubic meters. The gas distribution system has both 2t and 4t options. The differences between the models are minimal, so maintenance of 2 and 4 stroke 50cc mopeds is carried out according to the same principle.
- Carburetor adjustment at idle speed. The scooter starts and its operation without load is analyzed. The assessment is carried out based on the evenness of the strokes and the stability of the engine speed.
- The position of the screws for the quantity and quality of the mixture is adjusted.
Due to the relative lightness of the structure, adjustment is made with two control bolts. If stable operation cannot be achieved, it is necessary to remove the unit and carry out deep cleaning and adjustment.
Important: before servicing the carburetor on a 4t and 2t scooter, you should make sure that the piston group and ignition system are in good condition. Otherwise, the adjustment will have no effect.
Removal
Because of the way it works, the carburetor is attached directly to the intake manifold. The fuel line and air duct are connected to it. All removable hoses are removed from the body and the part is exposed.
The starting enrichment is switched off. The fastening bolts are unscrewed with a spanner wrench, and the entire assembly is pulled out.
Installation is in the reverse order.
Carburetor cleaning
An excellent cleaning method is to blow out the internal channels with compressed air from a compressor. For this, a special gun with a pointed tip is used.
During operation, plaque forms on the surfaces of the carburetor. This is due to the quality of gasoline. Most of the dirt stops in the fuel filter, but some gets into the intake tract.
To remove deposits, you can use either a solvent or a special liquid for cleaning carburetors. It is also suitable for scooters. The advantage of using it is that the cleaning agent is under pressure and is able to penetrate into the most inaccessible channels.
The scooter carburetor has rubber gaskets. To avoid exposing them to cleaning mixtures, it is recommended to insulate these parts in advance.
When cleaning the intake mechanism of a scooter, it is not recommended to use fluffy rags. Their threads can get stuck in the carburetor components, which will lead to additional difficulties.
Idle speed adjustment
An indicator of proper operation of the carburetor on a scooter is a stable idle. The absence of “floating” speeds and confident operation indicate a prepared mixture inside the combustion chamber.
For this purpose, there is a screw on the device that is responsible for dosing fuel when the scooter is operating without load.
Some carburetors do not have adjustment bolts. In this case, you need to adjust the idle mode using a needle and floats in the fuel chamber.
The scooter is started and allowed to run for a few minutes. This is necessary for better evaporation of gasoline inside the intake manifold and its mixing with air.
After warming up, turn the idle screw until the engine becomes stable. The criteria for correct adjustment are:
- the scooter maintains stable speed indicators;
- there is no engine tremors or failures in operation;
- the carburetor confidently switches to power gain mode (when over-throttled) and back.
Sometimes the scooter refuses to respond to idle adjustment. This behavior indicates additional problems in the intake system.
Mix quality
The two main components in the operation of any internal combustion engine are air and fuel. The force from their combustion pushes the pistons and forces the vehicle to move.
But simply mixing these substances is not enough. You can achieve maximum energy output only by maintaining the correct proportion of components. In a carburetor, this procedure is called adjusting the quality of the mixture and the entire operation of the 50cc scooter depends on it.
There are three types of air-fuel mass:
- poor;
- rich;
- optimal.
Maintaining the correct mixture ratio in the carburetor is vital for reliable engine operation.
Mixture control diagram
First, you need to start the scooter and warm it up. After setting the temperature, you should proceed according to the following algorithm:
- The mixture quality screw is tightened until it stops.
- Loosen the adjusting bolt one and a half turns counterclockwise.
- Start the scooter, tighten the screw a third.
- If the speed increases, turn it a quarter.
- We adjust until the speed stops falling.
This scheme allows you to configure all types of motorcycles.
- — Before adjusting, you need to check that the air filter is clean and soaked in engine oil. How to clean the air filter, read the article: Scooter maintenance.
- — If the rubber cuff on the quality screw is torn, then it can be replaced with a cuff from the quality screw of the classic Lada carburetor.
- — On Suzuki Sepia models, lets 2,
In the latest models of Honda Dio 34 everything is simpler. The carburetor has only one large screw, which is used to regulate the XO. The small one on dio 34 is located under the plug.
Why do you need to regulate?
During the adjustment process, the scooter carburetor needle is adjusted, the position of which affects the proportions of the air-fuel mixture, as well as a number of other adjustments.
Adjusting the scooter carburetor needle is done during the adjustment process
Each tuning operation has a different effect on engine operation and fuel preparation:
- adjusting the idle speed ensures stable operation of a running engine when the transmission is turned off;
- changing the quality of the air-gasoline mixture using a special screw allows you to deplete or enrich it;
- adjusting the position of the carburetor needle affects the change in the quality of the fuel mixture;
- Ensuring a stable level of gasoline inside the float chamber avoids flooding of spark plugs.
A power unit with an adjusted carburetor operates stably in any conditions, is economical, throttle response, develops rated power and maintains speed, and does not cause problems for its owner.
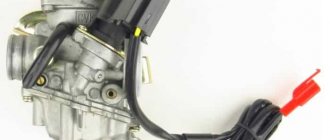
Design and connection of a Yamaha scooter carburetor
The Yamaha Jog scooter is one of the most popular on the Russian market: this is explained by the simplicity and reliability of the model, and its affordable price. The carburetor design of this scooter is standard, so you can figure it out using the description given above. However, when installing it, inexperienced owners may encounter some difficulties, which we will help you sort out.
The device is worth considering in more detail. This will help you understand not only how to adjust the carburetor and use it correctly, but also how to connect it correctly.
- A starter enricher is attached to the carburetor body: it is small in size and housed in a plastic case. It has two bolts with rubber seals. The enricher is powered via a 12 V battery. This device is used to start the engine when cold, as it allows you to automatically enrich the mixture with oxygen.
- The fitting is connected to the fuel supply hose coming from the gas tank tap.
- If the enrichment unit needs to be removed, you will need to not only unscrew the bolts, but also disconnect the electric valve, to which there are only two wires.
- The mixing chamber has a special cover to which a bolt is attached. If you unscrew it, you can get to the throttle valve. This allows you to check whether the throttle cable is connected, and also to get to the needle that regulates the level of fuel and air supply. If the carburetor needs cleaning, you will definitely need to remove the throttle.
- The enrichment connector has two wire outputs, the yellow one is connected to the generator, the green one goes to ground. In principle, if you reverse the polarity, nothing will happen and the device will still work.
- For the enricher to operate, voltage must come from the battery. When the element inside the device heats up, the needle will extend.
- A special fitting is connected to the air filter, and there is a rubber elbow between them.
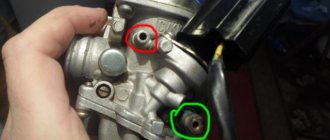
- There are several screws on the carburetor body with which you can adjust the idle speed and mixture quality.
- The float chamber is screwed from below and has 4 mounting bolts.
- There is an additional fitting for oil supply: it is the smallest.
- The second fitting is needed for communication with the atmosphere; you do not need to put anything on it.
- The third one is connected to a gas hose. It goes to the gas tank vacuum valve.
Exhaust system
The exhaust system serves to remove exhaust gases from the engine cylinder, as well as reduce exhaust noise to the permitted level. The exhaust gases leaving the cylinder have a high temperature and are under excess pressure. If they immediately enter the atmosphere, their expansion will be accompanied by loud noise. A muffler is used to reduce it.
The “saxophone” muffler is the hallmark of Nexus scooters.
A malfunction of the scooter's fuel system may be indicated by poor operation of the device's motor. The user may also notice a strong loss of power; the vehicle can no longer move with its previous strength and does not gain the required speed. In addition, serious fuel consumption is visible, without any reason. All this signals the user that the scooter’s fuel system requires repair or complete replacement. To eliminate all problems, in most cases, it is enough to simply remove the broken parts and install new ones. If you are looking for where to buy new scooter fuel systems
at a competitive price without overpayments, we advise you to visit our online store. There is always a wide range of products for scooters of all models and brands. We offer products with good price-quality ratio. By ordering from us, you get the opportunity to upgrade your scooter parts to new ones without putting a big hit on your pocket and ensure your safety on the road.
Buy fuel systems for scooters
You can do it online without leaving your home. Our consultants are always happy to help you choose a model that will match the type of your scooter and its characteristics.
The fuel valve is a structurally simple, but much-needed part for the correct operation of the scooter engine.
It should be immediately noted that for the most part, the fuel valve is non-separable and unregulated. If it fails, it simply needs to be replaced. Fortunately, it is inexpensive, and replacing it will only take a few minutes, even for an inexperienced scooter rider.
Location of the fuel valve under the tank
Not every scooter model is equipped with such valves; many engines with the tank located under the floor are equipped only with a fuel pump.
Operating principle of the fuel valve
So let's get to the point. Everyone knows that after starting the engine, a vacuum forms in the intake duct. Under the influence of negative pressure, the diaphragm compresses the spring supporting it, as a result of which a hole opens, through which, in fact, fuel enters the carburetor.
The vacuum from the intake manifold is transmitted to the tap through a separate rubber tube, the outlet of which goes under the membrane. Under the influence of vacuum, the membrane compresses the spring and opens the channel, after which fuel flows freely through the rubber tube from the fuel tank into the carburetor float chamber.
After stopping the engine, the vacuum disappears and the spring returns the diaphragm (valve) to its original position, the hole closes tightly and the fuel supply to the carburetor is completely stopped.
Fuel valve device
At its core, the fuel valve is an automatic replacement for the mechanical valve that is installed under the fuel tank (for example, on mopeds), where the valve must be manually opened before each ride.
The device is very simple. Only a diaphragm and a spring are installed inside. There is a rubber valve (protrusion) on the diaphragm in the center, which closes the fuel channel.
Outside, the fuel valve has 3 fittings:
- fuel mixture inlet (the hose comes from the fuel tank),
- outlet of the fuel mixture (the hose from the fuel tap goes to the carburetor),
- connection fitting to the intake manifold (to regulate the fuel supply by vacuum).
1 - with three fittings, installed on the frame.
2 - with two fittings, installed directly into the tank. It should be noted that there are also fuel valves that are installed directly under the tank (rigid clutch), therefore, there is no fuel supply hose there, because the fuel comes to it directly from the tank. Often such valves are also equipped with a fine filter for fuel. The filter is a tube of filter material at the inlet. The tube goes inside the fuel tank.
Carburetor cleaning
Before adjusting the carburetor on a 2t or 4t scooter, you should thoroughly clean the system mechanisms. To do this, you can use one of two methods. In the first case, the carburetor is washed with gasoline and purged with a compressor. The equipment must have a nozzle in the form of a pointed tip.
If you don’t have suitable equipment at hand, you can purchase a special liquid for flushing the carburetor. With its help, all channels, parts and elements can be easily cleaned. The liquid is in a can. Therefore, it is supplied inside under pressure. This principle facilitates thorough purging of even narrow channels.
There is no need to dry internal systems after flushing. They simply reassemble the systems in reverse order. Next you can make settings.
Tips and tricks
Setting up the carburetor on a 4t 50cc scooter is an important and responsible procedure for servicing motorcycle equipment.
When performing adjustment operations, it is important to follow a number of rules:
- perform adjustments only after the engine reaches operating temperature;
- rotate the adjusting elements smoothly, observing the operation of the engine;
- Make sure there is no debris inside the fuel chamber and the jets are clean.
Before starting work on setting up the carburetor, you must study the operating instructions and clearly determine the location of the quality and idle screws. If you have a 150cc scooter, the carburetor adjustment is done in a similar way. After all, the process of regulating the fuel system is the same for engines of different powers.
The design of a scooter carburetor is quite simple; Once you understand it, you will be able to understand how to properly configure the carburetor so that the vehicle does not let you down in bad weather, how you can tune it and improve the performance of the engine. You will be able to control the quality of the mixture and many other processes that affect the operation and operation of the device.
Features of setting up the carburetor of a 2-stroke scooter
Some mopeds have their own characteristics. Perhaps the simplest carburetors are made in China. And a 2t scooter has a simpler carburetor than a four-stroke. Adjusting such a model should not be a serious obstacle. However, there are some peculiarities here too. It should be noted that the needle in the 2t carburetor determines the quality of the mixture only while the throttle valve is not raised all the way. Otherwise, the fuel jet has a much stronger effect. There is also a connection with the idle system, but not on all models.
In 2T carburetors, the fuel level is much more significant than in 4T carburetors. You can set up the float chamber according to the instructions above; there are no significant differences, although the jets are different.
Signs of necessary adjustment
The only parameter that the driver controls while driving is the throttle position. It affects the volume of mixture supplied to the scooter.
There are a number of signs by which you can determine the condition of the carburetor. These include:
- drop in engine power;
- failures when accelerating the scooter;
- hard start;
- increased fuel consumption;
- abnormal reaction to the accelerator handle;
- sudden engine stop.
Signs do not have a noticeable periodicity; they can occur at any time.
Idle speed: settings features
Adjusting the Suzuki Sepia carburetor is impossible without using the idle speed. It regulates the number of revolutions, where when the screw is tightened, the speed indicator increases and the wheel spins independently without the throttle. When you unscrew the idle screw, the scooter will start only when you add more revolutions with the throttle. It is advisable to adjust this jet last, that is, first adjust the quality of the mixture, the needle in the throttle valve, and, if necessary, the air screw, and then adjust the idle speed.
Medium and high speed tuning
The quality screw prepares the mixture ratio at idle. Failures in operation at high modes are eliminated in other ways.
After opening the throttle valve, the fuel nozzle comes into operation. Its task is to supply gasoline to the diffuser while the scooter accelerates.
An incorrectly selected nozzle leads to deviations in the composition of the fuel mixture. During power build-up, the scooter may “suffocate”, until the engine stops completely.
The correct algorithm for tuning the carburetor at high speeds:
- cleaning internal channels from debris;
- checking the fuel level in the float chamber;
- adjusting the shut-off valve (needle) stroke;
- checking the jet's nominal value.
A sign of proper operation of 2t and 4t engines is a sharp increase in speed when the gas is opened. Any deviations from the stability of engine acceleration indicate a violation of the settings.
Signs of deviation in mixture preparation
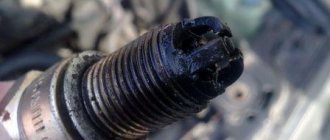
An important indicator of the quality of fuel combustion in the cylinders is the color of the spark plug. An experienced mechanic only needs to look at its condition to understand what adjustments need to be made.
There are two characteristic colors:
- A white (grey) spark plug means the mixture is lean, the moped overheats and does not produce optimal power.
- Black with soot – excess fuel, excessive consumption.
The behavior of a scooter with an incorrect fuel mixture is specific:
- abnormal reaction to the throttle;
- pops in the muffler;
- smoke content of exhaust gases;
- noticeable decrease in power characteristics;
- sudden engine stop.
A normal moped spark plug is brownish in color. There should be no carbon deposits on it, its electrodes should be clean, without traces of melting.
Replacing the carburetor on a scooter with another one
Scooter carburetor - disassembly, washing and assembly
Carburetor CV - Constant velocity - constant vacuum carburetor (English).
The plastic coverings on the rear of the scooter have been removed, and the seat and seat container have been removed (see page 66).
ATTENTION!
Before starting work on flushing the carburetor, we prepare the workplace: the workbench should be absolutely clean, it is desirable that there is also a minimum of dust in the air.
We lay clean paper on the workbench - we will put all the extracted parts on it.
1. Before removing the carburetor from the engine, close the fuel valve (if it is mechanical) and drain the fuel from the float chamber:
• Place the scooter on the center stand.
• We place a suitable container (0.5 l) under the central part of the scooter to collect gasoline (you must first find where the drain pipe is located under the bottom).
• Loosen and turn out the drain screw a few turns (shown on the removed carburetor).
The fuel will drain through the drain pipe into the container.
ATTENTION!
Do not unscrew the drain screw completely. It is enough to unscrew it one and a half to two turns.
1. Remove the carburetor from the engine. (see p. 123).
2. On constant vacuum (CV) carburetors, a rotary throttle valve is most often used. Remove the damper drive cable from the rotary sector.
3. Disconnect all hoses from the carburetor.
4. Unscrew the two screws securing the electromagnetic starting enrichment.
Motorcycle constant vacuum carburetors on a car engine - DRIVE2
Good time everyone! I have a task. The Honda Prelude 2 is undergoing long-term repairs. Standard cv dual carb power system with auto-heating, speed compensation xx, etc., etc., as on all conventional Japanese carburetors. Over the years of operation in an environment hostile to a Japanese car, many systems have failed and many elements have been irretrievably damaged and lost. It was decided to build a completely homemade intake and use motorcycle carburetors as a basis. Not as a tuning, but as the most budget-friendly solution to this problem for such an old, rare and difficult to install car in our area. A manifold was welded from a plate machined to the shape of the gasket and simple pipes. The diameter of the inlet windows, the internal diameter of the pipes and dampers are the same. This is very convenient, as is the fact that the general layout is identical to the stock one. The short manifold turned out to be approximately the same as the stock one, the carburetors also fit under the hood without any problems. There is also room for air. filter. Now, actually, an appeal to everyone who wants to help finally clarify the situation with motorcycle carburetors on car engines. Please respond only to those who have real experience (in other words, who have it running) or strong theorists who can reasonably explain why it will never run. I would be grateful for any cooperation and in return I will definitely create a report on the work done so that enthusiasts Don't waste your time anymore. And because I found a lot of topics on various forums and a lot of videos where all the Ladas are revving in the garage, but I never saw anywhere how it all works on the go, no one described what they did, how they set it up, what problems they encountered and how he is glad that everything worked. Topics on the forums are abandoned, projects are not completed... I found a man in my city who was building some kind of VAZ with such carburetors. He claims that the car drove very well, which I would like to receive confirmation of, but I cannot, because it is disassembled; according to the owner, the system is unreliable and extremely uneconomical. I have read and watched a lot. Quite a few have been tried. There is no urgency, there is a desire to get to the bottom of the truth. In a nutshell about the problem: the gas-air mixture spits out back, dips and pops when revving up, the engine does not develop maximum speed, all signs of a lean mixture in modes, and for some reason the spark plugs are periodically poisoned , which contradicts the first conclusion. With the theory of jumping air. valves are familiar, the problem was eliminated by blocking part of the cross-sectional area of the channel feeding the membrane chamber. At least visually the defect has disappeared. The dampers are able to open fully without constantly bouncing at low speeds. The jets, albeit roughly, were selected based on the total cross-section of the original Honda jets. Also, to equalize the flow of incoming air, just in case, a receiver was made, and even with pipes - runners (in case some disruption of the flow occurs in front of the carburetors, as well as to increase the flow speed. The advance works from the vacuum of one cylinder, which is enough, the ignition is set to a strobe , everything has been checked, valve timing, ignition timing, etc. repeatedly. The only problem is with the power supply. About the engine. This is an in-line 4-cylinder engine, 3 valves per cylinder + jet valve located in its own cast pre-chamber, 1 overhead camshaft . Volume 1.8. They repaired the cylinder head, the piston is in perfect condition, the compression is currently 12.5 everywhere exactly. Carburetors are from Yamaha xjr1300. I suspect that the system is not working and the defect lies deeper than I imagined before taking on So far, the only thing that comes to mind is that there is no required flow speed to lift gasoline from the float chamber or spray it, Although the theory of constant vacuum carburetors says that the flow speed is always optimal and high and depends only on the opening value of the throttle itself flaps The air cylinder changes the flow area of the carburetor, thereby regulating the flow rate (from the theory of constant vacuum carburetors, and I hope I understand this theory correctly) In my idea, this is a self-sufficient power system, simple and effective, all that remained was to configure it for another engine ( I thought all the work would consist of adjusting the mixture proportions in xx and modes, and at the end - just unsynchronize) In short, the problem is dynamics. And I'm not good at this. It is possible to achieve a stoichiometric mixture, but calculating the collector or receiver is not within my competence. I can still make it if there are calculation formulas or at least laws by which it all works.
Therefore, I am waiting for the help of someone who is knowledgeable, or someone who is ignorant, but competent enough to argue, because I’m already tired of redoing it at random. I am writing here to solve the problem once and for all, through joint efforts, to act for the benefit of society. Thanks to all .
www.drive2.ru