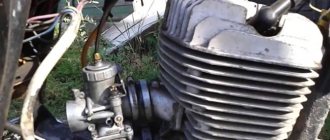
How to set up a pakko carburetor
It is periodically necessary to monitor the fuel level in the float chamber and the tightness of the needle valve.
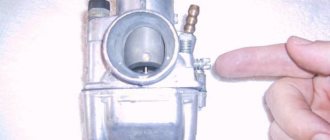
First, with the cover removed, check the tightness of the fuel valve seat and the amount of protrusion of the shut-off needle above the surface of the housing to which the sealing gasket is adjacent. To do this, you can use a caliper. This protrusion should be 15mm. If the deviation does not exceed 0.3 mm, subsequent level adjustment can be made by carefully bending the float tongue. If the deviation is greater, it is necessary to change the thickness of the shims under the valve seat.
Then you need to assemble the float mechanism and check the distance from the already mentioned body surface to the top point of the floats (Fig. 10). It should be the same for both floats and equal to 23+0.65 (25.5+0.5 for Rasso). Adjustment is by bending the tongue. The reliability of this adjustment will be much higher if you first weigh the float. It should be no heavier than 9.3+0.5 g (10.8+2 g for Rasso).
If the carburetor is installed after complete disassembly, then a gap of about 0.8 mm should be installed under the throttle, the quality screw should be tightened completely, and then unscrewed 1.5 turns.
Correctly adjusting the idle speed can only be done with a warm engine.
Using the quantity screw, pre-set the minimum speed so that the engine runs without interruption. Then, gradually turning the quality screw in one direction or the other, achieve increased speed. After this, use the quantity screw to reduce the speed, and use the quality screw to increase it. The adjustment is considered complete if, when the throttle is sharply opened and closed, the engine reacts sensitively to these actions and does not stall. After completing the adjustment, it is necessary to set the cable play to 1-2 mm.
The position of the metering needle in the throttle is individual for each engine and is selected during operation. The carburetor factory installs the latch in the second or third groove from the top. After the break-in is completed, you can try to clarify the position of the needle, guided by the color of the spark plug insulator, as described earlier. It should be remembered that the spark plug recommended by the manual must be installed on the engine. Otherwise, it is impossible to determine by the color of the spark plug insulator whether the carburetor is optimally adjusted.
Source
Major Solex faults
Almost all malfunctions are associated with aging of parts and clogging of channels with poorly filtered or low-quality gasoline, as well as airborne debris passing through a defective air filter:
- fuel overflowing through a faulty float chamber valve, the engine starts poorly when hot, black smoke comes from the muffler;
- contamination of the jets of the main dosing system, the engine loses traction, starts poorly, shoots into the muffler or air filter;
- the tightness of the diaphragms of the starting system, accelerator pump or economizer is lost;
- general contamination of the carburetor when using low-quality fuel or getting water into it, power is lost, starting is difficult;
- the throttle valves are worn out, it is impossible to adjust the idle speed, failures in transient modes;
- non-flatness of the lower flange due to overtightening of the nuts, air leaks, loss of idle speed and power;
- clogging of the accelerator pump, failures during acceleration;
- The transition system of the second chamber is clogged, failures at medium acceleration modes.
Often the carburetor is blamed for problems created by the ignition system or gas distribution mechanics of the engine. Therefore, this technically complex device should be dealt with last, after making sure that all other systems are in full working order.
How to set up a pakko carburetor
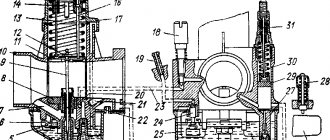
The carburetor ensures engine operation in all modes with its four systems. Let's look at them.
The float mechanism is shown in Fig. 1. The floats 1 are connected to each other and, through a lever 2 fixed on the axis 3, act on a steel needle 4, which locks the hole in the valve seat 5. The two floats create sufficient lifting force, which increases due to the lever connection of the floats with the needle - and this guarantees reliable valve closure.
Another feature: the axle is located behind the floats, and therefore when the motorcycle moves uphill, the fuel level automatically increases slightly, which improves traction characteristics, and when moving downhill, it decreases.
The starting device (Fig. 2) serves to enrich the mixture when starting a cold engine. To turn it on, you need to press lever 2. Then fuel from the float chamber through the nozzle 6 of the starting device is sucked into the well and emulsion tube 5, where it mixes with air and passes into cavity 3 under the piston. Here, air is added to the emulsion, entering through hole 4 on the inlet pipe of the carburetor, and the mixture of the required composition enters the outlet pipe. The device operates automatically. There is no need to manipulate the throttle handle when starting: to avoid temptation, it is better not to touch it at all. After a short warm-up, lift the starter lever to its original position. In this case, piston 1 will go down, and the rubber sealing washer on it will block the system.
The idle system (Fig. 3) is not much different from the generally accepted one. In this mode, the throttle is almost completely lowered - there remains a gap of only about 0.8 mm under it. The amount of air passing through it is insignificant; its speed in the nozzle zone is low and therefore does not cause fuel leakage. The vacuum near the gap reaches its greatest value - and therefore channels 2 and 3 of the idle system are brought out here. Fuel enters through jet 5, and air through the hole on the inlet of the carburetor, the well of the idle speed adjustment screw 4 and the well of jet 5. Here the fuel and air are mixed, air is added to this mixture through channel 2, and through channel 3 it flows to the outlet carburetor Mixing with the air passing through the throttle slot, the air-fuel emulsion becomes suitable for idling the engine. The quality of the mixture (degree of enrichment) is regulated by screw 4, and its quantity by a screw that limits the movement of the throttle.
Five random articles about motorcycles:
Jawa 638-5-00
Motorcycle Java 638 model 5-00 From the second half of 1984, Czechoslovak motorcycles began to arrive in the USSR.
This is a transitional model between the well-known Java-634 machine and the new design Java-638-0-00 (“Behind the Wheel,” 1984, No. 10). New engine, electrical equipment, front fork - this is what primarily distinguishes the 638-5-00 model. Engine. Although its layout has not changed fundamentally, it has undergone a thorough modernization. The cylinders are not made of cast iron, but of an aluminum alloy with a pressed cast iron liner. Aluminum heads now have fins arranged differently. The result is more efficient cooling of the cylinders and heads, and a more uniform distribution of thermal loads. Also, for better cooling, the inclination of the cylinder axes relative to the vertical was reduced from 25 to 15°. 1. The distance between the axes of the cylinders has been increased by 12 mm compared to the YAVA-634 model. This made it possible, in the interests of increasing durability, to install a middle collar neck... Read more >>
Solving the problem of clogged float chamber in the carburetor
For owners of the Java 634 motorcycle To prevent the drain hole in the carburetor float chamber on the Java 350 634 motorcycle from becoming clogged, I inserted a curved (see picture) plastic tube into it (a used ballpoint pen refill is suitable).
He heated a straight tube in boiling water and cooled it on a pre-bent wire of a suitable diameter - this way it will retain its shape and there will be no kinks on it. It is easy to install if you first loosen the float chamber cover and then tighten the screws, holding the end of the tube in the drain hole.M. IVANOV172500, Kalinin region, Nelidovo, st. Kuibysheva, 66, apt. 4 Plastic tube that protects the carburetor drain hole from contamination: 1 - float chamber body; 2 - tube; 3 - float. 1980N06P33 Read more >>
Java 634-7-00
New model YAVA-634 7.00 appeared in stores selling motorcycles this year.
This machine is a further modernization of the base model YAVA-634 (“Behind the wheel.” 1974, No. 8). which, after improvements in 1977, received the index JAVA-634.8.00 (“Behind the Wheel,” 1977, No. 3). A new block of control devices: on the left is the speedometer, on the right is the tachometer, in the center are warning lights. The 1981 YAVA motorcycle differs from previous modifications primarily in the new block of control instruments (tachometer, speedometer, four warning lights), elastically mounted on the front fork. The tachometer (new on road cars of this brand) is mechanically driven. In addition, the shape of the switches (made in the GDR) and control levers located on the steering wheel has been changed. Gas tank, switches and levers on the steering wheel. Other innovations include increased capacity from 16.2 to 17 liters and a modified... Read more >>
Conversion of Java electrical equipment 6V to 12V
Remaking the electrical equipment of Java Our magazine has repeatedly discussed the shortcomings of the power supply of the YAVA-634 motorcycle, produced before 1985.
At low crankshaft speeds (up to 1800 per minute), the 6-volt generator does not produce energy, and all consumers at this time are powered by the battery. If the lights and headlights are on, the battery is quickly discharged, which, with repeated cycles, leads to its failure. The only measure to avoid this trouble is to maintain medium speed even on bad roads or stops at intersections. It is clear that this causes great inconvenience, especially for residents of rural areas. The currently produced YABE model “638” uses a 12-volt electrical system (its description and diagram are given in No. 6, 1987), where a more advanced and powerful generator begins to work already at 1000 rpm. It is clear that many owners of the old model want to switch to new electrical equipment, but encounter an obstacle:... Read more >>
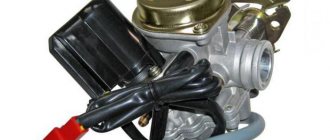
Setting up the Pakko carburetor on a Minsk motorcycle.
SETTING UP PACCO | SOLVED THE PROBLEM!!More details
Minsk does not pick up speed on the carburetor, what is the reason? More details
Elimination of the problem of caburator leakage PAKKO (India) on a motorcycle Minsk.Read more
INSPECTION! HOW TO PREPARE a motorcycle MINSK? Front brake cleaning and tire replacement. Part 1More details
Spring launch of Minsk, PACCO carburetor. motorcycle 1983.More details
PZ 27 assembly. Pros and cons. Improvements.More details
I bought a PACCO carburetor in MinskMore details
How to set up a carburetor in MinskRead more
Overfills the Pacco carburetor on a Minsk 125 motorcycle, looking for a solution to the problemRead more
Pakko carburetor for MinskMore details
HE WAITED 25 YEARS MINSK USSR NEW time capsule motorcycle Minsk 125 3.112 / pakko carburetor for MinskRead more
The best carburetor for a motorcycle Minsk PACCORead more
Robot motorcycle Minsk with carburetor pacco (pacco)More details
Gasoline leaking from Pakko carburetor. THIS IS WHAT I DID!Read more
THE BEST CARBURETOR in MINSK. More details
Pacco carburetor for a Minsk motorcycle. Unboxing, review. Read more
Mikuni at sunrise carburetor Minsk pakkoRead more
PACCO carburetor for motorcycle MinskMore details
Ride in Minsk I Ride to Music