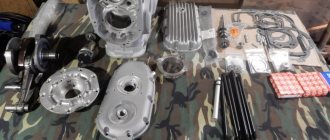
The Izh Jupiter 5 motorcycle is today considered one of the best Soviet bikes, so to this day hundreds of satisfied owners are trying to improve it. The best improvement to an old motorcycle is its tuning.
Izh Jupiter 5 was produced in a standard form, because in those days people loved simple but high-quality equipment. Today, many people want to have a unique, special motorcycle that would have not only excellent external characteristics, but also increased technical parameters.
Any motorcycle tuning is divided into two types: external and internal (the process of changing technical characteristics).
Previously, it was impossible to tune your vehicle, because then materials for tuning were not produced, and if you saw some special motorcycle, then most likely it was the personal fantasy of the owner. In general, any tuning is divided into external and internal (engine). But in addition to these two types, we will also look at tuning other characteristics, such as the tachometer and carburetor.
What are clip-ons on a motorcycle?
+7(916)923-63-67 MOTO SERVICE ButovoTeam
Motorcycle repair and maintenance
post-warranty service station
The world of auto and motorcycle tuning is very large, so even experienced professionals may not be aware of the latest innovations and technological changes. Clip-ons, as a steering element for motorcycles, are relatively popular among professional motorcycle racers due to the practicality of their shape and convenience, but the attitude towards this detail is ambiguous.
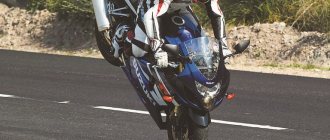
Clip-ons are a handlebar kit that consists of two metal tubes and a pair of brackets used to install and secure the element. Many motorcycle owners buy clip-ons to change their unique “image”; in some cases, this is the only solution for a complete bike package; for some, such parts give maximum control over control, especially for sport bikes; for others, clip-ons are just a pointless waste money for an unnecessary and short-lived item. Let's try to figure this out by answering the question, who needs this?
Simple clip-ons, manufacturing
Most sports bikes have “Clip on handlebars” type handlebars, or “clip-ons” in common parlance. Essentially these are separate handles that are attached with clamps directly to the fork pipes. They often break when dropped and are expensive. Moreover, on some models the weakest link is the sticks, with them it’s easier - throw away the curve, screw a new one into the clamp. But there are also those where it is the clamp that breaks and you have to buy the clip-on assembly - an excellent marketing ploy by the manufacturer :pardon: .
From time to time I make homemade ones for the unfortunate bikers. I tried different ways. The most important thing is that both handles turn out the same, so I came up with this method - fast, simple and everything is symmetrical. Maybe someone will find the technology useful.
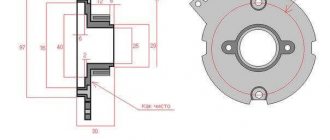
We take a round piece of suitable diameter (in this case a simple piece of wood, the customer wanted it as cheaply as possible), trim, drill and bore a hole according to the diameter of the fork leg. Then we peel it off using a high-speed router. More revolutions will result in a smooth surface. However, paint it anyway.
To set the downward slope of the levers, we cut off the edges at an angle, turning the VFG. (in this case 11 degrees). Using these bevels, we base ourselves in the drilling machine and drill holes where the handles will be screwed in:
Using a small router, select holes for the tightening bolts (M8 with internal hexagon). We drill holes and cut threads.
We cut a thread M18x1.5 for the handles. The operation is important - the length of the thread is small, you can fill it up and the handles will be inclined differently, so we control the angles like this:
Using a 3 mm disc cutter, we saw through the through groove (I forgot to take a photo), insert washers into the groove, and tighten them with bolts.
Now you can, without further ado, cut this polyhedron in half with a grinder. We clamp any round timber into a lathe chuck, grind a ledge on it along the diameter of the fork leg, tighten the clamp on it and trim it to size. Don't forget to remove the chamfers from the inside:
Well, how to turn two diameter 22 mm rods (standard handles) from duralumin with a thread at the end is already clear. We assemble, check for parallelism, admire  :
:
Now all that remains is to round off the sharp edges, place the handles on the thread locker and paint the steel clamps.
Don’t throw tomatoes at me, I’m not a turner or a milling machine operator, it’s just that sometimes at work they let me work on the machines.
If you have time and material, you can get creative and make them more interesting. Modified June 6, 2010 by Max35
Peculiarities
Clip-ons were originally invented for professional motorcycle racers who race on special trails and tracks. For such purposes, these parts were made of durable alloys (aluminum), which made the design not only reliable, but also much lighter and more convenient. After falls, the clip-ons were easily replaced with new steering parts; all you had to do was remove the clamp from the metal brackets. An important feature of clip-ons is their ease of replacement. When an incident occurs and part of the steering wheel is damaged, in the case of installed clip-ons, it is enough to replace only the straight tube, and not the entire mechanism. Some mechanics use different metal tubes of the same diameter, cutting them to the desired size. It is important to understand that replacing a bent pipe will cost much less than repairing a steering mechanism with a classic steering wheel installed.
Today's market offers a considerable assortment, but it is worth paying attention only to trusted brands and manufacturers. Among all the variety, the best options would be the following brands:
•Harris Performance; • Gilles Tooling; • Vortex.
You can find clip-on options with unique fastenings and non-standard bracket designs, but the classic version is the best choice, since other aspects are not so time-tested and technical issues. It’s better to remove the steering bridge once again than to experiment with new linings and clamps. For beginners and inexperienced users, the ideal option would be clip-ons from the Ukrainian manufacturer Vortex, which offers a low price for excellent product quality.
How to install clip-ons?
Installing elements such as clip-ons may have a different sequence for each master and depending on the motorcycle model, but for most cases a short and simple method is proposed:
• Remove the bridge or upper crossmember; • Install clip-ons or replace with new ones; • Rearrange the control elements (knobs and start buttons) onto the surface of the clip-on pipe; • Install and secure all elements in the reverse order.
It makes no sense to describe all the trivial aspects of removing bolts and clamps, especially for experienced craftsmen, but there are still small nuances when installing clip-ons. In factory models, special technological holes are made on the clip-on pipes on the gas side. By definition, such a design reduces the “survivability” of the assembly, therefore, some mechanics cut off the protrusions, and in case of urgent need they can be made independently. It is important to understand that the grip width in the trimmed version of the clip-on is quite enough for a confident and complete ride, but the strength of the pipe will be much greater than the previous one.
In addition, some inexperienced bikers experience significant difficulties in installing the clip-on symmetrically and evenly relative to the wheels and steering axle. In this case, only patience and trial will help, since installing such steering equipment as clip-ons significantly changes the position of the hands on the steering wheel and the driver’s tilt angle. Several tries and unsuccessful attempts will lead to the ideal position of the steering element of your motorcycle.
CLIPS: who needs it?
Clip-ons are a handlebar installation kit, usually consisting of two brackets and two handlebar tubes. Professional clip-ons are usually made from high-quality aluminum, so they are stronger, lighter and more comfortable than the original ones. At the same time, the metal steering tubes are easily replaced in case of breakage or significant deformation.
As a matter of fact, in addition to the clip-ons, this time the upgrade to my bike included the so-called “crab” - the element on which the front fairing is supported. Of course, these parts help not you personally survive global warming, but help maintain the controllability of the motorcycle in the event of a small incident on the track. Everything is clear with the crab: it’s a tuning one, made of aluminum tubes and is simply leveled by hand. While the factory one, spatial, with complex stiffening ribs, and also made of some kind of fragile alloy, is practically beyond repair. We replace the stock crab with a racing one and attach a racing fairing to it. That's it, the question is closed. With clip-ons, everything is also quite simple. Unlike the factory, one-piece design, they are made of two parts: a mount that is installed on the glass, and a tube, which is half of the steering wheel. In the event of an incident, only the tube is changed, and not the entire structure. In addition to the obvious savings of money, there is also a saving of time: you will not need to disassemble the motorcycle again. Just loosen a couple of bolts and insert a new tube. By the way, it is not at all necessary to buy spare parts from this company. You can pick up an aluminum pipe from a metal warehouse of the same diameter and, very preferably, no less rigidity. Well, then make “spare parts” out of it using an ordinary hacksaw.
What to choose from I made my choice from products from three manufacturers: Gilles Tooling, Harris Performance and the most famous in Ukraine, Vortex. I immediately discarded all sorts of options with dismountable fasteners that would make installation easier. I won’t talk about everyone, but for myself I long ago came to the conclusion that all these tricks are for me to play for a month and, in the end, I will still have to settle on one setting. And I’m not too lazy to remove the steering bridge once. Of the remaining simple options, I chose Vortex as the cheapest and one that has proven itself quite well in our market. Installation There are two options when installing clip-ons on my Fireblade motorcycle. The first involves the following set of actions:
- hang the front wheel on a special stand under the front crossmember;
- remove the front wheel and fender;
- Loosen the tension and release the front suspension struts.
The second is somewhat different and, at first glance, much simpler:
- remove the bridge or, as it is sometimes called, the upper cross beam.
Common part for two paths:
- remove old clip-ons and install new ones;
- rearrange the handles and fittings of the engine start/stop button;
- reassemble in reverse order;
- slightly crookedly stick 2 Vortex stickers on the plastic of the motorcycle (optional).
Obviously, in terms of the number of points, the second method is shorter. And anyway, what kind of nonsense is this about removing the wheel... Nonsense, of course. But except in the case of a Honda CBR1000RR or other Siberian with a similar factory damper. The catch is that in order to remove the bridge, you need to remove the damper. And to do this, in turn, remove the seat and false tank. It sounds shorter than it is done. But I still choose this method, since my front stand is not quite in order and I still need to work some magic on it. What kind of “Louis” equipment does not require our fine-tuning? I will not describe the trivial process of unscrewing/tightening the bolts, I will only dwell on the next important point. There are two technological holes in the factory clip-ons on the throttle side. One of them is used to fix the position of the engine start/stop button fittings, and the second is used to fix the gas handle casing. What's the difficulty? In general, drilling any holes contradicts the principles of survivability and quick replacement. Therefore, a more logical way is to remove the projections from the side of the reinforcement. After thinking about it, I still decide to drill holes - to preserve the original appearance of the parts. Then, if something happens, I will decide whether to drill the pipe. Of course, I hope I don't have to. Even with the controls in a fixed position, the grip width adjustment margin remains enormous. I set the angle relative to the axis of the motorcycle “by eye”, easily tighten and assemble the device. I sit down and realize that the landing has become much more aggressive: the handles have become further and lower. But I didn’t even suspect that it was so bad. I roll the bike forward and suddenly hit my hand hard on the plastic of the front fairing. Turns out I just turned the knobs wrong. Now I have clear guidelines: I turn the steering wheel point-blank and set the angle so that nothing interferes with my hand. I position the second handle symmetrically. The riding position no longer seems as aggressive, but the handles are still significantly further, and the footpegs feel higher.
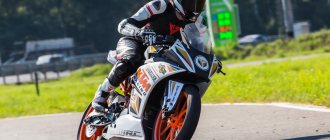
In action I start and warm up the motorcycle. I draw your attention to the visible vibration amplitude of the handles. On the same day, a training session on a karting track was announced - a great way to test the improvements in combat conditions. The beginning of the path leads me along an open highway, and I note that it has become a little easier to hide behind the windshield. At medium speeds, 6-8 thousand, vibrations are almost absent, although they are slightly noticeable. When I get into dense Kiev traffic, the picture deteriorates somewhat. No, everything is not so bad, but still, in city traffic, I must admit, stock clip-ons are more convenient. On the karting track, I have a dual impression: it’s, of course, more convenient to hide behind the windshield on the straights, and in medium-speed turns it’s also a little better, but on slow turns I strain more than I should, out of habit. But already the second trip shows that it is only a matter of time. I completely forget that the steering wheel has changed and think only about what I should think about during training: how I’m driving. At the end of the trip, the clip-ons again remind us of their existence with vibrations. But this is quite possible to survive. Conclusions I will not recommend replacing stock clip-ons to those who drive around the city, regardless of driving style. And for those who make regular trips to the track, this is also not so necessary. Clip-ons only provide some additional adjustment options, limited by the design of the plastic on your bike. The most important advantage is saving money and time in the event of an incident on the track. Text: Alexey Strausov, motorcycle magazine Bike How to install clip-ons on a Ducati motorcycle "(Article from MCN. In English, but with photographs)
Conclusions. Classic handlebar or clip-ons?
Among the numerous reviews from those who have successfully tested clip-ons, there is a clear answer to the question “who needs clip-ons?” Simple and uncomplicated handlebar elements are ideal for fast riding on sportbikes, especially in track conditions. After falls, clip-ons are easiest to replace with new ones; besides, the availability of material resources allows this to be done with low financial costs.
As for those who enjoy moderate city driving, clip-ons will not provide any advantages or additional effects. Their installation is relevant only for the individual design features of your motorcycle, where it is impossible to use a classic steering wheel due to fairings and additional tuning elements. “ButovoTeam” with its experienced staff of specialists will be able to help you in resolving any technical issues regarding the installation or purchase of clip-ons. Contact the specialists of our center, and the operation of your two-wheeled vehicle will always be comfortable and safe.
Reading → Motorcycle controls
The topic is very broad and interesting. Of course, you can turn all this into a book, but I will try to present the material briefly, clearly and understandably.
In this article I will start smoothly. You will be immersed in the world from a brief design of control levers to their features and subtleties of use. This material is aimed entirely at new people in the motorcycle culture and its main goal is to make people understand that a good Japanese motorcycle is the limit of perfection. Visually we divide the motorcycle crosswise into two parts - front and rear.
To the front we will include the controls:
1. Front fork 2. Steering wheel or clip-ons 3. Steering damper (it is not visible in the diagram, since it can be either inside or outside, I will describe it separately later in the article) 4. Brake mechanism 5. Clutch 6. Gas
Clip-ons are handles that a rider holds with both hands and shouts YYYHAAAA. :).
Why are clip-ons called clip-ons?