Most modern gasoline cars are equipped with fuel injection systems, but before they gained dominance, all cars were equipped with carburetor systems. For this system to work correctly, the carburetor settings must be performed flawlessly. High-quality carburetor adjustment will reduce fuel consumption, make the engine run smoothly at idle, reduce the emission of harmful substances into the atmosphere and increase the overall engine life.
Most domestic cars have a carburetor system, and the question of how to adjust the carburetor will not lose its relevance for a long time. Many owners of rare old foreign cars also face the problem of how to adjust the carburetor. Since the principle of operation of carburetors around the world is no different, the algorithm of work will be the same.
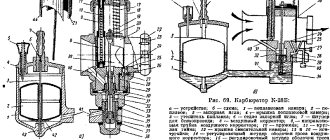
The carburetor is the main component of the fuel system of any carburetor car. This is where air and fuel mix to form a fuel mixture that enters the engine's combustion chambers. A properly adjusted carburetor produces a fuel mixture in the required proportions. Such a mixture will not detonate in the cylinders, which will increase the life of your engine.
How to adjust the carburetor and when to do it
Do-it-yourself carburetor adjustment is done after using low-quality gasoline or when engine operation is no longer stable. For prevention, the manufacturer recommends flushing the carburetor with a special compound every 6-7 thousand kilometers.
Possible malfunctions in the carburetor:
- Fuel leaks on the carburetor. In this case, you need to measure the fuel pressure. This is done using a special pressure gauge. The operating instructions will tell you what the pressure should be. Typically it ranges from 0.2 to 0.3 atmospheres. If the pressure is normal, the problem is in the float chamber and the fuel level needs to be adjusted;
- Carbon deposits on spark plugs with the smell of gasoline. This clearly indicates a problem with adjusting the carburetor floats or a burnt valve;
- Rough engine idling may not only be due to the carburetor. This often happens due to incorrect adjustment of the throttle cable. To check, you need to disconnect the cable and turn the valve manually.
Before you adjust the carburetor correctly, you need to clean it thoroughly. It is recommended to use special liquids for cleaning. The jets cannot be cleaned with toothpicks or needles. Damage to the jets will lead to calibration failure. If the holes cannot be cleaned with aerosols, you can carefully clean them with a soft wire. When cleaning, do not use rags. Threads can clog the holes, which will lead to malfunction of the carburetor. If the aerosol does not remove all contaminants the first time, you need to repeat the procedure.
Modification of the standard intake manifold
To tune the carburetor system, it is a good idea to equalize the length of the intake channels. To do this, part of the partition is cut off, which separates adjacent channels. This allows you to create a kind of cavity under the carburetor. In this cavity, the working mixture will mix much better, and this will happen without depending on the operating modes and the number of carburetor chambers involved. Only then will this mixture enter the intake channels.
The intake manifold itself must be placed on the cylinder head using pins. This is done so that their relative position is always the same. After installing the pins, it becomes necessary to join the channels in the intake manifold and the cylinder head in such a way that no ledges or other flaws appear at the junction. For best results, use a strip of paper that is thick enough. This paper must be pressed in turn both against the manifold flange and against the mating surface of the cylinder head. There will be prints on the paper corresponding to the channel holes, which can be used to easily identify places where the manifold and the block head do not match.
This method allows you to achieve positive results, which are manifested in improving the acceleration dynamics of a car with a carburetor without increasing fuel consumption. The second advantage is a noticeable expansion of the range of peak torque and maximum power of the internal combustion engine, and their increase is also observed.
Setting up the float mechanism
The level of the fuel mixture in the float chamber is directly related to its quality. At an increased level, the mixture will turn out to be lean, which will negatively affect gasoline consumption and increase toxicity. Without adjusting the floats, the question of how to adjust the carburetor cannot be solved. The process of adjusting the floats includes the following operations:
- Adjusting the floats in relation to the lid and walls of the fuel chamber. If deformation of the float fixing bracket is noticed, it should be aligned manually;
- We adjust the bracket with the needle valve closed;
- We adjust with the float retracted and the valve open; the distance between the float and the valve should in this case be set to about 15 millimeters.
Adjusting the mixture composition
Adjustment with needle
In Dellorto carburetors, the needle is fixed in the throttle valve using a locking ring installed in one of the grooves (on the cylindrical part of the needle).
Conventionally, the grooves are numbered from the blunt end of the needle, that is, from the top. The higher the groove in which the locking ring is installed relative to the sprayer, the lower the needle is lowered. This means that in order for the conical part of the needle to exit the atomizer, the throttle must be raised higher. Conversely, if you need to engage the tapered part of the needle at lower throttle lifts, you need to raise the needle by moving the stopper to a lower groove (second, third...). For example, in practice, the consequence of a rich mixture may be slowness in gaining speed and a dull, deep exhaust sound. In this case, it is necessary to lower the needle by moving the locking ring to the grooves above.
However, very often it is impossible to tune the carburetor well by changing only the position of the needle. In addition to the position, it may be necessary to vary the geometric parameters of the needle (meaning the taper and length of the conical part). They significantly affect the carburetion process, and engine response directly depends on this. Thus, there is a need to replace it with another one with more suitable geometric parameters.
For each family of Dellorto carburetors there is a wide selection of metering needles with different geometries. As necessary, during the tuning process, you can select a more suitable needle and begin testing. For example, you may not get a rich enough mixture at a certain throttle lift with the needle raised as high as possible. In this case, you need to try a needle with the same taper, but in which the taper will begin earlier, i.e. the cylindrical part will be shorter. In certain cases, needles with different tapers can be used to better suit a particular type of engine. When conducting this type of experiment, it is always best to vary only one parameter at a time.
Adjustment using a spray gun
The atomizer has a calibrated hole at the end that communicates with the diffuser.
In Russian-language literature, the phrase “nozzle diameter” is often used, which means the diameter of this hole. As a rule, there is a certain set of nozzles of various diameters for a specific carburetor. As the diameter of the nozzle increases, the mixture becomes richer, and vice versa - it becomes leaner as it decreases. Of course, you can achieve the same effect by changing the diameter of the dosing needle. However, a needle of the appropriate diameter may be difficult to obtain. In this case, it is much easier to select a sprayer, if such a need arises at all, since Dellorto carburetors are initially optimized for the specific type of engine for which they are intended.
Thus, carburetor tuning is most often done by selecting jets, setting the needle height and selecting its shape, while the atomizer and throttle valve angle remain unchanged even with the appropriate replacement kits.
Setting the fuel mixture supply
The carburetor control screws will help you figure out this setting. Before performing this procedure, you should know that the screws have a plastic factory press-on that limits the rotation of the screws (from 50 to 70 degrees). If turning in this range does not bring results, you need to break the press-on and turn the screws as much as necessary. Before setting the position of the screws, you should warm up the car engine to operating temperature.
To adjust the idle speed of the carburetor, you need to turn out the quantity screw and the mixture quality screw a few turns and, turning them, listen to the operation of the engine. When the engine starts to run smoothly, the carburetor idle adjustment is complete.
Carburetor adjustment with screws
First of all, before proceeding with the appropriate adjustment, it is necessary to debug the ignition system, make sure that the spark plugs are in good condition, adjust the fuel supply system, set the permissible gap on the device for automatically interrupting the current circuit, remove the gas pedal rod from the throttle valve and only then proceed to carburetor settings.
The engine must be warmed up to operating condition, otherwise after debugging “cold” during operation it will work completely differently. We completely disconnect the crankcase tube, completely eliminating the influence on the crankcase gas setting. The equipment you will need is a simple slotted screwdriver and preferably a tachometer (digital, since the dial does not show revolutions up to 10 units). In service centers, they could use a gas analyzer as a necessary, but not obligatory, one for fine tuning, but we will make do with the specified accessories.
- We reduce the number of idle speeds to a minimum using the “quantity” screw (the engine is running, but is about to stall).
- Using the “quality” screw, we look for the position at which the number of revolutions is maximum. We begin to screw it in, raising the speed; if the engine stalls, we unscrew it to the required criterion.
- We check the quality of the fuel mixture.
Give the gas sharply - the engine should not stall. If it suddenly stalls, then unscrew the “quality” screw until the engine starts working normally. The setup is complete.
Experienced drivers make such adjustments “by ear” based on the sound of the engine; for “confident” drivers, there are many instructions and training videos; for “beginners”, it is better to carry out the correct carburetor adjustment in the appropriate service centers.
Adjusting the carburetor draft
Before you begin adjusting the rods, you should remove the air filter cover so that nothing interferes with the process. First, using a caliper, measure the distance between the rod tips. According to factory parameters, it should be 80 millimeters. To adjust the length of the rods, you need to loosen their clamps.
Checking the strainer should be carried out when there is fuel in the float chamber. This will help you see if the shutoff valve is closing completely. After examining the valve, you need to clean and dry it. Problems with loss of power and engine failures occur due to obstructed fuel supply. This is another reason to thoroughly flush the carburetor.
The tightness of the shut-off needle can be checked using a rubber bulb, while listening for air leaks. If they are present, it is time to change the needle.
Injection system with multiple carburetors
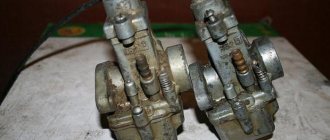
We can talk about tuning carburetor injection systems on internal combustion engines, taking into account extreme solutions. These include the installation and adjustment of several carburetors (from 2 to 4). This scheme, especially when installing a separate carburetor for each cylinder, can provide a significant increase in power and torque. The disadvantage is the complexity of installation and proper configuration of such an engine power system.
The reason lies in the fact that there are no completely identical carburetors. The slightest errors in setting up just one device can deprive the motor of the expected benefits. In practice, the implementation of such a forcing solution involves many alterations, modifications and financial costs. For an ordinary civilian car, the feasibility of such modifications is questionable, although this tuning method has become widespread in motorsport.
How to properly adjust a Solex carburetor
There are still many representatives of VAZ classics driving along the roads. Many of these cars have Solex carburetors under the hood. This carburetor is more economical and is capable of producing a higher quality mixture of fuel and air. For smooth operation of the engine, this carburetor must be properly tuned and adjusted. The class of carburetor masters is gradually dying out, so many people have to do the carburetor adjustments themselves.
Main dosing system: basic information
Modern motorcycle engines use carburetors with a metering needle.
This name is due to the design of the main metering system, since it is the conical needle that controls mixture formation in the range from 1/4 throttle lift up to full opening. The flow of fuel from most carburetor systems occurs under the influence of vacuum created by the movement of air flow. The total vacuum in the air path of the carburetor depends on the flow speed and resistance of the path. Let's consider this dependence in more detail.
The speed of air flow in different sections of the tract depends on the area of their flow section. Local contractions, provided that the continuity of the gas flow is maintained, causes an increase in its speed, which is accompanied by an increase in rarefaction. In modern carburetors, the air speed in the diffuser reaches 150 m/sec. When air moves, it overcomes friction against the walls of the duct and local resistance (nozzle, damper, etc.), which also leads to an increase in vacuum.
Of practical interest are the vacuums that arise in two areas: in the diffuser and in the mixing chamber behind the throttle. The figure shows the total vacuum curves in carburetors installed on engines of various types. The vacuum depends on the type, number of cylinders and operating modes of the engine. For a two-stroke single-cylinder engine, the vacuums are the smallest (curves 1 and 1′), for a four-stroke multi-cylinder engine they are the largest (curves 4 and 4′).
Change in vacuum in the mixing chamber P_k and in the carburetor diffuser P_g at different engine speeds n and throttle position φ_dr: 1 and 1′ - two-stroke single-cylinder engine; 2 — four-stroke single-cylinder; 3 - four-stroke two-cylinder; 4 and 4′ - four-stroke multi-cylinder
As the throttle opens, the vacuum in the mixing chamber decreases, and in the diffuser it increases. The nature of the change in vacuum in the diffuser and mixing chamber does not depend on the type of engine. Initially, when the throttle is opened by approximately 1/3, the vacuum in the mixing chamber decreases, and then remains almost constant (curves 1, 2, 3 and 4). Meanwhile, the nature of the change in vacuum in the diffuser is significantly influenced by its design. If in a carburetor with a diffuser of constant cross-section the vacuum increases continuously (curve 4′), then in a carburetor with a diffuser of variable cross-section, an increase in vacuum is observed only at the beginning of the throttle opening. With further opening of more than 1/3, the vacuum in the diffuser practically does not change (curve 1). With a constant throttle position and increasing engine speed, the vacuum increases in all parts of the carburetor air path.
A main metering system consisting of only a spray and controlled only by the amount of vacuum would supply too much fuel at low and medium throttle lifts and too little at high lifts. An over-lean mixture is especially dangerous because, in the worst case, it can lead to engine failure. This is why the conical dosing needle system was developed. Let's consider the principle of its operation.
Preparing tools and devices
If you intend to thoroughly clean the carburetor of your V8, then you will not be able to do it without a compressor. To blow out accumulated dirt from the channels, it is necessary to supply air at a pressure of at least 6 bar. The remaining tools are common ones found in every garage:
- 2 screwdrivers - Phillips and thin with a narrow flat slot;
- a set of small open-end wrenches - 8, 10, 13 mm;
- round nose pliers;
- rubber bulb (syringe);
- 2-3 wooden toothpicks;
- rags.
Compressor for carburetor purging
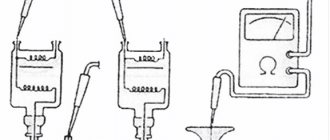
Note. It would be nice to have a tester or multimeter on hand to check the voltage. But if necessary, you can do without it.
Liquids for cleaning carburetor channels
A special product sold in aerosol cans (for example, from the ABRO brand) is excellent for cleaning channels. Do not use acetone or inorganic solvents, which corrode plastic parts, for cleaning. Buy new paper gaskets for DAAZ 2108 carburetors in advance (they will also fit the “nine”). You cannot buy or change jets, since the standard ones are designed for the entire service life of the machine, and fakes with large holes for fuel are often sold in repair kits.
What do we have after proper adjustment of the carburetor unit of the “six”?
Checking the adjustments of the fuel mixture preparation unit is the same important maintenance step as monitoring the condition of the car battery . An integrated approach to setting up the carburetor guarantees not only a comfortable mode of movement, but also a lot of useful points:
- An increase in power and a confident increase in speed.
- No failures in the operation of the internal combustion engine in the low and medium speed sector.
- Improved dynamic characteristics - the car picks up speed faster and accelerates in a short time.
- Optimal engine response, which is expressed in the responsiveness of the gas pedal.
The listed qualities make it possible to effectively use the combustible mixture, which is necessary both in urban traffic jams and on country roads. Therefore, proper adjustment of the carburetor unit will help the car gain speed in a timely manner and complete the planned maneuver.
Photo of the location of carburetor parts
General diagram of the DAAZ 2108 unit
This is what the floats installed on the Solex lid look like
Jet placement diagram
Nozzle design for four-stroke engines
The design described below is currently also widely used for two-stroke engines, as it allows one to obtain a leaner and more homogeneous mixture in all modes.
The body of the four-stroke type atomizer is equipped with rows of holes, and the annular chamber that surrounds it is constantly in communication with the atmosphere, but does not communicate directly with the diffuser. This allows the fuel to begin mixing with air before it reaches the diffuser, forming an emulsion inside the atomizer. With this design, the nozzle atomizer has no protruding part into the diffuser.
The operating principle of the main dosing system with a four-stroke type sprayer is shown in the figure. The holes in the lower part are immersed in fuel, since they are below its level. The holes in the upper part are always open for air to pass through. When holes in the top portion predominate, the mixture becomes leaner, while increasing the number and/or diameter of holes in the bottom portion results in increased fuel consumption with intense emulsification. Due to the location of the holes throughout the entire area of the nozzle, the annular chamber, initially filled with fuel, becomes empty as the speed increases, since the fuel is consumed through these holes, which leads to an over-enrichment of the mixture at the beginning and to its depletion in the future.
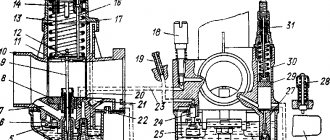
Operation of the main dosing system with a four-stroke type atomizer: Fuel rises from the float chamber along the atomizer 5, passing through the nozzle, which, together with the needle 3, regulates the fuel consumption. The fuel is initially mixed with air passing through channel 2 in the annular gap between the nozzle and the body. The emulsion is mixed with air entering through the inlet device 1 in the diffuser and mixing chamber 4.
Simply put, the location of the holes in the nozzle body and their diameter significantly affect the flow of fuel and the engine response that depends on it. Thus, by varying the parameters of the holes, it is possible to achieve the optimal mixture composition for all operating modes.
Jets and accelerator pump
Owners of carburetor cars know that jets change, but they do not always understand why jets are needed and how their size affects the operation of the carburetor. Let's start with the fact that the engine sucks in air through a special hole made in a large diffuser. At the same time, a certain amount of fuel is drawn through the fuel nozzle. The engine displacement directly affects how much air the engine will draw through the diffuser in a certain time, as well as the amount of gasoline sucked in parallel with the air.
It is for this reason that large-volume engines have carburetors with small jets. Installing such a carburetor on an engine with a smaller volume will mean that the “original” jets in this carburetor will produce a mixture that is too lean for normal engine operation. To solve this problem, you should find jets from a carburetor, which was initially designed for a specific internal combustion engine volume or as close as possible to it. You need to select jets starting with the fuel jet, then select the air jet under the fuel jet. The selection is made from a group of jets for the first chamber, the second chamber is adjusted only after the first.
Now let's talk about the accelerator pump. The accelerator pump delivers additional fuel when the throttle valve opens, allowing for more efficient acceleration. The pump is activated using a special cam. On engines with a Solex carburetor installed, the indicated accelerator pump cam must be set to the largest one.
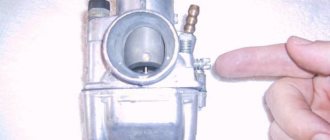
You should also pay attention to the so-called “spout” of the accelerator pump. When the valves are opened, fuel should flow in a clear stream and not drip even with a slight throttle opening. It is also important what position the nose occupies. The stream of gasoline must fall exactly into the area between the diffuser wall and the throttle valve, that is, the fuel is jetted directly into the manifold. The jet must not hit the diffuser or damper. If this happens, then after sharply pressing the accelerator pedal the car will not accelerate immediately, and a failure will occur. Self-refinement of the carburetor involves installing two spouts in the chambers to obtain better performance from the engine, or only one spout in the first chamber of the carburetor for a more economical mode.