One of the important systems of motorcycles is the carburetor. He is responsible for the correct operation of the vehicle, its stability and durability. The functionality of a motorcycle or scooter largely depends on the design features of the carburetor. Therefore, the owners of the presented vehicles evaluate the design features and operating principle of this device.
Often, when creating domestic brands of motorcycles, mopeds and even snowmobiles, the manufacturer installs a K-65 carburetor in the system. You can adjust it yourself if necessary. The setting will allow the engine to start simply and easily, its operation will be stable and smooth. The fuel mixture will consist of the correct proportion of components.
general characteristics
The K-65 type device was created on the basis of the K-62 carburetor. The previous model had a number of shortcomings. Because of this, frequent breakdowns occurred in the system. The designers took into account all the shortcomings. They have developed a completely new design that is more durable and reliable.
The K-65 carburetor is installed on IZH Planet 5, Ural, Minsk, Buran snowmobile, etc. This is one of the most popular types of devices presented. Its adjustment is not very difficult. In case of uneven engine operation or incorrect proportions when preparing the fuel mixture, you must perform the procedure yourself.
The technology for carburetors of various brands of motorcycles and scooters is produced according to an identical scheme. To ensure stable, long-term operation of the motor, you will need to read the step-by-step instructions for this process.
Alternative carburetor for motorcycles IZH Jupiter 4, 5
Today, the market offers many options for spare parts for motorcycles, including carburetors. If the old carburetor has become unusable, and repair kits no longer help, you can choose an alternative modern option. The main thing is to observe such parameters as the diameter of the diffuser and the throughput of the jets (main and idle).
The Keihin PZ30 is well suited for installation on IZH Jupiter motorcycles. To attach the pants to the carburetor flange, you will need to make an adapter. This carburetor was originally designed for a 250 cm3 engine, so the main jet must be replaced. The K-65D has a GTJ throughput of 260 ml/min, the diameter of the hole of such a nozzle is approximately 1.18 mm. If you can’t find the jets from the kit or can’t find them, you can try drilling out the standard ones with a small drill to the required diameter.
This carburetor has one “trick” - an accelerator pump. At high engine speeds, it injects additional fuel into the diffuser to combat the lean mixture that is typical of slide carburetors when the throttle is opened sharply. For its operation, you will need a special double cable, which works in tandem with the throttle cable.
Keihin PZ30 carburetor
This is what the Keihin PZ30 looks like on the IZH Jupiter 5 motorcycle
You can also install Japanese Mikuni vm 28.30 carburetors on the Jupiter. These carburetors are not cheap because they are rare. It is very difficult to find a whole, unworn Mikuni (not to mention repair kits for them), because... The Japanese abandoned them a long time ago and are now producing motorcycles with electronic injection.
Today there are many Chinese copies of K-62, K-65 and even Jikov carburetors on the market. With some modification of such carburetors (replacing the internals with Soviet components, drilling the missing holes), they perform their functions quite well.
Design
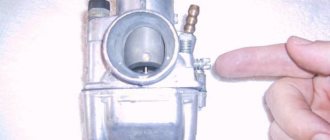
The K-65 carburetor of the Ural, IZH, Minsk, etc. motorcycles is characterized by a certain design. The system maintains a constant level of fuel in the combustion chamber. The fuel mixture reaches the fuel valve through the fitting. The shut-off valve has an elastic washer. The valve is connected to plastic floats. They are connected to each other. The floats can rotate.
When the fuel level rises, the excess will be drained through the drain hole. When heated, pressure may increase. To reset its excess, the design provides an unbalancing channel.
The metering device includes a sprayer, a fuel nozzle, a throttle needle, and an air channel. The first of these components is secured with a washer. It is located under the fuel supply pipe. This hose is one of the main components of the idle air system. It also includes an air channel, fuel mixture adjustment screws, and a transition hole.
Assembly features of the K65k carburetor
The K65k carburetor was produced back in the Soviet period. This can be judged by the cast body and internal parts.
Assembly of the structure consists of the following steps:
- The spray chamber is installed. It can only be fixed in a certain position. The body has a square-shaped protrusion. The nozzle groove should fit into the protruding part of the body. Now take the atomizer itself, the diameter of which is 2.63 mm. Looks around. It is purged with air and installed in the chamber.
- Then install the main fuel jet with a flow rate of 220 ml/min, an idle tube that passes 50 ml/min, and a lock washer, which has the same dimensions for all modifications of carburetors in this series.
- A fuel system is installed to control the fuel level. It consists of a needle and a two-chamber float. If all parts are without flaws, the carburetor is turned over and placed on the plane of the table. The needle is inserted into the bronze part of the float, which is fixed on the axis.
- The cover located at the bottom is being installed. A gasket is placed, and the entire structure is securely fixed with bolts. Tightening proceeds evenly to prevent the gasket from skewing.
- The starting device is installed and the mixture quality screw is screwed in.
- The top cover is assembled. A screw is screwed in to regulate the amount of mixture. A guide for the cable is also installed.
- The throttle valve together with the top cover is fixed to the K65k carburetor and tightened with bolts.
Despite the complex structure of this type of unit, knowing its technical characteristics, it is realistic to carry out the adjustment with your own hands. The main thing is to adjust the location of the float so that there is no overflow of fuel. After this, adjust the quantity and quality of fuel supply. Then, after starting and warming up, check the stability of the engine.
System operation
When adjusting the K-65 carburetor on Minsk, Ural, etc., it is necessary to understand the operating principle of the entire system. Its design has been discussed in detail above. The fuel is in the tank. From the float chamber it enters the sprayer through the main jet. This process occurs under the influence of rarefaction.
The fuel rises along the gap between the throttle needle and the nozzle. At the outlet, gasoline is mixed with air, which enters through the channel of the atomizer body. Engine operation is controlled by the throttle needle. It can be installed in one of the five positions provided.
At idle, the fuel mixture exits only through a special hole. As the speed increases, the vacuum increases. In the area of the next hole, the fuel mixture also exits. As the engine speed increases, the flow of fuel into the system increases.
What kind of carburetor is installed on Ant
The first Ant scooters were equipped with a cast-iron engine, as well as a K62G carburetor. This unit had a diffuser with a diameter of 26 mm and a mixing chamber of 28 mm.
After some time, the engine was modernized. As a result, a petal valve appeared at the inlet, the cylinders changed shape, as did the cooling fins. Additionally, the carburetor itself was replaced. Now the K65G model was installed on the scooter. Although it is worth noting that structurally they are in many ways similar to the previous unit.
There have been no changes in terms of the diameter of the mixing chamber or diffuser. They had similar dimensional characteristics.
But the throughput of the main fuel jet (GFJ) was changed. Now it has become 130 ml per minute versus 125 ml per minute with the old carburetor. The diameters of the nozzles were also changed from 2.6 to 2.63 mm, as well as the diameter of the needle and the transition hole.
The corrector has changed, but only slightly. In the K62G, in order to further enrich the fuel, a needle was used, which was immersed in the well of the float chamber. With a new carburetor, fuel is taken directly from the chamber using a fuel manifold jet.
General recommendations
When considering how to set up a K-65 carburetor, it is necessary to take into account a number of general recommendations. They must be performed before the process. All setup work must be carried out in accordance with the manufacturer's instructions. For owners of the presented vehicles who do not have experience in making adjustments, it is recommended that before starting work they carefully study all the requirements of the device creators.
The carburetor must be in good working order. If there is any abnormality in its system operation, it is necessary to carry out system maintenance.
If necessary, the system will need to be thoroughly cleaned. All consumables are replaced with new seals. The air filter must be clean. If necessary, it must be washed. In some cases it will need to be completely replaced.
When adjusting the carburetor, the engine must be warm. To do this, you can drive several kilometers along the highway. Only after this can you begin the procedure described below.
How to adjust the K-65 carburetor?
One of the important systems of motorcycles is the carburetor. He is responsible for the correct operation of the vehicle, its stability and durability. The functionality of a motorcycle or scooter largely depends on the design features of the carburetor. Therefore, the owners of the presented vehicles evaluate the design features and operating principle of this device.
Often, when creating domestic brands of motorcycles, mopeds and even snowmobiles, the manufacturer installs a K-65 carburetor in the system. You can adjust it yourself if necessary. The setting will allow the engine to start simply and easily, its operation will be stable and smooth. The fuel mixture will consist of the correct proportion of components.
Setup procedure
Setting up the K-65 carburetor in various vehicles is done using a certain technology. Stable, smooth operation of the engine, fuel consumption, and engine durability depend on the correct execution of all stages of the process. Therefore, this process must be approached responsibly.
First of all, the correct proportion of the fuel mixture is adjusted. To do this, first measure the gasoline level in the float chamber. If there are abnormalities in this system, the mixture may be too lean or too rich. If the ratio of air to gasoline is not maintained correctly, problems will develop in many systems over time.
Next, you need to configure other carburetor devices. The main dosing system is being adjusted. The driver must pay attention to the trigger mechanism. The engine speed is adjusted at idle speed. By consistently performing these actions, you can achieve stable, high-quality operation of all motorcycle systems.
Adjusting the quality of the mixture in operation
Adjustment of the K 65 carburetor under operating conditions is carried out by moving the metering needle relative to the lock. This should be done in a certain order.
The dosing needle is set to the middle position. To lean the mixture, the lock moves upward. At the same time, the gap between the dispenser cone and the wall of the atomizer becomes smaller.
Moving the lock down will result in a richer fuel mixture.
The color of the spark plug electrode insulation will indicate the need for adjustment. You should pay attention to it after 30 km. Under normal operating conditions, its whitish color indicates a poor mixture. A dark brown insulator with traces of soot indicates the need to lean the mixture.
Fuel level
Adjusting the K-65 carburetor begins with measuring the amount of gasoline in the tank of the float section. To do this, you will need to prepare a certain list of tools. Almost every home craftsman has them. The tool will be required during the process of dismantling the carburetor.
When the device is removed from the slots, you will need to remove the cover from it. It covers the float chamber. Next you need to take a ruler. The float has a special tongue. It needs to be unbent and bent to make adjustments. Due to this, the fuel level in the chamber will change.
You will need to place a ruler on the connector plane. Next, the tongue must be adjusted correctly. The strip on the float should be at 13 mm. The deviation is ±1.5 mm. The floats themselves must be level. The adjustment must be made very precisely. The operation of the carburetor depends on this.
Design of carburetors model K65zh
As already mentioned, the carburetor itself consists of four systems: a float chamber, a power stroke system, an idle system and a starting system. However, the design of some systems will be considered in more detail here.
Setting up on the Ural
Adjusting the K-65 carburetor on the Ural motorcycle has several distinctive features. The entire unit does not need to be removed from the vehicle. Dismantling this type of vehicle can be very difficult. Therefore, the procedure is carried out directly on the motorcycle.
To adjust the gasoline level in the float chamber, you will need to find a similar element from another similar motorcycle. The vehicle is firmly installed on the stand. The gas valve gradually opens. Fuel flows into the carburetor. The hose is disconnected and the gas tap is closed.
The bottom cover filled with fuel is removed. By comparing the fuel level, a conclusion is made about the need for adjustment. The tongue can be bent.
Carburetor synchronization
After tuning, the K 65 carburetor (Ural) must be synchronized. This can be conveniently done using a tachometer. In the absence of such equipment, synchronization can be performed using the speedometer.
To do this, place the motorcycle on a stand and start the engine. 4th gear is set. Remove the cap from one of the spark plugs and adjust the speedometer reading to 50 km/h. The gas handle is fixed with a bolt.
One cylinder turns on and the other turns off. The length of the cables is adjusted using fittings. At the same time, they achieve the same speedometer reading.
When removed, the spark plug cap must be grounded and shorted to the ground of the motorcycle. In this way you can adjust the Ural carburetor.
Candles
The K-65 carburetor for IZH, Ural and other brands of motorcycles must have the corresponding appearance of the spark plugs. A visual inspection is sufficient. If a new carburetor is installed, you will need to drive a motorcycle or scooter on the highway for about 30 km. Engine speed should be high or medium.
After this, you can put the vehicle in the garage and begin inspecting the spark plugs. Soot should not appear on their surface. If this happens, there is not enough air in the mixture. Such fuel is called rich. The spark plugs will need to be cleaned before tuning.
In some cases, the surface of the candles turns white. This picture is observed when the system prepares a mixture that is too lean. There is too much air in it. The normal color of candles should remain in the range of yellow to reddish-orange. In this case, no configuration is required.
Which carburetor is suitable for the Ant instead of the original one?
Now there are no particular difficulties in finding analogues. All thanks to the arrival of a large number of spare parts and consumables from China on the Russian market.
If we talk about which analog carburetors are now most often installed on the Ant, then the scooter is mainly equipped with PZ 26 and PZ 27 devices. They are intended for Chinese engines with a volume of 110 to 150 cm3.
Before you replace the original factory system with them, be sure to take into account a few points related to installing the PZ 26 and PZ 27 on the Ant:
- The jets will have to be replaced. This applies to the idle and main jets.
- You also need to make a flange to secure the carburetor to the engine cylinder. The fact is that at the bottom of the carburetor there is a recess along with a drain hose. This notch will most likely be in contact with the clutch release lever.
- To install an analog Chinese carburetor, it is warmed up and bent to the side, taking into account the squeeze.
- If this installation option is not suitable, you will have to make a longer pipe. In this case, the lever will be able to rotate freely without touching the carburetor. But you will additionally need to select a suitable air filter pipe.
- A bonus of the PZ 27 carburetor is an accelerator pump. Although in the case of the Ant scooter it doesn’t make much sense. Therefore, the issue of installing an additional cable can be eliminated.
On the Internet you can find positive reviews about 2 more alternative carburetors. These are PZ 30 and Jikov, which is installed on Java 638 motorcycles. But in reality, these are far from the best solutions for the Ant scooter.
This is due to the fact that the carburetors considered have a large diffuser diameter. And these are suitable only for engines that are forced and have high operating speeds.
If you install a PZ 30 or Jikov instead of a factory carburetor from an Ant scooter, you can hardly count on stable idle speed. Even the most careful adjustment and selection of jets will not help here.
So it turns out that the best option for replacing a failed carburetor is an original spare part. That is, the new K65G. If this option cannot be implemented for one reason or another, then choose between PZ 26 and PZ 27. But this is not the optimal option, since certain modifications and alterations are required.
Throttle needle
When studying the technology of how to adjust the K-65 carburetor, you need to pay attention to the shut-off valve. This is the throttle needle. If it does not cover the channel hermetically, the level of gasoline in the fuel mixture may be higher than the required level.
The throttle needle has several channels on its surface. The latch moves along them. In this case, it is possible to adjust the composition of the fuel mixture within small limits. The gasoline consumption of motor vehicles depends on this indicator. If you need to add more air to the mixture, you need to lower the needle. And vice versa.
When dismantling the float chamber, it is necessary to monitor the position of the throttle needle. If you move it carelessly, it may fall out. There is no way to lose this structural element. Therefore, the procedure is carried out very carefully. If the rubber elements of the throttle system are worn out, they must be replaced. The needle should move easily along the saddle.
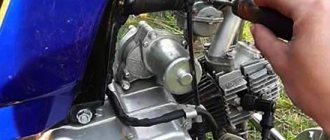
Carburetor - removal and disassembly
It is possible to partially disassemble the carburetor (removing and washing the throttle, repairing the drive, etc.) without removing it from the engine.
1. Place the motorcycle on the center stand.
2. Remove the protective covers.
3. Shutting off the fuel supply, disconnect the fuel hose from the carburetor.
4. Use a screwdriver to loosen the clamp and disconnect the rubber air filter pipe from the carburetor.
5. 10 mm
Unscrew the mixture corrector nut.
6. Remove the corrector plunger assembly.
7. Disassemble the corrector plunger.
8. Pulling the cable sheath upward, unscrew the throttle valve cover.
9. Remove the throttle valve assembly. Cover the hole with a clean cloth.
10. To replace the cable, you need to compress the damper return spring, and, pushing the cable down, remove its end from the cut in the damper needle nut.
1. 12 mm
unscrew the two bolts securing the carburetor adapter pipe to the cylinder. We remove the carburetor with the pipe, being careful not to tear the paronite gasket.
2. Hold the bolts with a 12mm
, unscrew the nuts securing the adapter pipe
with a 13 mm
. We remove the pipe.
1. Using a screwdriver, unscrew the two screws securing the carburetor cover.
2. Remove the float chamber. There is a paper gasket underneath, be careful not to tear it.
3. Using a thin drift, carefully knock out the float axis.
4. Use thin pliers to remove the axle.
5. Remove the float along with the locking needle.
8 mm socket wrench
We turn out the seat of the shut-off valve.
7. Using a screwdriver, unscrew the jets of the main dosing system and the idle system.
8. 6 mm
turn out the additional jet.
9. 12 mm
We turn out the fuel-emulsion nozzle of the main dosing system.
10. Turn out the “quantity” and “quality” screws.
13. We wash all carburetor parts, except gaskets and rubber parts, in acetone or solvent for nitro paints. We clean all channels and jets with copper wire or toothpicks soaked in solvent, and blow them with compressed air from the compressor.
It is unacceptable to clean carburetor jets with steel wire, needles or any other tool.
We assemble the carburetor in the reverse order, while lubricating the rubber o-rings, threads and gaskets with engine oil or BSK brake fluid containing castor oil.
We tighten the “quantity” and “quality” screws until they stop. Then we unscrew the “quality” screw one turn (preset), and unscrew the “quantity” screw five to seven turns.
We check the operation of the shut-off valve. When the carburetor is oriented with the throttle channel down, the air supplied by the mouth into the inlet fitting should not pass through the valve.
Adjusting the position of the needle of the main dosing system is carried out by rearranging the lock washer in the grooves of the needle:
- washer to the left - enrichment of the mixture; - washer to the right - lean mixture.
Idling
The K-65 carburetor is adjusted at idle. The engine must be well warmed up. At idle, the engine should run stably. Use a screwdriver to adjust the horizontal screw. To do this, turn it in the appropriate direction until speed stability is established.
After this, you can tighten the quality screw. A screwdriver is also used for this. When rotating the screw, you must listen to the operation of the motor. The number of revolutions at the maximum level should be stable.
Next, by opening and closing the throttle, the correct idle speed adjustment is checked. If the gas is applied suddenly, the engine will stall if the adjustment was carried out incorrectly. If this happens, the mixture will need to be enriched. At the moment of abrupt closure of the damper, stopping the engine indicates a lack of air in the mixture. The screw is loosened slightly.
Dosage system
The K-65 carburetor is adjusted especially carefully in the area of the metering needle. Its position must be carefully adjusted. The engine must be well warmed up. If it has already cooled down, you need to ride the motorcycle for some time on the highway.
On a straight section of the route, you can evaluate the engine's performance. If turning the throttle does not have sufficient effect, you will need to raise the needle. This will lead to an increase in gasoline in the fuel mixture. If after the next trip carbon deposits appear on the spark plugs, you will need to lower the throttle needle one notch.
This approach will ensure stable operation of the engine at medium speeds. This is the most frequently used mode when operating motorcycles. The maximum speed allows you to adjust the measurement of the jet cross-section. When the throttle is turned all the way, it will ensure the operation of the system.
Having considered what the K-65 carburetor is, as well as its structure, you can adjust it in accordance with all the manufacturer’s requirements.
Basic types of carburetor settings
It is no secret to any car owner that the carburetor is designed to prepare a combustible mixture for the engine, which it produces by mixing a certain portion of air with fuel. But its functions are not limited to this. It must also ensure that the motorcycle engine operates in different modes, which means preparing a fuel mixture with different proportions of its components. The implementation of this task is entrusted to various systems and components of the device. These include:
- Main dosing system;
- Idle system;
- Starting device;
- System for maintaining a given fuel level.
We will look at setting up these elements. The best place to start is by checking the fuel level in the float chamber.
. To do this you need:
- remove the carburetor;
- remove the float chamber cover;
- Having turned the carburetor over so that the floats are on top, measure the distance from the edge of the body to the top edge of the floats. It should be 26 mm ± 0.5 mm; in case of deviation, it is eliminated by bending the tongue;
- check the parallelism of the floats; adjust by bending the brackets.
Now let's move on to the main dosing system.
. First, check the gap between the throttle valve and the bottom of the air duct. It should be 2 mm. If the gap does not match, then adjust it using the throttle valve cable adjusting bolt, which is located on the throttle well cover tube.
The next step in adjusting the K-68 carburetor is to check the position of the throttle needle
. It has 5 grooves into which the needle lock can be inserted. The normal position of the lock is the middle groove. Moving the lock downwards makes the mixture richer, upwards - on the contrary, it becomes leaner. We check by the color of the central electrode of the spark plug:
- if the electrode is black or dark brown, this means that the combustible mixture burning in the cylinder block is highly enriched - move the lock down;
- if the color is light gray, it is depleted - raise the lock;
- The light brown color of the electrode indicates the normal position of the needle.
- We tighten the mixture quality screw until it stops, and then unscrew it one to one and a half turns;
- By rotating the throttle lift screw, we achieve a reduction in speed to the minimum stable;
- Using the quality screw, we bring the engine to maximum speed;
- Again, use the throttle lift screw to reduce the speed to minimum. This operation must be carried out several times until you achieve stable engine operation at the leanest possible mixture;
- Turn the quality screw ½ turn.
Finally, the K-68 carburetor has been adjusted. If everything is done correctly, then there is a full guarantee that with the remaining systems in working order and debugged, the motorcycle will start confidently and operate reliably in any mode, delivering true pleasure to its owner.