Electronic ignition for IZH or Java motorcycle. | electronic ignition
Motorcycle engines have either constant or variable ignition timing . With constant ignition timing , the beginning of the breaker break, and, consequently, the appearance of a spark, remains unchanged in all engine operating modes. With variable ignition timing, the moment of spark appearance is changed manually or automatically - with a centrifugal regulator, which, as the speed increases, increases the ignition timing from 10 to 30°. (see continuation)
In domestically produced motorcycles, the ignition timing according to factory data:
For two-cylinder engines M-61 and K-750, the breaker cam is a continuation of the camshaft, so the ignition timing is set at the factory. These machines have the same hammer break value for the right and left cylinders.
- - hole for decompressor;
- - rod for determining c. m.t.;
- — fixed contact of the breaker;
- — breaker lever;
- - fist.
The procedure for adjusting the ignition of a Java 350
Remove the right engine crankcase cover. Remove the spark plug and replace it with a device for determining the position of the piston. Turning the crankshaft with a wrench S=10 mm, placed on the head of the cam mounting bolt, place the piston in the idle position.
Set a gap between the contacts equal to 0.3 - 0.4 mm, to do this, loosen the screw securing the anvil and turn it around its axis in the desired direction. After tightening the screw, check the gap - a 0.3 mm thick feeler gauge should go through easily , but a 0.4 mm thick feeler gauge should not go through .
Connect the test lamp with one wire to the terminal clamp of the hammer, and the other to any ground point of the motorcycle. Turn on the ignition , and the lamp connected in parallel to the breaker contacts should light up.
Turning the crankshaft counterclockwise, lower the piston by the amount of ignition timing specified in the instructions. Count down according to the device. At the moment when the piston takes the desired position, the lamp should go out, signaling the closure of the contacts. If the contacts close earlier (the lamp goes out), it means the ignition is later , and later the ignition is early. In both cases, slightly loosen the screws securing the breaker disk and lightly hit the bent stop 12 (using a screwdriver) and turn it clockwise if the ignition is early, and counterclockwise if it is late. Tighten the base mounting screws and check the ignition installation. To do this, lower the piston 5 - 7 mm (the lamp does not light - the contacts are closed) and slowly raise it again. The lamp should light up (the contacts will open) at the moment when the piston does not reach TDC. by the amount of ignition timing (see TABLE ABOVE). Turn the crankshaft several times using the kick starter, and then check the ignition timing again when the piston moves to the top dead center. It should be remembered that when performing this work, you cannot keep the ignition on for a long time, so as not to damage the ignition coil.
On the Java-350 the ignition timing is adjusted in a similar way, first for the right cylinder - accordingly, the upper breaker, then for the left - the lower breaker. To do this, loosen the fastenings of the base (disk), and then for the left cylinder - the fastenings of the sector. To ensure synchronous engine operation, the ignition in both cylinders should be set to the same.
It sometimes happens that the required ignition timing of the JAVA 350 cannot be set due to the insufficient length of the groove limiting the rotation of the base. This indicates excessive wear on the breaker hammer stop or chipping. In this case, you need to replace the stop or install a new hammer.
During operation, the heel of the breaker hammer wears out and its height decreases. The anvil and hammer with contacts less than 0.5 mm thick are replaced with new ones. The wear occurs especially intensively after installing a new hammer. Changing the height of the heel of the hammer causes a change in the ignition timing.
Wear reduces the gap between the breaker contacts and the initial advance , and installing a new unused hammer to replace the failed one increases the gap between the breaker contacts and the ignition timing . Therefore, after replacing the breaker parts, it is necessary to adjust the ignition timing.
Setting the ignition on Java 634 6 volts
First, to fine-tune the ignition, you will have to find a micrometer. Dial-type indicator, to put it correctly
How to Set Electronic Ignition in Java
Topic: How to install the ignition! (Read 142,158 times). Author. Adjusting the ignition timing of the Java-350 motorcycle must be done in the following order. Adjusting the ignition timing on a two-cylinder engine is more difficult.
That's why we describe it for the JAVA-350 motorcycle engine. Let's start by adjusting the correct cylinder. JAVA 638 12V Ignition operation on one switch. How to install BSZ Jawa 638 with ignition. Duration: 3:03 BSZ on Java 350, 6 volts (exchange of experience). Duration: 10:09.
Java 638 ignition control is very important for proper engine operation. You can do this yourself at home. This is done before installing the ignition on the Java 638 to accurately measure the distance between the contacts. 1) You set the gap between the ignition cams = 0.4 mm (on both cams).
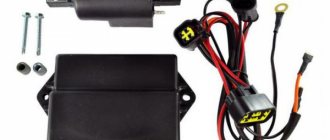
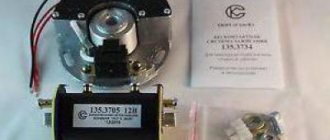
6) Insert a 6 or 12 volt light bulb into the cam of this cylinder (depending on whether the Java is 6 or 12 volt). We recommend replacing contact ignition with non-contact ignition (Fig. 1). Today I started the long-awaited rework of Java 634. I immediately came across a couple of frying pans, so the question arose: which engine is better to take and install diode ignition with BSZ on Java.
How to install the ignition on a motorcycle Minsk | Ural, ignition contact 6 volts. Ignition from Minsk to Java 634. Install the ignition on Jawa350 / 638 in two ways.
If all points follow exactly as indicated, the ignition will be set very accurately. Gay. I have a Java 350 634 1977 1.
Comments
Yuri Kolotov:
Hello, how did you achieve charging 634 at idle? I have at least 1500 rpm
dimasikz:
When the key is inserted, the dynamo light should light up? java634
Edik Pivovarov:
I installed BSZ on Java 634 6v and it worked like clockwork for a week and then the spark became weak, what should I do?
Nikas3715:
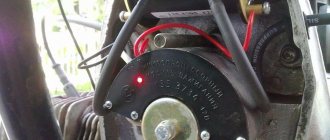
Today I installed the original generator on my 634, it works even when it doesn’t charge at idle. I can make a video. switch 0529.
Mikhail Suchkov:
on Jupiter 3 do the same thing
OGSStudio:
will be as long as the battery holds its charge, as soon as it gets low it will stop working, so it’s better to charge
Miroslav Pavlyuchik:
and if there is no idle, will the BSZ work?
Dima Koryagin:
Ivan, to make it work, buy a VTN switch
OGSStudio:
watch the second video on installing “BSZ 2” on our channel, everything is already chewed down to the smallest detail. or go to our website on the forum in the topic “BSZ for 634 6 volts”, re-read the entire topic from the very beginning and you will find the problem. I’ll say right away that the problem is in the switch and battery, you can find out more from the above
Ivan Shavanov:
Today I posted everything as shown in the video (Java 350 633 6v) nothing works, I connect 12 volts, there is a spark, but from 6 there is no spark! Is this all bullshit or can you tell me what the problem is?
OGSStudio:
all this is discussed on our MOTO MASTER website, the link is in the description, and in the video itself there is a sign “to find out how to install. " etc. Just click on that inscription and a video on how to install all this will open
Gleb Rudakov:
Can you describe in detail how you did it and what you hooked up where (wiring). What kind of generator is there, 35w or 45w?
OGSStudio:
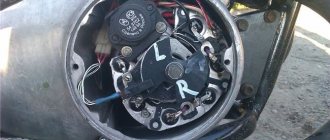
the modulator must be made as shown by me in the video on installing the BSZ, that is, the butterfly must be made according to the drawing indicated in the video
visn. Alex:
is the modeler homemade??
OGSStudio:
yes it will work, the main thing is that the charging is constant at all speeds, 6 volts is enough for such an ignition
visn. Alex:
Will this ignition work on Jupiter 3??
OGSStudio:
heh, if you have it working like that (not on the battery but on the generator) then it will be
How to set up the ignition on a Java 350 6 volt motorcycle
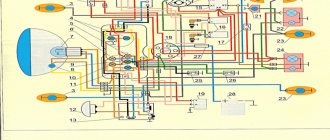
The Czechoslovak motorcycle has a number of advantages compared to other Soviet units, but is almost the same in terms of electrical equipment. The JAVA 638 wiring diagram is quite simple. Even an inexperienced motorist can handle repairs and maintenance.
Adjusting the ignition of the JAVA 638 is very important for the correct operation of the engine. You can do it yourself at home. To do this you need:
- Remove the spark plugs from both cylinders and remove the sump cover.
- After removing the spark plugs, install the indicator in the hole of the right cylinder.
- Now you need to fix the piston at top dead center. To do this, turn the crankshaft using a key.
- Then the cylinder contact spacing is adjusted. They should only touch slightly (distance approximately 0.35 millimeters ).
- A light bulb is connected to the contact on which the advance is set. This is done before setting up the ignition on the JAVE 638, to accurately measure the distances between the contacts.
- Zero is measured on the indicator, after which the position is fixed.
- The advance is different for each gasoline. So, when using the 92nd and 95th, the adjustment is 2.7-3.1 millimeters, for the 80th – 2.9-3.3 millimeters.
- If the installation is correct, the light goes out. Otherwise, adjustment will be carried out by a movable disk.
- An identical procedure is carried out on the other cylinder.
- When the adjustment is completed, crank the crankshaft several times using the kickstarter. Then the control ignition advance is performed. This completes the YAVA 638 ignition installation.
It is important to understand that if the ignition is incorrectly measured, the engine's operating life will be reduced.
Extraordinary JAWA tuning in action!
Here, too, I simply have no words. On the one hand, most of the motorcycle is kept original - the lower part. The pipes are shiny, no oil is leaking from them, good tires are installed, the engine is clean
. Most likely, technically everything is fine with this motorcycle, but why “decorate” it like that?
I remember as a child I was perplexed when I saw motorcycles passing by, whose seats were covered with some kind of skin, carpet, fur coat or something like that. Is this really convenient?
What's wrong with standard casing? Even if it was in short supply, is it really impossible to use another, more suitable material?
Well, I’m generally silent about the fairing. The solution with lighting devices is strange, in my opinion. At the very least, very extraordinary. And yet it is not clear why he was wrapped in a rag. Probably to match the seat.
History of appearance and description of the motorcycle
The motorcycle's history dates back to 1929, when Frantisek Janicek acquired a license for the production of two-wheeled vehicles from the Wanderer company. The first motorcycles were not very popular due to their high cost, complexity of design and operation.
During the occupation of Czechoslovakia, the factory stopped producing equipment altogether and was completely transferred to the needs of the German military department. The jawa 638, familiar in the Soviet Union, began production in 1984 and had a modification of the jawa 638 5 00. This model replaced the previous machine with the index 350-633. Here the driving and performance characteristics of the motorcycle have been thoroughly improved.
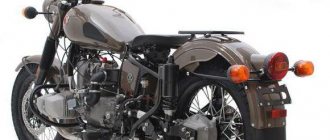
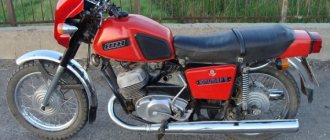
The appearance of the motorcycle, although not very outstanding, is nevertheless eye-catching. Among its other brethren, it is distinguished by elements characteristic only of Java: a large headlight and turn signals protruding from it, a harmoniously located instrument panel above the headlight, a large, neatly shaped tank and a double, straight seat.
There are compartments under the seat and on both sides of the tank for storing tools or belongings. The maximum speed that the Java 350 638 motorcycle can reach according to its passport is 130 km/h, but many enthusiasts tuning the Java 638 achieved much higher figures.
The Java 638 engine is air-cooled, and this fact also left its mark on the appearance of the motorcycle. The engine is completely open, with clearly visible structural elements. The engine also operates at higher speeds than all Soviet motorcycles produced at that time.
Features of electrical equipment
In many respects, the components and assemblies of the Czech motorcycle were similar to domestic products, but at the same time they differed:
- high quality;
- amazing wear resistance;
- maintainability and long service life.
Advice: when servicing a motorcycle with their own hands, owners often face a shortage of original spare parts. If you need to use non-original electrical appliances, you should carefully select their technical parameters.
In those years, Java motorcycles were in short supply, so they were often sold second-hand. And at the same time, the price remained quite high. New owners could immediately get behind the wheel and operate the equipment without any restrictions, because:
- wiring to Java did not require maintenance;
- the engine had a significant service life;
- shock absorbers and suspension had a fairly high safety margin;
- consumables were required no more often than provided for by the technical regulations.
However, the manufacturer constantly modernized its motorcycle models, and each time made changes to components and assemblies. In particular, in different years the following were supplied to the territory of the USSR:
- model 559-07 was produced since 1969 under the name “JAWA 250” and was a variant with a 250 cc engine producing 12 hp. with 6V equipment;
- model 634 (01-04) was produced from 1973 under the name “JAWA 350” and represented a variant with an increase to 350 cc. cm 16 hp motor, designed to work with 6V equipment;
- model 634 (01-08) was produced since 1977 under the name “JAWA 350”, but already with 12-volt equipment and on 16-inch wheels;
- Model 638 has been produced since 1986 under the name "JAWA 350". It had only visual differences in the shape of the frame and was equipped with 18-inch wheels (see wiring diagram for Java 638);
- Model 640 was the last modification that was officially supplied to our country. It was also designed to operate 12-volt equipment and had differences in design and suspension.
Electronic ignition for IZH or Java motorcycle. | electronic ignition
Motorcycle engines have constant or variable ignition timing. With constant ignition timing, the beginning of the breaker break, and, consequently, the appearance of a spark, remains unchanged in all engine operating modes. With variable ignition timing, the moment of spark appearance is changed manually or automatically - with a centrifugal regulator, which, as the speed increases, increases the ignition timing from 10 to 30°. (see continuation)
In domestically produced motorcycles, the ignition timing is set according to factory data:
For two-cylinder engines M-61 and K-750, the breaker cam is a continuation of the camshaft, so the ignition timing is set at the factory. These machines have the same hammer break value for the right and left cylinders.
- - hole for decompressor;
- - rod for determining c. m.t.;
- — fixed contact of the breaker;
- — breaker lever;
- - fist.
The procedure for adjusting the ignition of a Java 350
Remove the right engine crankcase cover. Remove the spark plug and replace it with a device for determining the position of the piston. Turning the crankshaft with a wrench S=10 mm, placed on the head of the cam mounting bolt, place the piston in the idle position.
Set a gap between the contacts equal to 0.3 - 0.4 mm, to do this, loosen the screw securing the anvil and turn it around its axis in the desired direction. After tightening the screw, check the gap - a 0.3 mm thick feeler gauge should go through easily, but a 0.4 mm thick feeler gauge should not go through.
Connect the test lamp with one wire to the terminal clamp of the hammer, and the other to any ground point of the motorcycle. Turn on the ignition, and the lamp connected in parallel to the breaker contacts should light up.
By turning the crankshaft counterclockwise, lower the piston by the amount of ignition timing specified in the instructions. Count down according to the device. At the moment when the piston takes the desired position, the lamp should go out, signaling the closure of the contacts. If the contacts close earlier (the lamp goes out), it means the ignition is later, and later the ignition is early. In both cases, slightly loosen the screws securing the breaker disk and lightly hit the bent stop 12 (using a screwdriver) and turn it clockwise if the ignition is early, and counterclockwise if it is late. Tighten the base mounting screws and check the ignition installation. To do this, lower the piston 5 - 7 mm (the lamp does not light - the contacts are closed) and slowly raise it again. The lamp should light up (the contacts will open) at the moment when the piston does not reach TDC. by the amount of ignition timing (see TABLE ABOVE). Turn the crankshaft several times using the kick starter, and then check the ignition timing again when the piston moves to the top dead center. It should be remembered that when performing this work, you cannot keep the ignition on for a long time, so as not to damage the ignition coil.
On the Java-350 motorcycle, the ignition timing is adjusted in a similar way, first for the right cylinder - accordingly, the upper breaker, then for the left - the lower breaker. To do this, loosen the fastenings of the base (disk), and then for the left cylinder - the fastenings of the sector. To ensure synchronous engine operation, the ignition timing in both cylinders should be set to the same.
It sometimes happens that the required ignition timing of the JAVA 350 cannot be set due to the insufficient length of the groove limiting the rotation of the base. This indicates excessive wear on the breaker hammer stop or chipping. In this case, you need to replace the stop or install a new hammer.
During operation, the heel of the breaker hammer wears out and its height decreases. The anvil and hammer with contacts less than 0.5 mm thick are replaced with new ones. The wear occurs especially intensively after installing a new hammer. Changing the height of the heel of the hammer causes a change in the ignition timing.
Wear reduces the gap between the breaker contacts and the initial advance value, and installing a new unused hammer to replace the failed one increases the gap between the breaker contacts and the ignition timing. Therefore, after replacing the breaker parts, it is necessary to adjust the ignition timing.
Advantages of BSZ over KSZ
While writing the article, I sat and thought and thought, and still did not come to the conclusion of what exactly is the main advantage of BSZ; for me, all the advantages listed below are the main ones and are equal to each other.
— High stability of engine operation (synchronous operation of the cylinders, strictly in turn)
— Frisky review of the throttle
— Better engine thrust (which allows you to easily use the largest drive stars without difficult acceleration!)
— Candles “live” four times longer than on KSZ (I’ll write about this separately below)
— Less well-known “snot” from Java mufflers (since fuel and oil are burned much better)