To improve their motorcycle, many drivers install an electronic ignition system on it. Which in turn has a positive effect on the operation of the productive element. Its dynamics are improved, the unit operates much smoother without interruptions. At idle speed, changes for the better will be immediately visible. Also, the converter element will respond better after applying gas to the handle. And starting the engine will not be difficult even with a weak battery charge. That is why most drivers are so willing to purchase electronic ignition for IZ Jupiter 5.
Installation process
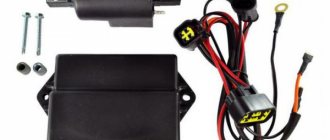
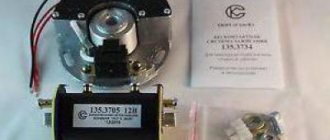
It won’t take much time to replace the ignition, maybe a day. The necessary parts can be removed from the Oka vehicle. Electronic ignition is a set of wires, a generator, a two-terminal ignition coil, a Hall sensor and a switch.
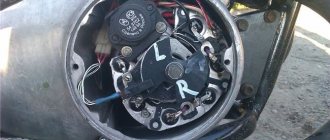
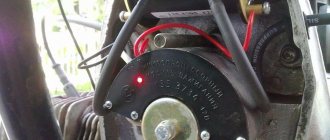
There is no need to make any changes directly to the generator itself. You just need to remove the cams and, where there is space, attach a Hall sensor. It is very important that the modulator plate passes through the slots of the sensor itself. Thanks to the modulator plate, smooth ignition operation is ensured.
Unstable sparking is often caused by an incorrect design of the so-called magnetic flux contactor. In this case, you need to carefully study its placement in relation to the sensor. Overlapping of the magnetic circuit or magnet is unacceptable in the open state of the contactor, while the closed state of the contactor implies complete overlap of these two elements. If this is not the case, then most likely the sensor will emit weak signals to the switch. As a result, unstable engine operation will be observed.
To make a modulator you will need a steel disk with a cutout of 0.8-1 mm. It is important to maintain a ratio of closed to open periods of 2:1. The angle of the cutout in the modulator depends on the type of main power unit. If the main power unit is 1-cylinder, then the angle is 120 degrees. On 2-cylinder engines, an angle of 60 degrees is maintained. The width of the cutout starts from 11 mm and more, but not less. You should also know: a spark occurs when the modulator “opens” the sensor. This is very important when setting the ignition timing.
Before installing electronic ignition on the IZH Jupiter 5 motorcycle, check that there are no large plays on the generator shaft. If they are, you should replace the generator bearings in order to get rid of the “bumpiness”.
Final actions
You should put rubber caps on the armor wires, and insert the latter into the candlesticks or coil above. If you skip this step, the motorcycle will stall when riding in rainy weather, as moisture will get into the battery.
By inserting spark plugs into the tip, it will be possible to maintain excellent contact between the battery and the volume of the vehicle. Now you will need a pre-purchased set of wires. The switch, coil and hall sensor are connected by wiring. She needs to be isolated. Of the entire mass, only a common plus is required.
How to set the ignition?
When setting up the ignition, problems often arise with setting the signal advance angle. A voltmeter will help fix this problem. Looking ahead, it should be said that a device designed for a minimum of 15 V and 10-50 kOhm (internal resistance) is ideal. A voltmeter is connected directly to the terminals. Next, you should bring the piston to the position at which sparking occurs. Then turn on the ignition and turn the modulator until the readings on the device change. You can track the charge on the spark plug by the voltage on the sensor, which should jump. This value is equal to tenths of a volt close to the on-board power supply of the equipment. As soon as the spark is “groped”, you need to fix the position of the modulator directly on the generator shaft. This is usually done with a bolted connection. When adjusting the ignition, constantly short-circuit the high-voltage wires to the frame of the unit. Otherwise, excessive load on the ignition cannot be avoided, which can lead to its failure.
Motorcycle IZH Jupiter 5 is one of the latest models of the brand. This model can be found in every corner of our country, working in rural areas and in the city. The popularity of the motorcycle is explained by its simplicity and accessibility. Back in the days of production, even vocational school students could afford it, and today the cost of a running model is comparable to a monthly salary. The motorcycle has a strong frame that can withstand uneven dirt roads; you can easily attach a stroller to it and turn it into a cargo worker. However, not everything is as good as it seems. Jupiter 5 received an outdated 2-cylinder, two-stroke engine. Despite the driving performance, the engine did not have a very long resource and required careful ignition settings. To make life easier for the owners of this model, we will tell you how to set up the ignition on IZ Jupiter 5. In our other review, you can learn about the pros and cons of installing electronic ignition on IZ Jupiter 5.
- How to correctly set the ignition on Izh Jupiter 5
Generator
The heart is the generator (sometimes called a magneto, but they were never used on Izh Planet).
Three windings produce alternating current. For excitation, an additional coil is used instead of a permanent magnet. Therefore, it is impossible to jump start a motorcycle with a completely dead or missing battery. Possible breakdowns in this unit:
- It is checked by measuring their resistance of current-carrying conductors and insulation. If the generator is damaged, it will become noticeably hot.
- — the output voltage will differ significantly from the nominal level or be absent.
- Although the electrical circuit includes short circuit protection, it happens that the automation does not work and most often the output transistor burns out.
Contact ignition
From the factory, the model is equipped with a simple contact ignition. Many motorcyclists do not like it for inaccuracies in operation and frequent desynchronization of settings, but these are all engine diseases with crankshaft problems and other major troubles. On a good engine, the correct ignition setting of the IZH Jupiter 5 will not cause any complaints. To set it up, we need a caliper, a 12-volt light bulb with 2 wires, two screwdrivers, an open-end or spanner wrench. First of all, remove the right cover, opening access to the generator and the main ignition elements.
Now we unscrew the spark plugs and insert a long screwdriver or a thin metal rod into the right cylinder. Next, turning the nut in the ignition center connected to the crankshaft with a wrench, we set the piston at top dead center. To find the v.m.t. You should tinker a little, it is important to very accurately catch the moment of maximum protrusion of the screwdriver. At this point, you need to fix this position (with the mark on the screwdriver). Next, we will need two hands, in one we hold the screwdriver, with the other we hold the caliper parallel and note the coincidence of the mark and the scale of the device. Next, we ask our comrades to turn the crankshaft COUNTERclockwise (lowering the screwdriver). On the caliper we fix the lowering of the screwdriver by 2.4 - 2.6 mm. This ignition adjustment for IZH Jupiter 5 is called advance. Now let's move directly to the ignition cams. When setting the piston, you should pay attention to which of the cams begins to open. We attach a light bulb to it; to do this, we hook one contact to the cam, and the other to ground. We release the fixing screw (it is located near the base of the cam) and rotate the adjacent adjusting screw. Until the light bulb starts to go out. The general idea of tuning is to catch that subtle moment when the light bulb just starts to go out. That is, the light will be on, but literally after 1/10 of a turn of the screw it will go out. Holding the adjusting screw, we tighten it with a fixing screw and the adjustment of one cylinder is completed. You can proceed to the next one, setting it up in a similar way.
Required Parts
In order for the ignition system to work correctly, a number of auxiliary parts are required. They are listed below:
- Switch for BSZ VAZ cars. You should not choose exclusively from the low price segment. The Astro switch has a lot of positive reviews;
- Hall Sensor. The best option for Jupiter 5 is a similar manufacturer VAZ. By purchasing it in branded packaging, you protect yourself from counterfeits;
- Ignition coil with two terminals. You should choose between the gazelle engine number 406 or Oka with an electronic ignition system;
- A pair of silicone armor wires with rubber caps;
- The modulator is a butterfly-shaped plate made of iron.
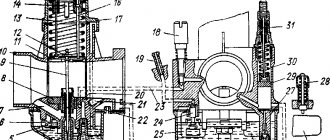
Modulator
The most difficult stage is the production of the modulator. It is important to maintain the required shape. The more accurately the required dimensions are observed, the lower the likelihood of problems occurring after the system is implemented, that is, there will be no need to adjust it with a file. The ignition timing must match on any cylinder used.
The bolt hole must be located in the middle. Otherwise, the engine operation will not be synchronized. It is also recommended to check the integrity of the crankshaft bearings. If you find defects, you should immediately replace it.
The contact ignition is not able to work normally if the bearings are damaged. The thickness of the part should not exceed one and a half millimeters. If it is thin, it will not be possible to avoid deformation, and if it is thick, it will come into contact with the surface of the hall sensor housing.
To create the plate, it is allowed to use any material except steel. Aluminum and others should not be used as they are not magnetic. The drawing that must be followed can be found in the public domain. The presented diagram will be useful to those people who decide to modernize the vehicle ignition device. Below are methods for installing electrical ignition devices in Jupiter.
It must be turned by a professional turner. He will make a simple disk and draw on it the markings of elementary distances between the corners. Then, in accordance with it, you will cut out the necessary sectors at home. The cost of the modulator is seventy rubles.
It is not advisable to use an ordinary plate, since its width is less than twelve millimeters. This will not be enough to fully accumulate the energy resource in the coil. Of course, it can be installed, but achieving four thousand revolutions per minute will become impossible.
In addition to the above you will need:
- A stud with an applied thread of seven millimeters, pitch 1, as well as a pair of nuts with washers of the corresponding parameters. The priority material for these components is brass. This is explained by the least magnetization of the plate from the generator rotor.
If you use a standard bolt, then difficulties may arise with the implementation of the ignition. The bolt tends to follow the modulator as it is tightened. However, it is necessary to observe the leading indicator, maintain the same position of the rotor and modulator, and tighten the bolt. It is advisable to use a pin, since many are not able to perform all the necessary actions in total;
- A set of wires with connectors for ignition without contact from VAZ. This part can be purchased or made with your own hands.
Contactless ignition on Izh Jupiter 5.
If you are the owner of a more modern and beloved BSZ motorcycle on Izh Jupiter 5, then in addition to all its well-known advantages, ease of customization will also be added. To begin with, we need to unscrew the spark plugs and, without removing them from the spark plug caps, lean them against the ribs of the cylinder, then catch the T.M.T. one of the pistons and rotating the crankshaft back lower the piston by 2.6 mm. When the advance is set, we move on to the modulator.
This element must rotate freely, due to which we must “catch” the moment of spark formation (on the spark plug) with the ignition on. Next, you need to very accurately fix the resulting position by pulling the modulator. Now let's move on to the next cylinder. We also place its piston in the top position, and then unscrew it, lowering it by 2.6 mm. Now, turning the crankshaft by the generator nut, we look at the ignition. If it matches, then everything is set, if there are deviations, then we proceed as follows: for early spark formation, loosen the lock nut of the modulator and set the ignition in the manner described above, then move on to the option when the ignition is later.
With late ignition, the edge of the modulator grinds down until, with the advance set, a spark is formed at the right moment. Finally, leaving the spark plugs on the cylinders, we crank the engine using the kickstarter, determining the evenness of the spark plug formation “by eye.” You can more accurately monitor the accuracy of the settings only by running the engine.
We recommend reading the article on tuning the Izh Jupiter 5 motorcycle with your own hands
General information
IZ Jupiter 3 uses (BSZ) 1137.3734, intended for all models equipped with a 12-volt generator. The ignition coil module for Jupiter 4 or another model makes it possible to select the appropriate operating mode of the motor thanks to the serial connection of the output wires.
The device as a whole improves the technical parameters of the vehicle thanks to:
- improved engine starting at low temperatures;
- more stable operation of the power unit, which is achieved as a result of reducing the asynchrony of spark formation, as well as by optimizing the SZ advance angle in accordance with engine speed;
- reducing the level of toxicity of exhaust gases, fuel consumption, as well as reducing deposits on spark plugs;
- stable start of the power unit even on a battery that has run down to 6 volts, provided that certain models of ignition coils are used;
- easier installation and maintenance of the system as a whole.
Setting up contact ignition on Izh Jupiter - 5
Let's take a step-by-step look at how to set up contact ignition on this device:
- Align the piston of the desired cylinder: - insert a screwdriver into the cylinder - rotate the crankshaft while holding the screwdriver
- Take a ruler and place it next to the screwdriver.
- Rotate the crankshaft, holding the screwdriver down with your finger so that it is level. We find a dead point.
- Turn the crankshaft in the opposite direction (1.5-2 mm).
- A spark is generated when the cam opens, locate the two adjusting bolts.
- Take a light bulb with two contacts, connect one to ground, the other to the contact.
- Turn on the ignition switch.
- You need to find the moment when the light comes on (the moment it lights up, the start occurs), and when it goes out, the contact closes on the contrary.
- Turn off the ignition, do and adjust the same with the second cylinder
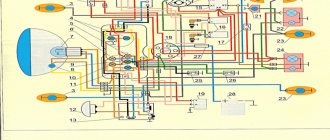
Major problem with motorcycle wiring
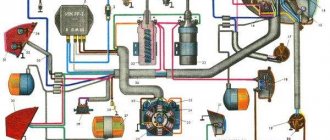
On IZ Jupiter 5, the wiring had a large number of contact terminals. Therefore, the main cause of malfunctions in the electrical circuit was a violation of the integrity of the connections. This led to such moments as: there is no charging for the battery, the generator does not provide the necessary 12-volt voltage to the system, the switch is not able to generate the necessary charge for the ignition coil, loss of functionality of all lighting devices, and a number of others.
The cause of loss of connection in the terminals was contamination and oxidation of the contacts. This was especially true for motorcycles produced at the beginning of mass production. The main way to solve this problem was to exclude these terminals from the IZ Jupiter 5 wiring.
To do this, we used soldering the wires directly to each other (by analogy with), as well as sealing the terminals on the supply wires to the following main elements:
- battery;
- generator;
- coil and spark plug;
- switch;
- lighting devices.
This increased the reliability of the connections and, as a result, ensured the operability of the specified parts, and also made it possible to turn on charging for the battery in order to subsequently confidently start the engine of the IZH Jupiter 5 motorcycle.
Ttontn.appspot.com
Ignition adjustment Izh Jupiter - 5
After all the adjustment manipulations are done, the turn comes for an operation called Izh Jupiter-5 - ignition adjustment.
It is better to produce from the following devices:
- Device K-25 - has an indicator head that fits into the holes for spark plugs or bushings and a knob with divisions from the tool
- Lamps 12 V, 2 W - with their help you can determine the moment of opening the necessary contacts of the breakers. The lamp must be connected to ground and the breaker terminal of the corresponding cylinder (for this, lamps with wires are used at the end), on which the ignition timing is adjusted.
Dashboard
The new instrument panel fits well into the appearance of the new motorcycle model, combining:
- Speedometer,
- Automotive type ignition switch,
- Control and warning lamps.
New instrument cluster IZH Jupiter 4
The display of warning lamps separately from the instrument scales had a positive effect on the information content. Now the driver can easily see their readings, additionally provided with inscriptions.
It is also easy to replace burnt out lamps:
- Using a Phillips screwdriver,
- Remove 3 screws (no. 3 in the diagram above),
- Remove the cover
- Remove the failed lamp
- Install working
- Reassemble the shield in reverse order.