002_moto_1211_080
...and a crankshaft position sensor - these are three elements of the injection engine control system, without each of which it will not be able to work (except for a malfunction of the ignition coil on multi-cylinder engines).
Unfortunately, if they fail, you will have to call a tow truck. ...and a crankshaft position sensor - these are three elements of the injection engine control system, without each of which it will not be able to work (except for a malfunction of the ignition coil on multi-cylinder engines). Unfortunately, if they fail, you will have to call a tow truck.
GET IN - IT WILL NOT KILL! Some citizens believe that when repairing or diagnosing electrical wiring, you can get an electric shock. It's in vain. Modern motorcycles (as well as cars) have a voltage of 12 V. This voltage is absolutely safe for humans, for example, if you hold both poles of the battery even with wet hands, you will not feel anything. The only exception is the ignition system, where the voltage in the secondary circuit (armored wire - spark plug) reaches tens of thousands of volts. Here it is better not to grab with wet bare hands, although I have never heard of cases of a person receiving any injury from a high-voltage motorcycle wire. Conclusion: there is no need to be afraid of working with motorcycle electrics. Any household appliance operating on a 220 V network is much more dangerous.
If the engine does not start, it is not at all necessary to immediately “turn the switch” to the ignition system. Moreover, her refusals are extremely rare. Most often, the cause of failure to start is the wrong mixture: either too lean (when, for example, we start a motorcycle in the cold after a long break), or too rich (when on a hot engine the driver forgetfully pulled out the “choke” or after a fall, when gasoline leaks from the float chamber managed to “fill” the cylinder).
It also happens that during many attempts to start the motorcycle, the battery runs low and one malfunction is replaced by another: for example, the mixture may already be normal, but it is no longer possible to produce a spark when the battery voltage is low (and it can drop to 6 V during cranking with the starter) Maybe. In this case, before you disassemble anything, connect another battery to help or, if it is not there, try to start it with a kick.
If flashes do occur in the cylinder, as a rule, the ignition has nothing to do with it. But if the engine is “out of whack”: the starter vigorously turns the crankshaft, the muffler smells of gasoline, and there is not a single flash, it’s time to check the spark.
In principle, little is needed for the engine to work: to supply gasoline (its quantity can vary within quite a wide range - that is why, if, say, a carburetor malfunctions, you can very often select the appropriate mode and get home without touching the unit in an open field) and on time a spark jumping between the spark plug electrodes.
There are rarely any problems with spark timing. So, for example, the protrusion that sets the pulses (for carburetor single-cylinder engines) is located on the generator flywheel and is thus rigidly connected to the crankshaft. Practically, the sensor of its position in injection systems reads pulses from the crankshaft. Thus, the main thing is to make sure that there is a spark at all.
Setting the ignition timing
The ignition is adjusted so that at some point a spark occurs. In the case of stationary stator windings, the rotor magnet rotates to the required position relative to the crankshaft journal. Keys are cut in those patterns where the rotor is attached to the key.
In systems with sensors, their position is adjusted.
Refer to Engine Reference Data for ignition timing. The most accurate way to determine SPD is to use a car strobe light. The spark occurs at a certain position of the rotor, which is marked on the stator and rotor. A wire with a clamp from the lit strobe is connected to the high-voltage wire of the ignition coil. After this, the engine starts and the signs light up with a strobe light. The position of the sensor is changed until all marks coincide.
005_moto_1211_080
To check the spark, you can leave the original spark plug alone and use a spare one.
Otherwise, it is often inconvenient to unscrew it, and sand pours into the cylinders... To check the spark, you can not touch the original spark plug, using a spare one. Otherwise, it is often inconvenient to unscrew it, and sand pours into the cylinders...
The easiest way to do this is without even unscrewing the spark plug, but by using a spare one. Remove the cap from the spark plug in the cylinder, insert a proven working spark plug, turn on the ignition, and turn the shaft (using the starter or kick). It is best if the electrodes of the spark plug are in the shade, so the spark is better visible. If the spark is regular and blue, there is a good chance that the ignition is fine. It remains to make sure that the spark power is sufficient. To do this, insert an electrically conductive object (for example, a screwdriver) into the wire cap and secure its metal part at a distance of 6–8 mm from the “ground” of the motorcycle (cylinder head or engine crankcase). A powerful, regularly sparking spark with a click is a guarantee of the system’s serviceability. If the spark is yellow and jumps out irregularly, check the battery, wires, contacts again (including the breaker and capacitor - on older motorcycles that used a contact ignition system).
If this does not help, and also if there is no spark at all, you will have to look for the fault by replacing parts. The easiest way to start is with a coil and a high-voltage wire. First, let's check the resistance between the low-voltage terminals of the coil (the two “bolts” sticking out of it). It should be very small (from fractions of an ohm to units). Next, we check the resistance between the high-voltage terminal and any of the low-voltage terminals: there should be kilo-ohms there. If you have doubts about the high-voltage wire for testing, you can replace it with any one, as long as it does not pass closer than a couple of centimeters from other parts and wires. This is usually easy to do for a spark test. As a last resort, the ignition coil for checking a carburetor motorcycle can be taken from any similar (non-injection) 12-volt motorcycle or even from a classic Zhiguli.
Easier with multi-cylinder engines. Failure of two independent elements (individual coils or injectors) at once is practically impossible, so to troubleshoot, you can move parts from cylinder to cylinder. And as a last resort, get there on one (or three) by simply turning off the fuel supply to the cylinder without a spark (by unhooking the cable from the carburetor or the connector from the injector).
If replacing the coil, wires and spark plugs does not help, you will have to call a tow truck. It will not be possible to determine the malfunction of the pulse sensor or “brains” (engine control unit) with improvised means, much less repair them. And hardly anyone carries these parts with them (especially an expensive control unit). In addition, checking the pulses produced by the sensor should be carried out using an oscilloscope, since both the shape of the curve and the amplitude are visible on it. And there the signal phase and tenths of a volt play a role. We have already written in detail about the components of the injection system (see “Moto” No. 10–2010).
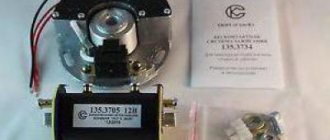
The photo shows an example of disassembling a generator to replace a faulty pulse sensor of a single-cylinder enduro. The work is not difficult, the sensor is cheap, but is not sold separately - only assembled with generator coils. And this is not cheap at all. Fortunately, there are now non-original kits and sensors on the market: you can try to find a replacement for the original one, preserving the “original” generator windings.
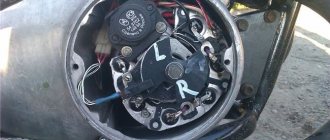
How to get to the generator winding and pulse sensor (using the example of a 1-cylinder enduro 250 cm³):
Types of CDI scheme
As thyristor ignition sensors, you can use a Hall sensor, coil or optocoupler. For example, Suzuki scooters use a CDI circuit with a minimum number of elements: the thyristor in it opens with the second half-wave of voltage taken from the charging coil, and the first half-wave charges the capacitor through the diode.
The engine-mounted chopper ignition device does not have a coil that can be used as a charger. In most cases, step-up transformers are installed on such motors, which increase the voltage of the low-voltage coil to the required level.
Model aircraft engines are not equipped with a rotor magnet, since maximum savings in both size and weight of the unit are required. Often a small magnet is attached to the motor shaft, and a Hall sensor is placed next to it. The voltage converter, which takes the battery from 3-9 V to 250 V, charges the capacitor.
Removing both half-waves from the coil is only possible when using a diode bridge instead of a diode. As a result, this will increase the capacitance of the capacitor, which will lead to an increase in spark.
010_moto_1211_080
After unscrewing the screws, remove the windings and sensor and inspect for damage.
You can measure the resistance of the components and compare it with the recommended one without removing the cover. Remember, as a rule, the control unit receives a signal both from the sensor and from its winding, distributed over the stator power windings. Therefore, it can operate regardless of the functionality of the main power system (the engine can be started even without a battery). After unscrewing the screws, remove the windings and sensor and inspect for damage. You can measure the resistance of the components and compare it with the recommended one without removing the cover. Remember, as a rule, the control unit receives a signal both from the sensor and from its winding, distributed over the stator power windings. Therefore, it can operate regardless of the functionality of the main power system (the engine can be started even without a battery).
Ignition system diagnostics
Checking the health of the CDI system is a fairly simple procedure that any car or motorcycle owner can handle. The entire diagnostic procedure consists of measuring the voltage supplied to the power coil, checking the ground supplied to the motor, coil and commutator, and checking the integrity of the wiring that supplies current to users of the system.
The appearance of a spark on an engine spark plug directly depends on whether the coil is powered by the switch. No consumer of electricity can operate without adequate power. The check, depending on the result obtained, continues or ends.
011_moto_1211_080
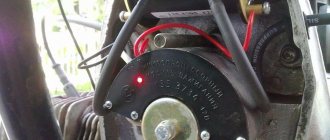
The actual culprit of the malfunction (in our case) is the inductive sensor.
There is an internal break in it. Attempts to carefully disassemble it were not very successful: the coil is assembled on a steel bracket, the assembly is filled with durable plastic. The failure occurred suddenly: the running engine stalled and would not start again. The only solution in this case is a tow truck. The actual culprit of the malfunction (in our case) is the inductive sensor. There is an internal break in it. Attempts to carefully disassemble it were not very successful: the coil is assembled on a steel bracket, the assembly is filled with durable plastic. The failure occurred suddenly: the running engine stalled and would not start again. The only solution in this case is a tow truck.
Motorcycle electrical equipment: where does the spark go?