Adjusting the PZ30 carburetor
Tuning the PZ30 carburetor, carried out to optimize consumption and create conditions for stable operation of the fuel system, is as follows:
Adjusting the level in the float chamber.
The fuel level in the float chamber affects the operation of the carburetor. It should be at a height of 10 - 18 mm from the flange to the top edge of the float. The specific level is selected based on driving conditions.
Low speed and idle speed of the engine are adjusted using a quality screw or by changing the size of the idle jet. The dimensions of the nozzle or its diameter are marked on the housing cover. The fuel mixture becomes leaner if the quality screw is tightened. Enrichment - if you unscrew it. In order to make the adjustment, you must first tighten the fuel mixture quality screw completely. Next, unscrew it half a turn or a full turn, start and warm up the engine. Next, using the quality screw, we achieve maximum engine speed.
In order to adjust the operation ... in the range from 1/4 to 3/4 throttle travel, it is necessary to change the position of the throttle needle. The needle itself is fixed using a C-shaped washer. In order to lean the mixture, you need to move the washer to the upper position, to enrich it - to the lower position.
The jet size is marked on the carburetor body. Changing weather conditions are a reason to change the jet. The higher the humidity, temperature or atmospheric pressure, the smaller the jet.
Source of the article: https://www.xn—-itbwcfcazgy.xn--p1ai/blog/nastroyka-karbyuratora-pz30/
How to check the accelerator pump for malfunctions
The verification scheme itself is not complicated.
The throttle lever is turned manually by acting on the pump lever. During this procedure, fuel should spray out from the nozzles in streams, without touching any walls, but simply falling to the bottom of the intake well. If the streams are weak or crooked, then the jets, channels and nozzles need cleaning and adjustment. To accurately determine the stability of the accelerator pump, it is necessary to measure the amount of gasoline sprayed during 10 injection phases. To do this, you need to remove the carburetor and, after manually performing the injection procedure ten times, measure the amount of gasoline using a ten-cc syringe. The volume should range from 5.25 to 8.75 milliliters. If the volume does not fall within these parameters, it means that the accelerator pump is not working correctly or is faulty. If the accelerator pump is faulty, when you sharply press the gas pedal, dips will be clearly felt, both while driving and at idle.
Carburetor pz30 – adjustment, repair
A true biker is ready to exchange universally recognized musical masterpieces for the rhythmic sounds of the engine of his iron horse. The health of the power unit largely depends on proper nutrition. A successful choice of a device capable of providing an optimal fuel mixture under various engine operating modes brings moral satisfaction to the owner. The article will discuss modifications, installation on domestic vehicles, and setting up the pz30 carburetor.
Let's sum it up
If you’ve read this far, it means you really want to understand how to set up your motorcycle’s carburetor, and the time spent writing above was not wasted. In fact, tuning the PZ30 carburetor, and others like it, is not the most difficult task and only looks like something incomprehensible. If configured correctly, even the famous Chinese quality will not interfere with the normal operation of the engine, although there will be nuances, such as the need to adjust the idle speed after each cleaning. But if you are patient and take one free evening, then as a reward for your time spent you will receive not only a motorcycle that responds to the throttle and consumes a minimum of fuel with maximum efficiency, but also a longer engine life. Which is, at least, nice, even though the piston engine for most Chinese motorcycles is quite inexpensive.
Having understood the nuances of tuning the PZ30 carburetor, you don’t have to be afraid of other carburetor models; the tuning algorithm, with very rare exceptions, will be absolutely the same.
Images used: china-moto.ru, alicdn.com, snegokhod-kayur.ru, jawa-store.ru, omoimot.ru
Description of carburetor pz 30
The peak of mass popularity and popularity of motorcycle technology in domestic spaces occurred in the 70s and 80s of the last century. Mopeds “Riga”, “Verkhovyna”. Light vehicles “Minsk”, “Voskhod”, “Kovrovets”. Motor scooters “Tourist”, “Tulitsa”, “Ant”. Heavy stroller models “Ural”, “Dnepr”, “Izh”. The cult dream of the reckless drivers “Jawa”, “CZ”.
A serious problem with most models was the power supply system:
- high fuel consumption (the cheap price of gasoline eliminated the problem);
- “dips” when the throttle is turned sharply, especially at medium and high speeds;
- constant need to adjust the carburetor depending on the load.
The beginning of the 90s changed the political map. The iron curtain fell. Mechanical engineering was going through a difficult period. The market began to fill with imported used two- and three-wheeled units, mainly from the Indo-Chinese region. Enterprising compatriots organized a flow of spare parts to support imported foreign rubbish. Internet trading has started. Carburetors became available for engines with a volume of 150 - 200 cubic centimeters.
The pz 30 carburetor is produced by Chinese machine manufacturers for mass-produced middle-class motorcycles.
The mixer, traditionally copied from the design of the famous Japanese company Keihin PD, has undergone some changes:
- walls are strengthened;
- the diffuser cross-section has been increased;
- accelerator pump installed.
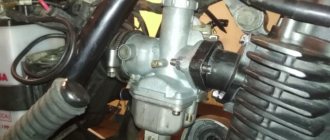
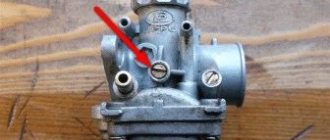
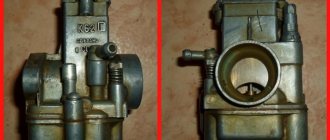
Externally, the PZ 30 carburetor resembles an inverted capital letter “T”, with a volumetric cover fitted at the bottom - a float chamber.
A horizontal passage with one flange (inner diameter is 30 mm) through a sealing gasket is seated on two studs and screwed to the engine cylinder. The other side (42 mm cross-section) is connected by a rubber curved pipe to the air filter.
The principle of adjusting the PZ30 carburetor
The purpose of the setting is to optimize gasoline consumption, stable engine operation at various speeds:
- The fuel supply in the float chamber is created by setting the immersion level of the floats located on a metal rocker. By bending the fastening tongue, it is necessary to achieve a horizontal position, parallel to the edge of the case. The elevated state will increase the percentage of gasoline and will contribute to the creation of a rich mixture. Recessed floats will reduce the amount of fuel and impoverish the composition.
- Regulation of the mixture in various modes of the power unit.
Stable idle speed and stable low engine speeds are determined by:
- quality screw position,
- cross-section of the hole in the idle jet.
The jet marking is written on the cover body. Tightening the quality screw clockwise leans the fuel mixture. Unscrewing - enriches.
At medium speeds, the throttle valve moves within 25% - 75% of the total stroke. Steady operation is created by the position of the needle. Five annular grooves are applied to the needle at the blunt end. A washer with a cut, initially snapped into the middle groove, determines the vertical position of the needle. To reduce the fuel in the mixture, the washer is moved closer to the edge. The opposite transfer enriches.
High speeds are critical to the size of the jet. Changes in climatic parameters dictate the replacement of the jet. The parameters increase - the jet should be reduced.
Malfunctions and their elimination
Freezing of the economizer housing
The K-151 carburetor on some engines has one unpleasant feature. In humid subzero weather, the fuel mixture in the carburetor actively condenses on its walls. This occurs due to the high vacuum in the channels at idle (the mixture moves very quickly, which leads to a decrease in temperature and the formation of ice). The economizer body freezes first, since air enters the carburetor from here, and the flow cross-section of the channels here is the narrowest.
The trunk of the air intake hose can be thrown directly to the manifold. Or make a so-called “brazier” - a heat shield made of a metal plate, which rests on the exhaust pipes and to which the air vent hose is connected (see figure).
Also, in order to reduce the risk of the economizer freezing problem, before the trip we warm up the engine to an operating temperature of 60 degrees. Despite the thermal insulation gasket from the engine, the carburetor still receives some heat.
Flange straightening
With frequent disassembly and removal of the carburetor, as well as with excessive force when tightening the flange to the engine, its plane may be deformed.
There are many ways to solve this problem. But the simplest and most accessible method is the following:
- We heat the plane of the carburetor flange using a gas burner. First, we remove all the components and parts of the carburetor (fittings, levers, etc.).
- Place the plane of the float chamber on a flat surface.
- As soon as the carburetor heats up, place a thick, even piece of hard metal on top of the flange. We don’t hit the piece too hard, moving it to different places each time. Basically, the bending of the flange occurs along the edges, in the area of the bolt holes.
Useful video
For more information about the method of straightening a flange, we recommend watching this interesting video:
To prevent further bending of the flange, simply tighten it evenly once to the engine and do not remove it again. As we saw above, the carburetor can be cleaned and adjusted without removing it from the engine.
Adjusting a removed pz30 carburetor
After the break-in run, it is advisable to perform preventive maintenance of the fuel system.
Important note. The carburetor contains many small parts. It is logical to prepare, spread a clean cloth for storing the removed spare parts.
Step-by-step instruction
- Close the tap on the fuel tank. Carefully pull off the fuel hose and drain the residue into a clean container.
- Unscrew the top cover, remove the twisted, leaf springs. Remove the cylindrical valve. Pull out the accelerator cable and move it to the side together with the cover.
- Disconnect the accelerator pump control cable.
- Remove the air duct.
- Unscrew the fastening nuts on the cylinder. Remove the carburetor.
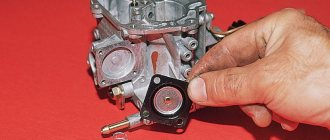
- Unscrew the three fastening screws of the bottom cover. Inspect the roof from the inside. Remove possible plaque and debris. Wipe with a soft cloth soaked in gasoline.
- Turn the carburetor over. Using an awl, push out the axle and release the bracket with the floats. Disconnect, ideally clean the needle. Rinse and wipe the seat. Check the free movement of the needle.
- Place the needle on the middle protrusion and restore the bracket back.
- Make sure the flat surface of the floats is parallel to the line of the carburetor body. Raised floats cause a lack of fuel, submerged floats cause excessive consumption. Changing the horizon of the floats is done by bending down or up the protrusion in the middle of the bracket. During seasonal maintenance, they unscrew, clean, and change the jets. Screw on the lid.
- Observing from the side of the flange, use the spring-loaded idle screw to slightly open the main air damper by 1 mm. Using a stretched tube, tighten the mixture quality adjustment screw until it stops, and unscrew it 1.5 - 2 turns.
- Install the carburetor on the motorcycle. Start and warm up the engine. Continue setting the modes, turning the attached hose in the direction of enriching the mixture.
Setting up a pit bike carburetor
The easiest way to check whether a pit bike's carburetor is set correctly is by the color of the spark plug. We unscrew the candle and look at the color:
- Brick color - the mixture is correct
- Whitish - poor mixture
- Black smoked – rich mixture
In addition, you can determine the quality of the mixture by the sound and reaction to opening the trigger. When you release the gas, you hear shooting sounds - the mixture is lean . When the gas is sharply opened, the engine seems to choke and there is no proper pickup - the mixture is too rich . In addition, when the mixture is lean, the engine overheats and the exhaust pipe becomes red hot .
Having determined the quality of our mixture, we begin to turn the carburetor. In reality, it looks something like this: first we try to achieve the desired mixture by raising or lowering the needle one or two notches, we try to ride it, if the difference is felt immediately, we continue to conjure until the desired result is achieved. Don't forget about the suction. The carburetor must be adjusted with the engine warm and the choke closed . If the difference is not immediately visible, we ride longer, then evaluate the results of the adjustment by the color of the spark plug. If you can’t adjust the needle, then return the locking ring on the needle to the middle position (default) and select the jets. The carburetor must be supplied with a set of jets of different sizes. The nozzle has two sizes: the first is the thread diameter (m5, m6, etc.), the second is the throughput of the nozzle in cm3/min (the numbers are stamped on the nozzle itself). You can change the jet or check its size by removing the carburetor from the pit bike, draining all the gasoline from it and opening the float chamber by unscrewing two bolts. The jet looks like a flathead screwdriver bolt with a through hole in the middle.
Accordingly, if the mixture is poor (the spark plug is white, the pipe is red, the motor is overheating), we raise the needle; if that doesn’t help, we increase the jet (the numbers are larger). If the mixture is rich (the spark plug is black, there are dips when the gas is opened sharply), we lower the needle; if that doesn’t help, we reduce the jet (the numbers are smaller). After you have adjusted the mixture, there will also be a bolt with a spring on the carber that is responsible for idle speed . If the pit bike stalls when the gas is released, the engine speed is too low - turn the screw clockwise (tighten it). If, on the contrary, the pit roars while standing on a stand, unscrew the screw counterclockwise. Ideally, do everything with the engine warm and running, so that you can immediately determine whether we have cranked up enough or whether we need more.
It happens that no adjustment helps, or this may be due to dirt and sand getting into the carburetor. Flushing and blowing all the channels in the carburetor will help here.
In general, this is how everything is set up, the main thing here is to stock up on time and patience, in this matter, of course, some professionalism is required, which will allow you to quickly identify the problem of a bad mixture and adjust the carburetor on a pit bike, but even without experience you can cope with this task. Although in particularly advanced cases it is better to call a professional .
Mikuni carburetor rebuild for pit bikes
SUPER ESSENTIAL UPDATE
An ultra-intensive course on setting up carbers on a pit bike.
- Removing the carburetor and filter
- We disassemble the carburetor down to the screws, wash everything in gasoline, and blow out all the holes with a compressor.
- Reassemble the carburetor in reverse order, keeping it surgically clean. We unscrew the quality screw two turns, and tighten the idle screw almost all the way. The needle is in the middle position.
- We wash the filter either with a special product, or with Fairy, or, if it’s just a foam cartridge (from a filter box), we soak it in gasoline.
- We dry the filter and thoroughly saturate it with special oil, let it soak, and squeeze out the remainder without enthusiasm.
- We put everything back on the pit bike.
- We put a new clean candle.
- Next, we look at the gas hose and gas filter (if installed). Kinks and pinching of the hose are not allowed. The filter should be blown freely without creating resistance.
- We check the presence of gasoline in the tank.
- After all the manipulations, we are looking for a deserted, flat, straight road. Let's start a pit bike. Warming up. Using the XX screw, we lower the idle to stable. Then we go all the way in a straight line and ride at an active pace for about 5-10 minutes. Turn off the engine with full throttle.
- We unscrew the spark plug and look at the insulator
- If it is ashen white , the mixture is too lean.
- If it is pale with a brownish tint , the mixture is too poor.
- If it is the color of coffee with milk, or a brick tint , the mixture is what you need!
- If it is darker (coffee with a small amount of milk
 ), the mixture becomes slightly richer.
 - If it is dark brown or black , the mixture is too rich.
If nothing is clear from the candle, we ride at full speed for another 5-10 minutes.
Jet
Next, based on the color of the candle, we change the jet.
- If it gets rich , we reduce the jet by two orders of magnitude.
- If it becomes lean , we increase the jet by two orders of magnitude.
- If we are close to the target, we change the jet in the range ± 1.
After each replacement, we roll back and forth at full throttle, then look at the spark plug. We turn off without releasing the gas. The process is quite long and tedious. Having received the desired color (coffee with milk), we proceed to adjusting the quality of the mixture at idle speed.
A correctly selected jet can also be determined by the following symptoms.
- If, when you sharply apply the gas and release the throttle, the speed seems to hover at the top point for a few seconds , and then reluctantly drops, this indicates a lean mixture.
- If, when you sharply apply the gas and release the throttle, the revolutions drop and sag almost until the engine stalls , and then rise and level out to idle, this indicates a rich mixture.
With a normally adjusted mixture, after releasing the throttle, the engine speed should drop to the idle level within a second and operate stably at it.
Screw quality
We dose the fuel with the quality screw.
- By twisting , we lean the mixture.
- By unscrewing it , we enrich it.
Remember that now we have the screw unscrewed two turns. We begin to twist it slowly, listening to the engine. Here it is very important not to turn up the XX screw on the idle speed, otherwise we won’t understand anything from the adjustment. XX should be such that the engine runs stably, but if it is reduced it will stall.
- So we tighten the quality screw, listen to the engine and count the number of revolutions. As soon as the speed starts to drop, we stop. We remember the position and twist it until it stops, counting the revolutions. So we know one limit value (for example, at 1.5 turns of the quality screw from the stop, the engine speed began to fall).
- Now we begin to twist in the other direction (unscrew), listen to the engine and count the revolutions of the screwdriver. The engine speed should first begin to rise, because we are enriching the mixture, and then begin to fall, because the mixture has become too rich. We record the number of revolutions of the quantity screw when the engine speed began to fall. Now we know the second limit value (for example, at 4 turns of the quality screw from the stop, the engine speed began to fall).
We need to set the midpoint between the two boundary points. If you plan to ride around the city, in the heat, with frequent stops, it makes sense to shift the adjustment to a richer side.
If you are too lazy to twist and count. We tighten the quantity screw until the motor is still running stably, but is about to stall. And gradually we begin to unscrew the screw. The turnover will gradually begin to increase. As soon as unscrewing the screw stops affecting the engine speed, stop rotating. All. We adjusted the amount of mixture at idle.
Needle
Let's move on to adjusting the needle position. We get on the pit bike and start riding, watching its behavior. Then we raise the needle by two divisions (we put the latch in the lower groove), enrich the mixture. We ride and look at the behavior of the pit bike. Then lower the needle to the very bottom (put the latch in the upper groove), lean the mixture. Let's ride. We select the position of the needle individually according to how you feel. There should be no dips during acceleration. If, after adjustment, the needle is in its extreme positions , it means that we selected the main jet incorrectly.
For 26-27mm carburetors, the approximate range of jets is 102 - 110.
Replacing a carburetor on a Ural motorcycle
Before starting the installation, you need to prepare, adapt the mounting locations for the mixer on the cylinder, the cables on the right steering wheel console, and the air filter pipe.
- The distance between the centers of the holes on the PZ30 carburetor flange is less than the center-to-center spacing of the studs on the cylinder. It is required to make (purchase) adapters - eccentrics. Externally, the adapter screw looks like three successively joined parts:
- thread to suit the size of the stud, the length is determined by the depth of the cylinder bore;
- area without thread to suit the thickness of the sealing gasket;
- threaded part with an offset center, with a diameter suitable for a flange eye.
- Modify the adjusting bushings on the cables and the holes in the handle.
Keihin PZ 30 carburetor with accelerator pump
In general, I decided to buy two of these carburetors for my 750 cc engine.
Actually the question is, has anyone encountered this beast?
I was very interested in them, but haven’t gotten around to buying them yet. The diffuser is like the 68u or even less information (30 is the diameter of the mixing chamber) Take the throttle handle with cables (there is a splitter for 2 cables, a throttle and an accelerator pump) or You will be collectively farming these splitters yourself. About the 750, I think the engines can be a little choke at the top, but on the K750 or 650 the engines are just that. True, the question of the quality of production of these carbs still remains unclear; you will also have to select jets
P\S can you post a link to the seller whose price they are now is 1800 with cables, I only found it by
wait, so 30 is not a diffuser? I have channels that were drowning in the subway, I need a 30 diffuser, or at least 28 like the 68
I'm selling BINGs with diffuser 32, there will be a song for 750!
Hello, such a problem. When the engine is cold, it runs great, and the revs drop well. Once it warms up, the thrust decreases and the revs gradually drop to idle. And the idle floats. When it’s cold, it also drives great. Idle jet 38.
sewed in 2 weeks! super fast! A friend in the Urals is having a blast with these carburetors; the precise, tuned operation of the engine is something that can never be achieved with standard ones. The quality is generally super, I couldn’t find a single jamb, everything is smooth, it works as it should! I recommend!
__________________________ I’ll buy duckweed dropsy IMZ
__________________________ I’ll buy duckweed dropsy IMZ
Source of the article: https://oppozit.ru/post_96526.html
Checking the pump's functionality
To check, you will need to perform several preliminary steps:
- Pump fuel into the carburetor.
- Remove the air filter housing.
- Remove the carburetor cover so that you can see the operation of the mechanisms inside.
After this we perform a fairly simple test:
- Turn the throttle lever. At the same time, the pump mechanism should turn on. We look carefully at the system from above.
- Straight streams of gasoline should appear from the pump nozzle, which then enter the inlet well without problems. The streams should be continuous, even and strong for several seconds.
This is normal operation of the mechanism. If the accelerator pump malfunctions, you may observe the following defects:
Weak oblique jets of fuel that do not even reach the intake well. The channels may be clogged, then it is necessary to clean the jets. If gasoline flows into the walls of the mixing chambers, you need to check the direction of the nozzles and correct it. Pliers will help here; you will have to slightly bend the nozzles with them.
This work must be done carefully, otherwise parts may break.