Homemade 4x4 ATV with an engine from an Oka car: photo and detailed description of the manufacture of the ATV.
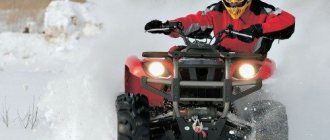
In previous articles, we have already considered several options for manufacturing rear-wheel drive ATVs, now let’s take a look at the all-wheel drive design. 4x4 all-wheel drive significantly increases the capabilities of the ATV; in fact, it is already a full-fledged all-terrain vehicle for off-road use.
The author of this homemade technique is Sergey Pletnev. Let's take a closer look at the design of the homemade product.
Engine and transmission
Engines from Soviet-made motorcycles such as the Ural or Dnepr are suitable as a power unit for a homemade all-terrain vehicle. For lighter and more maneuverable equipment, you can use units from Java or IZH motorcycles, which were equipped with single-cylinder two-stroke engines.
To simplify the design of the future ATV, it is better to use the same transmission and drive together with the engine that they were originally equipped with. To design a car with all-wheel drive, you will need to install an additional gearbox. This is used extremely rarely in home-made devices, since it will be difficult to implement an additional unit without dramatically adding weight at home.
Power unit
The motor is removed from a sports or regular motorcycle, scooter, or car. Auto mechanics advise using a four-stroke engine with a power of more than 15 hp. With. The power units of scooters differ from other analogues in their low fuel consumption. An ATV based on a scooter weighs little, so it can be pulled out quickly if it gets stuck in sand or mud.
To transport cargo or drive off-road, a stronger motor is installed:
- from Izh-1, Izh-2 or Izh Jupiter with a power of 24 hp. With.;
- from the Urals 32 or 36 l. With.;
- from Oka two-cylinder engine 35 liters. With.
To transport heavy loads, a three-cylinder engine is installed. To drive in hot weather, a motor with a cooling system is used. It is not available on older motorcycles. In such units, the cooling system will need to be modified.
Frame and suspension
The frame for a homemade device is usually made independently from scratch. You can use blanks from an old motorcycle as material for the frame. The pipes from which they are made are lightweight and have the necessary strength and flexibility. As a last resort, you can choose the material yourself. The main parameter here will be weight. Excessively thick tubes or profile will make the ATV very heavy and difficult to ride quickly and maneuverably.
For suspension, you can use shock absorbers with springs from the same motorcycles. The suspension itself is shaped like the letter “A” and is movably mounted on the frame. Shock absorbers and springs should be selected in such a way that they can withstand the weight of the future car and ensure a smooth ride with good control over bumps and holes.
Steering and wheels
The steering can be partially used for a motorcycle, with the addition of two-wheel drive. The drive is carried out by adding levers and ball joints to the design, which can be borrowed from a car. The main task of the steering is accurate and comfortable steering.
Wheels for an all-terrain vehicle are best used from a car, as they are wider and will improve the vehicle’s maneuverability. The diameter of the wheels must be calculated in such a way that the homemade ATV can develop sufficient speed and also have a harmonious appearance.
Body and electronics
To install attachments, a gasoline tank and controls, you can use a motorcycle frame, which is structurally connected to the ATV frame. Particular attention should be paid to the stability of the all-terrain vehicle, its appearance and the comfort of the driver’s seat.
Don’t forget about installing all the necessary lighting and external alarm devices on your homemade ATV. The headlights, taillights and turn signals can easily be used from the same bike that everything else came from.
Look at this homemade ATV in action!
How to make an ATV with your own hands is a difficult and responsible task, but feasible for a master who has mastered welding and turning. The effort and time spent are paid off not only by large savings, but also by the result obtained - an exclusive, original model of a quadric that no one else has.
Features of assembling a homemade vehicle highly depend on the chosen base - the engine and other elements that are used by the craftsman.
6 best options for a base (“donor”) for those who have set the goal of how to make an ATV.
- Motorcycle "Ural".
- Motorcycle "Izh".
- Motor scooter "Ant".
- Another motor scooter (scooter).
- Car "Niva".
- Oka car.
Most often, some structural elements are taken from a motorcycle, others from a car.
In addition to the parts (components) for the quadric, its creator will need:
- assembly “shop” - a fairly spacious garage equipped with good heating and lighting will be useful in this capacity;
- a set of equipment and tools;
- blueprints.
You may also be interested in our specialist's article, which talks about how to make.
Preparatory stage
When assembling the structure yourself, the power of the motor, the type of suspension, and the need to install a trunk are taken into account. To perform the upcoming work you will need: a welding machine, drill, grinder, keys, hammer, pliers, jack. As a basis you can take:
- Motorcycle Ural.
- Motorcycle Izh.
- Scooter.
- Oka or Niva car.
If necessary, transport is assembled from motorcycle and car parts. If the frame is made independently, special equipment will be required to deform the pipes. In this case, it is recommended to separately make drawings of the frame for the ATV with your own hands. This will simplify the process of assembling components:
Preparation for work, tools and equipment
First of all, you need to carefully consider when, where and for what purposes the future ATV will be used - hunting and fishing, motorcycling in nature, transporting goods, etc. It is on this basis that you need to make a choice of a “donor” vehicle, deciding how powerful the engine is needed, what kind of suspension is suitable, what kind of trunk, etc.
You can take ready-made drawings from the Internet, create them from scratch yourself, or combine both options and ready to remake them at your own discretion.
List of required tools:
- welding machine;
- Bulgarian;
- drill;
- a set of keys;
- various small tools - calipers, hammer, knife, screwdrivers, pliers, etc.
To make your own frame, you will also need equipment for bending pipes. If you don’t have one, you can rent it or outsource the necessary work to another craftsman. Only with remarkable skill can you bend the pipes manually by heating the bend with a gas cutter or torch.
Quad components:
- engine;
- frame;
- rear and front suspension;
- steering;
- brake system;
- cooling system;
- muffler;
- electrical equipment - battery, headlights;
- body, body kit
It is quite possible to make a muffler yourself. Everything else is to purchase used parts on the shadow market.
Step by step assembly
First of all, you should prepare and/or purchase all the necessary parts in accordance with the diagram of the desired device. Then they cook it from scratch or remake the frame. Suspensions, brakes and chassis are installed at the same time. Only after this the power plant and gearbox are installed.
Next comes the time:
- install a fuel complex;
- install electrical equipment;
- design the body of the future ATV;
- prime, paint and (optional) decorate this body;
- put all the components together;
- put the seat in its proper place;
- test the vehicle with a gradual increase in the complexity of the trips.
If you choose a different design, you can use bicycle shock absorbers. The wheels are taken from a garden wheelbarrow.
Next they make the frame and suspension. They install the motor from the brush cutter, and then the gearbox removed from the chainsaw. D-6 becomes the donor of the “asterisk”.
Next steps:
- formation of the front suspension;
- minor modification to the frame;
- its coloring;
- ATV trim;
- installation of wheels (7 inches is enough).
Parts selection
ATV frame
Depending on the “donor” and the design of the quad, you either have to make the frame yourself, or you can reconstruct a finished, used one.
The most important thing is that the engine is securely bolted to the bottom along the frame, which can be located either front or rear. The transmission and drive should also be firmly attached to the frame to avoid play.
The material used is ordinary water and gas pipes with a wall thickness of no more than 3 mm:
- for spars - 25 mm;
- for crossbars and struts - 20 mm.
The pipes are connected using spot welding, followed by solid welding. Ears for attaching shock absorbers and levers are welded to the frame immediately. Brackets - during installation of units and components.
Reconstruction of an existing frame
To reconstruct a finished frame, you should remove everything, leaving the frame, dismantle the back part and build up the front. Then weld elements for fastening a complete set of components and assemblies of the ATV. When reconstructing a motorcycle frame, the seatposts should be moved back by 40 - 45 cm.
The front and rear luggage racks are cut out of a metal sheet and welded to the frame. Finally, the finished frame is painted; there is no need to varnish it.
Engine
The engine is suitable for a car, motorcycle or scooter. Some “Lefties” even construct an ATV from a walk-behind tractor with their own hands, since newer models are equipped with four-stroke engines, the power of which in heavy devices reaches 15 “horses” - versus 11 hp. "Ant."
The engine of a scooter has the advantage of low fuel consumption; in addition, the scooter-based quad is the lightest, which makes it easy to pull it out when stuck in mud and sand. But a quad to transport cargo and/or drive off-road requires a more powerful engine.
The engine power of the Izh-1, Izh-2 and Izh Jupiter is 24 hp, the old Ural is 32 or 36 hp, the two-cylinder engine of the old Oka is 35 hp. , a three-cylinder car of a later release - 53.
To travel in hot weather, the ATV needs a cooled engine. Cooling was not installed on older motorcycles, so you will have to pick it up (for example, from a VAZ 2108 will do) and install it.
The suspension can be used both rear and front. The easiest way is to take the front one from a motorcycle.
2 rear suspension options:
- The rear axle of the car, shortened to fit the dimensions of a quad. The advantage is the presence of a differential. Disadvantage - the design will be heavier.
- Cardan-gear design - with a gearbox mounted on the rear axle.
Please note: the quad all-terrain vehicle requires an independent suspension with high ground clearance.
The suspension arms are bolted to the frame through rubber-metal hinges - silent blocks.
The front suspension strut must be tilted, otherwise the ATV may roll over.
The shock absorbers are suitable from Izha, but if the budget allows you to purchase gas-oil shock absorbers with pumping, the driver will be able to adjust the suspension according to road conditions.
Steering and chassis
The steering system of an ATV can be based on a car - with a steering wheel, or with a motorcycle steering wheel. Some craftsmen combine both types: motorcycle handlebars, levers and shafts at the top, car tie rods at the bottom. It is advisable to take the fuel tank along with the motorcycle handlebars.
A homemade steering shaft is made from a 20 mm pipe with walls up to 3 mm. A travel limiter must be installed at the bottom.
When making a quad on a car base, it is better to replace a gear pair with a chain drive. This will greatly simplify and reduce the cost of maintenance.
The input shafts from the gearbox must be directed directly to the rear and front axles.
The wheels are most often taken from small-sized VAZs (“Oka” or “Niva”) and are shod with tires that correspond to the operating conditions (weather, terrain, etc.). The brake system is selected depending on the wheels. The steering knuckles are also from Niva or Oka.
Four-wheel drive
If you choose a four-wheel drive vehicle, vehicle steering, differentials, and a manual transmission are required.
The existing frame will not fit in this case; a new one should be welded to suit the engine size.
The suspensions, like the steering system, must be taken from the car. On the front it is necessary to provide space for installing the gearbox.
Installing an all-wheel drive model requires not only special skills of the craftsman, but also additional labor costs. The alternative is to buy a ready-made all-wheel drive unit - it costs money.
Frame
Making the body is far from the simplest stage of the story called “how to assemble an ATV with your own hands.” Suitable materials are fiberglass and fiberglass; it is easier to make a body kit from the second.
First, you need to draw, cut and construct a “blank” of the body from pieces of durable foam plastic, glued or fastened with polyurethane foam. Then apply several layers of fiberglass on it, coating each with epoxy resin and inserting metal fasteners between them to attach the body to the frame. In conclusion, dry the body thoroughly, then prime, sand and paint.
Unfortunately, not every person has the opportunity to purchase an ATV in a store. All more or less interesting models are now quite expensive, and buying a used ATV is always a certain risk. In this regard, many motorcyclists advise making a four-wheeled all-terrain vehicle with their own hands, using an engine and spare parts from some old Soviet motorcycle. Earlier, we already told you about how to make an ATV from a Ural motorcycle. In today's article, we will talk about other donors that can be used if you decide to assemble an ATV with your own hands.
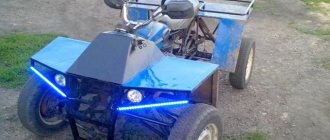
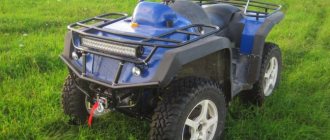
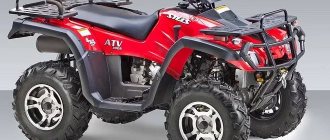
Homemade 4x4 ATV based on OKI and other equipment
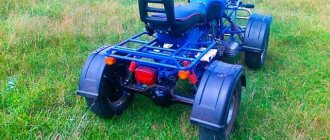
We present to you a 4x4 ATV model with all-wheel drive, which is designed to conquer off-road spaces.
This model was constructed by assembling various components, assemblies and parts of automotive vehicles from different manufacturers and brands - these are both domestic and foreign models. The ATV is assembled on the basis of an OKA vehicle. Technical characteristics of the assembled ATV model: - parameters of width 1 m 55 cm, base 1 m 60 cm; - height parameters from the steering wheel 1 m 30 cm, from the seat 90 cm; - clearance height 43 cm; - weight 390-410 kg; - an engine from OKA was installed; -installed axle gearboxes from Mitsubishi; -rear and front steering knuckles and hubs from Niva; -use of Niva drive; -front and rear suspensions are installed on double wishbones; - torsion bars and springs are used as elastic elements; -Power steering from Subaru; - the center and cross-axle differentials are locked.
Step-by-step assembly of an ATV
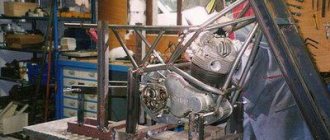
1. We prepare diagonal spacers-amplifiers with a lever. Pipe Ф21х4.
2. the suspension has 4 levers, 2 for 1 lever = 16 units;
3. Turning work according to the drawing of the gearbox adapter. Centering and balancing.
4. Assembling suspension arms.
5. We used a steering rack, in particular a hydraulic distributor, from Toyota; after grinding the gear, we attach the cardan and insert it into the section of the steering shaft. Thanks to this we have a tight connection.
6. The ear is welded. hydraulic cylinder to the bipod, placing one side to the frame and the other to the rod.
7. Use of hydraulic booster without changing designs.
8. We shorten the cylinder to the required size for compactness.
9. Setting up the front suspension, next in line are the elastic elements.
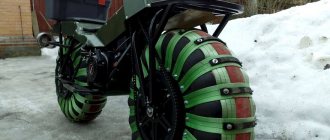
10. We use springs from the Urals complete with shock absorbers, installing 1 piece on the front axle. on the wheel.
11. Torsion bar front and rear suspension, and other parts according to the drawing.
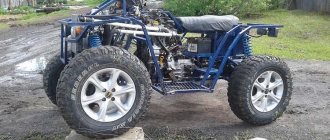
12. The transmission is almost assembled, the next step is to finalize the external frame.
Having completed the assembly according to the design drawings, we form and make the design. Very interesting, but painstaking and time-consuming work.
Why is it worth assembling an ATV with your own hands?
Assembling a four-wheeled all-terrain vehicle by yourself definitely helps solve several problems. The first reason why people decide to make a homemade ATV is, of course, a small budget. If you analyze the market prices for ATVs, you can understand that such vehicles can be considered almost a luxury. Prices for the simplest and lowest-power models start from 150 thousand rubles, for example, Yamaha Blaster YFS200. In principle, such a single-seat “quad” will be enough, but the power will always be in short supply.
But ATV models with engines with a volume of 500-800 cm 3 will cost much more, approximately 500 thousand rubles. You can also consider Chinese models, such as the Russian manufacturer Stels, but you will have to carefully monitor them. New all-terrain vehicles of this brand will cost approximately 300-400 thousand rubles, but the engines are much more interesting - 45-70 hp.
Nuances when operating a homemade “quad”
If you definitely decide to make an ATV with your own hands, then you should know about the intricacies of its operation. In principle, if you need an all-terrain vehicle for driving in impassable places where patrol cars have never been, then there’s probably nothing to worry about. You will have to face problems if you plan to drive even through small settlements, which are sometimes visited by patrol cars. If they catch you without documents for this vehicle, then with a 99% probability they will take it away from you. The whole difficulty lies in registering a homemade ATV, because the traffic police will most likely refuse you. In a good way, it is possible to register a homemade product, but it is extremely difficult to do. Therefore, assembling a homemade ATV only makes sense if you operate it in some wilderness.
Description of the vehicle
A modern ATV is equipped with four or six small wheels, but with increased maneuverability. The main technical characteristics include: light weight, all-wheel drive and low gear. Due to the unique configuration, the vehicle can easily travel on country roads. It can be used in summer and winter.
To make a homemade ATV, it is recommended to decide on its type:
- Utilitarian. The model has a lot of weight and good maneuverability. The vehicle easily carries several people and accelerates to 90 km/h.
- Stunt. Equipped with a narrow platform and radiator. The car weighs little and can accelerate to 137 km/h.
Vehicle assembly is carried out taking into account technical characteristics, equipment, and operating conditions. To perform independent work, you will need to have skills in working with a welding machine and a lathe. To build a car, you will need a spacious garage. Taking into account suitable parameters, a do-it-yourself drawing of an ATV is prepared.
Making a choice
So, how to make an ATV with your own hands? When creating a homemade ATV, we need to decide on the donor, that is, the motorcycle that will form the basis of our project. Old Soviet motorcycles are perfect for a four-wheeled all-terrain vehicle. From them we can borrow an engine with a gearbox, a frame, a steering wheel and, if desired, such parts as a tank, a seat and other elements. Since we already had an article about a homemade ATV from a Ural motorcycle, in this review we will talk about how to make an ATV based on an IZH motorcycle.
For our purpose, almost all models of motorcycles from the Izhevsk plant are suitable for us. The only thing that is important to understand is the engine power. Still, the end result will be a rather heavy structure, so the best solution would be to use the latest models - IZH Jupiter 5 or IZH Planet 5. There is no point in considering more interesting models, like IZH Planet Sport, because it is quite difficult to find them, and even if it is possible , then it’s better to restore them, because the motorcycle is quite rare and interesting. Let's move on to the main thing, how to make an ATV and what you need for this.
Additional accessories
A cargo ATV with a body can be additionally equipped with various devices and accessories, such as:
- windshields;
- bumpers;
- arch extensions;
- trunks and trunks;
- steering wheels;
- lighting;
- seats and backrests;
- tires and wheels;
- electrical devices, etc.
The owner can supplement any model of a cargo ATV with all the accessories he needs.
All necessary accessories can be added to any model of a cargo ATV
Rear suspension
Once you have decided on the donor, in our case it is IZH Jupiter 5, you need to completely disassemble the motorcycle. After disassembly, we will need a frame on which everything was supported, including the engine. It is logical that to increase the reliability of the structure, the frame needs to be strengthened in several places.
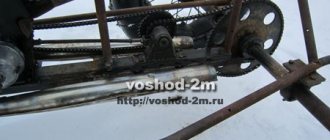
Now it is necessary to weld the rear axle so that instead of a wheel, a block of bearings with a chain drive can be installed on the axle. You can see an example in the photo. As a suspension, you can use ordinary shock absorbers from a motorcycle, and for the rear axle, parts from an old Lada car are suitable. You can take a more complicated route and install a monoshock absorber, but then again you will have to look for spare parts from a car, for example, from the same Zhiguli or Oka.
Front suspension
Once the rear suspension is finished and installed, you can move on to the front part of the bike, where things get a little more complicated. In the case where we were dealing with the rear suspension, we had the opportunity to choose how much shock absorber was installed. When creating the front suspension, we have only one option - to use two shock absorbers.
Oka's car is perfect as a donor for the front part of the ATV. From it we will need shock absorbers, swivel units and a steering linkage. However, be prepared for the fact that spare parts will still have to be changed - something must be welded, sawed off, or filed. Also a good and simpler option would be to install a monoblock with fixed wheel planes. Then you won’t have to look for a steering linkage, couplings, hinges and other spare parts.
A monoblock is a really simple option, because installation will take literally an hour of time. The only disadvantage of this front suspension design is the heavier mechanism. Turning the steering wheel will be somewhat more difficult than with a suspension with shock absorbers.
Engine
Many people wondering how to make an ATV with their own hands understand that they should start with the engine. Indeed, the main part in the future ATV is the engine. The final result, and indeed the entire design in general, depends on how powerful it is. Of course, you can keep the engine from the donor’s motorcycle, but in the end the “quad” will not be as powerful. If we take the creation of an all-terrain vehicle a little more seriously, then installing a more powerful engine would be an excellent solution. We hope that we have answered your question about how to make an ATV yourself.
Today, four-wheeled units are increasingly gaining popularity. But not everyone can afford to buy such a device. Then the question arises of how to make an ATV with your own hands. The creation process itself is very exciting, and finding components is not at all difficult. Therefore, if you have a desire, feel free to get to work.
Before starting work, a clear visual representation of the future structure is necessary. Drawings of homemade ATVs vary in accordance with the owner’s tasks and the characteristics of further use (carriage of goods, traversing rough terrain, etc.). After learning the basic diagrams and structures, draw up your own four-wheeled bike project. A clear example will serve as the basis for the work and will help explain to specialists what is required of them.
Of course, homemade work is inferior to established brands. However, if you choose the right materials and assemble compatible parts, then you will get a completely powerful unit that can compete with competitors. Moreover, you will save a lot.
Work process
The first step is to make the drawings of the ATV yourself. Put as much effort into sketching as possible. They will be needed to determine the required spare parts and calculate costs.
After creating the drawing, start purchasing components. Usually their main composition includes:
- frame - the main structure on which the entire unit will be supported;
- pipes of various lengths and diameters to ensure the operation of the system;
- rolled metal for installing shields, protection, etc.;
- shock absorbers;
- engine and its components.
The easiest way to make an ATV is with special equipment. If this is not available, the best option would be to contact specialists with ready-made drawings. They will not only do a high-quality job, but will also be able to correct inconsistencies
parts and mechanisms.
The frame should be made individually, according to the dimensions of the intended device. However, if you wish, you can also take a simple frame from a Russian-made motorcycle or car. The easiest way is to make an ATV from Oka with your own hands. Since the Oka has a small wheelbase
, this allows you to simplify the work of adjusting sizes.
Suspension and shock absorbers from cars and bikes are also perfect for future crafts. Considering that ATVs are designed to travel over difficult terrain, shock absorbers from a Minsk or Dnepr moped will be an excellent option.
Brakes are a very important part of the design. You shouldn't skimp on them. Create an ATV with your own hands, 4x4 drive, preferably with a brake system from a VAZ. Their strength is designed for cars, so a lightweight four-wheel bike will respond well to such a system.
The handlebar can be taken from any motorcycle. It is advisable that weights be installed on it to reduce vibration from engine operation and movement on rocky terrain. This will reduce pressure and hand fatigue when traveling.
Depending on which operating method you choose, you need to select wheels with wear calculations. For traveling on ordinary roads, simple wheels from Oka are suitable. However, if you want to achieve good off-road performance, it is worth investing in specialized wheels and tires from manufacturers.
And the most important thing is the engine. The best option for the role of a motor would be engines from IZH Jupiter or Planet motorcycles. A new motor will do just fine. Their simple design will help you easily replace worn out and broken parts. At the same time, do not forget about cooling. It is necessary to choose the ideal option for different climatic conditions. Active cooling is perfect, which, unfortunately, has not been used on motorcycles.
A homemade ATV from Oka, the drawings of which, depending on operating conditions, must contain additional equipment, can be equipped with fog lights, a tool box (very useful in case of breakdown) or a winch.
Selection of systems
The brake system uses new parts or with minimal mileage. It is dangerous to install old brakes. The muffler is removed from the old car or made independently from a pipe. If a frame from another machine is used, it must be securely bolted to the bottom of the motor. The power unit is installed at the rear or front. Experts advise securely attaching the drive and transmission to the frame.
If the frame requires reconstruction, the component elements are dismantled. The front part needs to be extended onto the frame. At the next stage, the components of the frame are welded. When reconstructing the frame of a motorcycle, the seatposts are moved back by 40-45 cm. Racks are cut out of metal and welded, which are then fixed to the frame. The resulting homemade quad part can be painted with any paint.
To make your own frame, use a regular pipe with a wall thickness of up to 3 mm. It is better to make the spars from a pipe with a diameter of 25 mm, and the struts from a 20 mm pipe. The elements are fixed by spot and then solid welding. In a similar way, the ears from the levers and shock absorbers are welded to the frame. It is recommended to fix the brackets when installing other components and assemblies.