Replacing the timing chain of a scooter with a detailed description
Sooner or later, during the operation of the scooter, the owner is faced with the need to replace any parts. We are not talking about standard consumables such as spark plugs or seals. Replacing the timing chain of a scooter is quite within the capabilities of its owner, this article will help. How to understand whether a replacement is needed It is clear that the chain needs to be changed when there is obvious dysfunction. When the chain wears out a lot, it makes a loud noise. Well, or jumped over the tooth of a star. Or it has fallen off, which indicates its stretching and wear. The standard service life of the chain should be close to the service life of the scooter engine itself. It's logical.
Each owner operates the vehicle differently, but the average chain lifespan is somewhere between 15,000-18,000 km.
In a situation where the engine was halved to eliminate other faults, and the chain was immediately replaced after using it for, for example, 9000 km, everything is clear. There are options for shortening the chain when stretched. But there are some caveats: if the step does not match, the star begins to erase, i.e. the stretched chain eats the camshaft sprocket. If the wear on the star is small, you can isolate the link and ride it a little. You need to do this correctly, adjusting the chain tension with a tensioner, and not forcibly. Otherwise, you will completely damage the chain. What is typical for a worn chain ? A small point: to check, you need to remove it. The degree of wear can be assessed by the angle of horizontal deflection. If it sags downwards, going almost vertically, change it 100%. The new chain deviates approximately 45 degrees from the horizontal. And by placing the old and new chains on the surface, you will see that the first one will be longer. Also, the wear of the scooter's timing chain can be indirectly judged by the level of extension of the tensioner rod. Critical wear is when the rod extends completely.
How to replace the timing chain in an engine
Having decided on such an action as replacing the timing chain of a scooter, you need to decide on how to implement your plan. There are two replacement options:
How to change, everyone decides for themselves. Both methods, advantages and disadvantages are described in detail below.
With disassembly
You should choose the right tools - generator and variator pullers (you can make them yourself), a kickstarter sprocket puller, 8, 10, 12 and 17 mm heads, a hammer, two screwdrivers (flat, Phillips). The engine is removed from its place, oil poured out, wiped and cleaned all parts. Next, remove the muffler and cooling casing. We remove the generator only with a puller. To do this, unscrew the bolts from the impeller and remove it from the rotor. It is necessary to fix the rotor with a puller and unscrew the nut. Then we tear the rotor off the crankshaft journal. Remove the variator cover. Also, secure the impeller with a puller, unscrew the nut, and remove the variator from the axle.
Below the variator is the kickstarter gear. Likewise, a puller is required for it. Then we clean the cylinder connector, valve covers and cylinder head. After unscrewing the bolts on the valve covers, remove it. Next, remove the scooter's timing chain tensioner. After unscrewing the bolts on the cylinder head, we pull out the camshaft bed.
Next, remove the chain from the camshaft and pull it out of bed. To avoid losing the guide bushings that center the parts relative to each other, you need to remove them and put them away. We remove the cylinder head, the cylinder itself, the piston (to do this you need to pull out the retaining ring and the pin from the upper head of the connecting rod). Unscrew the bolts on the crankcase cover, tap it a little, and remove it from the engine. We take out the starter intermediate gear, use a screwdriver and a hammer to unscrew the overrunning clutch nut (clockwise) and remove the gear and housing from the trunnion. We got to the chain! Remove the protective screen from the oil pump. Place a metal stick under the chain, twist the nut on the oil pump sprocket, remove it and remove the chain.
No disassembly
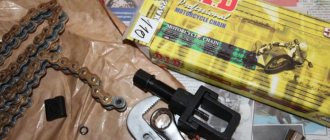
We take the following tools: a Phillips screwdriver, pliers, a new chain and a special puller. More details about it will be below. We flare the new chain - to do this, use a puller to press the pin out of the link joint, but not completely. We remove the cooling casing from the scooter engine, then the cylinder head cover. Next you need to remove the chain tensioner. We remove the camshaft bed, take out the shaft, remove the sprocket. We take the puller, center it with the pin, and gradually squeeze out the pin. You can press it out completely, it will not be useful. We compare the links of the new and old chains, thread the wire into the seat of the pin and fix the ends of both chains. We turn the cooling impeller counterclockwise, gradually replacing the old chain with a new one.
Then we separate the ends of the chains, throw out the old one, and combine the new links from the ends. We check the alignment, install the pin, and use pliers to carefully press the pin in so as not to damage the new chain.
We first check the mobility of the links. We finalize the pin with a puller. Again we control mobility. This point is very important: if you install the pin unevenly and miss it, it will begin to rest against one of the links and squeeze out the next one.
As a result, the subsequent pin or link bends, leading to its jamming and immobility. Next, we assemble the engine in the reverse order, placing marks on the rotor. When installing the camshaft bed, after tightening the nuts, you need to check the valve clearances with a feeler gauge. Upper valve – inlet: 0.05mm, lower – exhaust: – 0.1. The feeler gauge should pass freely between the valve and the adjusting bolt. Then install the chain tensioner. We unscrew the bolt on the top of the tensioner, install a screwdriver in the groove, and, turning it, push the rod back. We fix everything else back according to the diagram.
Which method is preferable?
It is logical that the first option with complete disassembly of the scooter engine is more complicated and takes more time and effort. But, as you can see, it is more reliable. Firstly, the factory integrity of the circuit is not compromised; secondly, by disassembling the scooter engine, you can see any defects, such as cracks, wear, change the seals, clean the parts. The second option is more simplified, can be used when you only need to replace the chain. And you are confident in the quality of your work.
Final word
The scooter is a fairly popular vehicle and is in increasing demand. Because it leaves traffic jams behind, has low operating costs and is economical in terms of fuel and lubricants. Many people prefer to do scooter repairs on their own, especially since four-stroke engines are simple and reliable to use. Timely technical inspections, careful operation and the above article will allow you to enjoy riding this miracle of the Asian motorcycle industry for a long time.
Replacing a scooter's timing chain guide
A scooter engine consists of many large and small parts and spare parts that make up the units and systems that supply and power the motor. Some of them play key roles in work processes, while others are invisible workers who conscientiously perform their functions. Such parts also include a timing chain guide, which is, however, a necessary and very important element of the fuel supply system to the cylinder. What is most striking is the fact that even schoolchildren know about the structure of a scooter’s chain drive (two sprockets and a chain), but only a narrow circle of initiates know about the dampers and chain guides belonging to the same system.
Meanwhile, the dampers, together with the chain tensioner, ensure its correct position relative to the sprockets. In addition, these parts ensure the elasticity of the chain when moving, its links clearly falling between the teeth of the sprockets and the most comfortable sliding at such high speeds. In addition, they protect the chain from wobbling, distorting and flying off the stars, which is dangerous and fraught with consequences for such a vehicle.
By ensuring the reliability of the scooter's chain drive, the dampers actually perform one of the most important functions in this design. And the performance of the scooter largely depends on the serviceability of these parts, the degree of wear and their service life.
Proper care of system parts - extending their service life
Unfortunately, there is not a single part of a scooter that lasts forever, so sooner or later they all have to be replaced. However, violation of operating rules, untimely technical inspections and the owner’s careless attitude towards his equipment significantly shorten the operational period of both the entire scooter and most of its systems.
The timing system contains many parts subject to intense friction, which means this engine unit requires intensive lubrication. In addition, its mechanism must be reliably protected from the penetration of dust and dirt from the outside.
One of the main procedures for caring for the system in general, and dampers in particular, is timely oil change. The fact is that during the operation of the scooter, the smallest dust particles still penetrate into the compartment where the chain drive mechanism is located. In addition, during operation, small fragments of metal (metal dust) are separated from the parts of the mechanism. Such impurities have a bad effect on the lubrication in the system - the oil becomes viscous and can no longer effectively perform its functions. If it is not changed on time, the service life of the assembly parts will be sharply reduced, and the chain drive itself will begin to work intermittently.
Adding oil is also an important factor in caring for dampers, because a lack of lubrication increases the friction force during the working process, and therefore increases wear of parts. It should not be expensive for the scooter owner to periodically check the oil level in the system and top it up in a timely manner.
Tips for selecting and replacing timing chain guides
When choosing dampers, first of all you should pay attention to their quality and compatibility with a specific scooter model. You should not buy such spare parts in spontaneous markets or secondhand. You should also refrain from purchasing if such a spare part does not inspire confidence (there are scratches, irregularities, chips, etc.) It is best to make a purchase in a trusted auto store or on the website. You can order either the damper itself or a kit that also includes a tensioner shoe at a competitive price.
Having dealt with the selection and purchase of the necessary spare parts, you can begin to disassemble and replace the worn or damaged part. Do not forget that before carrying out repair work you need to keep the garage clean and tidy. A mandatory procedure is also the preparation of tools and auxiliary items (containers, plastic bottles, rags).
Disassembling the scooter is carried out according to the same scheme as replacing the timing chain:
- removing the engine block along with the transmission;
- engine disassembly;
- ensuring free access to the circuit and other parts of the system;
- releasing the damper mounting and dismantling it.
When installing a new damper (and at the same time replacing the chain with a new one), it is necessary to thoroughly lubricate their rubbing surfaces. Assembly should be carried out in the reverse order, strictly monitoring the correct installation of components and assemblies. After fixing the protective casing, you need to fill in new oil to the level of the inspection hole.
The scooter must first be run in in a gentle manner to ensure reliability and correct assembly. If the scooter's engine systems operate normally and without failures, the repair was successful.
SCOOTER. ENGINE TIMING GEAR ASSEMBLY (50CC)
ATTENTION!
The cylinder head gasket is made of soft metal (copper, aluminum) and after tightening the cylinder head nuts it is deformed, thereby ensuring a tight connection. Reinstallation of the cylinder head gasket is not permitted. 2. Install the timing chain guide. 3. Install the cylinder head. 4. Set the piston to TDC according to the marks on the flywheel. This is usually the "T" mark on the flywheel. Align the mark with the tide on the engine crankcase.
ATTENTION!
The following operation is one of the most important when assembling the engine. It is important to align all the marks very accurately. An error in installing the chain even by 1-2 teeth will result in the engine not working correctly, and it will probably even lead to serious damage to the timing and cylinder-piston gas parts when trying to start the engine! 5. After making sure that the timing chain has not jumped off the drive sprocket on the crankshaft, install the camshaft into the cylinder head, at the same time putting a chain on its sprocket so that the marks on the camshaft sprocket are parallel to the plane of the edge of the cylinder head, and the cams are directed downward (inside the head).
6. Install the rocker arm support, orienting it according to the installation marks. Lubricate the cams and camshaft bearings.
On the rocker arm support are the letters “EX” - which means “EXHAUST” - release. The "EX" mark should be located above the exhaust valve.
content .. 61 62 63 ..SCOOTER. ENGINE TIMING GEAR ASSEMBLY (50CC)
1. Install a new cylinder head gasket.
ATTENTION!
The cylinder head gasket is made of soft metal (copper, aluminum) and after tightening the cylinder head nuts it is deformed, thereby ensuring a tight connection. Reinstallation of the cylinder head gasket is not permitted.
2. Install the timing chain guide.
3. Install the cylinder head.
4. Set the piston to TDC according to the marks on the flywheel. This is usually the "T" mark on the flywheel. Align the mark with the tide on the engine crankcase.
ATTENTION!
The following operation is one of the most important when assembling the engine. It is important to align all the marks very accurately. An error in installing the chain even by 1-2 teeth will result in the engine not working correctly, and it will probably even lead to serious damage to the timing and cylinder-piston gas parts when trying to start the engine!
5. After making sure that the timing chain has not jumped off the drive sprocket on the crankshaft, install the camshaft into the cylinder head, at the same time putting a chain on its sprocket so that the marks on the camshaft sprocket are parallel to the plane of the edge of the cylinder head, and the cams are directed downward (inside the head).
6. Install the rocker arm support, orienting it according to the installation marks. Lubricate the cams and camshaft bearings.
On the rocker arm support are the letters “EX” - which means “EXHAUST” - release. The "EX" mark should be located above the exhaust valve.
ATTENTION!
• Check the correct axial alignment of the camshaft (make sure that the camshaft bearings are correctly positioned on the beds). It is likely that on some scooter models there will be an “IN” - “INTAKE” - inlet mark on the holder. Accordingly, the “IN” mark must be located above the inlet valve.
ATTENTION!
If the copper washers are severely deformed (flattened), they must be replaced, since if the washers do not fit tightly due to oil leakage, the pressure in the lubrication system will drop and the motor will quickly fail. Sealing this connection with any sealant is unacceptable.
7. Install sealing copper washers on the studs.
8. Screw on all four cylinder head nuts without tightening them.
9. We recess the working rod of the timing chain tensioner inside the housing.
10. Reinstall the timing chain tensioner and tighten its mounting bolts.
11. Insert the working bolt and the timing chain tensioner spring, tighten it. In this case, you can hear characteristic clicks - the ratcheting mechanism of the tensioner working rod will be activated, which, under the influence of a spring, will come out of the housing and tension the timing chain.
12. Sequentially, crosswise tighten the cylinder head nuts in 3-4 steps. The final tightening torque is 10-15 Nm (More accurate values can be found in the repair instructions for the specific scooter model).
13. Screw in and tighten the additional cylinder head bolts.
14. Using a socket wrench for the central bolt of the flywheel, or with your hands holding the flywheel, slowly turn the engine crankshaft clockwise 3-4 turns to make sure that the timing timing is set correctly and the piston does not collide with the valves.
15. We install the crankshaft at TDC of the compression stroke and once again check the correct installation of the camshaft according to the marks.
16. Adjust the valve clearances (see Adjusting the valve clearances
).
17. Rotate the crankshaft several turns and once again check that the valve clearances are set correctly.
18. Install the cylinder head cover and tighten its bolts.
19. Place the crankcase ventilation hose onto the fitting in the cylinder head cover.
20. Install the cylinder cooling casing.
ATTENTION!
Do not forget to remove the paper from the intake manifold if you covered it from dirt during disassembly.
21. Install the inlet pipe assembly with the carburetor.
ATTENTION!
In most cases, when installing an exhaust system, the exhaust pipe gasket will need to be replaced. It is better to replace it with a new one during assembly.
22. Install the exhaust system.
23. Fill the engine with oil.
content .. 61 62 63 ..
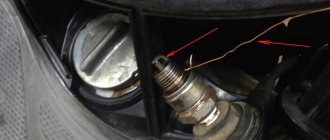
Photo report: How to check the timing chain of a scooter?
It’s always like this in life: one thing is good, the other is bad. Exactly the same principle applies to various types of mechanical torque transmissions. Chain transmission was no exception here. On the one hand, there is nothing simpler, more reliable, lighter, more compact and cheaper than a chain drive. On the other hand, we get eternal “hemorrhage” with chain stretching, sprocket wear, endless cleaning, lubrication, maintenance and tensioning of this very chain. But there is nothing to be done, the chain transmission has a lot of advantages over other types of mechanical transmissions, so these types of transmissions are used almost everywhere. However, today we will not talk about the chain transmission as such, but about a method for diagnosing the timing chain driving the camshaft of a scooter engine.
To change or not to change?
Suppose you “overhaul” your engine: you change the seals, crankshaft, gaskets and other devices, but you doubt whether to replace the timing chain with a new one or not. If you doubt it in vain, change it for a new one at the first opportunity. And now I will explain why. See for yourself: a chain has an average service life of approximately 18,000-20,000 km of a scooter (personal experience), approximately the same as the average service life of the engine itself. And for example, after driving 6,000 km, the crankshaft jammed or the engine leaked, or something else happened that requires complete disassembly of the engine.
Naturally, you disassemble the engine, replace the crankshaft with a new one, and leave the chain, which by that time has exhausted a third of its service life.
And what happens? The chain, after 12,000 km, will exhaust its service life and become unusable, but the crankshaft and other parts will be in good order and you, like it or not, will have to again, because of the chain alone, half the engine. Is it necessary? The chain is a consumable item. Never skimp on it!
Examination
Personally, I never check timing chains. I simply throw them in the trash, no matter how awesome they seem to me. For me, a chain is a consumable, just like a spark plug, oil or oil seal. But if it’s important to you, or money is tight, you can use the old fashioned method. We stretch the chain along its length, hold it with our fingers and try to position it in a horizontal position
For clarity, I took a new and heavily worn chain, put them together and checked for horizontal deflection. As you can see: the new chain (above) described a barely noticeable arc, while the worn and useless one sagged like snot, almost at an angle of 90 degrees. The worn chain turned out to be almost a centimeter longer compared to the new one.
How to replace the timing chain of a scooter engine?
How to adjust and tension the chain?
Proper maintenance and adjustment of the motorcycle timing chain
Modern engines of imported motorcycles require almost no attention, except for timely oil and filter changes. But on motorcycles with a fairly high mileage, there still comes a moment when the engine itself suggests with increased noise that it is time to start servicing the timing system - gas distribution mechanism. We will look at how to do this correctly without harming your engine in this article.
Unlike modern car engines (ancient Zhigulis and Muscovites do not count), (and Italian exclusives, such as Ducati motorcycles), where the gas distribution mechanism is controlled by a rubber toothed belt, on most modern imported motorcycles the timing chain is controlled. Of course, there are exceptions on some large cruisers, or English classic motorcycles, which use camshaft drive using gears. But such a drive does not need adjustment at all, since if after a very long mileage parts wear out, they are simply replaced with new ones (the same gears).
With a chain, everything is not as simple as it seems, since it must be constantly tensioned with a certain force in order to accurately transmit torque and serve the required period. After all, the camshaft of any engine must rotate absolutely synchronously with the crankshaft.
To tension the chain with a certain force, a set of parts intended for this purpose is used, consisting in most cases of two dampers coated with anti-friction material, along which the chain slides during operation, and the chain tensioner itself.
The tensioner is mounted in the engine so as to rest against the driven arm of the chain, and this arm is constantly pressed with the required force. This entire unit (and its normal operation) is very important, since a malfunction of this unit is dangerous and can lead to the dire consequences described above. And although problems here are quite rare, it still deserves attention, since in order to correctly diagnose the tensioner parts and then assemble them correctly, you need to know well how this unit works. Semi-automatic mechanical tensioner. Tensioner designs, depending on the years of manufacture, vary some. On the most ancient models until the 80s, simple mechanical timing tensioners were installed (see photo on the left), which were very easy to set up.
All you had to do was loosen the tightening bolt (usually a 10mm wrench), then rotate the engine crankshaft as it rotates until the resistance weakens, and re-tighten the bolt. Everything is quite fast and simple.
But after 1980, tensioners began to appear that automatically tighten the chain relative to its stretch. They are still used today. Some automatic tensioner systems are slightly different from each other, but their essence is the same - if they once extend to the required distance, the tensioner rod is fixed in this position and cannot move back. Thanks to this, the timing chain is constantly tensioned at all times with a certain force, which is set by the tensioner spring.
But many will wonder: why bother with the tension system if everything is automated.
Well, first of all, I already said at the very beginning of the article that you only have to climb into this unit on motorcycles with high mileage, because after a certain mileage everything eventually wears out. And secondly, when disassembling the engine (for example, to repair it), or replacing tensioner parts, many novice repairmen make mistakes, which in the end can turn out to be very expensive. My goal, or rather the goal of this article, is to warn against these mistakes. One of the common mistakes of novice “masters” is when, when removing the valve cover of some engines, on which the damper is located, the chain naturally weakens, since there is no longer pressure on the damper, the cover is then removed .
And when the chain tension is weakened, a working tensioner will immediately tighten the chain by extending slightly. A novice “master”, having checked the chain tension, will naturally be pleased with the normal tension. Only now he will not be able to install the valve cover in place normally, since the damper located in the cover will rest against the tense chain.
The unfortunate mechanic begins to press harder on the cover and compress it with standard bolts. The chain guide into which the tensioner rod rests is slightly worn. If the chain is tightly tensioned, it can wear out in a few minutes of work. As a result, either the tensioner clamp or the tensioner shoe itself (or the tensioner) breaks. If the high-quality parts of the tensioner and stabilizer can withstand such abuse, then the next time the engine starts, the chain will be so tense that the friction material of the tensioner and stabilizer will be erased in a few minutes of operation.
And the chain itself, during the same short operating time, will stretch as if it had a long mileage. As a result, the wear and noise of this unit will increase many times over, and very quickly. Therefore, before assembling the unit, I advise you to study the principle of operation of the tensioner of your particular engine, and find a way to return the tensioner rod back.
Below I will tell you how to do this correctly. The sprocket of a modern silent chain looks like a gear. 1 - sprocket, 2 - additional gear of the motor transmission, 3 - main gear, 4 - damper springs.