Why does the Ant scooter not start, reasons?
The scooter won’t start, a new carburetor was bought, the spark is good from the magneto, it seems to be trying to start, but it doesn’t work, what could be the problem?
Judging by the question asked, only the carburetor was replaced. Therefore, we do not touch sparking and early-later issues.
“If it grabs, but doesn’t chew and won’t work, the reason could be low compression or a misadjustment of the carburetor. Or "oversucked".
Compression, in the absence of a compression gauge, can be checked “by touch”. Plug the spark plug hole with your finger and turn the crankshaft. If the pressure “knocks out” from under your finger, we will consider it normal.
Carburetor. Screw the quality screw all the way and unscrew it 1.5-2 turns, this is a preliminary adjustment, it is adjusted while the engine is running (after it has been running.)
The “Ant” scooter runs on a fuel mixture and has a two-stroke engine.
The proportions of gasoline and oil when preparing the mixture were not maintained.
Recommended proportions are 400-500 grams of oil per 10 liters of gasoline.
That is, a poor-quality fuel mixture is the reason that the scooter does not start.
Or an old fuel mixture, if it has been poured into the tank for a long time, then it is better to drain it and fill it with fresh one.
Problems with the spark plug, the gap is not set (it is better to set the gap with a feeler gauge,
Poor (low) compression in the combustion chamber.
The air filter is completely (tightly) clogged, and the scooter may not start.
There are problems with the carburetor; at a minimum, it needs to be cleaned and adjusted.
No fuel is getting into the carburetor.
You haven’t started your scooter for a long time; for example, it’s been sitting all winter, try starting it with a pushrod.
I had such a problem, we changed the piston on the engine, cleaned the carburetor and tried to start it for 3 days. There was no way at all from the pedal, and I tried to grab something else from the pusher, but still they couldn’t start it.
You take out the spark plug, it seems to be wet, you calcine it with a burner, there seems to be a spark on the body, but it doesn’t start, somehow it tries a couple more times after calcination, but then it goes out.
They also sinned with a large fuel supply or even thought that the new ring had burst.
But the problem turned out to be in the spark plug itself, they installed a new one, they just started it with the pusher for the first time, probably the piston was filled, and then after applying the gas it started starting with the pedal.
Source
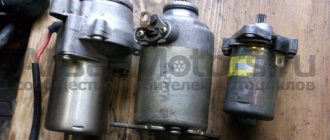
How to restore starting from the starter
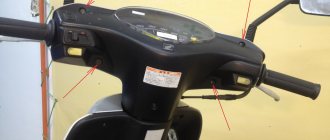
The moped does not start well from the starter, however, doing it from the foot is simple and easy. If the engine does not start well from the starter, you must first check the fuse located in the battery compartment.
The location of the fuse on the battery is marked with an arrow.
Due to the often poor quality of the manufacture of the fuses, and, consequently, the entire starter, the wire located inside the starter glass bulb can barely touch the contact caps, which is why the fuse contact becomes unsuitable. After the low-quality fuse has been replaced, the moped can be started using the starter.
Why does the Ant scooter not start, reasons?
The scooter won’t start, a new carburetor was bought, the spark is good from the magneto, it seems to be trying to start, but nothing, what could be the problem? Judging by the question asked, only the carburetor was replaced. Therefore, we do not touch sparking and early-later issues.
“If it grabs, but doesn’t chew and won’t work, the reason could be low compression or a misadjustment of the carburetor. Or "oversucked".
Compression, in the absence of a compression gauge, can be checked “by touch”. Plug the spark plug hole with your finger and turn the crankshaft. If the pressure “knocks out” from under your finger, we will consider it normal.
Carburetor. Screw the quality screw all the way and unscrew it 1.5-2 turns, this is a preliminary adjustment, it is adjusted while the engine is running (after it has been running.)
The “Ant” scooter runs on a fuel mixture and has a two-stroke engine.
The proportions of gasoline and oil when preparing the mixture were not maintained.
Recommended proportions are 400-500 grams of oil per 10 liters of gasoline.
That is, a poor-quality fuel mixture is the reason that the scooter does not start.
Or an old fuel mixture, if it has been poured into the tank for a long time, then it is better to drain it and fill it with fresh one.
Problems with the spark plug, the gap is not set (it is better to set the gap with a feeler gauge,
Poor (low) compression in the combustion chamber.
The air filter is completely (tightly) clogged, and the scooter may not start.
There are problems with the carburetor; at a minimum, it needs to be cleaned and adjusted.
No fuel is getting into the carburetor.
You haven’t started your scooter for a long time; for example, it’s been sitting all winter, try starting it with a pushrod.
I had such a problem, we changed the piston on the engine, cleaned the carburetor and tried to start it for 3 days. There was no way at all from the pedal, and I tried to grab something else from the pusher, but still they couldn’t start it.
You take out the spark plug, it seems to be wet, you calcine it with a burner, there seems to be a spark on the body, but it doesn’t start, somehow it tries a couple more times after calcination, but then it goes out.
They also sinned with a large fuel supply or even thought that the new ring had burst.
A dead battery is a common problem.
If the scooter does not start from the starter, try starting it from the kick starter. The most common problem is that the battery is simply dead due to a long period of inactivity, or has reached its intended service life. But it also happens that the relay regulator fails or the fuse blows. The fuse is usually transparent and its demise can be determined by eye. A malfunction of the regulator relay can be determined by starting the scooter with a kick starter and measuring the voltage at the battery contacts. It should not exceed 14.5 V. To avoid discharging the battery in the future, we advise you to remove the negative terminal, and during winter idle time, keep the battery warm, check the electrolyte level and fully charge it before storage.
If you want to upgrade your scooter, then you will be interested in the article tuning a scooter with your own hands.
How to install a magneto on an Ant scooter. How to set magneto ignition on ant
History of models. Who's online? You are an Anonymous user. You can register by clicking here. Soviet scooters: Forum. Previous topic :: Next topic. Matroskin Interested Registered: Dec 16, Messages: Explain how to do this on your fingers, the instructions say about some kind of meter, etc.
To come back to the beginning. First, you need to write on what engine. Everything written below concerns Tula ones. If I'm not mistaken, the opening of the contacts should begin 2. If the ignition is normal: we hook a 12V light bulb with one end to ground, the other to the terminal of the coil to which the wire from the contacts goes, take an iron rod about 6 mm, about 10 cm long, unscrew the spark plug, stick the rod into hole, lightly resting on the piston, rotate the rotor counterclockwise until TDC, set TDC, put a notch on the rod with a needle file, pull out the rod, and put a second mark at a distance of 2.
Now we turn on the ignition, stick the rod back with the same side, and turn the rotor counterclockwise, when the SECOND risk mark that you made the 2nd time appears, it is at THIS moment that the light bulb that you connected to the coil should light up, if it lights up earlier or later, then loosen the screws and turn the ignition to the correct position. Well, it seems to be something like this on the fingers. Labuh wrote:. Now turn on the ignition, stick the rod back with the same side, and turn the rotor counterclockwise, when the SECOND mark appears, it is at THIS moment that the light bulb that you connected to the coil should light up, if it lights up earlier or later, then loosen the screws and turn the ignition , choosing the correct position.
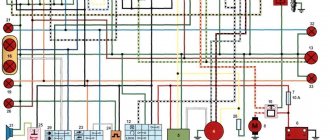
No spark
To check the spark, apply ground to the spark plug.
- - faulty spark plug,
- — breakage of the spark plug or armored wire, short circuit in the ignition coil,
- - there is no contact or the diode in the ignition switch with three wires on diode 34 is faulty,
- — the switch, generator or hall sensor is faulty.
All this is checked with a multimeter, or, in simple terms, a “tseshka”.
Electrics is a voluminous topic, so I will describe it in another article.
It turns out that ants don’t like to work at all, scientists have found
Owners of motorcycles not only made in Russia, but also of foreign cars often face the problem of “shooting” from the muffler. This happens due to improper care of the air-fuel mixture ignition system. The motorcycle shoots the muffler in several cases:
- when using low-quality gasoline;
- malfunction of the electronics system responsible for fuel supply;
- gasoline does not enter the combustion chamber in pure form;
In such cases, you don’t need to wonder why the muffler on a motorcycle shoots. Poor quality gasoline has a very high combustion temperature due to the addition of water, so it does not ignite completely. The remaining drops fall on the walls of the heated muffler
. Their ignition creates pops.
The motorcycle also shoots into the muffler when releasing the gas. The lower the pressure created in the internal combustion chamber, the more droplets enter the muffler. On some bikes, fuel accumulates in the muffler, followed by rare but very loud bangs.
Most often, but not always, owners of the Russian motorcycle industry face this problem. For example, a Ural motorcycle shoots into the carburetor. This occurs due to direct clogging of gasoline in the carburetor itself. To avoid this problem, it is necessary to constantly clean the filters and change the consumables responsible for cleaning the engine. Proper operation of your bike will not only ensure good engine performance, but will also maintain factory specifications.
Symptoms
The engine starts with great difficulty, there is practically no traction. The owner swears and swears that everything was installed new (you know the symptom too).
In such cases, first of all, you need to check the spark, the ignition timing, the carburetor, the rubber gaskets under the carburetor (the gaskets often burst and thickly and begin to suck air through the cracks) and, just in case, the air filter. If nothing suspicious is found in these devices, measure the compression in the combustion chamber and if it is below 8 kg/cm, feel free to open the piston
In our case, the piston is new, so we will not measure the compression, but will immediately remove the head and see how things are going there. But things here are neither bad nor good: new parts are so disgusting that you need to think three hundred times before buying them.
The new head turned out to be crooked and a fair amount of compression was lost through it. The matter was further complicated by the fact that the cylinder liner was pressed flush with the cooling jacket. Over time, the sleeve warped a little, literally by a tenth of a millimeter, due to which the already crooked head began to rest on the shirt in one place and a decent gap formed between it and the sleeve.
Insufficient fuel
Fuel may not flow due to a jammed carburetor shut-off needle. This is possible when it is clogged, or because the level in the float chamber is out of whack. It is necessary to disassemble the carburetor, blow out all channels and jets with compressed air. You can use a bicycle pump for this. After cleaning, check that the float and the rubber seal on the shut-off needle are intact, and adjust the floats. The position of the floats must be horizontal. Otherwise, by bending the tongue under the locking needle, achieve a horizontal position of the floats on the inverted carburetor. After putting it back together, use a transparent hose to accurately check the fuel level. You can use the VAZ washer hose. by connecting it to the carburetor sump and unscrewing the drain screw, the fuel level should be level with the joint of the bottom cover +/- 2mm as in the figure below:
The ant scooter will not start, what should I do?
The ant scooter will not start, what should I do?
Download file - Ant scooter will not start, what to do
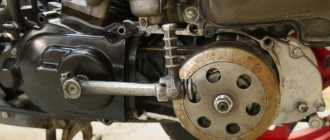
The engine is almost assembled, all that remains is to install the second crankshaft oil seal, flywheel and assemble the housing. I didn’t encounter any particular difficulties here. Perhaps only with an oil seal. For some reason, it was the crankshaft seals that caused the problem; all the other ones that fit into the box fit perfectly. By the way, this seal was not included with the seals, fortunately I found an old one in spare parts. Old, but soft from the category of “still fit” True, it had one spring, but on this engine there were two, one at one end, the other at the other. But the one that stood on the engine was oak and broken. Apparently there are two types of seals, but I didn’t have to choose, since there was only this one:. Full size Placed with a spring to the crankshaft. The gasket from the kit did not fit the holes for the screws, so I had to install it on the sealant, although initially I thought about installing it only on the gasket. And here the most important thing is to spread it just a little bit near the oil channel so that the sealant does not block the channel. Full size Bearing lubrication channel. Lubricate the oil seal and install the housing. Be sure to place the screws on the clamp and tighten them with a long impact screwdriver: Next, I needed to find a key somewhere for the flywheel. Because when I was filming it, it was cut off. By the way, it was written on the forums that you cannot remove the flywheel with a pry bar. True, I read this after I removed it. Therefore, I verified that it is possible to remove the flywheel with a pry bar, although the key was cut off. Even when I was filming, I thought that the key from the Zaporozhets generator should fit. Fortunately, I have a few generators. The key was a little small in width. Therefore, using a hammer, I made it like this: I didn’t take any further photos, since the flywheel and housing were already installed on the frame and there was no time for a camera. But the most important thing is to first install the housing, and then the flywheel. Then a fan and a rubber band under the magneto are screwed onto it. And the second part of the housing is installed with a diffuser for the fan, well, more precisely, not quite a diffuser, but rather just with a guide, in general, I don’t know what to call it: Here is the engine on the frame, though it’s already dirty after traveling through puddles of snow, mud, clay, etc. There was no oil noticed anywhere, and there were no leaks from under the head either. At first there were gaps from under the candle, since there was no ring on it. I installed it with the ring and everything was fine. A little difficult to start due to the reed valve. Because if the magneto is shorted to ground, open the enricher and pour more gasoline into the carb and pull the kickstarter without ignition 5 times, and then turn on the ignition, it will start the first time. And if you don’t do this, then you can grind it for a long time, until you have bloody calluses on your hands, but it still won’t start. Or, as an option, splash a little gasoline before starting, unscrewing the spark plug. But it’s better to just twitch the leg without ignition. That's basically it for the engine. I’ll write a little more about the carburetor; I haven’t decided exactly what yet: K 62, which is on it. Mine doesn't fit tightly either, but starts with half a kick. I had another problem. I went through the clutch of a new model, and second gear stopped engaging. I started sinning on the box, took it apart, and everything in the box was like new. Now I’m guilty of a backlash in the kozin. Tomorrow I will start assembling, at the same time I will only change the seals and the motor chain. Everything else is fine. Well, I don’t know, I was thinking about a reed valve. There was simply no time to check whether this was the case or not, because a friend wanted to sell it and did not want to buy spare parts. Well, if the others turn on, then it’s unlikely that the clutch is to blame. The switching mechanism itself is of course not well made, and it must be assembled very carefully. It should start on the first pull. If it's cold, you need to use a fortifier. Its reed valve did not fit tightly to the plane, so there were problems with winding. If I poured gasoline directly into the cylinder, it started immediately. And so it was possible to pull for a long time, I didn’t even grab it. Help Symbols VKontakte Twitter Mobile DRIVE2. About the project Vacancies Business account Advertising and cooperation. Site Rules User Agreement Privacy Policy. Audi RS3 7. Peugeot GTi Heel and stirrer. Subaru Impreza WRX STI Subaru! Ford Mustang Shelby GT BMW 5 series project E34Coupe Fastback. Cars Personal experience Communities Flea market Read interesting News and test drives Cars for sale d2. DonAuKind last online 1 day ago. Apparently there are two types of seals, but I didn’t have to choose, since there was only this one: Next: Scooter for repair. Or carry out maintenance according to the regulations! It’s just that there was no time to check whether this one was true or not, because a friend wanted to sell it and didn’t want to buy spare parts. Well, if the others turn on, then it’s unlikely that the clutch is to blame. Help Symbols VKontakte Twitter Mobile DRIVE2 About the project Vacancies Business account Advertising and cooperation Site rules User agreement Privacy policy.