Electrics, lights, music
It just so happened that I myself drew wiring diagrams for pit bikes of all types and capabilities, and I assemble the wiring for my pit bikes myself, not for the first time, and I realized something for myself.
So, another wiring option was created specifically for the pit club. The idea was to create a separate, completely permanent wiring harness that could be quickly removed, leaving only the wiring that is directly responsible for the spark.
Since I was so determined to install LED headlights everywhere, it came to a pit bike. There are no such places to properly secure the headlight, so a little ingenuity. After the first fittings, it was decided that the headlight should stand slightly above the mounting hole of the shield.
And so the FLINT headlights...they shine well, but there is a problem with the mounts on some models. We are talking about single headlights, on which the fastening to the headlight itself is, for some unknown reason, made on a groove-to-groove slide, and the whole thing is pulled together with one poor M3 screw. You understand m 3! which if you don’t tighten anything, you will either tear the thread out of the headlight housing, or the bolt itself will break off..
So, this circuit is suitable for all types of pit bikes, except for the YX 150 with a starter, where the generator has 4 output contacts. The relay regulator used in the circuit is a regular 4-pin. The generator is standard: 5-pin with windings for light.
Well, as usual, there are lazy people among us, and there are those who simply do not have the money to buy and install a battery on their pit tank to ensure normal operation of the headlight. Many people certainly need a headlight, but few people know how to connect it due to inexperience, and that’s why here’s the simplest connection diagram.
The fact is that the CNC button has constant contact with ground. When pressed, if the power wires from the starter are connected to it, everything will simply short out and burn out.
In general, all ignition coils themselves are the same on the pits. I’ll say more: the notorious Alpha and Japanese endurics have the same ignition coils.
But there is a very important difference not in the coils themselves, but in the armored wire and spark plug cap that come with the coil. It is these two elements that most often rape the brain, and the damper the weather, the more these details bother you.
Without further ado, straight to the point! The colors of the wires from the generator completely match the color of the wires on your generator! The rest of the colors are arbitrary! Red in the diagram is PLUS everywhere! Just like the black one that goes to the ignition coil! Green always and everywhere MINUS! The relay regulator in the diagram and in my pit was used not with 5 contacts, but with four! Why? Becauze I whant so!)))
Everyone has a hard time figuring out the main wiring, but the starter turned out to be a stumbling block for many, so especially for you here and now ELECTRIC STARTER CONNECTION DIAGRAM FROM AND TO)))
Source
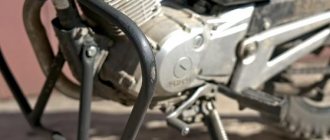
Repair of crankshaft connecting rod blocks
The crankshaft is one of the most critical engine parts, and highly qualified craftsmen from ALL4Motors take a particularly responsible approach to repair work.
We carry out various work on the repair and restoration of the crankshaft using modern high-precision foreign-made equipment.
Crankshaft straightening (Editing)
Probably the most important process for diagnosing a crankshaft, which determines its suitability for repair, is identifying the magnitude and direction of crankshaft deflection using a stand with prisms. If crankshaft runout is detected during the measurement process, then a decision is made to straighten the crankshaft using a hydraulic press.
Grinding the crankshaft journals
After measuring the wear of the main and connecting rod journals, the minimum permissible size for grinding the journal is determined; if during the troubleshooting process it turns out that when carrying out repair work when grinding the crankshaft, it is possible to grind only the main journals or, alternatively, only the connecting rod journals, then our craftsmen will carry out this operation in the shortest possible time deadlines. When carrying out crankshaft grinding operations, we use modern specialized machines with a variable axis of rotation. The most important parameter of the crankshaft journal is maintaining the ovality and taper dimensions established by the manufacturer within the tolerances; our crankshaft boring specialists have undergone appropriate training and are qualified for high-precision work on modern equipment.
Polishing crankshaft main and connecting rod journals
At the end of the grinding work on the crankshaft journal, the crankshaft journal is polished. This procedure is mandatory, since during its implementation, all micro-scratches and burrs left by the sharpening stone during grinding are removed from the surface of the journals, and it is this procedure that ensures better lapping of the liners and eliminates their premature wear.
Mechanical processing of the crankshaft for thrust half-rings
After measuring the crankshaft and identifying wear on the seats for installing the thrust half-rings, our specialists grind the thrust surfaces for the crankshaft half-rings of a repair size. If the wear of the surface under the half rings is not diagnosed in time and repair work is not carried out to restore the surface, the crankshaft in the engine receives free axial play, which significantly increases the load on the piston group and leads to premature wear of the gas distribution mechanism drive, gearbox and generally reduces the engine life. .
Connecting Rod Repair
We carry out comprehensive repairs and restoration of the connecting rod group, the main types of repair work on the connecting rod carried out by ALL4Motors:
- — mechanical processing of the surface of the lower head of the connecting rod for the bushing hole
- — boring the lower head of the connecting rod to restore the parallelism of the axes
- — honing of mounting holes
- - adjusting the mass of the connecting rod
Before making a decision to repair and restore the connecting rod, our specialists check that there is no deformation and that the dimensions are accurate to the factory parameters. As a rule, there are only three types of main malfunctions of the connecting rod group - this is deformation of the lower hole of the connecting rod due to overheating when turning the main liner. Wear of the connecting rod upper head bushings with “floating” pins and deformation of the connecting rod due to water hammer or other mechanical damage.
Call and come to our repair shop! And we will always help you with the repair of the crankshaft and connecting rods in a short time!
Source
Will the headlight work without a battery?
There are more and more pit bikes, and the buyers are most often amateurs. Until now, many pits are not only not equipped with a full-fledged generator, but also completely lacking a headlight, although those who simply ride without a hint of a cross track really, really need one.
And, naturally, the question arises: how to connect? Yes, very simple!
First, we buy a full-fledged generator with power coils and power wire output.
For 125 motors we use a heavy generator. With it you will not lose “tractor” traction at the bottom.
For motors 140 and above, we use a lightweight generator with the same power coils and two power wires output.
And, naturally, you need a relay-regulator, from which power wires are already distributed to any lighting equipment. You can take any relay, even with 5 contacts, even with 4.
How to connect a headlight to a Kayo pit bike
Hello everybody. In this article we will try to tell you in an accessible form how to install a headlight on a pit bike. We all understand that everything that seems simple has various nuances, if missed, the whole work will go downhill. For this reason, we decided to write an article with general recommendations.
Also in this article we will explain how to connect a headlight to a pit bike. That is, we will highlight the available options for connecting a headlight on a pit bike. Installing lighting components on a pit bike is a fairly common question that affects every second rider. Some people need a headlight because they often ride on night roads, while others need a headlight because they frequently travel on city roads. Accordingly, the PPD obliges owners of pit bikes to equip their vehicles with a lighting device.
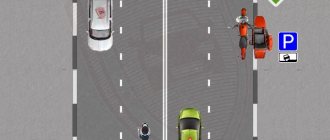
How to connect a headlight on a pit bike
For understanding, let’s say that in nature there are only two options for installing a light on a pit bike. Which of the two options is right for you depends solely on whether the generator has the appropriate wiring to power the light or not. So
- Option 1. Three wires come out of the generator, one of which is insulated. An example is the Zongshen 160; there is no winding on the generator of this motorcycle. The output is to install a generator with a winding for connecting light.
- Option 2. There are 6 wires coming out of the generator, three of which are insulated. An example of this situation would be the Lifan 140. This generator has a winding for powering the light. Installing a light on a pit bike with such a motor will take 2-3 hours if you follow the instructions.
Pressing the crankshaft
Reassembling the crankshaft into working condition is not particularly difficult. An automobile block made of cast iron can serve as a working surface on which the Minsk crankshaft will be repressed, although an anvil would be an ideal option.
— Take a new finger and drive it into one of the crankshaft cheeks. Preferably the one in which the old finger remained
Please note that unlike removing the old finger, which was carried out from the outside of the cheek, installing a new one must take place from the inside.
— First put the seperator on the finger, and then the Minsk connecting rod.
— Install the crankshaft cheek so that the pin rests securely on the surface of the anvil.
- Now align the second cheek of the crankshaft with the finger and start hammering it in. It is also advisable to do this using a heavy hammer.
Do everything carefully, even though you drive your finger into the crankshaft cheek, as you may accidentally hit the threads or other weak parts of the crankshaft. This will lead to deformation and most likely to the purchase of a new crankshaft
After the crankshaft is pressed, use the bar to check the clearances again. If they do not coincide with those that you wrote down earlier, spread the cheeks using the method already described above, or, on the contrary, knock them together a little until the gap reaches the required value. Make sure that the pin is completely hidden in the crankshaft. If it's not, knock it in.
How to make a light on a pit bike
In order to install the headlight, remove the interfering plastic, tank and switch. After installation, you need to find a suitable place to attach the relay-regulator there and hook the switch back up, just don’t forget to fasten everything back.
To install the headlight, remove the plastic that is in the way, the tank and the switch. After installation, find a suitable place to secure the regulator relay and connect the switch back, it is important not to forget to secure the green wire with a ring at the end, it leads to ground.
The headlight must be connected according to the colors of the wires. Each lamp has a bundle of wires. It happens that manufacturers use incorrect colors and then you can easily get confused about what to connect to what; the way out of this situation is to try each wire in turn.
When the connection is complete, make sure that the switch on the remote control is in the “on” position. The high and low beams work in turn and are working properly. If you have no reason to think that you did not do the job correctly, then feel free to rewind the wiring and put everything that you removed in place
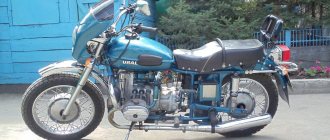
Engine IZH Planet 3, 4 and 5, disassembly, assembly for repair and tuning
When disassembling the engine, you must first drain the oil from it and remove it from the motorcycle frame; you must wash the engine thoroughly. To do this, it is advisable to use a high-pressure apparatus (car wash) with car shampoo. Having washed the engine and protected it from getting dirt inside, we proceed to disassembly.
We remove the right engine cover, remove the generator (by unscrewing the mounting bolts). Be careful not to damage the paronite gasket; remove the cover and disassemble the box. We take out the gears with the shafts and disassemble the shift mechanism, remove the control levers from the engine, and remove the clutch cover. We completely disassemble the clutch and remove the motor chain.
We disassemble the piston, remove the cylinder head (by unscrewing the fastening nuts), then remove the cylinder. After this, remove the piston from the crankshaft, first removing the retaining rings and carefully knocking out the piston pin.
We place the engine on its left side and, carefully without damaging the heads, unscrew the connection bolts using a powerful screwdriver. Then we knock out the centering halves of the crankcase half the length of the bushing.
Disassembled parts must be washed in gasoline and carefully inspected; damaged and faulty parts must be replaced with new ones. Clean the junction of the crankcase halves from old glue
On the oil seals (cuffs), pay attention to cracks and springs. Bearings should rotate easily without jamming and should not have any play
Having prepared the serviceable parts, we begin assembly.
We assemble the engine in the opposite order of disassembly. Be sure to heat the crankcase half to the same temperature, which makes assembly easier and preserves the crankcase surface from damage during pressing. The connection of the crankcase halves must be coated with BF-4 glue.
When installing the piston on the crankshaft, it is advisable to heat it to a temperature of 60 degrees, this will help when inserting the piston pin. During assembly, you also need to lubricate the cylinder mirror and piston pin with engine oil.
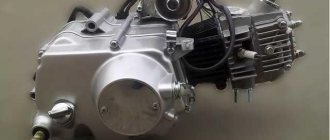
How to install a headlight on a Kayo 125cc pit bike
Now let’s look at a specific option, where the basic configuration of a not-so-cheap pit bike simply does not have a headlight. But everything is not so bad, it has a winding already installed on the generator to power the light.
Installing a headlight on a kayo 125 pit bike is problematic and will require special tools. To install the relay regulator, you only need a screwdriver, electrical tape and wires.
Let’s assume that we want to leave the design the same, which means we will need something that won’t spoil the look and is compatible with the existing design of the pit. We will also not make unnecessary holes and openings. We remember that only an original headlight can be better than an additional headlight; all professionals and amateurs in car mechanic work of any vehicle strive for this.
Be prepared for the fact that it will take a lot of time to select foglights. Most people at the counter are trying to sell us high beam headlights, and the vast majority, without thinking, fashion them and blind oncoming drivers! Everyone knows how unpleasant this is. If we are talking about high beam headlights, then this is a headlight with diffused light, such that the beam looks like a low beam headlight. You will come across a large number of headlights and you can choose any one. The average cost is 200 rubles per headlight.
Next, we find the bracket on the headlight and bend it (you can use your hands - the metal is quite soft, but you can also use a tool, pliers or pliers) and choose the correct bending angle.
We drill holes. Please note that the saddle must be selected with tight mounting screws. With a normally adjusted hole, we eliminate breaking due to vibrations when driving over bumps and engine vibration.
We use screws with a large diameter so as not to use washers, which we think is a better option. We installed the bracket and move on. We remember that we need a minimum number of holes in the front of the motorcycle. A stiffening rib runs nearby, which is why the fog lamp is installed in this particular place. We tighten the headlight. There are holes in the “ears” of the bracket for adjustment, that is, if you made a small mistake when marking, it can be corrected when adjusting the fasteners.
If you follow our recommendations, you will receive an installed headlight on a Koya 125 pit bike. In this case, the light will be installed as is now popular, similar to BMW with their asymmetrical optics.
Most people think that they will face many problems when solving the question of how to connect a headlight to a kayo pit bike. The PITBIKER.RU team has studied a lot of information about capacitors, about the ground, etc.. the first thought is that this is beyond the bounds of the possible and how can we even talk about it so that it’s clear. But a great desire to tell our clients about how to install and connect a headlight to a pit bike gave us the strength to write this article.
Causes of bearing wear
Otherwise, a complete replacement of the shaft or repair along the path of metal spraying is required. Do not forget also about emergency situations, such as jamming of the piston in the cylinder. This will inevitably lead to bending of the crankshaft, which, by the way, can occur during unprofessional disassembly of the motorcycle, when the shaft is knocked out with a hammer or sledgehammer.
If the bend can be eliminated, then physical damage cannot. Don’t also forget about replacing worn out oil seals in a timely manner. Replacing crankshaft oil seals on a Minsk motorcycle will allow you to avoid such troubles as the release of a gasoline-oil mixture into the generator. Many owners also experience difficulty starting the engine and a sharp drop in power.
Placement of wiring components
It just so happened that I myself drew wiring diagrams for pit bikes of all types and capabilities, and I assemble the wiring for my pit bikes myself, not for the first time, and I realized something for myself.
- The first thing I realized was that all the components should be in one place.
- Secondly, they must be accessible.
- Third, there should not be any clear fastenings for a certain model of components, as the Chinese are very inventive, and every time there is something new.
- Fourth - ease of removability.
- The last fifth thing is the wiring itself. It must be soldered, no twists, high-quality terminals and a decent thickness of wires.
Let's start with placement. I placed everything as accessible and protected from moisture as possible. Behind the side shield. For installation, I made a mounting plate on which you can install any type of component, the plate itself is also fastened quickly.
The regulator relay, CDI and even the starter relay, which is necessary for a motor with an electric starter, can easily be placed on this plate.
Unfortunately, I didn’t have a connector for CDI, and it’s not advisable to buy wiring for it, so the contacts are 1.5 mm, and heat-shrinkable tubes. There is essentially no difference, only in the convenience of removal. But if you know the crucible by heart, it’s not so stressful.
Since I have the same starter installed, I need a battery, I run the minus from it along the frame, pairing the wires with the minus of the regulator relay. so as not to pull unnecessary ground wires in the future.
The situation is exactly the same with the regulator relay, but if there was a trick, it would not be very convenient for me, as it is more convenient to place the wires directly from the regulator relay and one at a time.
In addition to everything, the wires themselves must be protected and not dangle anyhow, so every last wire is placed in special corrugations.
As for the headlights, of course a FLINT diode headlight is installed, only that and nothing else! Great light, great look! Durability and aluminum body! The set of these parameters makes this headlight simply ideal for installation on a pit bike!
But the headlight switch is far from modern, but from the USSR. Probably the most reliable and simplest thing there is, since it is in a metal case with a textolite base, even if you hit it with a hammer, it will not cause much damage, and its functionality will be completely intact.
Everything was assembled according to my already well-known scheme, which works great on all the pit bikes that I made, and from those who purchased wiring from me.
Source
Repair
Important! Balancing a motorcycle crankshaft and replacing parts should include a thorough inspection of all surfaces, in particular, looking for damage, wear, and wear. If you decide to replace or repress the crankshaft, you need to include engine maintenance in the list of works, including flushing all oil channels
It will also be necessary to replace the crankshaft seals of the Minsk motorcycle and install new gaskets. For this purpose, a special kit is purchased, with all consumables for repairs. It is most convenient to place the removed and opened engine in a horizontal position so that there is free space for the shafts.
If you are interested in motorcycles and want to purchase components or assemble your bike at a lower price, a crankshaft failure and subsequent repairs will help you save money when buying a used motor. Very often, owners, not wanting to waste time out of ignorance, sell engines in excellent condition, in which only one of the bearings has failed, or the crankshaft needs balancing. While driving, engine parts decrease in volume over time due to regular friction .
When replacing the crankshaft, it is advisable to take measurements of the original dimensions and diameters before starting work, otherwise you will have to bore the crankshaft and each time, trying it on in the appropriate groove, reduce its size to the appropriate one. The service life of the crankshaft and bearings depends on the correctly implemented clearances of the intermediate bearing (intermediate support).
If you want to limit yourself to minimal investments, you can restore the original dimensions of the crankshaft by plasma spraying. This will make it possible to use existing parts. At the same time, there are quite a lot of companies that provide such services. Crankshafts come in various types and designs, including monolithic and pressed. Repair of monolithic crankshafts comes down to balancing, straightening and grinding.
Since it is impossible to replace the brushes, the crankshaft will have to be replaced completely. Repair of pressing crankshafts also has its own nuances - if at least one part is replaced, then alignment and balancing of the crankshaft will be necessary.
In addition to the necessary repair of the crankshaft, if knocking occurs in the engine, it will be necessary to eliminate the emergency gap between the bearing roller and the connecting rod head.