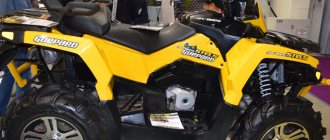
The Stels ATV 600 Y Leopard ATV is the result of a decision to take reliability and quality indicators, as well as the availability of components, to a new level. This is explained by the fact that no components made by Chinese manufacturers were used in the creation of this model. Stealth ATV 600 Leopard can be called the first model that was completely developed and manufactured by the Zhukovsky Motovelozavod.
The power plant of the ATV has a carburetor fuel system and liquid cooling. The motor was also provided by a domestic manufacturer, as were many other elements of the machine. Its rated power is 39 horsepower with a volume of 594 cubic meters. Perhaps one of the main features of this unit is its impressive torque, thanks to which the equipment copes well with increased loads and has traction throughout the entire operating range.
The initial stage of production of the ATV implies the presence of a body transferred from another equally famous model, Hisun ATV 500. This was done so that many elements were interchangeable between these models. Thus, there are no problems when searching for spare parts.
The Stealth ATV 600 Leopard model is equipped with a dashboard from the manufacturer Koso. This element turned out to be very informative and clearly displays information regardless of temperature conditions.
One of the key advantages of an ATV is predictable handling and riding comfort. The equipment perfectly maintains its stability even when taking sharp turns. It should also be noted that the machine has an impressive margin of safety. This was largely due to the efficient suspension.
Diagnostics and repair of the Nexia generator
To repair the generator, it must be removed from the car (see “How to remove a generator”)
We disassemble the generator. We unscrew the three bolts (they are star-shaped, but you can use a regular “6” head) and, gently tapping with a hammer, half it.
We check the armature - the slip rings should ring together (see photo). We check the armature for a short circuit by leaning the tester probe against the slip ring and the generator cover - there should be no contact between them
Remove the plastic cover covering the diode bridge and brushes. We unscrew the diode bridge, charging relay, brushes (star bolts, but you can use a head). We also unscrew the nut with an “8” key.
The brushes are held tightly in the lid, so to get them out you need to carefully hit them from the back with a flat screwdriver, thus knocking them out
A little about the generator design. The generator produces alternating current, and in order to rectify it (to get “+” and “-”), a diode bridge is needed. Diodes are designed in such a way that electric current passes in one direction and not in the other. Due to this, alternating electric current is divided into “+” and “-“. The base of the diode bridge has two plates: positive (to which the output bolt is attached) and negative (which is attached to the generator housing).
Checking the diode bridge. We set the tester switch to the dialing mode (resistance measurement). We lean one tester probe against the negative plate of the diode bridge, the second probe against the terminal on the winding (pin “1” in the photo). The tester should show one (if this is not the case, then swap the probes). The diodes were checked in one direction. Now let's check in reverse. We swap the probes, now the tester display should show a value of 450 - 650. If the value is 0.00 or 1, then the diode bridge is faulty. The same operation must be done with the positive plate, the values on the display should be the same. If this is not the case, then replace the diode bridge with a new one.
The charging relay cannot be checked at home. Therefore, if the brushes, diode bridge, armature and winding are intact, then change the charging relay
First, the terminals on the winding must be thoroughly tinned, and the winding terminals must also be treated with a soldering iron. Thoroughly solder the winding to the terminals of the diode bridge.
To insert the anchor without breaking the brushes, you need to insert a wire into the hole in the brush body, after pushing the graphite brushes inside.
After assembly, connect the battery, start the car and check the voltage on the battery. A working generator with the headlights on and the heater fan in maximum mode should produce a voltage to the battery of less than 13.5-14.8 V, but it is even better if the voltage lies in the range of 13.8-14.4 V
Tags: Nexia repair, Nexia generator diagnostics, Nexia generator repair, daewoo nexia repair
Comments
#15 Redactor 11/15/2016 23:53 Quoting Foad2016:
Who knows the model and number of the generator for Daewoo Nexia 2005 16kl, A15MF engine?
any of these numbers
#14 Redactor 11/12/2016 11:18 pm Quoting Foad2016:
Who knows the model and number of the generator for Daewoo Nexia 2005 16kl, A15MF engine?
The generators are all interchangeable.
#13 Foad2016 12.11.2016 17:43 Who knows the model and number of the generator for Daewoo Nexia 2005 16kl, A15MF engine?
#12 kursor 05/02/2015 19:50 I quote alex3187:
How much does a generator cost for an 8kL Nexia!? And is it possible to install a more powerful generator?
I had a native one, a Korean one. When the charging relay got stuck, it became a big problem to find it. When I found it, the price was 4.5 thousand. One relay. I went to the store and bought 85 or 90 amps from Lanos!! For 3.6 thousand rubles - I changed the pulley on it - on Nexia it is 12 mm longer. And the fire - everything is wonderful (((
#11 NotDeath 04/27/2015 21:14 Tell me, I want to install a generator from a Priora 115, will it fit, or will I have to redo it?
#10 Sashok 04/26/2014 16:34 Quoting alex3187:
I’m not as much, but as on vases! For example, set it to 130!
If your hands grow from where they need to be, adjust the VAZ. When my family was being repaired (waiting for spare parts), I had a generator for a penny.
#9 alex3187 04/26/2014 16:11 I quote Sashok:
Price from 4500 rub. and higher, there are also different powers: 75A, 80A, 85A. Enter the number 96252547 in a search engine and see for yourself.
Price from 4500 rub. and higher, there are also different powers: 75A, 80A, 85A. Enter the number 96252547 in a search engine and see for yourself.
I’m not as much, but as on vases! For example, set it to 130!
#8 Sashok 04/26/2014 15:47 I quote alex3187:
How much does a generator cost for an 8kL Nexia!? And is it possible to install a more powerful generator?
Price from 4500 rub. and higher, there are also different powers: 75A, 80A, 85A. Enter the number 96252547 in a search engine and see for yourself.
#7 alex3187 04/26/2014 11:05 How much does a generator cost for an 8kL Nexia!? And is it possible to install a more powerful generator?
#6 wowadts 04/24/2014 21:12 Quoting Angar7902:
And also, I’ll push the thought, I would like to know the numbers of the bearings, the identification mark of the brushes and the entire generator, well, as a reference, and as an advertisement, to know the places where this can be purchased at a specific price...
Slip ring number 133924, https://exist.ru/price.aspx?pid=50003121&sr=-8
#5 mehanic 09.21.2013 17:54 and where is the ground for the engine on the Nexia 16kl N100? I looked for it and couldn’t find it, the battery runs out quickly, the ground is apparently rusty..and is it possible to put an additional wire on the engine ground?
#4 sanya24 07/09/2012 18:27 The gene can be removed and you just need to loosen the ramp pipe through the top.
#3 hapson 02/28/2012 21:27 Quoting Angar7902:
And also, I’ll push the thought, I would like to know the numbers of the bearings, the identification mark of the brushes and the entire generator, well, as a reference, and as an advertisement, to know the places where this can be purchased at a specific price...
Comparison with competitors
The main opponents of the domestic utility are devices from the Cheetah and Leopard series. Many buyers prefer the more “fresh” and powerful Guepard 800. Of course, the device costs almost 100 thousand rubles. more expensive than its predecessor, but significantly superior in technical characteristics. You can also consider the middle model of the line - Stels 700.
The Guepard and Leopard 650 are not far behind the Stels ATV 650. The cars are very similar both externally and technically. But Cheetah is more versatile. The double unit is suitable for work, leisure and tourism. A single Leopard 650 YL costs only 30 thousand rubles. cheaper than its brother.
The Sportsman 600, developed by Polaris, also competes with the Russian ATV. The athlete, introduced back in 2005, is inferior to the Cheetah in power and maneuverability. The American also loses a little in price. The cost of a Sportsman ranges from 580 to 620 thousand rubles, while the Stels 650 ATV can be purchased for 460-558 thousand rubles.
Repair of Daewoo Nexia generator, generator does not charge
The service life of the Daewoo Nexia is about 150,000 (km) mileage . At this mark the main “sores” of the generator , the main of which are:
- Lack of battery charge
- Power failure for on-board electronics
Although the Daewoo Nexia generator is serviceable, the maintenance regulations provide for the repair of this unit by replacing it with a new analogue . It is rational to restore the generator only when its mileage is less than or about 100,000 - 120,000 (km) mileage . In all other cases, it is best to fix the generator breakdown by replacing the unit with a new analogue. The cost of a new Daewoo Nexia generator is $ 60-80 .
The generator is removed from under the hood . To get the problem generator you will need 15-20 minutes of time .
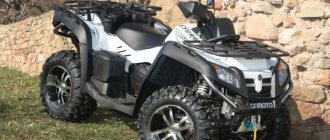
Stels ATV 650 Guepard: reviews and operating experience
The Stealth Cheetah 650 ATV is one of the most popular vehicles on the Russian market. In reviews, owners of the Stealth 650 Cheetah ATV note:
- Reliability. The high quality of all components allows the machine to operate without serious breakdowns for at least 2-3 seasons.
- Low cost. The Stealth Cheetah 650 ATV costs significantly less than its foreign competitors.
- Safety. Hand protection, arch extensions, an aluminum bottom and an automatic engine stop check increase the “life” of the device and reduce the risk of injury.
- Versatility. Stels Guepard 650 feels comfortable both on the highway or dirt road, and on rough terrain or in the mountains.
There are some shortcomings in the car. Many users noted the poor quality of the fuel system and “weak” suspension bushings. Also disappointing is the high weight, which reduces the maneuverability of the device.
Daewoo Nexia generator replacement process
- Be sure to disconnect the negative terminal from the battery.
- We remove the air duct . It is necessary to loosen the clamps on the filter housing and throttle valve , as well as on the crankcase vent and deflector. We simply remove the air duct.
- Disconnect the fuel line tube . Be careful, fuel may spray out of the hose . To remove the sleeve, you must first tighten the latches .
- We loosen the tension of the generator belt . We unscrew the fasteners on the adjusting bar and move the generator towards the cylinder .
- We remove the generator belt from the pulley .
- Disconnect the wire block . You must first squeeze out the latch.
- Unscrew the nut and remove the wire .
- We unscrew the long pin that secures the generator to bracket .
Some craftsmen prefer to dismantle the Daewoo Nexia generator complete with bracket. In this case, it is necessary to unscrew the bracket from under the car (it is held on by bolts) and remove the generator complete with the bracket. Then unscrew the fastener connecting the generator to the bracket. This is an alternative way to dismantle the generator.
- Removing the generator.
- We replace the worn-out generator with a working analogue (restored or new).
- We assemble the unit in the reverse order.
- We check the operation of the generator.
Generator analysis
Before directly restoring the Daewoo Nexia generator, it must be completely disassembled to provide access to the stator, rotor, brush mechanism, relay and other components.
- First, the generator needs to be properly cleaned . It is advisable to blow out the generator housing with compressed air.
- Remove the plastic casing , held on by 4 latches. It is better to use a flathead screwdriver.
- Unscrew and remove the brush holder with the voltage regulator .
- Unscrew and remove the rectifier block .
- Unscrew the 3 studs that connect the bottom and top covers.
- We disconnect the case.
That's it, you can start diagnosing and repairing.
What was used in the process of dismantling and disassembling the generator
- A set of keys
- Screwdriver Set
- W.D.-40
- Mounting blade
As you can see, the process of dismantling and disassembling the Daewoo Nexia generator is not particularly difficult. The generator is located immediately under the hood. All housing elements and components of the generator are removable and can be easily diagnosed and serviced.
Regarding diagnostics, a technician cannot do without a special multi-measuring tool.
Additional Information
The following signs indicate problems with the Daewoo Nexia generator:
- The Check-Engine warning light is on (no battery charging)
- The headlights are dimming
- The instrument panel does not work correctly
- etc.
That is, a worn-out generator stops powering both the on-board electronics and the battery pack. The car's power is completely transferred to the battery. Driving on battery power alone does not bode well . The battery quickly becomes unusable. It may happen that the car simply will not start after a planned or emergency stop.
Practice shows that the following generator components most often fail:
- Brush mechanism
- Voltage relay
- Stator winding
- Diode bridge
- Rotor
Don't forget about contact tracks and bearings . All these parts require maintenance.
If the generator has already completed its 150,000 (km) mileage, then it is best to simply get a new Daewoo Nexia generator. There is practically no point in restoring an old generator. Full maintenance of the generator will cost a considerable amount, but no one will give a guarantee for the repair unit anyway . The service life of a refurbished generator is much lower than that of a completely new branded analogue.
19.8.3 Checking the generator
With the engine running, we bring the crankshaft speed to 3000 rpm and turn on the maximum number of consumers (high beam headlights, rear window heating element, electric heater fan, etc.). We measure the voltage between terminal “30” of generator 37.3701 (terminal “+” of generator 58.3701) and the generator housing. The voltage should be in the range of 13.5-14.6 V. If the voltage does not fall within these limits, the voltage regulator, brush assembly may be faulty, the contact rings of the field winding may be oxidized, or one of the generator windings may be shorted to ground.
The removed generator voltage regulator 58.3701 can be checked by connecting a lamp (1-3 W, 12V) between terminals “W” and “B”, and the metal base of the regulator to the “minus” of the DC power source. When a voltage of 12 V is applied to terminals “B” and “C,” the lamp should light up, and when a voltage of 15-16 V is applied, it should go out. If the lamp does not light in both cases or is constantly on, the voltage regulator is faulty and requires replacement. To check the generator voltage regulator 37.3701, connect a lamp (1-3 W, 12 V) to the brushes. We connect the negative of the power source (DC) to the “mass” contact of the regulator. When a voltage of 12 V is applied to the “B” terminal, the lamp should light up, and when a voltage of 15-16 V is applied, it should go out. If the lamp does not light in both cases or is constantly on, the voltage regulator is faulty and requires replacement.
Scheme for checking the voltage regulator of the generator 58.3701: 1 - battery; 2 - voltage regulator; 3 - control lamp.
Scheme for checking the voltage regulator of the generator 37.3701: 1 - battery; 2 — output of the “mass voltage regulator; 3 - voltage regulator; 4 — output “Ш” of the regulator; 5 — output “B” of the regulator; 6 - control lamp.
Checking other components on generators 58.3701 and 37.3701 is carried out almost similarly (described using the example of generator 37.3701).
You can check the serviceability of the valves of the rectifier unit in a car by first disconnecting the wires from the battery, generator and voltage regulator output. We connect the “plus” of the battery through a lamp (1-3 W, 12 V) to terminal “30” of the generator, and the “minus” to its body. If the lamp is on, then there is a short circuit in both valve blocks (“positive” and “negative”).
To check the short circuit in the block of “positive” valves, we connect the “plus” of the battery through the same lamp to terminal “30” of the generator, and the “minus” to the terminal of one of the phase windings of the stator or one of the mounting bolts of the rectifier block. If the lamp is on, then one or more valves are broken.
To check the short circuit in the “negative” valves, we connect the “plus” of the battery through a lamp to the output of one of the phase windings of the stator, and the “minus” to the generator housing. If the lamp is on, one or more valves are broken or the windings are shorted to the generator housing. To check the windings for short circuits, remove the generator from the car (see “Removing and disassembling generator 58.3701” and “Removing and disassembling generator 37.3701” ) and disconnect the windings from the voltage regulator and rectifier unit. We check the serviceability of the windings with a lamp or ohmmeter. The generator valves can also be checked with an ohmmeter, connecting it instead of a test lamp and battery, as described above. We check the closure of the additional valves of the generator 37.3701 by connecting the “plus” of the battery through a lamp to terminal “61” of the generator, and the “minus” to one of the phase windings of the stator. If the pump is on, one or more additional valves are broken. The malfunction of each valve can be checked individually with a lamp or ohmmeter (on the removed rectifier unit). If one or more valves fail, it is better to replace the rectifier unit as an assembly.
Specifications
Power point:
- Number of cylinders - 1.
- Working volume - 594 cubic meters.
- Rated output power is 39 horsepower/29 kilowatts (at 5500 rpm).
- The highest torque is 56 newtons per meter (at 4250 rpm).
- Number of camshafts - 1.
- The camshaft location is overhead (SOHC).
- Number of valves - 2.
- Cooling system type: liquid.
- Type of lubrication system - oil bath.
- Fuel system type: carburetor.
- Recommended fuel is AI-92.
- Type of ignition system: contactless electronically controlled (CDI).
- Starting system type: electric starter.
Chassis:
- Drive type - full.
- The type of transmission system is a variator with a V-belt drive (CVT).
- Frame type: tubular steel.
- Clutch type - centrifugal automatic.
- Front suspension type: independent with two wishbones and spring-hydraulic shock absorbers.
- Rear suspension type: independent with two wishbones and spring-hydraulic shock absorbers.
- The front suspension travel is 170 millimeters.
- Rear suspension travel is 225 millimeters.
- Front tires - AT26x9-12.
- Rear tires - AT26x10-12.
- Front wheel type: light alloy.
- The type of rear discs is alloy.
- Front brake type: hydraulic disc.
- Rear brake type: hydraulic disc.
- Power steering type: electric.
Dimensions:
- Structural length - 2250 millimeters.
- The structural width is 1210 millimeters.
- The structural height is 880 millimeters.
- The height of the seat back is 1300 millimeters.
- Wheelbase length -1365 millimeters.
- The lowest ground clearance is 290 millimeters.
- The smallest turning radius is 3200 millimeters.
Other characteristics:
- The capacity of the fuel tank is 14 liters.
- The maximum weight of cargo transported on the front trunk is 40 kilograms.
- The maximum weight of cargo transported on the rear trunk is 70 kilograms.
- The curb weight of the ATV is 372 kilograms.
Daewoo Nexia 1.6 4door sedan, 109 hp, 5 manual transmission, 2008 - generator malfunction
Basic generator malfunctions
When checking the generator, as well as when operating the car, you must follow a number of simple rules so as not to damage the generator:
– do not allow the generator to operate with the battery disconnected; – do not check the operation of the generator for a “spark”, since in this case a significant current flows through the diodes and they fail; – do not test diodes with voltages exceeding 12 V or with a megger; – when carrying out electric welding work, disconnect all wires from the generator and the battery; – check components and circuits of electrical equipment and eliminate malfunctions with the engine not running and the battery disconnected.
The wires on the generator are loose
or battery,
battery terminals have oxidized,
Tighten the terminals, strip the battery terminals,
Replace the brush holder assembly with brushes
Check the soldering of the field winding leads to the slip rings
and restore it if necessary
Eliminate the cause of the oiling
Failure of generator bearings
Rotor contact with stator pole
Replace defective bearings
Generator malfunctions - signs, diagnostics, causes, testing
Common generator problems:
pulley wear or damage; wear of current collecting brushes; wear of the commutator (slip rings); damage to the voltage regulator; short circuit of the stator winding turns; wear or destruction of the bearing; damage to the rectifier (diode bridge); damage to the charging circuit wires. Common battery faults: short circuit of battery electrodes/plates; mechanical or chemical damage to the battery plates; violation of the tightness of battery cans - cracks in the battery case as a result of impacts or improper installation; chemical oxidation of battery terminals. The main causes of these malfunctions are: gross violations of operating rules; expiration of the product's service life; various manufacturing defects. Of course, the design of a generator is more complex than a battery. It is quite reasonable that there are many times more generator malfunctions, and their diagnosis is much more difficult.
It is very useful for a motorist to know the main causes of generator malfunctions, how to eliminate them, as well as preventive measures to prevent breakdowns.
All generators are divided into alternating and direct current generators. Modern passenger vehicles are equipped with alternating current generators with a built-in diode bridge (rectifier). The latter is necessary to convert current into direct current, on which the vehicle's electrical consumers operate. The rectifier, as a rule, is located in the cover or housing of the generator and is integral with the latter.
generator structure. Generator in detail
All electrical appliances of the car are designed for a strictly defined operating voltage range. As a rule, operating voltages are in the range of 13.8–14.7 V. Due to the fact that the generator is “tied” with a belt to the engine crankshaft, it will work differently depending on the speed and speed of the vehicle. It is for smoothing and regulating the output current that the relay-voltage regulator is designed, playing the role of a stabilizer and preventing both surges and dips in the operating voltage. Modern generators are equipped with built-in integrated voltage regulators, colloquially referred to as “chocolate” or “tablet”.
It is already clear that any generator is a rather complex unit, extremely important for any car.
Types of generator faults
Due to the fact that any generator is an electromechanical device, there will be two types of faults - mechanical and electrical.
The first includes the destruction of fasteners, housing, malfunction of bearings, pressure springs, belt drive and other failures not related to the electrical part.
Electrical faults include winding breaks, diode bridge faults, brush burnout/wear, turn-to-turn short circuits, breakdowns, rotor beating, and relay-regulator faults.
Basic generator malfunctions
Often, symptoms that indicate characteristics of a faulty generator can also appear as a result of completely different problems. As an example, poor contact in the fuse socket of the generator field winding circuit will indicate a generator malfunction. The same suspicion may arise due to burnt contacts in the ignition switch housing. Also, the constant lighting of the generator malfunction indicator lamp can be caused by a breakdown of the relay; the blinking of this switching lamp may indicate a generator malfunction.
The main signs of a malfunctioning autogenerator:
When the engine is running, the battery discharge warning lamp flashes (or stays on continuously). Discharging or overcharging (boiling) of the battery. Dim car headlights, a rattling or quiet beep when the engine is running. Significant change in headlight brightness with increasing speed. This may be acceptable when increasing the speed (re-throttle) from idle, but the headlights, having lit up brightly, should not increase their brightness any further, remaining at the same intensity. Extraneous sounds (howling, squeaking) coming from the generator. It is necessary to regularly monitor the tension and general condition of the drive belt. In case of cracks and delaminations, immediate replacement is necessary.
Technical parameters of Daewoo Nexia 1.6 / Daewoo Nexia in a 4-door body. sedan with a 109 hp engine, 5 manual transmission produced since 2008.
Price
The Stealth ATV 600 Leopard ATV is currently available for sale at prices ranging from 360 thousand rubles to 410 thousand Russian rubles for a car with zero mileage. The price varies depending on the year of production and configuration, but the type of painting may also affect the final price tag (camouflage colors are often offered). Nowadays, many companies also offer the purchase of motorcycle equipment in installments. The cost of this option is on average 16 thousand Russian rubles per month.
In used condition, this ATV is in the price range from 280 thousand rubles to 335 thousand Russian rubles, depending also on the year of manufacture and mileage.
How to determine the type of generator on Nexia - Electrics - Daewoo Club - Daewoo forum
If the voltage is less than 13 V, the contacts of the wire from the generator to the battery may have oxidized, the voltage regulator is faulty, the brushes are oily or worn, or the generator itself is faulty.
How to check the generator on a car. Basic malfunctions. Just something complicated
Electronic voltage regulator 2, combined with a brush holder, is also attached to cover 4. Using a stethoscope, we evaluate the condition of the generator bearings based on noise.
Maybe this will help. On Nexia there were two types of Delco Remy CS and CS (where the numbers are...
Belts also vary in length for vehicles with and without power steering, so be careful when purchasing a replacement belt. To check the diode bridge, you need to check the resistance between the terminals and the air cooling grid; to check the diodes, there should be different readings between the terminals and the mounting plate. First, the terminals on the winding must be thoroughly tinned, and the winding terminals must also be treated with a soldering iron.
However, on cars with high mileage, it is often more profitable to replace the assembly with a new one than to replace failed parts.
We set the tester switch to the resistance measurement mode. We lean one probe of the tester against the negative plate of the diode bridge, the second probe to the terminal on the winding, pin “1” in the photo.
The tester should show one; if this is not the case, then swap the probes. The diodes were checked in one direction. Now let's check in reverse. We swap the probes, now the tester display should show the value - If the value is 0.
The same operation must be done with the positive plate, the values on the display should be the same. If this is not the case, then replace the diode bridge with a new one. The charging relay cannot be checked at home.
Therefore, if the brushes, diode bridge, armature and winding are intact, then change the charging relay. We assemble the generator. First, the terminals on the winding must be thoroughly tinned, and the winding terminals must also be treated with a soldering iron. Thoroughly solder the winding to the terminals of the diode bridge.
Scheme for checking the generator voltage regulator Checking other components on generators You can check the serviceability of the valves of the rectifier unit in a car by first disconnecting the wires from the battery, generator and voltage regulator output. If the lamp is on, then one or more valves are broken.
If the lamp is on, one or more valves are broken or the windings are shorted to the generator housing. To check the windings for short circuits, remove the generator from the car, see