25.08.2015
9822
Moto, Repair
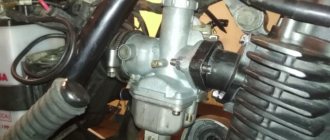
This article will talk about how to clean the carburetor on a Chinese scooter with a 4-stroke engine. A clean carburetor is the key to stable engine operation. From my personal experience, I can say that 80% of the reasons why a scooter rides poorly, does not start, etc. lie in a dirty, clogged carburetor. Therefore, you need to pay due attention to your carburetor.
Removing the carburetor
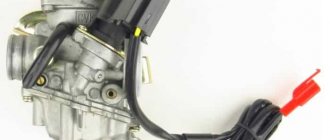
At the first stage, unscrew the 4 bolts and remove the seat compartment; on some models, the oil tank cover is also unscrewed. Then the air filter is removed, for which we release the screw of the clamp securing the cuff and 2 10-point bolts that secure the housing. The rubber cuff of the filter housing can be pulled off the carburetor with a certain amount of force. Now you need to disconnect the gasoline and oil hoses. For this purpose, the loops of the clamps are compressed and the two hoses are pulled together. Using a 10mm wrench, unscrew the nearest bolt attaching to the intake pipe. Unscrew the second bolt inside. At the moment, 2 hoses have already been released, 2 fastening bolts have been unscrewed. Now you need to remove the device, unscrew the throttle cover and remove the throttle. To finally release the device, you need to remove the protective cover of the starting enrichment from the latches and unscrew the 2 screws from the clamping bracket of the enrichment.
Thursday, September 28, 2022
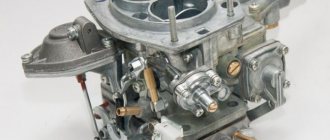
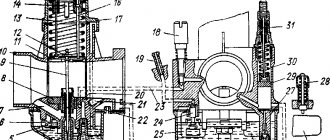
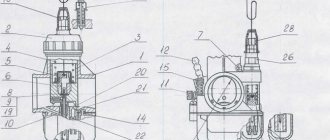
Carburetor diagram for 139qmb
Check all O-rings for damage. Replace if necessary.
When cleaning the carburetor, remove the vacuum diaphragm before using purge air or cleaning solvents. This will prevent damage to the diaphragm.
Possible malfunctions of the CVK carburetor
1.The engine is difficult to start
— No spark - Poor compression
2. There is no fuel in the carburetor
-Closed fuel line -Closed fuel filter -Blocked vacuum line -Damaged Broken vacuum line -Clogged inlet needle -Float level set too high
3. Too much fuel for the engine
-Dirty air filter -Air leak in the manifold -Faulty enrichment valve -Blocked air passage in the carburetor
4. Air/fuel mixture too rich or too pale
-Faulty enrichment valve -Tightened idle screw -Float needle stuck or dirty -Float height too high or too low -Blocked carburetor air passage -Dirty air filter -Carburetor or manifold air leak
5. Engine does not accelerate
-Bad spark -Air mixture screw too tight -Accelerator pump faulty
6. Almost does not respond to the throttle
-Weak spark/poor ignition -Blocked fuel line -Blocked fuel filter -Bad fuel -Water in fuel -Air leak in carburetor or manifold -Faulty enrichment valve -Fuel flow difficult in carburetor -Vacuum choke stuck -Damaged vacuum diaphragm -Dirt in carburetor
Removing the carburetor
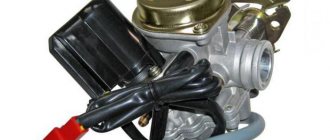
1. Remove the seat and container underneath. 2. Remove the right side panel. 3. Disconnect the starter cable connector. 4. Loosen the carburetor drain screw and drain the fuel from the float chamber. 5. Loosen the clamps in the intake pipe and intake manifold. 6. Loosen the throttle cable and pull it out of the caliper and out of the throttle control sector. 7. Disconnect the fuel line from the carburetor. 8. Remove the air intake tube and pull the carburetor straight back out of the intake manifold. 9. Remove the starter enricher from the carburetor.
Checking the enrichment valve
1. Check the resistance level. 2. The standard value is below 5 if it is cold. 3. Connect the enricher to a 12 V battery. 4. The plunger should extend 3/8 inch (approximately 10 mm) after 5 minutes.
5. Check the needle and its working place in the carburetor. 6. Replace if necessary. 7. Place the enrichment valve in the installation location and press down. 8. Install the retaining ring and tighten the screws.
Air shut-off valve
1. Unscrew the two screws of the traverse, the throttle cable, and remove it. 2. Unscrew the two screws of the air shut-off valve. 3. Remove the spring and vacuum membrane. 4. Check for membrane wear, replace if necessary. 5. Clean the channels, remove dirt.
Vacuum chamber
1. Remove two screws and remove the cover. 2. Remove the spring and membrane flap. 3. Remove the fuel needle. Be especially careful not to damage the membrane. Replace if damaged.
1. Check the needle for wear and replace if necessary.
Float chamber.
1. Remove the three screws and float chamber pan. 2. Remove the pin that holds the float. 3. Remove the main fuel jet, idle speed jet and idle mixture quality adjustment screw.
Be careful not to break the fuel jets and mixture screw. Count the number of revolutions when removing the mixture quality screw. When reinstalling the jets and screw, do not tighten them.
4. Clean the jets with solvent and compressed air. 5. Clean the carburetor body and all passages with compressed air.
1. Check the float needle and its seat and blow off any dirt. 2. Install the idle jet, fuel needle nozzle, main fuel jet into the carburetor.
3. Install the float. Adjust the fuel quality screw. Standard setting is 2 turns, plus or minus 1/4 turn. 4. After installing the float chamber pan, check the fuel level using a small ruler or calibrator. The correct fuel level is 20.5 mm (0.807 in).
Disassembling the carburetor
Before unscrewing the carburetor, remove external dirt from it - oil, dust, sand. This is conveniently done with gasoline poured into a bath. We put on gloves, take a brush and clean the outer part. Now you need to shake the carburetor, rotating it in different directions to remove any remaining liquid. You can unscrew the transparent drain hose and drain the gasoline. It is convenient to work on a wide table, since small parts can be lost during disassembly.
Carburetor disassembly sequence: 1. First, you need to unscrew the 2 screws of the float chamber and remove the cover. 2. We study the structure of the carburetor in the form of a white float, 2 jets (main and idle), and a shut-off needle on the petal. 3. The float axis is removed and the float with the needle is released. Particular attention to small details. 4. Take a slotted screwdriver and unscrew 2 jets. There is no need to unwind anything else.
Setting the mixture quality
The quality of the mixture plays a key role in the operation of the entire scooter, because incorrectly configured parameters will lead to the scooter choking, consuming a lot of fuel and increasing wear on the piston group. That is why the combustible mixture must be in the optimal quantity; a lean mixture indicates a loss of power and frequent overheating of the engine, a rich mixture is characterized by high fuel consumption and the presence of heavy carbon deposits in the combustion chamber.
There are two ways to adjust the quality of the mixture - with an adjusting screw or the needle level in the damper. In some cases, the carburetor design assumes the absence of an adjusting screw, so adjustment is carried out only with a needle. The standard procedure for adjusting the screw is to rotate counterclockwise and clockwise; in the first case, the mixture becomes lean; tightening the screw indicates that the mixture is richer. In the case of a needle, you can enrich the mixture by raising it up; the lean mixture is set on a lowered needle.
The instructions for most scooters say that there is a standard setting for the mixture quality, where the screw should be unscrewed only 1.5-2 turns. Therefore, if it is impossible to accurately adjust the mixture, stick to this indicator.
The needle is adjusted by raising or lowering it; it has markings and a special locking ring that sets the current height. Accordingly, if you find a lean mixture, you will have to raise the ring level by 1 notch. Having achieved optimal performance, your scooter will operate smoothly and correctly, it will consume fuel in normal quantities, and the power will correspond to the characteristics.
Carburetor cleaning
It is convenient to work with a special cleaner - ABRO, VELV, KERRY - the more expensive, the more effective: the thin tube fits well into the nozzle, the sprayer cap does not jam. The can is under high pressure and plays the role of a kind of compressor with the injection of a special flushing liquid. Do not forget about safety precautions: if the cleaner gets on your skin, it causes irritation, and you can get serious burns to your eyes. Safety glasses are required! Cleaning should be done in fresh air.
We insert the cleaner tube into the jets and blow through. We check the condition of all holes in the jets. If there are solid particles that the cleaner cannot remove, you need to clean the holes with a needle. When washing, a stream of solution sprays out of the nozzle. All carburetor channels are washed in the same way. Dirt actively accumulates in the float chamber cover - it is actually a fuel sump, so it must be wiped thoroughly.
Maintenance Procedure
Scooter motors are manufactured in different volumes. The most common are 50 and 150 cubic meters. The gas distribution system has both 2t and 4t options. The differences between the models are minimal, so maintenance of 2 and 4 stroke 50cc mopeds is carried out according to the same principle.
- Carburetor adjustment at idle speed. The scooter starts and its operation without load is analyzed. The assessment is carried out based on the evenness of the strokes and the stability of the engine speed.
- The position of the screws for the quantity and quality of the mixture is adjusted.
Due to the relative lightness of the structure, adjustment is made with two control bolts. If stable operation cannot be achieved, it is necessary to remove the unit and carry out deep cleaning and adjustment.
Removal
Because of the way it works, the carburetor is attached directly to the intake manifold. The fuel line and air duct are connected to it. All removable hoses are removed from the body and the part is exposed.
The starting enrichment is switched off. The fastening bolts are unscrewed with a spanner wrench, and the entire assembly is pulled out.
Carburetor cleaning
An excellent cleaning method is to blow out the internal channels with compressed air from a compressor. For this, a special gun with a pointed tip is used.
During operation, plaque forms on the surfaces of the carburetor. This is due to the quality of gasoline. Most of the dirt stops in the fuel filter, but some gets into the intake tract.
To remove deposits, you can use either a solvent or a special liquid for cleaning carburetors. It is also suitable for scooters. The advantage of using it is that the cleaning agent is under pressure and is able to penetrate into the most inaccessible channels.
The scooter carburetor has rubber gaskets. To avoid exposing them to cleaning mixtures, it is recommended to insulate these parts in advance.
Idle speed adjustment
An indicator of proper operation of the carburetor on a scooter is a stable idle. The absence of “floating” speeds and confident operation indicate a prepared mixture inside the combustion chamber.
For this purpose, there is a screw on the device that is responsible for dosing fuel when the scooter is operating without load.
Some carburetors do not have adjustment bolts. In this case, you need to adjust the idle mode using a needle and floats in the fuel chamber.
The scooter is started and allowed to run for a few minutes. This is necessary for better evaporation of gasoline inside the intake manifold and its mixing with air.
After warming up, turn the idle screw until the engine becomes stable. The criteria for correct adjustment are:
- the scooter maintains stable speed indicators;
- there is no engine tremors or failures in operation;
- the carburetor confidently switches to power gain mode (when over-throttled) and back.
Sometimes the scooter refuses to respond to idle adjustment. This behavior indicates additional problems in the intake system.
Mix quality
The two main components in the operation of any internal combustion engine are air and fuel. The force from their combustion pushes the pistons and forces the vehicle to move.
But simply mixing these substances is not enough. You can achieve maximum energy output only by maintaining the correct proportion of components. In a carburetor, this procedure is called adjusting the quality of the mixture and the entire operation of the 50cc scooter depends on it.
There are three types of air-fuel mass:
- poor;
- rich;
- optimal.
Maintaining the correct mixture ratio in the carburetor is vital for reliable engine operation.
Mixture control diagram
First, you need to start the scooter and warm it up. After setting the temperature, you should proceed according to the following algorithm:
- The mixture quality screw is tightened until it stops.
- Loosen the adjusting bolt one and a half turns counterclockwise.
- Start the scooter, tighten the screw a third.
- If the speed increases, turn it a quarter.
- We adjust until the speed stops falling.
Adjusting the mixture quality on a scooter
We indicated above that the mixture can be optimal, rich or lean. So, manufacturers of a certain scooter model recommend using specified proportions, which means that sooner or later you will have to make adjustments. Most 4t scooters have an adjustment screw, otherwise the procedure is done using a needle in the throttle. The mixture is enriched by turning the screw clockwise; when the screw is turned counterclockwise, the mixture becomes lean. Adjusting the indicator on scooters without a mixture quality screw occurs by increasing or decreasing the height of the needle.
Troubleshooting
The first and main sign that the equipment needs repair is the inability to start the engine. Scooter repair begins with identifying the fault and then eliminating it. In this case, the breakdown must be looked for starting from the place where the thermal energy of the burnt fuel is converted into mechanical energy of the rotating crankshaft of the engine. So let's get started:
— determine whether fuel enters the combustion chamber,
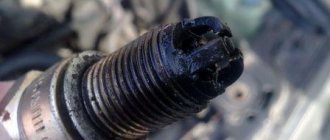
— is there a spark between the spark plug contacts?
If all of the above factors are present, then the following malfunctions are possible:
1. There was a breakdown of the spark plug insulator. To do this, simply replace the spark plug.
2. The ignition timing is off, and the fuel mixture does not ignite at the moment when the piston almost reaches its top dead center (TDC). Here you can no longer do without an indicator, with the help of which the position of the piston in the cylinder relative to TDC is determined, and at what moment a spark appears on the spark plug, igniting the fuel mixture. In this case, repairing the scooter will consist of setting the correct ignition timing recommended for this type of engine.
If there is no spark at the spark plug, then the following problems may occur:
1. The spark plug is faulty.
2. The candle holder is faulty.
3. The armored wire is broken.
4. The ignition coil has burned out.
5. If the ignition is electronic, then either the ignition unit or only the Hall sensor may be damaged.
If the fuel mixture does not enter the combustion chamber, this may be caused by such problems.
If the scooter is two-stroke:
1. fuel filter clogged;
2. The carburetor is clogged or broken.
If it is a four-stroke engine, then a malfunction of the gas distribution system (burnouts or bent valves) may be added to the breakdowns.
Materials and equipment
The internal surfaces of carburetor chambers are well cleaned with acetone. You can also use diesel fuel, or buy a special aerosol. The instructions will indicate how many minutes the composition is left to sit before washing it off. Having a can of compressed air won't hurt either.
Typically, carburetor cleaning composition is supplied in the form of an aerosol. The product is sprayed, left for several minutes and washed off with gasoline. The word “washing”, moreover, may mean starting the engine. This means that assembly will need to be done in 1-2 minutes. We will leave the choice to the owner.
There is a huge selection of products on the market that help you clean the carburetor yourself. But most of the chemical compounds offered even by well-known brands are made on the basis of acetone.
Aerosols with flexible tubes - carburetor cleaners
Be careful: in addition to acetone, aerosols contain methane and propane. These substances are highly flammable.
Aerosols
It is convenient to work with them, since the aerosol comes out under pressure and additionally clears blockages with a flow of air with the mixture. Sprayers contain propane, acetone and a number of other dangerous components. Therefore, avoid getting them in your eyes and hands. They catch fire easily and can only be extinguished with carbon dioxide fire extinguishers.
Aerosol Abro for carburetor cleaning
Aerosols do an excellent job, but they cannot clean the float chamber.
The cleaning process is the same for all cars:
- Remove the air filter;
- Spray cleaner through the tubes outside and inside;
- After 3 minutes, start the engine at high speed and spray the product intermittently for 2 minutes.
This process will take you a maximum of 15 minutes.
As for manufacturers, today the following brands are in deserved demand: Abro, Hi-Gear, Mannol, Gunk, STP, Turtle Wax, Wurth.
Article on the topic: Features of replacing the rear brake cylinder 2114
What is the carburetor of a Chinese scooter and its capabilities, disadvantages, tuning
The carburetor circuit of a Chinese scooter is, in principle, standard and suitable for both 2t and 4t engines. The design of the carburetor allows certain actions to be taken to improve its performance, however, if the engine is two-stroke, the efforts will not make sense.
The simplest approach is to replace the carburetor with a more advanced one, for example, with an accelerator motor, if you have a fairly old version without it. Most often, simple tuning is limited to replacing the main fuel jet, this is especially true for engines with low power. Replacing the nozzle helps to increase the fuel channel and, due to this, add a little power to the engine.
Quite often, more serious tuning involves the use of a 150 cc scooter carburetor. Interesting models with a diffuser diameter of 17.5 mm. It is great for 70cc piston. Less often you come across a large diameter of 19-24 mm, it is just ideal for a bored 150 cc piston engine. However, the diameter must be selected correctly, otherwise the motor will begin to choke.
When to check your work?
Let's figure out in what cases it is necessary to check the operation of the scooter. For this you need:
periodic checks, cleaning, replacement of parts
With them, attention is directed to brittle, fragile parts; regular – parts sensitive to blockages. Dirt on them can lead to engine failure, overheating or jamming;
Maintenance leads to an extension of the life of motorcycle equipment
- current - when a violation is detected: rupture of connecting tubes, leakage of oil and the presence of stains from it, as well as cracks due to the influence of precipitation and temperature on the plastic;
- Preventive checks when changing oil, refueling, cleaning from dirt. Ignition and braking systems are also checked.
Preventive inspections and measures taken to replace unsuitable parts are important:
- fuel pump,
- gas tank,
- gasoline tap,
- fuel filter,
- air filter,
- carburetor,
- connecting tubes.
You can check the functionality of the fuel pump yourself.
How to properly check?
How to check the fuel pump on a scooter? This question worries many fans of this vehicle when the vehicle does not start. There could be several reasons for this, one of them is that there is something wrong with this part. You can carefully check the performance of the fuel pump yourself.
First, let's try to configure the fuel pump:
- It has two screws: the first is for idle speed, the second is responsible for the quality of the fuel mixture. We tighten both screws, then release the second screw two turns, the first two and a half turns. We start the scooter, listen to the engine: smooth - no adjustment required, intermittent - continue.
- We fix the equipment with a step, slowly tighten the idle screw until the clutch engages - the wheel begins to rotate. Unscrew it a quarter turn. We check while driving: if acceleration is difficult, then tighten the screw a quarter turn. Acceleration is normal - the screw should be turned a quarter counterclockwise. Then we adjust the idle speed screw again.
Let's take a closer look at how to check the vacuum fuel pump on a scooter if the adjustment fails:
- Unscrew the four screws using the hexagonal star handle;
- carefully pull out the fuel pump cover, remove the rubber gasket, membrane, see the valve;
One of the important parts is the fuel pump for the scooter.
- due to the vacuum, gasoline passes through the valve from the tank into the upper chamber of the carburetor, we clean it;
- close it in the same sequence: gasket, membrane, gasket, screw it on, install it on the scooter and ride. It is necessary that there is always gasoline, otherwise these parts in the gasoline pump may dry out;
- You must tighten it carefully so that gasoline does not spill out.