Hello, friends!
We continue to get our scooter in order.
The carburetor on a 2T engine needs to be cleaned and adjusted once a season, or every 5 - 6 thousand km.
This procedure is not complicated and, slowly, will take max 2 hours.
In this article we will look at how to clean the carburetor on a scooter, and in the next article we will look at how to adjust it.
For convenience, so that there is no confusion, I will describe all the actions in the form of an algorithm.
Roll up your sleeves and go!
Cleaning my scooter.
The design of a scooter carburetor and its operating principle
The design of a scooter carburetor is quite simple; Once you understand it, you will be able to understand how to properly configure the carburetor so that the vehicle does not let you down in bad weather, how you can tune it and improve the performance of the engine. You will be able to control the quality of the mixture and many other processes that affect the operation and operation of the device.
: Adjusting the fuel level in the scooter carburetor
First of all, engine power drops. This can also be observed due to wear and tear of the engine systems.
The cylinder piston group may require replacement. However, an incorrectly configured carburetor can also affect the power of the engine. If it introduces more air into the mixture than required, the fuel becomes lean. This leads to overheating and reduced power. If the engine refuses to work at all, this may also be evidence of improper carburetor operation.
However, to find the cause of the breakdown, you will need to check several major systems. If the engine starts but stalls, this may be due to a clog in the carburetor. In any case, the driver must responsibly approach the issue of solving any problem related to his vehicle.
The principle of operation of a scooter carburetor
The carburetor design of a 4t scooter is not very complicated. The basic principle of its operation is as follows: a certain amount of fuel and oxygen enters the float chamber of the device, where they are mixed in the required proportions and supplied to the combustion chamber of the engine.
The design of a 4-stroke scooter carburetor may vary slightly depending on the model, but in general it is the same for all types of carburetors. The float version of products is most often used. It is distinguished by the presence of a float chamber in which fuel is mixed with air, after which the finished mixture is fed into the cylinder. In order for air to enter the fuel in the required proportion, the carburetor includes the following elements:
- Jets.
- A needle that meters the supply of oxygen.
- Spool.
- Throttle valve.
Sometimes the design of a 4t carburetor on a 50cc scooter includes an element such as an accelerator pump. It works in tandem with a starting mixture enricher. These devices help the scooter engine to work correctly and start in damp and wet weather. The correct operation of the motor depends on the coherence of the devices, so it is important to pay attention to their settings.
Scooter starter booster
Most often, scooters are equipped with an electric starting enrichment; on older models you can find a manual one. The task of this device is to create the right mixture in order to start the engine after a long period of inactivity.
The carburetor has an additional channel for connecting the enricher. If the device is automatic, the channel opens itself when you try to start the scooter and closes as the engine warms up. If the enrichment is manual, you need to close its valve yourself. The operating principle of the device is as follows:
- Inside the housing there is an element heated by electricity, which pushes out a needle that blocks the fuel channel.
- After the engine is stopped, the needle will be retracted.
Float chamber device
Mixing of fuel with air in the carburetor occurs with the participation of the float chamber; Thus, the finished fuel, saturated with the required amount of oxygen, enters the combustion chamber, where it explodes and sets the scooter in motion.
From the gas tank, fuel enters the carburetor through special pipes. But mixing cannot occur in them, so first the fuel ends up in the float chamber, and only then it is enriched with oxygen and further moved. To ensure that gasoline does not flow continuously, but in the right quantity, the carburetor is equipped with a special system with a float and valve. When the chamber is full, the float rises and the valve blocks fuel from entering the carburetor; when the float is lowered, the flow of fuel resumes.
Fuel dosing system design
The mixture is supplied to the cylinder in finished form, so it is necessary to control its quality. For this purpose, the carburetor has a special needle with grooves and a locking ring. The position of the needle depends on the position of the ring: the higher it is, the richer the mixture, and vice versa. Modern carburetor models allow you to tune them without disassembling them.
For proper operation of the device, the diameter of the main jet is important. It is selected based on motor power and diffuser size. When tuning, the nozzle hole can be enlarged.
Idling - principle of operation
If you need to start the scooter after a long period of inactivity or when it is cold, adjust the carburetor idle jet. This is necessary in order to enrich the mixture with oxygen at startup. As a result of correct adjustment, the engine will idle smoothly and stop stalling.
The system has a special valve that, at the right time, blocks the possibility of mixing fuel and air. In order for the engine to stop stalling, we make adjustments with the quality screw, adjusting the idle speed to the desired value. The adjustment screw is located on the side and is accessible while the engine is running. There is no need to disassemble anything, just carefully turn it with a screwdriver to the left or right. As a result, the speed will rise or fall.
If the quality of the mixture is insufficient, we achieve maximum idle speed. When the engine warms up, it will be enough to reduce the speed again to normal.
Clean and blow
and without adjustment (completely plastic).
Do not clean the nozzle holes with a needle or hard iron wire - you can scratch it and change the diameter of the nozzle.
Why adjust the carburetor?
Carburetor adjustment may be required in the following cases:
- The spark plugs are serviceable, but do not work very well; their color has changed to black or yellowish.
- The engine does not provide the required power
- Scooter won't start
- Fuel consumption has increased excessively.
All these problems in most cases are caused by an insufficiently enriched or, conversely, overly enriched mixture with oxygen, and they can be corrected by correctly adjusting the carburetor.
The settings, regardless of whether you have a 2t or 4t scooter, have three phases and are made as follows:
- Idle speed adjustment
- Setting the fuel level
- Adjusting the quality of the mixture.
On some carburetor models there is no screw that adjusts the fuel quality, so you have to disassemble the carburetor to change the position of the needle.
The idle speed adjustment is carried out after the engine has warmed up: this takes no more than 15 minutes. For this purpose, the design provides an idle screw. It allows you to make the engine stable by selecting the desired idle speed. When the screw is tightened, the speed will increase, and when it is rotated counterclockwise, it will decrease.
It is important to adjust the quality of the mixture. If it is too lean, the scooter will ride with difficulty, and the engine will noticeably lack power. If the mixture is too rich, the spark plugs will turn black and quickly fail. Fuel quality adjustment is usually carried out using a screw located on the carburetor body. To enrich it you need to turn it clockwise, to lean it counterclockwise. If there is no screw, the carburetor is opened, the locking ring on the needle moves up for a richer mixture, down for a leaner one.
Adjustments are made as follows:
- Start the engine and warm it up for 10 minutes, after which you need to turn it off
- The screw must be tightened clockwise until it stops, but without force.
- After this, it is unscrewed counterclockwise 1.5 turns
- The engine needs to be started and the screw turned an additional 1/3 turn in the same direction. Wait 2 minutes
- As the speed increases, you need to unscrew the screw an additional 1/4 turn and observe the reaction for about 2 minutes. If the speed does not drop, repeat the steps
- If the speed begins to decrease, the screw must be turned clockwise 1/4 turn.
Ideally, the engine will operate exactly at 1.5-2 propeller revolutions, but its position depends on the quality of the fuel. In the case of a needle, the quality of the mixture will vary depending on the position of the needle locking ring. The disadvantage of such a carburetor is the small number of needle positions and the need to disassemble it each time to make adjustments.
You can adjust the fuel level in the chamber as follows:
- Unscrew the drain screw
- The phone is lifted up
- You need to check the fuel level while the engine is running. The melting level is slightly below the skirt located on the float chamber cover
- Most often, the level rises above normal and the carburetor overflows, so you need to adjust the float so that it fires earlier. To do this, the needle holder is usually bent. A lot of force is not required, only a few mm are needed.
Adjusting the Honda Dio 27 carburetor yourself - Repair, operation, car tuning
HONDA DIO, settings folder
That is why the combustible mixture must be in the optimal quantity; a lean mixture indicates a loss of power and frequent overheating of the engine, a rich mixture is characterized by high fuel consumption and the presence of heavy carbon deposits in the combustion chamber. The system is assembled in the reverse order and installed in place. To gain access to it, you need to remove the oil screw, lift the tube away from the carburetor, and check the fuel level.
Hello. Thank you for your answer. I am convinced of your competence. Yesterday, before your answer arrived, I set the fuel level of the Honda scooter...
The main task of any carburetor is to create a high-quality fuel mixture. The needle is adjusted by raising or lowering it; it has markings and a special locking ring that sets the current height. The operating principle of the carburetor is as follows:
You will definitely succeed!
You can adjust the quality of the supplied mixture using the adjusting screw. By tightening it, you can achieve fuel enrichment, and by unscrewing it, you can achieve fuel depletion. Before starting work, it is necessary to warm up the engine.
Normally, the engine works perfectly if the quality screw is unscrewed by 1 turn. The combination of both methods allows us to achieve the most acceptable results when tuning, however, in the absence of the first, as for example on Suzuki Sepia and Suzuki Assress carburetors, we will be content with only moving the needle.
And thanks for that. Before adjusting the carburetor, warm up the scooter for minutes; the carburetor must be clean from the inside. It is considered ideal to operate the engine with the mixture quality screw in the unscrewed position by 1.5 - 2 turns.
Idle speed adjustment.
Depending on engine wear and other faults, this range may fluctuate. The scooter should accelerate smoothly, without dips, and there should be no jerking while driving. If you are unable to achieve acceptable operation of the scooter, remove the throttle from the carburetor and raise or lower the needle.
The carburetor was flushed again, but it didn't help. By the way, in the previous cap.
After that, the mokick started right away. I’ll try to change the spark plug, maybe it’s time to change “China” to a new China... There is one caveat - our starting enrichment is not working now, my son broke off the boss with the wires and we couldn’t find it, apparently somewhere earlier on the move. Maybe because of him we can’t start it. But then, as before the cap. Checking the characteristics of your mixture is quite simple; just inspect the spark plug for its condition; if the spark plug is flooded and has carbon deposits or other changes, most likely you have an enriched mixture.
Design and connection of a Yamaha scooter carburetor
The Yamaha Jog scooter is one of the most popular on the Russian market: this is explained by the simplicity and reliability of the model, and its affordable price. The carburetor design of this scooter is standard, so you can figure it out using the description given above. However, when installing it, inexperienced owners may encounter some difficulties, which we will help you sort out.
The device is worth considering in more detail. This will help you understand not only how to adjust the carburetor and use it correctly, but also how to connect it correctly.
- A starter enricher is attached to the carburetor body: it is small in size and housed in a plastic case. It has two bolts with rubber seals. The enricher is powered via a 12 V battery. This device is used to start the engine when cold, as it allows you to automatically enrich the mixture with oxygen.
- The fitting is connected to the fuel supply hose coming from the gas tank tap.
- If the enrichment unit needs to be removed, you will need to not only unscrew the bolts, but also disconnect the electric valve, to which there are only two wires.
- The mixing chamber has a special cover to which a bolt is attached. If you unscrew it, you can get to the throttle valve. This allows you to check whether the throttle cable is connected, and also to get to the needle that regulates the level of fuel and air supply. If the carburetor needs cleaning, you will definitely need to remove the throttle.
- The enrichment connector has two wire outputs, the yellow one is connected to the generator, the green one goes to ground. In principle, if you reverse the polarity, nothing will happen and the device will still work.
- For the enricher to operate, voltage must come from the battery. When the element inside the device heats up, the needle will extend.
- A special fitting is connected to the air filter, and there is a rubber elbow between them.
- There are several screws on the carburetor body with which you can adjust the idle speed and mixture quality.
- The float chamber is screwed from below and has 4 mounting bolts.
- There is an additional fitting for oil supply: it is the smallest.
- The second fitting is needed for communication with the atmosphere; you do not need to put anything on it.
- The third one is connected to a gas hose. It goes to the gas tank vacuum valve.
Features of tuning the carburetor of a 4-stroke scooter
Tuning the carburetor on a four-stroke scooter is not as difficult as it might seem. Although problems can arise at any stage, the fuel delivery system is still a fairly delicate device. But all difficulties can be overcome if you follow the instructions and carefully read the manufacturer’s recommendations.
Carburetors on four-stroke scooters are similar to each other, so the instructions are suitable for both the delta moped and the domestic automobile industry. Although electronic systems are gradually replacing mechanical ones, the main advantage of the carburetor is its reliability. Therefore, it will be possible to meet the iron horse with him for many more decades.
Carburetor design (video)
For clarity, we suggest watching a video instruction about the design of carburetors and the principle of their operation:
Knowing the structure of the carburetor and understanding what needs to be connected where, you can easily disassemble, reassemble, clean and adjust it yourself, regardless of what brand and model of scooter you have, with some skill. All these procedures will not take much time and will help you save money on car services. The ability to carry them out will help you out when the engine does not want to start.
Adjusting the carburetor on a 2t scooter: setting it up together
We continue to discuss DIY motorcycle repairs.
The carburetor has been cleaned, the next step is to adjust the carburetor of the 2t scooter. Over the summer, you have to adjust and adjust the operation of the engine several times.
Anyone who is at least a little familiar with the structure of the carburetor will be able to set it up on their equipment themselves. On 2-stroke engines, carburetors are adjusted according to the same principle. Therefore, the topic will be of interest to owners of any brand of 2t 50cc scooters. Whether you have a Honda Dio 27, 34, 35, stroke, Yamaha Jog, BVS or other 2-stroke mopeds.
Diagnostics
Before installing the air filter, turn on the ignition and jerk the kickstarter foot several times until the engine starts.
If it does not start, then the most common reason is that the cold start system is malfunctioning.
We check this way: cover the carburetor hole with your fingers to maximally enrich the mixture with gasoline, and continue to push the kickstarter.
If the engine starts and the speed does not drop during operation, then look for the reason in the cold start system.
If the cold start system is working properly, then after starting the engine the speed will rise and gradually, within 10 minutes, begin to fall. On a warm engine, gradually unscrew the large screw (amount of mixture) until the speed drops to medium, confident idle.
At the same time, drops of gasoline should not splash or pour out of the carburetor.
If gasoline splashes out of the air supply hole, this indicates a malfunction of the reed valve in the engine. Then the valve needs to be removed and cleaned or replaced with a new one.
And if gasoline leaks out, this indicates a high level of gasoline. Adjust the float level and ensure the needle valve is sealed.
Intermediate setup
Adjusting the carburetor of a 2t scooter is carried out after installing the air filter in its place.
Start the engine and let it run for about five minutes to warm up.
Adjust the idle speed (ISR) with the quantity screw: by tightening it, the throttle rises and the idle speed increases; and when unscrewing, the throttle is lowered and the CO is reduced.
Set the speed so that the scooter operates at a lower speed.
Lifehacks for the last time
- — Before adjusting, you need to check that the air filter is clean and soaked in engine oil. How to clean the air filter, read the article: Scooter maintenance.
- — If the rubber cuff on the quality screw is torn, then it can be replaced with a cuff from the quality screw of the classic Lada carburetor.
- — On Suzuki Sepia models, lets 2,
In the latest models of Honda Dio 34 everything is simpler. The carburetor has only one large screw, which is used to regulate the XO. The small one on dio 34 is located under the plug.
The first time the setup will take 15 - 20 minutes, and then everything will be automatic. Feel free to get down to business and share your experience in the comments.
Subscribe and see you for new articles!
Scooter carburetor. Correct adjustment
The carburetor is a unit whose importance cannot be overestimated. Since it is in the carburetor that gasoline is mixed with air and, thus, a fuel mixture is formed before it is directly supplied to the scooter cylinder. The quality and correct composition of the fuel mixture determines fuel consumption, wear of the cylinder-piston group and spark plugs, maximum speed and dynamics of the scooter, and much more. This is why it is so important to take a responsible and comprehensive approach to setting up the carburetor. A properly adjusted carburetor will ensure stable, reliable and productive engine operation, as well as make driving comfortable and safe.
Unfortunately, scooter riders often, due to ignorance or lack of experience, underestimate the importance of comprehensive carburetor tuning. For example, there is an extremely widespread misconception that adjusting the degree of richness of the mixture only means adjusting the quality screw on the carburetor. In fact, this setting allows you to achieve the correct mixture only at idle and low speeds. At the same time, at medium and high speeds the proportions of the fuel mixture can be completely disrupted. Let's figure out how to properly configure the carburetor.
Features of tuning the carburetor of a 4-stroke scooter
Adjusting the carburetor of a 4t scooter is quite possible with your own hands and should not cause any difficulties, the main thing is to act according to the instructions described above. It’s not always possible to adjust; the carburetor on a 4t scooter works right away. You will have to be patient: you may have to repeat the procedure several times until you get a result that suits you. The smooth operation of the engine, the ability of the vehicle to start in cold weather, and what kind of piston wear will depend on how to correctly configure the carburetor in a 4t scooter.
4T scooters are usually equipped with similar carburetor models, so the VLC carburetor adjustment scheme described above is also applicable to other types of devices.
Scooter carburetor - design and principle of operation - Scooters Maintenance and repair
Before you start making adjustments, you need to warm up the engine, and if there is contamination, the carburetor should be cleaned.
Carburetor settings
It's like another miniature carburetor in the main carburetor.
Honda Dio 27 does not hold xx installed a new carburetor, when it is started it is necessary to constantly The device and ...
Scooters of the Tact family are designed for novice drivers.
Float chamber It is important that the fuel in the float chamber is always within certain limits and does not drop below the permissible norm.
We tried to start it, but the result was the same.. Still, I think that I’ll go buy the enricher tomorrow, because when disassembling this unit I also discovered that the needle itself does not hold in the latches inside, one of the 3 latches is broken, and the wiring is broken, it cannot be repaired. There is only a big plus from RACING around equipment - broken and torn bolts are changed in parallel, brake pads are replaced and so on. If they had started the scooter right away, then they definitely wouldn’t have gotten around to it until the fall Reply Reply with a quote Quote Report to moderator 0 Alexey82ua After capitalization on a Honda tact fullmark, gasoline flows from the carb from the lower tube, and not from the tube where the drain screw.
It completely refuses to start, and if it does start, you have to squeeze the gas all the way down, as if it was missing something.
The principle of idle operation is very similar to the main one. This is a kind of miniature carburetor within a carburetor. It is needed for idle speed, which prevents the scooter engine from stopping during a temporary stop when you do not turn off the engine.
Cleaning the carburetor of the Honda Dio AF18 moped
In fact, cleaning the carburetor on mopeds is not much different, so this article will apply to many models.
1. In order to get to the carburetor, you need to remove the side plastic, remove the seat with the glove compartment and remove the air vent.
2. To remove the air filter housing, you need to unscrew the 2 bolts under the housing and unscrew the clamp on the carburetor diffuser.
3. move the fuel hose clamp and the oil line clamp.
4. Unscrew the throttle valve. To do this you will need pliers.
5. Unscrew the carburetor from the inlet pipe.
6. Remove the casing from the cold start needle (unscrew 2 screws), remove the bracket and pull out the enrichment needle.
7. Using gasoline, remove dirt from the carburetor (you can use any container and a brush. A grimy carb)))
8. After we have removed all the dirt from the outside of the carburetor, unscrew the drain bolt of the float chamber and pour out all the contents. Then unscrew the float chamber.
9. Remove the float and needle valve.
10. Unscrew the idle jet and the main fuel jet with the emulsion tube. We put the unscrewed jets into the float chamber, into which we first screw in the drain bolt and fill the float chamber with any liquid for cleaning the carburetor.
11. Unscrew the idle speed adjustment bolt, unscrew the mixture quality adjustment bolt, and pay attention here! remember the order and completeness of what will be here, and the following will be here: an adjusting screw, a spring, a washer and at the end a rubber seal. Accordingly, we then assemble everything in reverse order.
12. Wash the adjusting screws with gasoline.
13. Spray all holes in the carburetor with cleaner.
16. Wash all carburetor components with an ether-based cleaner.
17. We pay special attention to the fuel jet of the cold start needle.
18. Putting everything back together)
19. After we have tightened the adjusting screws, unscrew the idle speed screw by 2.5 turns and the mixture quality screw by 1.5-2 turns.
A clean carburetor means dirty hands.
Call center 24 hours. Any questions from those. consultations to assistance with placing an order.
Warranty on all products
Warranty for goods from 6 months to 3 years. If there is a defect, we will replace the product without any questions asked.
Secure payment methods
Pay by credit card, PayPal, bank transfer or cash upon delivery.
Delivery throughout Russia
You can choose delivery by courier, Russian Post or at a pick-up point.
We will pack it well, send it for delivery and monitor the order until delivery.
My account
You should monitor the tread height of your tires and replace them as necessary. Riding a scooter with worn tire tread is extremely unsafe.
The turn should be done “pull”, controlling the gas or releasing it in advance. Always turn on low beam headlights when riding a scooter.
Float chamber It is important that the fuel in the float chamber is always within certain limits and does not drop below the permissible norm. It is also important that gasoline does not rise above the permissible standards - this will help to avoid overfilling.
Actually, the float, which on the opposite side has a shut-off needle at its disposal, is responsible for the optimal level of fuel in the float chamber. Gasoline filling the chamber raises the float as it enters, which is constantly afloat.
cleaning the carburetor Honda Dio 27
When it reaches its maximum fulcrum, it closes the channel through which gasoline is directed from the gas tank to the carburetor. This is how the stable presence of a small amount of gasoline in the float chamber is regulated.
These are probably all the main systems of the Honda Dio 27 carburetor, so once you understand the operation of this device, it will not be difficult for you to put your scooter in order using the instructions in the manual.
What is a starting enrichment
A starting enricher (electrovalve) is a device designed to supply an additional amount of air-fuel mixture into the combustion chamber during a cold start of the scooter engine. The fact is that when starting the scooter when cold, the engine requires an enriched mixture. The supply of such a mixture is ensured by the carburetor solenoid valve . If the starting enrichment is in good working order and there are no breakdowns in other engine elements, the scooter engine starts easily even at temperatures around zero degrees.
Scooter starting enrichment device
There are two types of starting concentrators - manual and automatic.
The manual (mechanical) starting enrichment requires adjustment - it must be opened at startup and closed after the engine warms up using a cable on the steering wheel. But manually opening and closing the additional channel for supplying the mixture is inconvenient. An automatic starting enricher (thermoelectric valve) is installed on most modern 2t and 4t scooters. We will learn about the device of the automatic starting enrichment further.
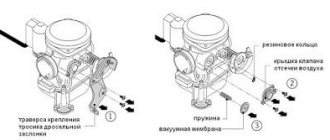
Solenoid valve body- Ceramic heater
- Drive (powder)
- Stock
- Pusher
- Damper
- Fuel chamber
- Float chamber
- Starting fuel jet
- Spring
The scooter carburetor has a small additional fuel chamber 7, which is connected to the main float chamber 8 through the start nozzle 9. The tube from chamber 7 leads to the mixing chamber into which air is supplied and from which the air-gasoline mixture goes into the engine. A valve 6 can move in the mixing chamber, similar to a carburetor throttle valve, only much smaller in size. Just like the throttle valve, the starting valve contains a spring-loaded needle that closes the fuel channel when the valve is lowered. Valve body 1 is wrapped in thermal insulation (polyethylene foam) and covered with a rubber boot. This enricher design is used on almost all modern scooters.
Older models may use a design without an electric heater, heat is transferred to the drive through a copper heat-conducting cylinder directly from the scooter's engine cylinder, and a membrane . One cavity of the flask, where it is located, is connected through a thermal valve to the intake manifold, which is mounted on the cylinder head.
Features of setting up the carburetor of a 2-stroke scooter
The carburetor on the 2t scooter is slightly different in design and does not fit the 4t motor. The question of how to set up such a device worries all owners of two-stroke machines.
Most Chinese models have a fairly simple carburetor without unnecessary adjustments. The enrichment here is mechanical, although if you are tuning a scooter or you have a Japanese model, the enrichment can also be electric. In order to use the mechanical option, you must first pull the trigger on it, and then try to start the equipment.
Adjusting the carburetor of a 2T scooter is not difficult, but it does require some patience. In order to do this, you will need to disassemble the carburetor: first you will need to unscrew the top cover. The needle in it is fixed with a staple; it needs to be pulled out. The quality of the mixture is adjusted in the same way as described above. A feature of the push-pull system is that the needle affects the quality of the mixture only in a certain position. If the throttle valve is raised to its maximum, only the main fuel jet will be responsible for the fuel mixture. Sometimes the idle speed system interferes with it. Depending on what carburetor you have installed.
- Design, configuration and malfunctions of a four-stroke scooter carburetor
For a cold start, you need to use a starting enrichment, which must be closed after the engine warms up; Simply put, it's a suction. In such carburetors, the fuel level plays an important role. It is also regulated by mechanical intervention in the operation of the float chamber. It is configured in the same way as in the four-stroke version. In fact, the carburetor for 2t engines differs from models for engines on a 4-stroke scooter only in jets and some other parameters, but it is designed similarly, and therefore is regulated in the same way.
The principle of operation of the scooter carburetor solenoid valve
When the engine is cold, the valve with the spool needle 6 is raised as high as possible (open). The needle opens the fuel supply channel, and the flap opens the air supply hole. At the first engine revolutions, a vacuum is created in the emulsion channel and gasoline located in chamber 7 is sucked into the engine through channel A, causing a strong enrichment of the mixture and facilitating the first flashes in the engine. After the engine has started, but has not yet warmed up, it still needs a rich mixture. The enricher works like a parallel carburetor - gasoline enters it through jet 9, mixes with air and enters the engine.
When the engine is running, alternating current from its generator is always supplied to the contacts of the ceramic heater 2 of the thermoelectric valve of the starting system. Heater 2 warms up drive 3. As the engine and drive warm up, the rod gradually extends by 3 ... 4 mm and drives the damper through pusher 5. Thus, the engine warms up along with the thermoelectric valve, the spool with the needle drops and closes the air and fuel channels, and the mixture gradually becomes leaner. After 3...5 minutes, the damper closes completely and the degree of enrichment of the mixture on a hot engine is regulated only by the carburetor idle system .
When the engine stops heating of the valve stops , the damper drive cools down (the powder is compressed) and under the action of spring 10, pusher 5, rod 4 and damper 6 return to their original position, opening the channels for subsequent start-up. Cooling down and returning to its original position also occurs within a few minutes.
The disadvantage of this type of enrichment is that it operates separately from the engine. For example, very often, especially in warm weather, while the engine is still hot and there is no need to enrich the mixture, the thermoelement is already cooling down. We start the engine and it gets a rich mixture.
Operating principle of the second type of starting enrichment (with a membrane)
When cold, the valve is open . After starting the engine, a vacuum occurs in the manifold and is supplied to the membrane through a thermal valve. As a result of low pressure, the membrane rises and opens a channel for additional air supply. As the cylinder head warms up, the valve closes and the valve with the needle is lowered under the action of a spring, cutting off the additional fuel supply.
With this design principle, the connection with the actual engine temperature is maintained, and fuel dosage is carried out more correctly.
Features of setting up the carburetor of a 2-stroke scooter
Some mopeds have their own characteristics. Perhaps the simplest carburetors are made in China. And a 2t scooter has a simpler carburetor than a four-stroke. Adjusting such a model should not be a serious obstacle. However, there are some peculiarities here too. It should be noted that the needle in the 2t carburetor determines the quality of the mixture only while the throttle valve is not raised all the way. Otherwise, the fuel jet has a much stronger effect. There is also a connection with the idle system, but not on all models.
In 2T carburetors, the fuel level is much more significant than in 4T carburetors. You can set up the float chamber according to the instructions above; there are no significant differences, although the jets are different.