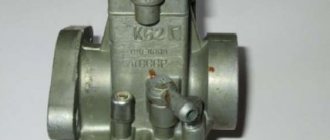
Adjusting the K-68 carburetor on the IZH Planet-5 motorcycle
The K-68I carburetor was installed on the Izh Planet-5 motorcycle more often than others.
With proper setup and proper care, the motorcycle starts quickly, runs smoothly and without complaints. To adjust the K-68I carburetor you will need a flat-head screwdriver, pliers, and a ruler. For clarity and ease of adjustment, use the K-68 carburetor diagram.
Algorithm for adjusting the Izh Planeta-5 carburetor:
- The first step is to check the fuel level in the float chamber. Unscrew the camera cover bolts with a screwdriver and remove it. Turn the carburetor over and use a ruler to measure the distance from the carburetor body to the top edge of the floats. It should be 26 ± 5 mm. If the parameters deviate, the tongue of the floats is bent in the appropriate direction using pliers. At the same time, in no case should the parallelism of the floats be disrupted.
- Set a gap of 2 mm between the throttle valve and the bottom of the mixing chamber by adjusting screw 11. Then check the position of the throttle needle. The required needle position is the middle groove. The remaining grooves are made to move the needle lock and adjust the appropriate fuel quality depending on climatic conditions.
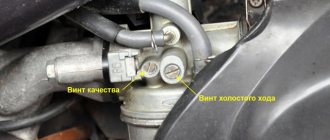
- After all the above steps, we proceed to the most important stage - setting the idle speed. The idle quality adjusting screw 15 (located vertically on the left side of the carburetor) is screwed in until it stops, and then unscrewed 1-1.5 turns. Start the engine and warm up for 5 minutes. Using the mixture quantity adjustment screw 11 (located horizontally on the left side of the carburetor), we set the minimum stable engine speed. At the same time, slowly unscrew screw 15 until the engine speed stops increasing. It is the moment of reducing the crankshaft speed that will be optimal for determining the position of the adjusting screw 15. We again reduce the engine speed with screw 11 and unscrewing screw 15, we find a new optimal position of the throttle valve. This operation must be repeated until the minimum, but at the same time stable, engine crankshaft speed is established.
- By sharply turning the throttle lever at idle, we check the correctness of the adjustment (the quality of the mixture). If, when the throttle is opened sharply, the engine stalls or picks up speed poorly, screw 15 needs to be tightened a little, thereby enriching the mixture. If the engine stalls when the throttle is closed, screw 15 should be unscrewed slightly.
- You can also check the correctness of the adjustment by the color of the central insulator of the spark plug. After adjusting the carburetor, drive a motorcycle for a distance of 5-10 km and remove the spark plugs from the cylinder head. Dark carbon deposits indicate that the mixture is too rich. A light color (whitish or sandy) indicates that the mixture is poor. The normal recommended candle color is brown or brick.
- It is also worth remembering that the free play of the throttle cable is 1-3 mm. If it is not there, the throttle adjustment will be incorrect. The free play is set by adjusting a special bolt located under cap 18.
The video below clearly shows the adjustment of the K-68I carburetor on the Izh Planet-5 motorcycle.
https://youtube.com/watch?v=hYa2vXAlVno
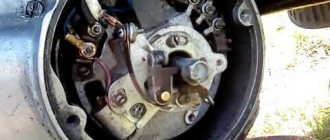
Stop valve
When checking the K-68 carburetor, you should pay attention to the shut-off valve. This valve has another name - a needle. It is he who can get a rich mixture due to the fact that the valve is not tightly attached.
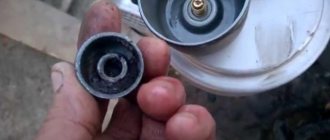
The needle-type valve contains a rubber ring in its assembly. During the inspection, you can pay attention to the condition of this element. To do this, you need to remove the cover, which is located at the bottom. It is secured with two bolts. When removing these elements, you need to ensure that the gasket is not damaged.
After this, you need to remove the float. To achieve this, you need to squeeze the float rod out of the grooves. During this process, you need to watch the needle, as it can easily fall. Notice how the needle moves along the saddle. If the movement occurs without failures, then everything is normal. If the ring is worn out, it is necessary to replace this element.
Adjusting the carburetor on the Ant scooter
Before adjusting the carburetor on an Ant scooter, you need to check the motorcycle’s ignition system to make sure there is no air leakage between the seals. The air filter must be clean and moistened with engine oil. Only after this you can start setting up.
The procedure for adjusting the K65G carburetor:
- Unscrew the mounting nuts and remove the carburetor from the engine. After unscrewing the 2 screws, remove the float chamber cover. Turn the carburetor over and check the fuel level. To do this, use a ruler to measure the distance from the edge of the carburetor body to the middle of the float. If it does not meet the standard - 13 (+ 1.5/-1.5) mm, bend the float tongue in one direction or another to achieve the desired level.
- Using the quantity screw (on top of the carburetor), set the distance between the lower edge of the carburetor and the damper to 2-3 mm. We put the carburetor in place. We adjust the free play of the throttle and enrichment cables with screws. It should be 2-3 mm. This is done to prevent tension on the cables when turning the steering wheel.
- Idle speed adjustment. We tighten the quality screw to the end and unscrew it 1-1.5 turns. We start the motorcycle and warm up the engine using the corrector. After warming up, turn off the corrector and use the quantity screw to set the minimum stable engine speed. At the same time, use the quality screw to raise the speed to the maximum permissible value. We repeat these operations several times. Correctly setting the mixture also helps evaluate the engine's response to a sharp turn of the throttle. If the engine stalls when you open the throttle sharply, it means the mixture is lean and the quality screw needs to be tightened a little. In the opposite case, when the engine stalls when releasing gas, the mixture should be “leaned” by slightly unscrewing the quality screw. With an optimal mixture composition, the engine picks up and drops speed quickly, without failures or hesitation.
- When using a motorcycle for a long time, engine parts wear out, and the composition of the mixture in the carburetor changes accordingly. The quality of the mixture can be assessed visually by the color of the central electrode of the spark plug. It happens that after correctly adjusting the carburetor, it is not possible to achieve the normal color of the spark plug insulator. In this case, the adjustment is carried out by moving the position of the dosing needle in the throttle lock (by default, the needle is in the middle position). When the color of the candle insulator is light whitish, the needle needs to be raised one notch. A candle with traces of soot or soot (see fig.) needs a lean mixture; in this case, the needle must be lowered one notch.
Carbon deposits on spark plugs for two-stroke engines.
1. Too much oil in the fuel. 2. Rich mixture. 3. Lean mixture. 4. Normal mixture. It should be remembered that the mixture parameters can be affected by air leaks from the crankshaft oil seal, a clogged filter, etc. Therefore, it is necessary to maintain your scooter in a timely manner according to the user manual.
It’s not for nothing that Ant scooters have won people’s love and fame. In many ways, this was facilitated by the carburetors installed on them. As we can see from the article, they are simple and easy to use. Unfortunately, most of these carburetors are already worn out. But to replace them, you can always pick up Chinese copies or analogues.
We recommend reading:
| Engine repair IZH Jupiter 5 Assembly, disassembly, repair and tuning |
| Engine repair Izh Jupiter 5 Expert advice |
[sc:ads6]
Have you read it? Write a comment
The K62 carburetor has two adjusting screws, with which you can change the idle speed, and a needle, by changing the position of which, you can change the property of the mixture (enrich or lean it). When we raise the needle, we enrich the mixture; when we lower it, we make it leaner. Adjusting the quality of the mixture is carried out by walking 2-3 km (at a speed of about 60-70 km/h) and looking at the spark plug. If the candle is covered with the working mixture (the candle is oily, dark brown or black), we lower the needle; if it is too dry (the color is white, light straw), we raise it. As a result, a light brown soot should appear. But this is just part of the adjustment; each time you need to set the carburetor idle speed. So we continue to adjust further:
- Basic rules for repairing a K65 carburetor
To adjust the idle speed on the K62 carburetor there is a “quality screw”. This screw supplies air even when the throttle is closed. We repeat, the propeller produces air, although some people think that this propeller is designed for fuel. Therefore, by tightening the quality screw, we close the air flow, that is, we enrich the mixture. If we unscrew the screw, the mixture becomes leaner. As was said, this screw provides air in all positions of the damper, and therefore at idle speed of the crankshaft. Therefore, the quality screw belongs to the idle air regulator. At this moment, it significantly affects the operation, but if the gas is at medium or high speeds, then the influence is not large, but it is present. So, it all comes down to the fact that the idle speed is adjusted, and this automatically affects all engine frequencies. Now, after a short introduction, let’s talk about the idle speed adjustment itself. To keep things simple, let’s talk about adjusting K62 K carburetors and similar ones for Minsk and Voskhod motorcycles. But by analogy, the adjustment of all types of carburetors is the same, so it will also work on IZH and other motorcycles.
Remember that carburetor adjustment always takes place on a warm engine. When the warm-up is done, we begin the adjustment. First, tighten the quality screw to the maximum and unscrew it halfway - one turn. Next, we start the motorcycle and lower the throttle completely with the upper idle screw, then, by unscrewing it, we achieve the minimum stable speed. Next, by unscrewing the quality screw little by little, we achieve maximum speed; when, after further unscrewing, the speed drops, we screw it back to the same maximum and stability. It turned out that we set a stable idle speed at these minimum speeds. But the idle speed is most likely too high, so we lower the throttle with the upper screw, achieving even lower speeds. We tighten it down to the very minimum, when at even lower crankshaft speeds the motorcycle begins to stall. Having established the minimum at which the motorcycle still works, we repeat the procedure again with the quality screw. By screwing in and unscrewing the screw we achieve stability. Then we lower the damper again, making a higher minimum of crankshaft revolutions and so on until the crankshaft begins to operate at the lowest frequencies. When we have completed the adjustment, we can check the idle for stability. To do this, take and sharply turn the throttle to maximum and look at the speed at which the revolutions increase. After increasing, we sharply lower the gas and listen to the engine again. If the idle speed adjustment is done correctly, then with such a sharp increase and decrease in gases, the motorcycle engine should listen to the throttle at the moment and also sharply increase and decrease the crankshaft frequencies. When the engine lags, it means the adjustment is slightly incorrect. In such cases, you can try to do everything all over again, but you can simply add or reduce air at idle. If, with a sharp increase in gas, the engine does not respond immediately or even stalls, it means that the screw should be tightened 1/4-1/2 of a turn. In case of poor performance in cases of sudden release of gas, the screw must be unscrewed 1/4-1/2 turn.
In principle, the adjustment can be completed here. As you can see, there is no particular difficulty here. The main thing is to do everything right.
Mostly motorcyclists suffer with carburetors due to complete misadjustment of the motorcycle. You should first carefully check the ignition and spark plug (it is advisable to install a new one). If the motorcycle is old, then worn out rings will affect performance and make it difficult to install the correct idle. If the whole point is in the development of engine parts, here you need to listen and adjust, since the specified rules will fit, but not completely.
You can also add that the K36 carburetors and other models are very similar in adjustment. The screws are basically the same, only their placement may differ. Therefore, having learned how to adjust the K62 carburetor, you will definitely be able to make adjustments in another model………
based on materials from blog-moto.ru
Single-cylinder two-stroke motorcycles Izh Planet 5,4,3 were equipped mainly with K-series float carburetors. In this article, the design of such carburetors, their malfunctions and adjustment will be described in detail.
Carburetor design
To this day, we have received mainly float models - the latest and most improved. So you can find them on most cars.
Design of a float carburetor: 1 - adjusting screw of the starting device; 2 — lever pin 24, included in the groove of lever 3; 3 — air damper control lever; 4 — screw securing the air damper drive rod; 5 - adjusting screw for slightly opening the throttle valve of the first chamber; 6 — throttle lever of the first chamber; 7 — axis of the throttle valve of the first chamber; 8 — throttle drive lever of the second chamber; 9 — adjusting screw for the amount of idle mixture; 10 — axis of the throttle valve of the second chamber; 11 — throttle lever of the second chamber; 12 — pipe for suction of crankcase gases into the rear throttle space of the carburetor; 13 — throttle valve of the second chamber; 14 — outlet openings of the transition system of the second chamber; 15 — throttle body; 16 — sprayer of the main dosing system of the second chamber; 17 — small diffuser; 18 — fuel nozzle housing of the transition system of the second chamber; 19 — accelerator pump nozzle; 20 — fuel supply pipe to the carburetor; 21 — econostat sprayer; 22 — air damper; 23 — starting rod; 24 — air damper lever; 25 — starter cover; 26 — lever pin 24, operating from the rod 23 of the starting device; 27 — air damper axis; 28 — carburetor cover; 29 — tube with econostat fuel jet; 30 — fuel filter; 31 — needle valve; 32 — emulsion tube of the second chamber; 33 - float; 34 — main fuel jet of the second chamber; 35 — accelerator pump bypass jet; 36 — throttle valve drive lever; 37 — accelerator pump drive lever; 38 — accelerator pump diaphragm; 39 — adjusting screw for the quality (composition) of the idle mixture; 40 — vacuum intake pipe of the vacuum ignition timing regulator. 41 — carburetor housing. 42 - solenoid shut-off valve; 43 — adjusting screw for additional air for factory adjustment of the idle speed system; 44 - trigger diaphragm.
A float carburetor consists of many elements.
- A float chamber, which is responsible for maintaining a certain fuel level.
- A float with a shut-off needle, designed for automatic dosing of the fuel level in the float chamber.
- Mixing chamber in which the main mixing of atomized (fine) fuel and air occurs
- A diffuser is a narrowed area through which the air flow accelerates its movement.
- A nozzle with a nozzle connecting the float and mixing chambers, through which fuel passes directly to the diffuser.
- Throttle valve - regulates the flow of mixture entering the cylinders.
- Air damper - regulates the air flow entering the carburetor.
Thanks to it, you can make the mixture “poor”, normal or “rich”. The diagram shows that a normal mixture is when there is about 15 times more air than fuel. Under such conditions, there will be complete combustion of gasoline and maximum power. - Idle system - supplies fuel bypassing the mixing chamber when the throttle valve is fully closed. Through special channels, gasoline and air pass into the throttle body.
- Economizers and econostats are devices for additional fuel supply when the engine is operating at maximum load. In this case, economizers have forced control, and econostats operate from air rarefaction.
- Fuel suction is a system for forced enrichment of the fuel mixture. By pulling the lever, the driver slightly opened the throttle valve, as a result of which air passed more intensely through the mixing chamber and took in more fuel. The result is a rich mixture, convenient for starting a cold engine.
What carburetor is used on the IZ Jupiter 5 model
IZH Jupiter 5 is the latest and most modified model in the series. The first “fives” were transitional: facing from model 4 and a K-62D carburetor. Then, an updated version was put into production - IZH Jupiter 5-01, the motorcycle received an interchangeable lining with IZH Planet 5 and carburetors K-65D, K-68D and Jikov-2928CE. The latter was taken from the Czechoslovakian motorcycle Java-638, which had similar engine parameters to the Jupiter.
Later, Izhmash presented a modified version of the Jupiter engine with water cooling. The so-called “dropsy” had the same engine power as a conventional engine, but the engine’s noise level and fuel consumption decreased. A new K-68D carburetor was also installed on it. Its feature was the new cylindrical shape and material of the throttle valve (like Jikov), which reduced its wear. Idle speed has become more stable.
Causes of overflow
Let’s say that there is no doubt that the carburetor began to pour gasoline mercilessly
What to do next? First of all, it is important to determine the cause of the problem. By answering the question “Why is the carburetor flooding?”, any vehicle owner will be able to fix the problem on their own
Often the cause of such a breakdown is one of the following:
- There is a malfunction in the needle valve. A similar “sore” often affects the carburetor on a moped and similar components on a trimmer or similar devices. A malfunction of the needle valve often occurs due to its loss of a sealed state, in which it promptly and completely closes the fuel channels, thereby dosing its supply. If the valve is heavily worn or “stuck” in the open position, gasoline overflows cannot be avoided. This unit can be checked for correct functioning by supplying discharged air to it; during normal operation, the needle should stably close the fuel paths and not allow air to pass through;
- The float in the float chamber is either leaking or touching the walls of the carburetor. The owner of any carburetor unit is not insured against this kind of problem. You can check the normality of the float by removing the float chamber cover and conducting a detailed inspection of the unit;
- The level in the float chamber has increased or the one that was present all the time has ceased to be relevant. This often happens when a motorcycle, moped or car has had a faulty component for a long time that increases fuel consumption. The part has been replaced or successfully repaired, but gasoline continues to be supplied in the same quantities. As a result, it turns out that the carburetor is “flowing”. Checking for the presence of such a problem is carried out exclusively by an empirical method, that is, by “playing” with the fuel level in the float chamber;
- The fuel pump is faulty. Perhaps this is also a problem from which it is impossible to insure yourself. It appears for only one reason - the fuel pump has failed due to some of its elements. In such a situation, all that remains is to disassemble, inspect and repair the broken part;
- The check valve that returns gasoline to the fuel line when there is overflow in the float chamber has broken down. Relevant for any Solex carburetor and similar components. You can check for a problem with the “return” by disassembling it, visually inspecting it, and blowing it with compressed air. If such manipulations do not correct the situation and no other problems are observed, then you should think about replacing the check valve.
The reasons described above for the carburetor overflowing on a scooter, car or other unit occur in 80-90% of all cases during a breakdown of this kind. Much less often, gasoline overflow occurs due to a malfunction or incorrect configuration of individual elements of the fuel distribution unit. Mainly affected are rubber nozzle seals, power mode economizers, throttle valves, solenoid valves, carburetor gaskets and mixture quality adjustment screws. The functioning of these elements is checked by disassembling the carburetor and inspecting it in detail, followed by subsequent repair measures.
Throttle needle
When studying the technology of how to adjust the K-65 carburetor, you need to pay attention to the shut-off valve. This is the throttle needle. If it does not cover the channel hermetically, the level of gasoline in the fuel mixture may be higher than the required level.
The throttle needle has several channels on its surface. The latch moves along them. In this case, it is possible to adjust the composition of the fuel mixture within small limits. The gasoline consumption of motor vehicles depends on this indicator. If you need to add more air to the mixture, you need to lower the needle. And vice versa.
When dismantling the float chamber, it is necessary to monitor the position of the throttle needle. If you move it carelessly, it may fall out. There is no way to lose this structural element. Therefore, the procedure is carried out very carefully. If the rubber elements of the throttle system are worn out, they must be replaced. The needle should move easily along the saddle.
Installation and configuration
Before adjusting a new K 65 carburetor, it must be installed and adjusted.
First you will need to remove the carburetor cap. The throttle spring holds the needle through the lock. It has one round and two shaped holes. A round slot located in the center serves to attach the throttle cable. The T-shaped hole is necessary for attaching the propeller rod.
Having installed the carburetor on the engine, a cable is connected to the throttle, and the cover is secured.
Use the throttle to raise the throttle and check whether the diffuser opens completely. These actions should be performed several times. The diffuser should open and close freely without jamming.
Next, use a screw to raise the throttle so that a gap of 3 mm appears between its bottom edge and the diffuser generatrix.
If the K 65 device (carburetor) has a corrector, it should be removed as an assembly and the cable should be attached to the piston. After this, you should install the unit in place.
Next, you should adjust the position of the stops of the cable sheaths so that their free play is 2-3 mm.
The screw must be tightened until it stops, then loosen it by 0.5-1.5 turns. The fuel hose is connected to the fitting. Fuel should not leak at the connection points.
Then the peak starter turns and the crankshaft rotates 3 turns. The ignition is turned on and the start is made. After warming up, the starter or corrector can be turned off.
Candles
The K-65 carburetor for IZH, Ural and other brands of motorcycles must have the corresponding appearance of the spark plugs. A visual inspection is sufficient. If a new carburetor is installed, you will need to drive a motorcycle or scooter on the highway for about 30 km. Engine speed should be high or medium.
After this, you can put the vehicle in the garage and begin inspecting the spark plugs. Soot should not appear on their surface. If this happens, there is not enough air in the mixture. Such fuel is called rich. The spark plugs will need to be cleaned before tuning.
In some cases, the surface of the candles turns white. This picture is observed when the system prepares a mixture that is too lean. There is too much air in it. The normal color of candles should remain in the range of yellow to reddish-orange. In this case, no configuration is required.
Carburetors of early “Jupiters”, their features and adjustment nuances
IZH Jupiter 2.3 motorcycles were equipped with K-36Zh carburetors with a diffuser diameter of 24 mm. At that time, the carburetor design was the most progressive.
The following are responsible for setting the carburetor: the mixture quantity screw (16), the mixture quality screw (24) regulates not the amount of air, but the fuel emulsion that flows behind the throttle valve (by analogy with a car carburetor), the throttle needle (12) and the main fuel jet (18). The latter can be easily unscrewed from the side of the carburetor for cleaning or replacement, which is undoubtedly very convenient.
The throttle valve is made flat, rectangular in shape with a characteristic cutout on the intake side to lean the mixture at idle. At the top of the throttle, the needle is attached to the hole without the help of a lock. And the mixing chamber cover (1) is secured using two leaf springs (10). This design is made for quickly removing the needle and adjusting the carburetor at medium engine speeds (by moving the position of the metering needle).
The fuel corrector consists of a needle, which, under the action of a spring (2), closes the corrector jet (17). The corrector cable comes out of the guide (9) and connects to the coin on the steering wheel. When it is turned, the needle rises, and additional fuel enters the opening of the mixing chamber through the corrector jet, enriching the mixture.
As can be seen from the diagram, the idle jet (25) is located behind the gas turbine engine, due to which the idle system partially affects the operation of the engine when the throttle is fully open. For the same reason, the diameter of this diffuser was increased to 70 ml/min.
Next, tighten the quality screw until the stability of the engine is disrupted. When this happens, unscrew the same screw back so that the motor starts working stably again. At the end of the quantity screw we again try to reduce the speed to a minimum. To check the correctness of the adjustment, sharply unscrew the throttle cable to the middle, and then drop it.
If the gas is gained quickly and without failures, and when it is released the engine does not stall, then you have achieved the optimal mixture composition.
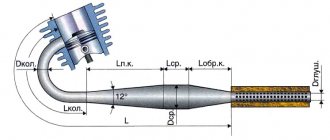
The K-36 carburetor has one unpleasant feature. In the diffuser, due to the nearby location of the corrector system, the mixing chamber is slightly offset to the side. On a two-cylinder engine, this is reflected in different amounts of mixture entering the cylinders. As a result, one cylinder heats up more. In order to get rid of this problem on early Jupiters with a K-36Zh carburetor, a special regulator was installed between the cylinder pipe and the carburetor flange (see figure).
Later, already on the 4th model, the need for this regulator disappeared, as new K-62D carburetors began to be installed. Its design is in many ways similar to the K-65D carburetor described above. Therefore, we will not dwell on it in detail.
A whole era is associated with IZH Jupiter motorcycles in the USSR. As the power of this motorcycle increased, a whole generation of carburetors that were installed on them changed. With proper adjustment and timely maintenance, these carburetors can last for many years. But if desired, old worn-out carburetors can always be replaced with good modern analogues.
Dosing system
The components of the dosage system are the main fuel jet, atomizer, air supply channel and throttle needle.
The entire system operation process occurs according to the following scheme. From the float chamber, fuel enters the atomizer through the main jet. Under the influence of liquefaction, it rises along the gap between the throttle needle and the nozzle. At the exit from it, the fuel is mixed with air, which entered through the hole in the atomizer body through the channel.
The K 65 carburetor has the following engine control system. The throttle needle can be set to one of five positions. This ensures that the engine operates at medium speeds. But at the highest power, it should be taken into account when tuning that the carburetor of the K 65 model determines the fuel consumption by the throughput of the main fuel jet.
There is a lock washer installed under the fuel pipe. It secures the nozzle.
Advantages and disadvantages of carburetors
Only the deaf have never heard of the horrors of constant carburetor repair. But what really? What are the advantages of this device and is there any point in dealing with it at all? Strange as it may sound in our technological age, the carburetor has several serious advantages.
- Simplicity of design. No, the point is not that this is a very simple mechanism. But compared to the electronic components of today's cars, the carburetor is much easier to repair, maintain, and even operate. Most carburetors do not have any electronics, only mechanical devices, which means that a person with “straight hands” can repair and maintain it himself. The “old guard” – our parents, who are accustomed to delving into their “beloved” Zhiguli and Cossacks – remember this well.
- Maintainability. Anything that breaks in the carburetor can be repaired without “excess blood.” The necessary spare parts can be purchased (there are manufacturers that still produce repair kits. Why not?).
- When working with low-quality fuel, the carburetor turns out to be much more durable and stable than the injector. In general, it is not too demanding on cleanliness, and if it gets clogged, it can be easily cleaned at home (“garage”).
- A small amount of water entering the carburetor will not harm it, unlike the injector. However, over time it will require cleaning and calibration.
- And finally, the carburetor does not require connection to the electrical network, sensors, processor and other “joys” of civilization. It operates solely on the energy of the air sucked in by the engine, which means it was the best option for installation on older cars that had no electronics at all.
But there are also disadvantages due to which carburetor cars eventually disappeared from the world automotive arena.
- Technology required a fuel supply system with flexible adjustments, rather than with constant parameters, in order to minimize fuel consumption (which no one had previously taken into account). Therefore, the carburetor was replaced by an injection system, which is still being developed and improved.
- The second significant disadvantage is the dependence of the carburetor on weather conditions. During the cold season, condensation collects inside, interfering with operation; in winter, there is a risk of icing of the inside. At the same time, the summer heat also prevents it from working stably due to active evaporation - disruptions in the supply of the mixture begin.
- Well, the third drawback is that the environmental performance is significantly lower compared to an injector. In the modern struggle for the environment, carburetor cars simply do not stand up to criticism, since their harmful emissions are much higher.
How to set up a carburetor on an Alpha
On my moped it was possible to adjust the spark plug insulator only by checking it. Normal settings at 2.5-3 full turns of unscrewing the quality screw (2.5 turns is the minimum at which the soot stopped appearing) MY ENGINE STALLED WHEN CLOSING THE THROTTLE SHARPLY AND I NEEDED TO LEAN THE MIXTURE (AND I MIXED IT UP AND ENRICHED IT)
Next, after all that has been done, we drive the scooter for several kilometers as usual, unscrew the spark plug and visually determine by the color of the spark plug insulator what mixture the carburetor is “preparing.”
If the spark plug insulator is black and covered with a layer of soot, then the carburetor is “preparing” a “rich” mixture, in this case the situation can be corrected by UNLOCKING THE QUALITY SCREW (if this does not help, then lowering the carburetor needle to the desired division.)
It must be remembered that the reason for the enrichment of the scooter mixture can be not only incorrect carburetor settings, but also a dirty scooter air filter; and the cause of a lean mixture may be the scooter’s fuel system clogged with dirt.
How to adjust the K-65 carburetor?
One of the important systems of motorcycles is the carburetor. He is responsible for the correct operation of the vehicle, its stability and durability. The functionality of a motorcycle or scooter largely depends on the design features of the carburetor. Therefore, the owners of the presented vehicles evaluate the design features and operating principle of this device.
Often, when creating domestic brands of motorcycles, mopeds and even snowmobiles, the manufacturer installs a K-65 carburetor in the system. You can adjust it yourself if necessary. The setting will allow the engine to start simply and easily, its operation will be stable and smooth. The fuel mixture will consist of the correct proportion of components.
Idle system
Another important system that must be taken into account when adjusting the K 65 carburetor is the idle speed device.
The presented system consists of a fuel pipe, an air channel, an idle hole, mixture quality and quantity screws, and a transition hole.
When the engine operates at low speeds, an emulsion is formed. This occurs by raising the fuel through the tube under the influence of vacuum in the mixing chamber. The fuel is combined with air, which enters through the channel. The K 65 carburetor assumes that the emulsion exits at low speeds only through the idle hole.
As the speed increases, the vacuum in the hole area increases. The same emulsion also begins to flow through it. So the fuel supply increases as the engine speed increases.
Standard carburetor of a modern engine
Carburetors installed on modern models of scooters, motorcycles and ATVs have the same two adjustment screws, but the quality screw regulates the mixture only at idle speed.
To regulate the quality of the mixture throughout the entire speed range, a metering needle is installed on the throttle valve.
This needle has a locking ring that allows you to raise the needle, thereby enriching the mixture, and lower the needle, thereby leaning the mixture.
We check the correct position of the needle as follows. First, sharply unscrew the throttle handle, the engine should quickly pick up speed without failures. If the engine stalls, the mixture is lean, you need to raise the needle one notch. If there is black smoke, popping sounds are heard in the muffler, the engine does not reach maximum speed - the mixture is rich, the needle should be lowered. Next, after a short run, we can more accurately determine the quality of the mixture based on the carbon deposits on the spark plug and make appropriate adjustments.