The engines of Soviet (and not only) motorcycles are designed for certain average performance in order to ensure their service life and durability, so it is always possible to improve the motorcycle parameters that interest us. (see continuation)
The muffler cannot provide an increase in power over the entire rpm range. Plus, it is initially set to a mode that produces an increase in torque, not power. In this case, the wave of exhaust gases must have time to pass through the entire resonator, be reflected from the cone and return to the exhaust window at the moment when it is still open, and the purge windows have already closed. If the wave arrives earlier, it will drive part of the working mixture back into the purge channels. If later, part of the working mixture will have time to fly out of the exhaust pipe. In both cases, torque and power will decrease and fuel consumption will increase.
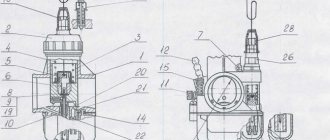
Resonator dimensions : L – total length of the resonator; L count – length of the muffler “elbow”; L p.c. – length of the front “straight” cone; L cf – length of the middle part; L obr.k. – length of the reverse cone; D count – diameter of the “knee”; D cf – diameter of the middle part; D jam. – diameter of the muffling part.
The most important dimension - L (total length of the exhaust system from the exhaust port to the end of the return cone) can be calculated using the formula:
L =[( a prod + avyp)/720 x 1/ n x 33,360]/2
where: aprod — purging phase (deg.); avyp — release phase (deg.); n — engine speed at which it is necessary to obtain an increase in torque (rpm); 33,360 m/min is the accepted average speed of the gas wave in the exhaust pipe. The volume of the resonator must be an even number of times greater than the working volume of the cylinder, that is, 2, 4, 6, etc. - only in this case will the muffler work as it should.
Pipes, muffler for motorcycles IZH Jupiter, Planet 5
The engine of IZH motorcycles is two-stroke, so the fuel combustion process is noisier than a four-stroke engine, and a larger amount of unburned gases is also released into the atmosphere. At the moment of release, the exhaust gases have a high temperature that is dangerous to the health of the motorcyclist. Therefore, the IL muffler pipes must have a more complex design. Comply with safety standards and not cause harm to human health and the environment.
Tuning Izh Planet 5. Preparation.
If you bought an expensive Japanese motorcycle, tuning it will become difficult, and you won’t be able to carry out the upgrade yourself. Do-it-yourself tuning of Izh Planet 5 is quite simple, you will only need to have a small set of equipment and from an old Soviet transport you will get a modern and powerful motorcycle. Any tuning consists of two types - external and internal (change in technical characteristics). Let's look first at the first option, namely modernizing the appearance.
The principle of operation of the muffler
After fuel combustion in a small chamber, the gases have enormous energy and escape at high speed from the cylinder pipe into the pipe and then into the muffler. This is accompanied by a lot of noise. After passing through the labyrinths of the silencer, the energy wastes its strength. This causes all exhaust parts to heat up. This system not only performs the work of removing gases. By selecting the size and geometry of the muffler pipe, you can achieve fuel savings and increase the power of a two-stroke engine. The picture of the layout shows which part is responsible for what.
External tuning of Izh Planet 5
Often, to improve the appearance, styling of individual elements is used, and let's start with the muffler. Previously, a muffler kit was made, including chrome pipes and various attachments. Having found such a kit, you will not only get a beautiful appearance, but also improve the performance of the exhaust system, and the engine will run even more stable and smoother. Therefore, we recommend starting tuning with the exhaust pipe.
Next, they most often replace the rear shock absorbers by installing a higher size. Raising the motorcycle will significantly reduce the pressure on the engine and gas tank, so replacing the shock absorbers is also necessary. But it is worth considering that for proper operation you will have to balance the wheels. Let's look at other changes in the appearance of IZH Planet 5.
- For better sportiness, the height of the front wing is increased.
- An additional tuning will be the replacement of standard round turn signals with rectangular ones.
- A modern type of external styling is the installation of xenon. With it, the vehicle will not only be more beautiful, but also safer on the road.
- Most often, Izh Planet 5 owners install an updated windshield. Just one detail will give the motorcycle a new look.
- To make Izh behave better on the road, newer and higher quality tires are installed instead of old ones.
As you can see, tuning Izh Planet 5, photos of which are sufficient, show that there are enough opportunities for modernization, and you can limit yourself not only to the above methods. Almost everything can be changed, it depends on your imagination and desire. Some craftsmen even created a sports body for the motorcycle, thanks to which you can’t even tell that it’s an Izh.
Causes of engine power loss
The first models of IZH motorcycles were equipped with easy-to-maintain mufflers. The advantage is complete disassembly. We began to notice a drop in power. First of all, pay attention to the exhaust system. Disassemble the muffler and give it a good cleaning. But soon they felt weak power again. Pay attention to the gap between acoustic filter 2 and partition 1. The lack of normal gap inhibits the exit of gases, which leads to a drop in power. The engine starts running intermittently.
Muffler cleaning methods
The exhaust system has no adjustments, therefore, it is necessary to clean it in a timely manner.
Filters that dampen sound must be removed and burned. You can do it over a fire or use a blowtorch. Cool quickly using cold water. This leads to carbon deposits peeling off. Clean the pipe with a metal brush.
The next method is to burn off the carbon deposits and remaining fuel inside. Let's place the pipe vertically, you need to set it on fire from below, a draft will appear and all the carbon inside will burn out. All that remains is to remove the combustion residues.
A gentle way to clean. Use a chemical solution to soften deposits. The solution is prepared for a liter of water, 25 grams of caustic soda, 33 grams of carbonic soda, 8.5 grams of soap. Heat the solution strongly until almost boiling. Pour it inside the muffler and wait a couple of hours. After this, rinse thoroughly with warm water.
Similar articles:
The last notes
Chainsaw ms 180 stihl
Chainsaw ms 180 stihl. Traveling on all-terrain vehicles to hard-to-reach places to cut fallen trees, prepare firewood for a fire, you need a simple, lightweight classic chainsaw.
Two-stroke engine operating principle
A two-stroke engine in which the working cycle occurs in one revolution of the crankshaft, and in a cycle.
© When using the material, an active link to planeta-4.ru is required!
Source of the article: https://planeta-4.ru/obsluzhivanie/glushitelj-izh.php
Motorcycle IZH-Planet.
Operation, maintenance and repair. >> Exhaust system. Exhaust pipe and muffler - removal, cleaning of carbon deposits and installation LLC "World of Autobooks"
Exhaust pipe and muffler - removal, cleaning of carbon deposits and installation
Carbon deposits in the exhaust system significantly reduce engine power and efficiency. Therefore, from time to time you have to remove and disassemble the exhaust system for cleaning.
Removal and disassembly
1. Place the motorcycle on the center stand.
2. Using a special ring or “gas” wrench, unscrew the union nut securing the exhaust pipe to the cylinder. If the nut does not give in, we moisten the threads of the pipe with penetrating lubricant and after one or two hours we apply light “unscrewing” blows through the beard along the slots of the nut.
3. Remove the aluminum sealing ring.
4. Using the same tool, unscrew the union nut securing the muffler to the exhaust pipe. Carefully slide the nut forward along the pipe, trying not to damage the asbestos cord sealing the joint.
5. Unwind and remove the asbestos cord. It is more convenient to screw the nut back onto the muffler thread for subsequent removal of the system.
6. Using a slotted screwdriver, unscrew the two screws securing the acoustic pipe.
7. Remove the acoustic pipe from the muffler body.
8. Using a 17 mm wrench, unscrew the nut of the rear muffler mounting to the frame, holding the bolt with a 14 mm wrench.
9. Using a 19 mm wrench, unscrew the nut of the front muffler fastening (at the same time this is the fastening of the driver’s footrest).
10. Remove the muffler together with the exhaust pipe and, unscrewing the nut, separate them.
CLEANING FROM COCK
The muffler has a non-separable design, so the easiest and most effective way to clean it from carbon deposits is thermal, that is, burning. Work should be carried out outdoors or under a hood.
We fix the muffler vertically, with the rear end up. You can tie it with wire to a steel rod driven into the ground. We bring the flame of a blowtorch or gas burner to the lower end of the muffler. A draft is created inside the muffler, like in a furnace, the carbon deposits ignite and begin to burn out, while a blue flame with sparks flies out of the upper hole of the muffler (the burner can now be removed). We wait for the end of combustion and the complete cooling of the muffler, after which, having untied it, we tap it on the weld seam with light blows of a rubber hammer and, turning it over, shake out the ash from both ends.
The exhaust pipe can be burned in the same way and then cleaned with a steel brush.
It is easier to heat an acoustic pipe with a blowtorch and throw it into water; the carbon deposits are easily separated from the metal.
If there is heavy carbon deposits in the cylinder pipe(s), carefully clean it with a suitable tool so that carbon particles do not get into the cylinder.
Note
Carbon deposits in the exhaust system are an inevitable drawback of two-stroke engines, where the oil is mixed with the fuel and, in the end, burns (unfortunately, not completely) along with it. However, the intensity of deposit formation can be reduced, which means there will be no need to carry out this work frequently. To do this, use special “two-stroke” oil; its content in the fuel (for a run-in engine) can be reduced from the factory-recommended ratio of 1/25 to 1/40-1/50. Motor oil for four-stroke engines can be used, but it is desirable that its API quality class is not lower than SH. The viscosity index should be as high as possible, for example: SAE 15W40, 15W50, etc. In this case, the fuel mixture should be in a ratio of 1/30. All modern high-quality motor oils are ash-free, that is, they practically do not form a solid inorganic residue during combustion, which further reduces the formation of soot and reduces wear on parts such as the piston, cylinder and piston rings. You can further reduce the oil content in gasoline by adding various additives to the mixture - metal conditioners, such as SMP, ER, FENOM (see instructions for using these drugs).
During the cooking process, thoroughly mix the fuel mixture, in a separate container*, before pouring it into the tank. Make sure that the carburetor is properly adjusted and the engine's thermal operating conditions are not allowed to start driving without warming it up, as well as overheating when driving for a long time at low speed in low gears.
From time to time, you can add special automotive preparations to the fuel, designed for in-place cleaning of soot from valves and combustion chambers of four-stroke engines.
Attention!
Do not use automotive engine waste to compose the fuel mixture, no matter how tempting it may be from an economic point of view.
Installation
We install the removed parts in the reverse order.
It is useful to treat the threads of the union nuts and the aluminum o-ring before assembly with a special finely dispersed graphite lubricant; this improves the tightness and makes subsequent disassembly easier.
If necessary, replace the asbestos sealing cord. It should also be impregnated with graphite or simply wet with water. A damaged ring can be replaced with one made from sheet annealed copper or aluminum.
Attention!
When installing the exhaust system, you must first screw on (without tightening) the upper union nut, thereby attaching the exhaust pipe to the cylinder. Then we fix the muffler to the frame and only after that we tighten, first the upper and then the lower union nuts. If this assembly order is violated, then due to the misalignment of the parts there is a risk of damage to the relatively soft thread of the aluminum cylinder pipe by the steel nut.
Similarly, we remove, clean and then replace the other exhaust pipe and muffler (with a dual exhaust system).
Contents :: Next >>
Calculation and production of a resonator in reality 350 638
L=((118+164)/720*1/5250*3360)/2=1.24m = 1240mm
The length of the elbow should be within 20-28% of the total length of the exhaust system: (1240*28)/100 = 350mm The length of the straight cone should be 32-38%: (1240*32)/100 = 400mm The length of the middle part is accordingly 8 -10%: (1240*10)/100 = 120mm The length of the reverse cone is respectively 30-35%: (1240*30)/100 = 370mm The diameter of the elbow is 63-70% of the diameter of the cylinder, which is 58mm: (58* 65)/100 = 38mm , i.e. corresponds to the diameter of a standard JAVA elbow. The diameter of the muffling part is 65-75% of the diameter of the elbow, i.e. 25-28.5mm We will calculate the diameter of the middle part using the formula given in the article: 38+0.21*400 = 120mm
Making a resonator in real life 350 638
Dimensions of resonator parts designed for different speed ranges of the JAWA 638 motorcycle
Program for calculating resonators in Java, etc. download
1 way. A more labor-intensive method is to shorten the elbow according to its estimated length, and make the straight cone curved, dividing it into small cones. Photo of the resonator below:
Method 2. Less labor-intensive - we shorten the elbow so that a straight cone can be attached to it. Then we make several longitudinal cuts from the end of the knee to the place where the calculated knee should end.
The cut parts must be expanded so that they form the beginning of a straight cone. You will also have to cut “patches” to connect the cut parts. Photo of the resonator below:
You can scan metal using the setup-cone program. Download
Drawing of a resonator for Izh Jupiter/Planet motorcycles
(Jupiter is the average size, for the planet it is the maximum)
I read earlier on the Internet that the resonator for the P5 engine (one-pipe design) is very long and awkward.
Today at work during a smoke break I came across a program for Android (I use a tablet) to calculate the resonator for a 2T motor. The program contains four calculation methods - Grigoriev, Voitenko, Blair and complex. I calculated using a complex method.
I’ll say right away that the calculation is carried out according to the purge and exhaust phases. I have modified, seriously modified valve timing; these drawings will not work at all on a stock engine.
I wanted something like this: a resonator, but of short length, and maximum output at low speeds (3-4.5 thousand) because installing a huge pipe doesn’t fit the style, I don’t want to run it under the frame; I plan to use it not only on asphalt. I will say that my wishes regarding the short exhaust were dashed by calculations.
The main calculation for my engine is for 3 thousand revolutions. For 4 thousand I'll throw it lower
The resonator is calculated to add 8-17% power (compared to a standard exhaust). With the current configuration, the piston configuration produces 32 hp without a resonator and 34.5-38 hp with a resonator.
Help. What to do. The length of 2 meters does not suit me (counting is from the mirror of the cylinder). For reference, the standard length is 20 cm less. Optimal - 120-160 cm. The long exhaust kills the entire appearance. Can you tell me how and where to hide it?
- I like I like 4
Other entries in this logbook
Lowering and proper drainage
Hello friends! There won’t be a lot of writing) Yesterday I looked at the “tied” motorcycle and decided to “lower” the tail) But not by sawing etc. Read more
What's happening.
Greetings friends! Happy belated holidays to you! In all today’s photos you see the motorcycle in the position in which I’m sitting on it—simply. Read more
Chains or spikes? I was faced with a choice.
Good day, readers! The cold weather has set in and winter and snow are approaching (yeah, captain obvious, I know). Road grip becomes in. Read more
Comments
Only authorized users can leave comments
Rechitsa
I came across this post by accident. It's nice that someone is using my program. And yes, indeed, the lower the calculated speed, the longer the silencer is. And this is the real problem. I thought in reality that I wanted to get the engine to run efficiently at 4500 rpm. But the length is too long. But everywhere they recommend calculating the cutter at the speed at which the engine produces maximum power, and on my Java it’s 5200. Although I’m not sure I’m spinning that much. But when calculating for 5200, the length turns out to be at least sane. In your case, you can do as the guys in this video vk.com/rezkit?w=wall-32646518_202%2Fall Screw the resonator into a ram's horn. It will be more difficult to make, of course, but this is a compromise. If you think about it, you can do it beautifully.
- Answer
- June 21, 2016 at 07:53
SaviorBlack
Russia, Krasnodar
The program is really interesting. Partially helped in understanding and small calculations. But for the motor, not a classic half-wave resonator was made, but a quarter-wave one. The twist into the ram's horn did not suit me. I calculated it myself according to Blair, and made the sound dampening system ala “LeoVinci”. It is in subsequent posts)
- Answer
- June 21, 2016 at 09:29
NoAdO
Moscow, Moscow
Maybe try a scooter layout? Those. rotate the pipe after the resonance chamber 180 degrees and there is already a muffler there? Or will it not get up at all? Option two - the resonance chamber is parallel to the ground, then bend so that the muffler goes at an angle of 30 degrees to the ground, a la a sportbike? The third option is to bend the cones (a la Leovince SP3, although this model is a quarter-wave) to reduce the length, the 4th is to use a quarter-wave pipe for less power in a larger rpm range.
- Answer
- May 23, 2016 at 12:19 pm
Do-it-yourself muffler IZH
Sooner or later, any equipment requires repair or replacement of some components.
These requirements directly depend on the age of the model, mileage, and operating conditions. Over the 12 years of use (I am not the first owner, the planet is 50 this year), I already had to change the mufflers several years ago. We got them almost new. But since the motorcycle accumulated kilometers mainly off-road, the question of replacing them came up again. The right pipe had dents in the body, and the left one was completely broken and deformed in the area of the driver's footrest. The difference in height at the ends of the pipes was more than 3 cm. Of what was on sale that day, nothing suited me. Almost everything from the existing assortment required adjustment and alteration. In addition, I have long wanted to get rid of such a headache as weak walls. I’ll make a reservation right away - I was not interested in the exact calculations that are so actively used on the forums, coolness. I set myself a specific goal: ease of manufacture + minimal costs + available materials + durability, since I need my horse for work, not for exhibition. There is one drawback in my version - the weight of the pipes, but this is compensated by the fact that after using them for about a year, as you can see, there is not a scratch on them. No changes in operation are visible. The craving is the same, even the “voice” has not changed (at least by ear). Well, now let's move on to describing the process. Step one - prepare the source material. We will need:
- Three electrodes (preferably not Chinese, since even after grinding and painting they quite clearly outline the welding seam with pores and slag). .
- Wheels for grinder; cutting and grinding.
- Dye. I used black enamel. Waterproof, can withstand temperatures up to 400 degrees. You can choose according to your taste, for example with the addition of silver, the main thing is that the paint is heat-resistant.
- Pipes.a Two sections with internal diameter = 82 mm, length 230 mm. (this is the fitting size for the glass and tip) for the cylindrical part. bTwo segments with outer diameter = 72 mm, length 490 mm. For diffuser. In the preliminary drawing I tried to start from the first diameter (on a scale of 1:1) but it turned out cumbersome. A smaller diameter, as well as length (of segments b), is undesirable - the volume of the diffuser cavity is significantly reduced, which leads to deterioration in engine performance. Increasing this length will also bring the finished pipes beyond the dimensions of the motorcycle.
- We cut off the threads from the old pipes, through which the connection to the elbows is made, to a length of thread + 30 mm.
- Carefully cut the old exhaust pipes along the seam - the collar (so as not to spoil the glass) and remove it. (after removing the tip and taking out the acoustic filter).
On the left is the acoustic filter, then the tip and grille. Since I can’t show the glass in the picture - it’s already welded, I’ll give a schematic image. (see below)
Step two - finalizing the components:
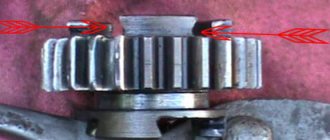
- We take segment A. Insert the glass. We put an acoustic filter on the hairpin. The picture clearly shows the skirt of the glass (between the filter and the pipe). The baffles are located in the front part of the cylindrical section of the pipe.
Arrows below - pipe on the left, acoustic filter to the right.
The arrow at the top is the glass skirt. Next, insert the tip into the groove between the pipe and the skirt of the glass. We adjust all the parts in this way: the tip is as tight as possible in the seat. We insert the lattice washer and tighten it with a nut. Then lightly hit the nut (use a wooden adapter) and push the tie inward until it rests. Next, we unfold this entire set. On the back side, in the segment, at your edge there is the outermost supporting partition of the glass. If it does not fit the end of the pipe, then we cut the pipe until this partition and the end of the segment coincide along the plane. We make 3-4 welding points in a circle. This part is ready. 's take segment B. We measure the circle at one end and divide it into 3 equal parts. Let's celebrate. (for me this = 240 mm) - 3 points every 80 mm. We make similar markings at the other end. (important) the marking points at the ends must match. Pair - left point / axial parallel / right point. And so on for all 3 pairs.
Then we make additional markings along the points on either side. For example point a. We adjust 12 mm on both sides of the point. We mark (and so on at all three points on one side of the pipe). They are designated as a 2 and a 3. From them we draw straight lines to the point a 1 (also on the remaining pairs). We cut out the resulting wedge between points a 1, a 2 and a 3. The same at points b and c. The cuts should be at an angle of 30-35 degrees.