Different types of forks
Telescopic fork
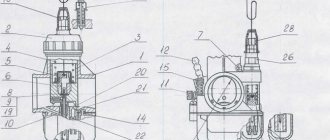
This fork consists of two identical tubular parts that are mounted on either side of the front wheels of your motorcycle. To ensure its operation, it is equipped with several internal elements. First, we have a plunger tube that will be placed inside the shell. Besides the said dip tube, the hub contains other materials and components such as oil or spring, depending on the damping system present on your fork. For this reason, there are two damping systems: a hydraulic system, which is responsible for controlling the fluid, and a spring system, which is a more classic version. Finally, we have the spinnaker, which acts as a seal between the pipe and shell.
The advantage of this type of plugs is that they are inexpensive and easy to find in the market. However, you should be aware that it wears out quickly; therefore, the fork cannot be used for sports purposes or for extreme activities.
Our recommended products:
Here is a selection of telescopic forks for your motorcycle that may interest you.
Black telescopic fork for Peugeot 103 SP / SPX motorcycle.
Gray telescopic fork of the Motodak brand for the PEUGEOT 103 145 ST560 moped.
Black telescopic fork 26 mm universal brand for Peugeot type 50 or 105 SP.
See all telescopic fork models available on Amazon
Inverted fork
This type of fork is an inverted version of the classic fork. We saw its appearance in the early 80s, its operating mode, roughly speaking, is the same as this one. Only the location of the immersion tube differs. To achieve this, forks of this type have all parts turned upside down. The hub is attached to the triple trees, then the plunger tube is connected to the axles of your wheels.
You can enjoy sportier riding and off-road riding with this type of fork. It is more rigid and durable. However, this stiffness can be a hindrance on some types of terrain.
Our recommended products:
Here is a selection of inverted forks for your motorcycle that may interest you.
770mm long inverted fork tube for off-road or pit bikes.
735mm inverted fork for 15mm wheel axle. Ideal for off-road motorcycles.
Inverted fork tube for dirt bike. Length 735 mm. Ideal for wheel axle diameters from 15 to 20 mm.
See all inverted fork models available on Amazon
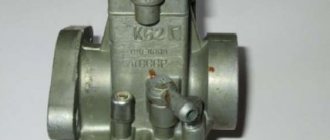
Cartridge plug
This type of fork could very well be a telescopic fork, which is the most classic version, or an inverted fork. However, it uses a different system that allows for longer life and durability. There is an oil cartridge installed there. These two pistons provide two systems. One is responsible for compression, and the other for rebound. To this end, adjustment has become smoother and simpler.
This type of fork is ideal for sports or off-road use. The cartridge system provides easier access to the oil. This simplifies maintenance.
Our recommended products:
Here is a selection of cartridge forks for your motorcycle that may interest you.
Fork cartridge for Guzzi motorcycle. For compatible models: T5 850 or V 1000.
The fork chuck is adjustable up to 30mm. Ideal for cafe racers or roadsters.
Guzzi motorcycle fork cartridge for T3 and V models from 1975 to 1984.
View all cartridge plug models available on Amazon
One shock absorber or two? Foaming of oil in shock absorbers.
In the good old days, all motorcycles had two rear shock absorbers. In the course of evolution, the design of two shock absorbers was replaced by a monoshock absorber. Question: why?
And the answer is quite simple. In a system of two shock absorbers, they are located quite close to the rear wheel. This means that the piston inside the shock absorber moves almost the same distance that the pendulum travels. Large bumps force the piston to travel a distance of 10 centimeters up and then down, which gives the effect of foaming the oil inside the shock absorbers. When the consistency of the oil begins to resemble a Frappuccino, the shock absorbers begin to handle bumps much worse.
A monoshock system involves mounting directly at the base of the swingarm. The pendulum moves up and down the same distance, but the shock absorber piston travels a much shorter distance than with a pair of shock absorbers. And modern progression systems further soften the load on the shock absorber. Thus, the monoshock absorber copes with large bumps more easily and handles small ones faster. Looking ahead, I would like to note that, reading the paragraph about BMW suspensions, you will understand why the shock absorber mount on the first Paralever was subsequently shifted to the very base of the pendulum - precisely because the original design with a mount at the rear wheel did not provide any advantages over the same suspension design with two shock absorbers.
Characteristics of a good motorcycle fork
You have to take several factors into account, the type of use you are going for. Is your motorcycle more of a sport, off-road or roadster type? After this, you will need to select the type of cushioning. Let us remind you that there are two of them, including oil suspension or leaf spring suspension.
Spring
So you're faced with two options: your motorcycle's powertrain and your shock absorption system. That's why we have a constant pitch spring and a progressive pitch spring. First, the flexibility system is continuous. thus it can withstand small impacts. However, it's worth noting that this one comes on the heels. For a progressive pitch spring, each element of the spring plays a different role in compression. Thus, the system easily adapts to any type of complexity and any type of shock.
Suspension system
As we saw earlier, the suspension type of your fork is divided into two. For this we will see the first one which uses a spring. The latter makes compressive movements when the motorcycle moves along the road. This way, all shocks are absorbed and it allows you to control the motorcycle at the same time. Currently we can still find such a system, it is still in effect.
Then we have oil suspension system or hydraulic suspension. This provides movement for good traction and comfort. It is as if the latter compensates for the various fluctuations present in this type of difficulty. The hydraulic system will reduce vibrations using the energy it receives from the springs. At this time, oil will circulate inside the fork and the valve will slow down.
Basic compression adjustment.
Compression adjustment is very difficult to do in a garage without test riding the bike, so I like to start by deliberately softening the compression.
Once you feel satisfied with the results of the static tests, you can move on to the next step: you need to set the damping range.
How. The next step is to set the compression and rebound range. And at the same time we will have to force ourselves to act in the opposite direction. That is, set for yourself two extreme adjustment points at which you feel that the setting is incorrect: the softest and the hardest. Now that you have two extreme points that you can feel, you can skip the suspension tuners and gradually narrow your damping range. 80% correct damping is an excellent result.
For what. Feeling and understanding compression and rebound will give you a clear answer on how your suspension should be set up. A test drive should be taken each time before moving on to the next step.
1. Springs. Check preload and sag adjustments. And if the sag value is correct, you can move on to the next steps to adjust the damping.
2. Rebound damping. At this step, the compression settings can be neglected. When a motorcycle wheel hits a bump, the spring is compressed and a counterforce forces the wheel toward the ground. When the force generated by the wheel hitting a bump can no longer compress the spring further, it begins to decompress and rebound. You must control the speed of this rebound as the combination of spring rate and proper rebound setting gives you stability.
3. Compression damping. Once you have achieved stability based on the previous tips for adjusting rebound damping, you can move on to compression settings and begin to control how the front wheel of the motorcycle behaves when going over a bump. Use the same method of extreme points in the damping range.
This is the first big step. Fine-tuning the suspension begins after you complete it. Never drive at the limit of speed before making a basic suspension adjustment.
All.
Our selection of the 5 best motorcycle forks
Sharplace Shock Front Fork for Super Dirt Mini Bike
Motorcycle front fork from Sharplace for 47-stroke engines from 49 to 2cc. See Made from durable gray aluminum-based material. Ideal for superbikes or mini dirt bikes. The length of this is 510 mm. As for the diameter of the wheel axle, it is 12 mm.
Classic Fork Tubes - 650mm - Dirt Bike
This new Motorz motorcycle fork is 650mm long and is ideal for off-road motorcycles. The diameter of the compatible wheel axle is 15 mm. As for the weight, it is 4.6 kilograms. Sleeve diameter 33/33 mm. Metal material in two colors: black and grey.
Wai Danie motorcycle front shock absorber fork
This pair of motorcycle front forks is made by Wai Danie brand. The material used is mainly aluminum. Ideal for Yamaha PW 50 motorcycle models from 1981 to 2015. The total weight of the fork is 2 kilograms. The length of the fork is approximately 50 cm.
All black moped fork
This type of fork is telescopic and made of black painted aluminum. Made by 2 extreme brands. Ideal for mopeds and maxi-mopeds such as motorcycles. Length 100 cm. As for its weight, it is 5.58 kilograms. Compatible with puch maxi moped fork.
Cartridges for Moto Guzzi Bitubo Nitro forks
This product is a fork cartridge model for Moto Guzzi type V1000 or T3 850. Manufactured by the BItubo brand, it is brand new. Durable construction made of material which is mainly made of aluminum. The weight of the product is 2 kilograms.
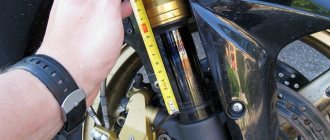
Set the correct sag using spring preload.
The sag can be adjusted in any conditions, including immediately before departure. Please note that the condition of the suspension can greatly affect the measurements. When taking measurements, do not “plop down” on the motorcycle, do everything smoothly and carefully.
Using a tape measure and clamp, take measurements:
| The fork is fully extended. Lift the motorcycle onto a motocross stand or stool. Do not use tackles; the front wheel of the motorcycle must be hanging out. Attach the clamp (plastic tie) to the fork leg close to the boot. | Motorcycle sag (static sag): Gently lower the motorcycle from the motocross stand or stool. The distance by which the clamp or tie slides along the motorcycle fork leg will be the sag of the front fork of the motorcycle (static sag). | General sag. Take your normal position, sitting or standing on the motorcycle, with both feet on the pegs. Place your elbow on the wall or ask a friend to help you hold the bike. The total distance that the clamp or tie will slide is the total sag. |
Front total sag value: Check your motorcycle manual for the full fork travel value. The overall sag of the bike should be about 33% of the full fork travel.
Use a tape measure. Don't "plop" on the motorcycle.
Measurement 1. The rear shock absorber is fully extended.
Lift the motorcycle onto a motocross stand or stool. Do not use tackles; the rear wheel of the motorcycle must be hanging out. Measure the length of a vertical line from the center of the rear wheel axle to the mark on the plastic of the motorcycle or exhaust pipe with a piece of duct tape.
Dimension 2. Motorcycle sag (static sag).
Carefully lower the motorcycle from the motocross stand or stool. Re-measure. The difference between the first and second measurements will be the static rear sag of the motorcycle.
Dimension 3. Total sag.
Take your normal position, sitting or standing on the motorcycle, with both feet on the pegs. Place your elbow on the wall or ask a friend to help you hold the bike. Re-measure. The difference between the first and third dimensions will be the total rear sag of the motorcycle.
Rear total sag value: Check your motorcycle manual for the total rear shock travel value. The total sag of the motorcycle should be about 33% of the full rear shock travel.
Motorcycle fork care
To keep your fork in good condition for a long time, you need to assign three types of maintenance to it.
Relaxation
It consists of regulating the amount of oil in a calibrated hole. This type of adjustment allows you to act directly on the fork, moving it to its original position.
Limitation
To do this, it is necessary to adjust the amount of oil entering the valve. This is necessary to adjust the compression speed or compression of the fork.
Prestress
To continue, compress the spring until it hardens. Refer to the adjustment screw, which is usually located at the bottom of the fork leg. It should be noted that on standard motorcycles the spring should be quite stiff, and on roadsters it should be quite soft.
Why and how often do you need to change the oil?
If you buy a motorcycle without mileage in the Russian Federation, for example in Moscow this can be done at synergosmoto.com, then you will not be able to change the oil soon, but after prolonged use, even on such bikes you will have to change the oil, usually after 5000-7000 km. The oil in a motorcycle fork has two main functions - the role of a damper, and to absorb the remaining metal shavings. In the first case, loss of oil will lead to a deterioration in ride quality, the fork will begin to “peck”, may begin to lock, etc. Such behavior not only interferes with full movement, but can also provoke an accident. Oil contaminated with metal shavings loses its lubricating properties, which leads to rapid wear of parts.
In addition, the oil should be changed when:
- leak
- after winter downtime
- after a long period of inactivity
- within the period established by the manufacturer
The last option is the most preferable, because most often motorcycle owners carry out a scheduled oil change in the fork. Each manufacturer specifies how often the fork lubricant should be replaced. This parameter depends on both the type of bike and the design of the fork. For city motorcycles, it is recommended to replace them every 10-15 thousand km, and for motocross and enduro motorcycles this figure can drop to 5-10 thousand km.
Tools needed to service a motorcycle fork
Fork oil
This fork oil is compatible with a wide range of motorcycle forks. It protects the fork from possible wear thanks to its anti-friction and anti-emulsion technology. This Ipone brand lubricant is ideal for maintaining your two-wheeler, providing good performance under all circumstances. The capacity of the latter is 1 liter.
Syringe for dosing or adjusting oil level
You'll need this to help you avoid getting confused about the ideal dose of oil. This will also make the fork easier to maintain. There is a meter that allows you to see or measure the amount of oil that needs to be injected into a special element of your fork. Product weight is only 300 g.
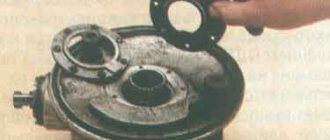
Disassembly
Be careful not to hang up the motorcycle when disassembling it, as otherwise you will not be able to remove the front wheel from it. Having a helper hold your vehicle, loosen the front axle bolts, which are usually located directly on the shock absorber pins. After this, hang the motorcycle, and also remove its front wheel and fender from the fork. Unscrew the nuts securing the stays and remove the springs from the fork - be careful not to damage their attachment points during dismantling. In addition, you will need to unscrew the nuts securing the lower bridge, after which you can begin to remove the stays.
This process can be relatively difficult - first you need to remove the upper boot of the pen by prying it off with a special puller or a regular slotted screwdriver. The retaining ring can be removed using pliers, but you need to be very careful not to bend or break it. Afterwards, the bolt holding the fork in the yoke is loosened, as a result of which it can be removed by hand. To completely disassemble the fork, loosen the bolt securing the shock absorber rod, and then repeat the operation, removing the boot and the retaining ring of the stay at the bottom.
Reassembling the fork is often associated with problems - if the stays do not want to be removed from their attachment points, turn the nut a little in the opposite direction, and also hit it with a wooden mallet. After this, the process will be much easier, and you will be able to remove the feathers without putting in almost any effort. Loosen the locknut and the upper bridge pinch bolt, after which you will be able to remove the headlight, gasket and other components that interfere with further disassembly of the fork.
Prepare two containers of 0.5–0.75 liters each and begin removing the oil seal. The nut located on its body will need to be unscrewed with a spanner of the appropriate size, after which the seals can be removed by hand. Place prepared containers under the fork pipes, as at this moment an oil leak may form. Unscrew the rod axles, after which the liquid will probably flow out of the motorcycle fork. When the oil has completely flowed into the containers you have prepared, all that remains is to remove the supporting and sliding pipe.
After this, you can begin repairing the motorcycle fork, since it will be completely disassembled. When you are done replacing the worn parts, you will need to reassemble in reverse order
Please note that the bolts can only be tightened after the nuts that are used to secure the fork leg have been completely secured. In this case, you will be able to set the correct position of this unit, ensuring maximum stability of the motorcycle and ease of control.
Steering dampers.
As already mentioned, with small fork rake values, the motorcycle steers easily and quickly, but suffers from a lack of stability at low speeds. This isn't much of an issue on sportbikes, which require precise handling while still being quite fast. The problems start when you hit a big enough bump. The motorcycle fork compresses, the wheelbase decreases, the motorcycle loses stability, and the front wheel dances from side to side. And so on until the fork unclenches and the wheelbase returns to its original length.
Once this happens, the gyroscopic effect that occurs on the front wheel causes the motorcycle to "bob its head." The gyroscopic effect causes the motorcycle's front wheel to wobble from side to side. In some cases, the handlebars dangle so much that the grips touch the motorcycle’s gas tank. Usually this all ends in a highside, when the motorcycle throws the rider forward, over itself.
At one time, this behavior of the motorcycle was the reason for the recall of a batch of Suzuki TL 1000S after a couple of weeks after they hit the windows of motorcycle dealerships. And this is the same reason that led engineers to develop steering dampers for motorcycles. A steering damper is a great thing to use on the track and if you don't fully trust your motorcycle. There are two main types of steering dampers: linear and rotary. Linear dampers consist of a hydraulic cylinder and a rod with a piston, one side is attached to the motorcycle handlebar, the other is attached to the frame. Such dampers are similar in appearance to shock absorbers and are not activated during normal driving, but as soon as the shock begins, the damper takes on most of the load.
Rotor steering dampers are also available. They are mounted on the motorcycle steering column above the bearing and work by increasing the steering column's resistance to sudden left-right movements. The resistance is achieved by damper hydraulics. Just try hitting one of the handlebars with your fist when the steering damper is installed - and you will understand how it works.