Mikuni carburetor device and adjustment
In this article we will talk about the Mikuni carburetor, its design and adjustment, and to be precise about its common modification VM.
Unlike many models of carburetors produced for motorcycles, Mikuni VM carburetors can be compatible with both two-stroke and four-stroke engines.
These are the most popular and high-performance carburetor models for regular and sports motorcycles.
The brand belongs to the Japanese company Mikuni Corporation, founded on October 1, 1923. Over the years of its existence, the company managed not only to conquer the market of its native country, but also became famous for its high-quality products all over the world. By the way, this manufacturer has gained popularity not only among owners of “two-wheeled” vehicles.
Design and operation
It is important to note that according to the manufacturer's manual, the installation angle and tilt angle of the Mikuni carburetor should not exceed 20 degrees from the horizontal. First, let's look at what parts the Mikuni carburetor consists of:
First, let's look at what parts the Mikuni carburetor consists of:
Mikuni carburetor parts
The vehicle engine is operated in different operating modes: from idling with the throttle valve almost fully closed (1), to full load with the throttle valve fully open. To meet the requirements for the required ratio of air and fuel in the mixture, Mikuni VM-type carburetors are equipped with a low-speed fuel system (pilot system - in foreign literature, or the idle system more familiar to us) and a main fuel system (main metering system).
Idle system (pilot system)
On Mikuni VM-type carburetors, the idle system and the main system are of independent design.
When the engine is idling (fig. left), or when the engine is running at low speeds without load, the throttle valve is almost lowered, the air flow rate through the main system needle valve is low. Consequently, the pressure is high enough to cause fuel to flow from the main system atomizer. The fuel mixture is supplied during idling through the outlet hole (3), and when the throttle is further opened, also through the transition hole (4). The fuel, entering through the idle fuel nozzle (5), is mixed in the required proportion with air, the amount of which can be adjusted using the screw (6), and enters the engine in the form of an emulsion.
Operation of the Mikuni Carburetor Idle System
The fuel entering through the idle nozzle is also mixed with the air entering through the transition hole, and through the idle nozzle enters the outlet (7), and then into the engine.
When the throttle valve is opened, the air flow increases and the fuel supply from the idle air system (pilot) nozzle becomes insufficient. This drawback is compensated by a transition hole, from which it is no longer air that begins to flow, but additional fuel (Fig. on the right)
The mixture ratio is adjusted at this stage using the idle jet and the propeller.
Main system
Mikuni Carburetor Basic System
When the throttle valve (1) is opened 1/4 or more, the speed of air flow past the metering needle area increases and the pressure drops to the point where fuel can be drawn from the main system. The throttle valve and metering needle move simultaneously. Since the metering needle (11) has a different cross-section along its length, its position determines the amount of fuel supplied from the main system to form a combustible mixture. This gives the required ratio of fuel and air.
Fuel entering through the main jet (9) into the mixing tube (10) is mixed with air entering through the air hole (12), and through the sprayer it enters the diffuser (2).
CARBURETOR ENRICHMENT SYSTEM
When the snowmobile engine is cold, the fuel mixture should be rich when starting the snowmobile. The carburetor enrichment system differs in operating principle from the starting pump. Fuel is not injected into the intake manifold. It is necessary to set the enrichment lever to the maximum raised position. The cable will lift the plunger located in the carburetor, opening the fuel inlet, air inlet and outlet.
When the engine starts, a vacuum is created in the intake manifold. Due to the vacuum, fuel is sucked through the starting nozzle into the emulsion tube, where it is mixed with a small portion of air. This mixture, passing under the plunger, is mixed with air coming from the carburetor inlet. Finally, the mixture passes to the engine inlet through the outlet of the enricher.
Since the operation of the enrichment is based on vacuum, you must remember that the throttle valve must be closed when it is operating. The plunger position is adjusted using a special device, and this position is fixed with a lock nut.
What carburetors are used on Chinese chainsaws
The most optimal carburetor designs for chainsaws were developed by the world's leading manufacturers - German Stihl, Japanese Walbro and others. These top developments are hard to beat. Therefore, most Chinese manufacturers copy the best models.
Some are nameless, from an unknown manufacturer and do not even have markings. They are simply offered for a specific chainsaw model. For example, a carburetor for a Stihl MS 361 chainsaw.
Others have brand names of well-known brands.
Still others have their own catchy names - in Russian transcription King Kong, Technopark, Rezet and others.
How to adjust a Mikuni carburetor
First, pre-adjust the control unit of the Taiga St 500 d snowmobile with the engine turned off. Screw in quality screw 6 and unscrew it taking into account the data specified in the manual. When you turn the screw clockwise, you need to enrich the mixture and when you turn it counterclockwise, you need to lean it.
Further:
- Completely unscrew the control screw from HD 7, which should not come into contact with the throttle.
- Slightly unscrew the lock nut of the screw intended for adjusting the cable and adjust the play of the cable.
- Press the throttle control lever - the bottom of the throttle should be level with the top of the diffuser or no more than a millimeter below (motor side). If necessary, adjust the throttle position by rotating the screw.
Make sure that the throttle does not touch the carburetor cap so that there is a gap.
How to adjust and adjust throttle timing
Check whether the carburetor throttles open synchronously: remove the intake noise muffler, take a mirror and look into the diffusers. After this, slowly press the throttle control lever. For asynchronous, non-simultaneous movement, adjust the position of the throttles using the triple cable screws.
Using the HD speed screw, make a gap of 1.5 mm between the lower part of the throttle (from the motor side) and the diffuser. (When installing the free gap, use the appropriate size wire).
Final adjustment with the engine running
You need to start the engine and let it run for a minimum of 3 minutes and a maximum of 10 minutes. After this, adjust the HD speed by rotating screw 7 (according to the diagram) for the engine in the direction of movement clockwise or counterclockwise to decrease. Now turn off the engine and check the parameters.
Check table
| Checking | What should be |
| Play in the coating of the fuel corrector cables | "Closed" |
| Needle locks | Central 3rd ditch |
| Carburetor dosage elements | GTZh230 (main fuel jet); ZHKH55 (HD jet). It is recommended to replace the HD jets with 40. You can remove them from the VM34560 carburetor |
| Location of HD mixture quality screws | To correctly configure the VM34619 KB with an idle jet, it is recommended to completely tighten the screws and turn them out 2 turns. For KB VM34619 with an HD 40 jet, unscrew the screws one turn. |
| The diameter of the fuel jet of the Mikuni carburetor on the Taiga 500 snowmobile | 25 |
Check the settings:
- Clean the spark plugs from carbon deposits and set the gap to 0.7 mm.
- Without changing the throttle, drive 4 km, reaching 45 km/h.
- Stop the Taiga snowmobile and turn off the engine (do not leave it running).
- Unscrew the spark plugs and look at the color of the soot that appears.
- If the spark plugs are dirty or there is carbon deposits, then move the locks of all needles to the 2nd groove (top).
- Follow the necessary steps again, which are indicated in points 1 and 3.
Adjust the HD mixture screws.
How to adjust the location of the device float
An important condition for high-quality engine operation is the correct location of the float inside the design chamber. To check that the location adjustment (P) is correct, do the following:
- remove chamber (P) 11 and gasket from the carburetor;
- make sure that the part used to mount float 9 on the vertical plane is symmetrical;
- When placing the carburetor, which is installed with the top down on a flat surface, measure the height between the surface of the body and the top of the contact tab. Keep the ruler in a vertical position, parallel to the axis (P) along with the center of the main jet passage.
To adjust the height, bend the contact foot (P) until the desired value is reached, i.e. 23.9 mm.
Adjusting the centrifugal regulator and carburetor of the Neva MB-2K walk-behind tractor
I just ran into a problem setting up the Neva MB-2 walk-behind tractor. During operation, I wiped the rod of the centrifugal regulator with a rag and apparently the bolt was not tightened too much - in general, it turned. After that I tried for a long time to set it up until it worked. I'll try to describe how I adjusted it and how it works.
I'll start with the centrifugal regulator. Its purpose is to maintain a constant engine speed when the load on the shaft changes. Those. so that the walk-behind tractor does not stall when you, for example, plow. At the same time, through the wheels, gearbox, pulley, belt, engine pulley, the engine begins to slow down and if not for the centrifugal regulator, the engine would stall. After all, we do not have the ability, like a car, to press more and more on the gas. The design is very well thought out.
After the engine is started, the regulator weights unwind. Due to centrifugal force, they move apart, opening like a flower, and on the rod they move forward, turning the regulator lever. Now, if we load the engine, the rotation of the engine will begin to slow down. At the same time, the speed of rotation of the weights will also decrease, they will begin to fold (cover themselves like a flower) and the regulator lever will begin to return back, which will lead to rotation through the centrifugal regulator lever, rod, carburetor throttle valve to increase fuel consumption, i.e. will add gas. That is Having set the throttle to a certain position, we now no longer have to worry that the engine will stall under load. As soon as we reduce the load, the weights again diverge and turn the throttle valve through all the rods, now to reduce the gas. There is one more spring in this entire line. As the gas increases, it stretches through a cable and a bracket in the shape of the letter “L” and counteracts the rotation of the throttle valve in the direction of decreasing gas.
Further. Because the speed “walks” when the air damper is fully opened, then a lean mixture comes out. It needs to be adjusted. Screw in the idle mixture adjustment screw all the way. Now unscrew this screw one and a half turns and start the engine. The design of the carburetor is such that when we screw in the screw, we close the air channel and increase the amount of gasoline into the engine. That is, we enrich the mixture, and if we unscrew the screw, we add more air, so we lean the mixture. Now, with the air damper fully open, we try to rotate the propeller to achieve maximum stable speed, reduce the gas to a minimum and again try to achieve minimally low but stable engine speed.
Now let's look at another important part - the throttle stop screw. When the gas is exhausted, it should rest against the carburetor board. Now we smoothly unscrew it and achieve minimum speed. This screw allows the throttle valve to close at a certain angle. Now you can test the walk-behind tractor in action. By letting it warm up under load, you can check by looking at the spark plug whether the working mixture is adjusted correctly. Because after idling, you won’t see this.
Determining problems in engine operation by the appearance of the spark plugs.
We hope that this article will help you choose the right spark plug and determine the condition of your engine. The appearance of the spark plug electrode can determine the condition of the engine, the suitability of the spark plug heat rating, and whether the carburetor and ignition timing are properly adjusted.
Wet spark plug electrodes (Fig. 1-2) may be due to one of the following reasons:
(a) Very rich air-fuel mixture (lots of fuel, not enough air). (b) Ignition system malfunction. (c) Oil entering the combustion chamber (worn piston rings or valve guides).
Operating principle of the air damper
Thanks to two air damper positions, the Mikuni carburetor on the Buran is the most dynamic and sensitive fuel supply mechanism among all snowmobiles in this class. This air damper has become truly unique among most snowmobiles operating in harsh winter conditions, in severe frost.
The presence of two full-fledged operating positions allows you to qualitatively regulate the quantity and volume of the enriched fuel mixture entering the ignition chamber of the internal combustion engine. Below (Fig. 2) is an analysis of each of the air damper positions.
In the standard position, when the lever is lowered, the additional channel that serves to supply the enriched fuel mixture is closed. The snowmobile engine receives only the amount of fuel that is directly supplied by the carburetor.
Open channel position. The flag is raised, the additional fuel mixture supply channel is open. Additional fuel enters the engine combustion chamber, and the power unit develops maximum power.
Checking the engine after adjustment
After adjusting the carburetor, you need to look at the efficiency of the power unit in the modes, measure the engine consumption at a speed of 50 km/h, taking into account only the 1st driver.
To get performance indicators:
- fill the tank full with gasoline and write down all the data shown on the odometer (a measure of the total distance traveled);
- start the engine of the Taiga snowmobile and drive a few kilometers, using the odometer readings, calculate the distance (s, in kilometers);
- add gasoline using a measuring canister into the snowmobile tank and calculate the amount of fuel consumed;
- using the formula gt = v/s•100 (liters per 100 kilometers), calculate gasoline consumption.
Recommendations from experts: if an RMZ550 engine is installed with a “KOSO” gas temperature measurement sensor included in the kit, you need to look at the temperature of the power unit at high speeds. Temperatures can reach 745 degrees. If the indicated temperature is much higher than normal, then release the gas.
Recommendations from specialists for working with carburetors:
- You should not use a solvent to wash rubber parts, as well as rings and floats, because these substances can lead to corrosion;
- wash the body with jets with cleaner;
- check filter 15 regularly and clean or change if necessary;
Check the spark plugs: residual fuel that does not burn when the carburetor overfills fuel sticks to the electrodes, preventing the engine from starting. To find out why overflow occurs, you need to check shut-off valve 16. If there is a malfunction, then it is replaced along with the socket. If necessary, it is recommended to contact an authorized dealer for diagnostics and repairs.
- https://www.snowmobile.ru/forum/index.php
- https://karburater.ru/regulirovka/regulirovka-karbyuratora-mikuni-na-snegoxode-tajga.html
- https://catfishing.ru/snegoxody/regulirovka-karbyuratora-snegokhoda-taiga/
Signs of a Solex carburetor malfunction
Before adjusting the carburetor on a VAZ 2109, you need to familiarize yourself with the associated faults so as not to repair the unit just like that.
So, the reason after which the VAZ 2109 carburetor is adjusted is considered:
- Fuel mixture too rich. Experienced auto mechanics know that for an ideal ratio of fuel and air, a value of 1 to 15 is required. This means that for the combustion of 1 kg of fuel, 15 kg of air are needed. If the mixture is called rich, it means that the fuel level is higher than the nominal level.
- The air/fuel mixture is too lean. A lean mixture means that too little fuel is supplied. Because of this, the car loses dynamics and increases the amount of fuel supplied. In some cases, gasoline savings are observed, but spark plugs fail faster. A lean mixture is accompanied by an increase in engine idle speed.
The following signs can be called a consequence of the previous ones and this is:
- Unstable idle speed;
- Increased fuel consumption;
- Deterioration of starting properties;
- Reduced engine response.
The operating principle of the carburetor and fuel supply system forces car owners to perform such a procedure as adjusting the VAZ 2109 carburetor at least once every six months. The mechanism on a car with a carb needs to be lubricated once a month, unlike a car with injection, which has injectors. Everything is extremely easy to adjust.
The role of the flag in the carburetor
It is not for nothing that the carburetor on Buran is equipped with a special flag that serves to open an additional channel. This unit plays a critical role in power characteristics, starting a cold engine in winter, and the speed of warming up the engine on a snowmobile to operating condition.
Rice. 2. The main elements of the Mikuni carburetor: 1 – flag, 2 – fuel intake fitting, 3 – adjustment screw, 4 – pumping fitting.
If you put the flag up, the engine begins to receive a significantly larger amount of fuel. At this moment, the snowmobile operates at increased crankshaft speeds. The use of a flag greatly facilitates the operation of the entire mechanism in the cold season: autumn, winter, early spring, frost and cold.
Drivers who constantly operate snowmobiles throughout the autumn-winter season use this device when starting a cold engine in the morning. Once the mechanism has cooled down overnight, it is much easier to start if you lift the flag up. Fast, high-quality start-up and accelerated warm-up greatly facilitate the operation of the snowmobile.
After starting a cold engine, you should thoroughly warm up the mechanism that has cooled in the cold overnight. The raised flag allows you to do this much faster than the standard mode. The snowmobile will run for a while on suction, quickly warm up and you can hit the road.
A well-warmed-up engine runs steadily, without pops, jerks, or difficulties. After normal warming up, the flag moves down and takes its standard position. Then the machine is operated in its usual operating mode.
Once the engine has reached operating temperature, a small volume of the fuel mixture is sufficient for stable, uninterrupted operation. In a similar rhythm on a snowmobile, the engine enters an economical fuel consumption mode and can be operated for a long period of time.
How does a gas trimmer carburetor work?
It is almost impossible to cover all types of carburetors produced by gas trimmer manufacturers. But, since the design of this module, as well as its operating principle, is largely similar between different models, it is possible to make a generalized description of the processes occurring in the carburetor. This information will allow the user to understand the principles of operation of the device, troubleshoot problems and operate it correctly.
The basis of the trimmer carburetor is a solid aluminum body. Below is a diagram of this block.
At the bottom there is a diffuser, which is also called a Venturi nozzle (18). Air is sucked through this nozzle by a motor.
In the upper part of the diffuser there are fuel channels (11,12). Air flows through these channels and draws in gasoline. The fuel pump itself, the jets and the system used to regulate the flow of the fuel-air mixture can be built-in or installed externally.
The throttle valve (9) regulates the amount of air drawn into the carburetor. Its amount affects the power that the engine develops. The flap (7) is used for cold starting. It must be closed if you are going to start the unit. After the engine has started, it must be opened, otherwise the engine will immediately stall.
The impulse channel (1) connects the impulse chamber of the pump with the engine crankcase, namely, with its internal volume. The piston located in the cylinder, performing reciprocating movements, consistently changes the pressure in the crankcase (vacuum or increase in pressure). Pressure differences cause the membrane (4) to move. Therefore, the operation of the pump is synchronized with the operation of the engine.
The suction of gasoline from the tank occurs precisely with the participation of the membrane (4). Gasoline enters the carburetor through fitting (2). Further, its path lies through the inlet valve (3), exhaust valve (5), through the mesh filter (6), fuel channel (10), passes the needle (14) and fills the chamber (16), which has a control membrane (18) .
The valve (14) is connected to the membrane (18) via a lever (17). The cavity, which is located below the membrane, is connected to atmospheric air through the hole (19).
The device operates as follows.
- A vacuum is created in the diffuser during the suction stroke. This fact causes air leaks. The position of the throttle valve (9) determines the amount of air entering the carburetor chamber, as well as the engine power and the number of revolutions.
- At this time, fuel is sucked from the chamber (16) through the jets (11,12), after which it is mixed with the flowing air. Gasoline, mixing with air, begins to atomize. This creates an air-fuel mixture.
- The finished mixture enters the cylinder, where it is compressed by a rising piston and ignites at its top point from a spark generated by the spark plugs.
- Since the volume under the control membrane (18) is connected to atmospheric air through the channel (19), the membrane goes up, opening the valve (14) through the lever (17). After opening the valve (14), a new portion of fuel enters the chamber (16).
- Once the chamber (16) is filled, the membrane (18) returns to its original position and the valve (14) closes.
Further, when the motor is running, all the above processes are repeated. To adjust the amount of fuel entering the diffuser through the jets, a screw (13) is used. A screw (15) is also used to adjust the idle speed. When the regulators are unscrewed, the fuel mixture becomes richer, and when the regulators are tightened, the mixture becomes leaner. Also, in some carburetor models, you can adjust the engine idle speed using a quantity regulator. It is usually located on the outside and, when tightened, rests against a lever mounted on the throttle valve axis.
Thus, using 3 adjusting screws, you can achieve maximum engine performance, as well as configure its uninterrupted operation at any ambient temperature, and even in mountainous areas.
TYPES OF CARBURETTORS
Carburetors of VM and TM snowmobiles differ from each other in the shape of the throttle valve. The TM has a rectangular throttle valve that allows more air to be supplied to the snowmobile engine. Control of the throttle valves is made easier, since it is carried out through one rod with one spring, and in VM - springs in each carburetor.
The carburetors on ROTAX engines are positioned high enough to ensure that fuel for operation flows into their float chamber by gravity. Therefore, in order to raise the fuel to the required height, you need to have a snowmobile fuel pump. Fuel pumps, used on equipment with a carburetor power supply system, are of the diaphragm type, using alternating pressure generated in the crankcase of a two-stroke engine during its operation to pump fuel. The pump has two types of valves, inlet and outlet. Slam-shut type valves that pump fuel in one direction only. The pumps are also equipped with automatic safety valves built into the design and used to prevent fuel from flowing through the pump when the engine is stopped.
When the snowmobile piston moves away from the snowmobile crankshaft, negative pressure (vacuum) is created in the crankcase. When the piston moves in the opposite direction towards the crankshaft, excess pressure is generated in the crankcase. These pressure fluctuations cause the snowmobile's fuel pump diaphragm to vibrate. When negative pressure is applied to the diaphragm, the fuel pump inlet valve opens and the outlet valve closes. Fuel tends to fill the fuel pump chamber. The atmospheric pressure pressing on the fuel in the fuel tank forces the fuel to fill the fuel pump chamber. When excess pressure from the engine crankcase is applied to the diaphragm, the exhaust valve opens and the intake valve closes. In this case, the fuel, under the influence of pressure on the diaphragm, tends to leave the fuel pump to the carburetors.
Preparatory work
We warn you in advance that you can adjust the carburetor when:
- Spark plugs are working properly
- The ignition is set correctly
- The fuel pump is working properly
- The required gap is set on the device to automatically interrupt the current in the circuit.
It is also recommended to clean the carburetor itself, wash it of carbon deposits, and clean all channels and jets. In general, it is better to buy a repair kit, which includes all consumable parts, including jets, and after washing, install everything new, including gaskets.
After cleaning, carefully put everything back together and be sure to pay attention to the gaps, they should be within normal limits.
Technical characteristics of the Buran snowmobile and its design
Technical characteristics of the Buran snowmobile and its design
Vehicle dimensions: 2.7 * 0.91 * 1.33 m, weight - 285 kg.
Box dimensions
Buran 4TD is equipped with boxes whose size is 2.42 * 1.06 * 1.13 m.
Suspension
There is an elliptic spring front suspension and an independent rear suspension equipped with a balanced spring.
The travel of the front and rear mechanisms is 5 cm. The number of front springs is 1.
The snowmobile suspension design includes the following elements:
- bearing shell;
- outer hub;
- star;
- internal type hub;
- shaft;
- mounting bolts and nuts;
- sleeve;
- video clip;
- ski;
- axial device;
- clamp;
- buffer;
- steering column;
- cuff;
- thrust washer;
- sprocket driven type of chain drive;
- retaining ring.
Installing a carburetor on a Taiga 500st snowmobile
The process is performed in the reverse order of removal; before installing the carburetor, you need to check the quality of the housing and the triple cable (intended for gas control).
Expert opinionRukin DaniilSpecialist on snowmobile “Buran”
I go fishing in my free time. Attention! The rubberized device designed to connect the ends of the intake manifold shafts to each other must be checked for damage. When assembling the CB, this coupling must touch the manifold cover, otherwise the power unit may be damaged.
Install the connecting elements used to fasten and seal the hose connection (worm type) so that their bolts are offset. Mount the gas cable into the needle locking plate.
Note: Do not block the hole made in the throttle when installing the needle stop plate, this is an important condition. Thus, it is possible to ensure lubrication of all rubbing surfaces of the throttle well from the engine power system unit
See if there is a needle seal that has plastic as its material. Damage to the power unit may occur if this circuit is not used in operation:
Higher, further, stronger, or Briefly about tuning
Snowmobile ?Buran? ? one of the most common snowmobile models in our country. In terms of power, it is comparable to a small tractor capable of transporting small loads. It will not be possible to make a racing snowmobile out of it, but some modifications are still possible.
By replacing or customizing standard parts, you can achieve greater productivity, efficiency and ease of use of this model. ?Buran? begins to obey its owner more if the moment of starting is sharpened, the maximum speed is increased and the centrifugal regulator is adjusted. In addition, you can make your snowmobile consume less fuel, which will help you save a lot of money. You can read about some of these upgrades and do-it-yourself tuning below.
Design features of the K-126 model
The carburetor of the K-126 model of the GAZ-53 is a two-chamber part with a descending flow of the combustible mixture. It also has a mechanically driven economizer with an accelerator pump.
Its body consists of an upper, middle and lower part, each of which is connected with screws, and fuel will flow into the float chamber through a strainer. As a starting device, the K-126 carburetor has an air damper - it has an air valve, which is designed to prevent the formation of an enriched mixture at the moment when the engine starts. And each of the two cameras has its own autonomous idle system.
GAZ-53 carburetor size
STARTING PUMP
The starting pump consists of a cylinder, a piston with a ring and two valves. The starting pump is connected to the fuel supply line, between the fuel tank and the fuel pump. As the piston is pulled out of the cylinder, the intake valve opens and the exhaust valve closes due to the vacuum created in the cylinder. In this case, the fuel enters the cylinder, filling its internal cavity. When the piston moves back, increased pressure is created in the cylinder, closing the intake valve and opening the exhaust valve. The fuel is pushed out of the cylinder by a piston. A portion of fuel from the starting pump is supplied to the intake manifold. Usually two or three strokes are enough. When the engine is hot, there is no need to use the starting pump. When the weather is very cold, it is recommended to rotate the piston three to four turns before bleeding. This will prevent possible jamming of the piston during operation.
Replacing the jet
The selection of carburetor jets is carried out according to the markings. The number of each part in the set must correspond to the diameter, according to the table. When choosing a set of carburetor parts, decide what power and take-off speed will suit you. If you are setting nominal dimensions, then everything is simple - you must first select a kit. This is the most important job when purchasing. It should be remembered that 80% of the parts on the market are from China
Pay attention to this when choosing them. Then you can make repairs
To carry it out we will need to remove the carburetor from the engine. This will make further work more convenient
The carburetor removal diagram is described in other articles on the site; the only thing you need to pay attention to is the gasket between the carburetor and the engine housing
After removing the carburetor with a screwdriver, unscrew the screws securing the cover. We remove it and use a flat screwdriver to unscrew the fuel and air jets. On air ones, it is necessary to disconnect the emulsion tubes. Then new parts are installed or old serviceable jets are cleaned. For greater confidence, it is necessary to calibrate the jets on a special stand. “Incorrect” parts should be removed, but this operation cannot be performed independently.
Before installation, all carburetor parts must be washed in cleaning liquid, dirt and carbon deposits removed, and all channels cleaned. We are starting to install new jets. In this case, the correct location of each part of the mechanism must be observed. The jets on the carburetor must be placed according to the markings.
After assembling the device, install it on a new gasket and tighten the fastening nuts. Primary adjustment and tuning is carried out using the mixture saturation and idle speed adjustment screw. These operations will allow you to start the engine. We connect all the hoses and wires, install a new air filter. We make sure that all parts are in place and securely fastened. We test run the engine. Now we need to adjust the operation of the motor and warm it up.
After looking at the engine temperature data, we adjust its operation.
Having completed all the operations of installing jets and adjusting the carburetor reliably and in compliance with all instructions, think about how much fuel you will save.
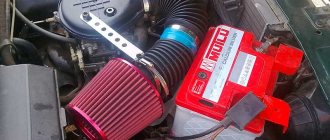
Tips for installing a Mikuni carburetor
Theoretically, this transport device can be mounted on any engine of any two-wheeler. However, this is impossible without a special adapter. Many are ready for such a “hero”, since it is this element of preparing and supplying fuel for scooters that is considered the most optimal option.
We, in turn, advise you to use the “Mikuni” series “VM” due to its wide suitability (suitable for installation on both two-stroke and four-stroke engines).
Such a “pipe valve” has a round throttle valve in cross-section, but the diameter of the diffuser can vary in the range of 16-44 mm. Still, choose fuel mechanisms with an indicator equal to 26 mm. It's not cheap, but it's quite common. Search on the Internet, but remember that even in Java, even in Izh, you will have to install it, having first found rubber adapters and metal fastening clamps on the automobile market or in specialized stores. The required diameter is easily selected using a caliper. And remember that even a simple change in the preparation device and fuel mixture will likely bring interesting results.
- Back
- Forward
Engine insulation
Hood on a motorized dog
Often on motorized towing vehicles, the engine is located under a kind of hood that covers it on all sides. This is done in order to protect the engine from the oncoming flow of cold air and snow. The temperature inside is much higher than outside, so the air entering the carburetor and cooling the engine is warmed up. This avoids freezing of the carburetor and excessive cooling of the head and cylinder.
Starter access door
When creating a protective casing for the engine, it is important to provide exhaust gas removal, access to the starter and gas tank and, preferably, a controlled flow of fresh air so as not to overheat the engine in relatively warm weather. You can insulate the motor with any materials: metal, plywood, fabric, etc.
How to make the adjustment correctly
Before you start adjusting the trimmer carburetor, you must do the following:
- flush the engine;
- replace or clean the spark plug;
- replace or clean the air filter (it is recommended to wash it in warm, soapy water, wring it out and let it dry thoroughly).
It is also necessary to install a cord of a suitable diameter in the trimmer reel or install knives - this is done so that during the tuning process the engine has at least some load. After installing the cutting tool and starting the gasoline engine, let it warm up for 10 minutes.
If at idle engine speed you notice that the cutting tool is rotating, then you need to reduce engine speed. This is done using the lower idle speed control, often marked with the letter “T”. The picture below shows the placement of the controls on a Husqvarna trimmer.
But, for example, on a Stihl trimmer this screw may be marked “LA”.
So, turn the idle speed control to the left until the trimmer head comes to a complete stop.
To adjust the carburetor, 3 regulators (screws) are used.
- The right control L adjusts the level of enrichment of the fuel mixture at low speeds. It needs to be adjusted first. Achieve maximum idle speed. This is done using the L control, turning it left and right. After finding the maximum speed point, return the regulator half a turn to the left (counterclockwise).
- The lower adjuster T (LA) is used to adjust the idle speed. By turning it to the left, the engine speed will begin to decrease, and when turning the regulator to the right, the engine speed will increase.
- The left regulator H is responsible for enriching the fuel mixture at high speeds. The enrichment setting completes the carburetor adjustment. Also, using this regulator, you can adjust the maximum speed, fuel consumption and engine power.
To eliminate this nuisance, adjustment will be required. With the engine running, give full throttle, then turn the “H” control to the right until the speed begins to decrease. After this, the “H” regulator must be slowly turned to the left until you hear uneven engine operation. Then turn the “H” control to the right until you hear the motor running smoothly.
After carrying out the above steps, the carburetor adjustment can be considered completed. After correct adjustment, the engine should confidently pick up speed, quadruple slightly at maximum speed, and when idling, the cutting tool should not turn. This manual is suitable for adjusting carburetors on Huter, Patriot and other lawn mowers.
There are also carburetors without a screw, which is responsible for enriching the combustible mixture at low speeds. That is, they have only 2 adjusting screws: the idle speed regulator and the fuel mixture quality regulator at high speeds. You can learn how to set up a carburetor of this type from this video.
ATTENTION. Update your browser! Our site does not work correctly with IE 8 and older versions.
The problem is the following.
Motor RMZ 640 Buran AVIA. One carburetor, K65Zh. Initially, the engine starts at half a turn, at any temperature, but then it begins to overflow. The needle does not hold pump pressure. I decided to install a figure eight check valve in front of the carburetor to relieve excess pressure. Then I removed this valve, leaving the drain directly, and installed a zero filter in front of the carb. This scheme worked perfectly - the excess was directly drained into the tank, and what remained in the filter was quite enough for work. But another problem arose: when the engine runs for a long time at high speeds, after 5 minutes it simply stalls due to lack of gasoline. So it turns out: either overflow at low speeds or lack of gasoline at high speeds. I think if I don’t decide anything, I’ll install a supply tank on top of the motor, but these are all additional parts. Has anyone encountered a similar problem?
- i.e. The buyer of RMZ, for his own money, initially has the opportunity to become a torch on takeoff! . or on boarding. Damn, I'm losing faith in humanity! -Yes, and screws are pouring pistons for the RMZ-500.
RMZ Buran AVIA initially all came with such carbs. Mikuni began to be installed normally only on the RMZ 500. The standard Buran scheme is a mesh intake filter, then a settling filter, and after the pump directly into the carburetor. The Internet is full of this information.
By the way, there is no overflow effect with a two-float circuit. Our boy has been flying for three years now, and we haven’t had such a problem.
Today I did the following: I installed a new carburetor, I don’t remember the brand, I know it goes to Planet 5, its insides are like 65, the difference is in the body and the damper, it is cylindrical in shape, like on Mikuni. The only thing I moved to it was the main jet from K65, it is larger. I made the fuel line diagram like this: after the pump I installed the return line through a tee (sold in any auto parts store for Zhiguli V8) and on the return line I installed a check valve (from the same V8), this valve holds the pressure in front of the carburetor. And I changed the zero-resistance filter to a regular paper one, which also adds resistance. As a result, I did not observe any overflow; I kept the engine at different speeds for a long time. Only the bastard began to eat a lot, he ate a liter and a half at the gas station. Although the motor runs smoothly. Tomorrow I'll play with the needle and try to reduce the consumption.
Initially there was no valve, the excess was simply drained from the tee, the drain tube was smaller in diameter. Everything worked, I even did the first approaches like this, but then a lack of fuel appeared. Everything was dumped into the return line and probably, theoretically, the leaking fuel carried gasoline from the carb supply pipe. It's like draining gasoline from a tank through a tube. Therefore, I think it is still necessary to maintain the pressure with the valve. The valve opening pressure is lower than the pressure held by the needle valve. Well, the paper filter adds resistance.
You can also experiment by placing a second check valve parallel to the first one to increase the cross-section of the return channel. By the way, I was amazed by the performance of the pump, there was such pressure from the return.
The solution is as follows. As I described above, I just decided to buy another check valve. And I was very surprised that the other one was designed for less pressure. So if anyone needs it, you can do it as in the photo, only when buying a valve you need to choose the one that opens at lower pressure.
Carburetors: adjustment, problems and maintenance
As a “calibration tool” we use a drill with a diameter of 1.5 mm. Why exactly 1.5 mm? Because it is precisely this diameter that best corresponds to the throttle position at idle.
Using the throttle valve position screw, we achieve a tight passage of the drill between the window wall and the throttle valve skirt, naturally from the cylinder side, because at the inlet the skirt is cut at an angle. According to the service manual, Polaris recommends using a 6.1mm drill bit and inserting it from the inlet side of the carburetor (where the throttle skirt is angled).
We make a cut (notch) with a file or file on the idle speed adjustment screw. This is the largest screw with a spring. We noted the position, then unscrew the screw 90 degrees. (a quarter turn) counterclockwise - this will correspond to the maximum idle speed.
We repeat the operation on the second carburetor and then place the carbs side by side.
We press the throttle trigger approximately halfway and see if the dampers are open synchronously. Then we fully squeeze the gas trigger, both valves should open completely on the cylinder side, the valve skirt will stick out by 4 mm (approximately). If there is no synchronization, then we adjust the tension of the cables.
Adjust the position of the main fuel jet needle. This is the needle that is installed on the throttle valve. The needle should be on the second notch from above (the pointed end of the needle is located towards the bottom). If you need more “undermining” when opening the throttle, then install the needle stopper in the third groove (this is the middle).
Next, tighten the mixture quality screw (yellow and small screw) completely
ATTENTION!!! There is no need to be overzealous with effort! Twist gently. Then unscrew the mixture quality screw half a turn (180 degrees), the same on the second carburetor
Carefully pull off the rubber seal of the starting enrichment cable casing. Then slightly pull back the casing of the starting enrichment cable; the free gap should be approximately 1 mm. We check the gap by slightly turning the starting enrichment flag, see how the casing has tightened and how much
ATTENTION!!! This adjustment must be made without unscrewing the enrichment needle, i.e. assembled on the carburetor!
Next, we assemble everything, start it, and warm it up. If there is a need, we carry out additional adjusting the idle speed (the largest screw with a spring), noting how many degrees the screw was turned. On the second carburetor we do the same thing simultaneously!
Happy snowing to you!
Wednesday, April 30, 2014
Carburetor adjustment!
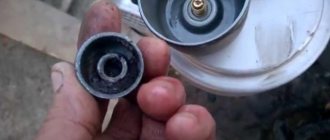
The easiest way to check whether a pit bike's carburetor is set correctly is by the color of the spark plug.
We unscrew the candle and look at the color:
- Brick color - the mixture is correct
- White - poor mixture
- Black smoked - rich mixture
Jet
- If it gets rich, we reduce the jet by two orders of magnitude.
- If it becomes lean, we increase the jet by two orders of magnitude.
- If we are close to the target, we change the jet in the range ± 1.
- If, when you sharply apply the gas and release the throttle, the speed seems to hover at the top point for a few seconds, and then reluctantly drops, this indicates a lean mixture.
- If, when you sharply apply the gas and release the throttle, the speed drops and sags almost until the engine stalls, and then rises and levels out to idle, this indicates a rich mixture.
Screw quality
- By twisting, we lean the mixture.
- By unscrewing it, we enrich it.
- So we tighten the quantity screw, listen to the motor and count the number of revolutions.
As soon as the speed starts to drop, we stop. We remember the position and twist it until it stops, counting the revolutions. So we know one limit value (for example, at 1.5 turns of the quality screw from the stop, the engine speed began to fall). - Now we begin to twist in the other direction (unscrew), listen to the engine and count the revolutions of the screwdriver.
The engine speed should first begin to rise, because we are enriching the mixture, and then begin to fall, because the mixture has become too rich. We record the number of revolutions of the quantity screw when the engine speed began to fall. Now we know the second limit value (for example, at 4 turns of the quality screw from the stop, the engine speed began to fall).
- Removing the carburetor and filter
- We disassemble the carburetor down to the screws, wash everything in gasoline, and blow out all the holes with a compressor.
- Reassemble the carburetor in reverse order, keeping it surgically clean. We unscrew the quality screw two turns, and tighten the idle screw almost all the way. The needle is in the middle position.
- I wash the filter with a special product, or Fairy, if it is just foam rubber (from a filter box), and rinse it in gasoline.
- We dry the filter and thoroughly saturate it with special oil, let it soak, and squeeze out the remainder, without enthusiasm.
- We put everything back together and install it on the pit bike.
- We put a new clean candle.
- Next, we look at the gas hose and gas filter (if installed). Kinks in the hose are not allowed. The filter should be blown freely without creating resistance.
- We check the presence of gasoline in the tank (at least 500 g.)
- After all the manipulations, we look for a deserted, flat road. Let's start a pit bike. Warming up. Using the XX screw, we lower the idle to stable. Then we go all the way in a straight line and ride at an active pace for about 5-10 minutes.
- We unscrew the spark plug and look at the insulator
- If it is ashen white, the mixture is too lean.
- If it is pale with a brownish tint, the mixture is too poor.
- If it is the color of coffee with milk, or a brick tint, the mixture is what you need!
- If it is darker (coffee with a small amount of milk), the mixture is slightly richer.
- If it is dark brown or black, the mixture is too rich.
Source