The acceleration speed and output from a motorcycle engine largely depend on the components that are integral with the internal combustion engine. Among them are the exhaust system and, most importantly, the carburetor. Today, the spare parts market offers a huge number of different components and the choice of carburetors is also quite wide. How the motorcycle will react to the throttle, and in general the overall condition of the engine, largely depends on the carburetor, which does its job. It is not so easy for novice motorcyclists to choose a decent option with which there will be no problems. That is why in today’s review we will talk about carburetors and take a closer look at the Mikuni carburetor.
Cleaning the carburetor of a walk-behind tractor
Frequent malfunctions in the operation of the power unit of a walk-behind tractor indicate the accumulation of blockages inside its carburetor. This fuel unit constantly interacts with engine oil, gasoline and air. They contain solid fractions, tar and small debris, which can be deposited on the walls of the carburetor chambers and inside the fuel channels. In this regard, the carburetor needs regular cleaning, especially if low-quality fuel is used to refuel the agricultural unit.
Before directly flushing the carburetor of the walk-behind tractor you are using, you need to remove the standard air filter and rinse it thoroughly in clean gasoline. After this, the part will need to be dried. The operator should also inspect and clean the spark plug. If a thick layer of carbon deposits has formed on its cap, this indicates oil leakage.
The further procedure should be as follows:
- First, you need to carefully remove the inoperative carburetor from the factory device and completely drain the remaining fuel from the standard metal float chamber;
- Next, you will need to inspect the built-in fuel fitting. If air does not pass through it, then the fitting must be blown out with compressed air from a purchased cylinder;
- Next, the operator must examine the condition of the float metal chamber and the “tongue” necessary to adjust the position of the float. The operator must check the level of the amount of refueling fuel that enters the chamber - its level must initially be no lower than 3.5 cm;
- After this, you will need to remove the needles responsible for setting low and full gas - this is necessary to completely flush the nozzle;
- Next, you need to unscrew the bolts and disconnect the standard upper part of the factory carburetor from the lower one. After this, the operator will be able to thoroughly rinse the built-in fuel supply valve;
- Then you need to blow out the nozzle with air from the cylinder. This and other carburetor elements should not be wiped with a lint-lined rag. Otherwise, the risk of damage to the chrome coating of the walls of the fuel unit will increase;
- After all the parts of the standard carburetor are completely dry, it can be assembled.
Immediately after installing the fuel unit, the operator must configure it and smoothly start the walk-behind tractor engine. Next, the user will need to check the operation of the node. If the built-in engine operates as stably as possible and does not make any extraneous sounds, it means that the standard carburetor was cleaned and adjusted correctly.
Repair and maintenance of Druzhba chainsaw
Reliable spare parts and durable mechanisms of the Druzhba chainsaw are not able to protect the tool from damage. Most often, the causes of tool malfunction are improper handling or simple wear and tear of the mechanisms.
To reduce the risk of premature breakdown of the chainsaw, you should use high-quality gasoline of at least AI-80 grade to refuel it, in which oil for 2-stroke engines should be diluted. The proportion of gasoline and oil should be 1:25, that is, 40 ml of motor oil should be diluted in 1 liter of fuel.
The oil used to lubricate the chain must also be of high quality. Under no circumstances should you pour waste material into the oil tank of your Druzhba chainsaw, otherwise this will lead to damage to the tool’s lubrication system. To prevent the chainsaw chain from subjecting to excessive friction, use only fresh oil from trusted manufacturers.
It should be noted that the use of a high-quality fuel mixture and lubricant does not guarantee the constant uninterrupted operation of the Druzhba chainsaw. However, even if you discover a malfunction, you should not get upset right away. Some breakdowns are quite easy to fix with your own hands. Below we list typical malfunctions of domestic tools and ways to eliminate them yourself.
Adjusting the Druzhba chainsaw carburetor
- To find the highest engine speed in idle mode, you must slowly turn the screw marked “L” clockwise. Once you find the maximum RPM, turn the same screw back ¼ turn. If after this the chain on the bar continues to rotate, then turn the screw marked “T” counterclockwise until the saw element stops completely;
- Turning the screw marked “H” will allow you to adjust the required power and speed. To do this, you need to connect a tachometer to the Druzhba chainsaw and by turning the “H” screw, find the optimal number of revolutions indicated in the instructions. Immediately after this, turn screw “H” ¼ turn counterclockwise;
- Then you need to fine-tune the engine idle speed. To do this, screw “T” should be turned until the saw chain begins to rotate. Immediately after this, turn the screw “T” in the opposite direction until the chain stops completely.
Carburetor adjustment carried out according to the instructions will allow you to reduce the fuel consumption of your Druzhba chainsaw and protect its parts from excessive wear.
How to set the ignition on a Friendship chainsaw?
To properly repair a tool, you need to carefully study its operating instructions. As the repair instructions for the Druzhba chainsaw indicate, to install the ignition, you need to remove the cover to which the starter is attached and turn the magneto so that the marks on it and the adapter coincide. After this chainsaw, friendship will be much easier to make.
Cleaning the carburetor
To adjust the level, the carburetor on the walk-behind tractor is first completely cleaned of dirt. Before starting work, drain the fuel from the gas tank. To do this, unscrew the drain plug or remove the supply hose. Gasoline is poured into a clean canister or plastic container. Before refilling, it is advisable to pass the flammable liquid through a filter. After the fuel tank is empty, the supply hose is removed, dried and blown with compressed air.
The remote control is mounted directly on the cylinder head. To remove the metering mechanism, remove the air filter with the supply pipe. Then disconnect the throttle valve drive, unscrew the fasteners, and remove the carburetor from the seat. Cleaning the remote control:
- Disassemble the settling filter housing. At the bottom, unscrew the fixing bolt and remove the glass. Oily deposits are cleaned out from inside, everything is thoroughly wiped and dried.
- A float chamber is made in the lower part of the body. In its center is the main fuel jet, which can be unscrewed with a screwdriver. Underneath there is a small bushing, which is also removed. To remove the float with the closing needle, remove the support axis with pliers.
- The carburetor body (with pre-removed plastic parts) and jets are placed in acetone or white spirit for a day. The polymer components are washed with pure gasoline, cleaned with a soft brush, and then thoroughly dried.
- Soaked parts are cleaned of deposits with a rag, and the dosing holes are cleaned with a thin needle or wire.
- Assembly is performed in reverse order.
Wednesday, April 30, 2014
Carburetor adjustment!
The easiest way to check whether a pit bike's carburetor is set correctly is by the color of the spark plug.
We unscrew the candle and look at the color:
- Brick color - the mixture is correct
- White - poor mixture
- Black smoked - rich mixture
Jet
- If it gets rich, we reduce the jet by two orders of magnitude.
- If it becomes lean, we increase the jet by two orders of magnitude.
- If we are close to the target, we change the jet in the range ± 1.
- If, when you sharply apply the gas and release the throttle, the speed seems to hover at the top point for a few seconds, and then reluctantly drops, this indicates a lean mixture.
- If, when you sharply apply the gas and release the throttle, the speed drops and sags almost until the engine stalls, and then rises and levels out to idle, this indicates a rich mixture.
Screw quality
- By twisting, we lean the mixture.
- By unscrewing it, we enrich it.
- So we tighten the quantity screw, listen to the motor and count the number of revolutions.
As soon as the speed starts to drop, we stop. We remember the position and twist it until it stops, counting the revolutions. So we know one limit value (for example, at 1.5 turns of the quality screw from the stop, the engine speed began to fall). - Now we begin to twist in the other direction (unscrew), listen to the engine and count the revolutions of the screwdriver.
The engine speed should first begin to rise, because we are enriching the mixture, and then begin to fall, because the mixture has become too rich. We record the number of revolutions of the quantity screw when the engine speed began to fall. Now we know the second limit value (for example, at 4 turns of the quality screw from the stop, the engine speed began to fall).
- Removing the carburetor and filter
- We disassemble the carburetor down to the screws, wash everything in gasoline, and blow out all the holes with a compressor.
- Reassemble the carburetor in reverse order, keeping it surgically clean. We unscrew the quality screw two turns, and tighten the idle screw almost all the way. The needle is in the middle position.
- I wash the filter with a special product, or Fairy, if it is just foam rubber (from a filter box), and rinse it in gasoline.
- We dry the filter and thoroughly saturate it with special oil, let it soak, and squeeze out the remainder, without enthusiasm.
- We put everything back together and install it on the pit bike.
- We put a new clean candle.
- Next, we look at the gas hose and gas filter (if installed). Kinks in the hose are not allowed. The filter should be blown freely without creating resistance.
- We check the presence of gasoline in the tank (at least 500 g.)
- After all the manipulations, we look for a deserted, flat road. Let's start a pit bike. Warming up. Using the XX screw, we lower the idle to stable. Then we go all the way in a straight line and ride at an active pace for about 5-10 minutes.
- We unscrew the spark plug and look at the insulator
- If it is ashen white, the mixture is too lean.
- If it is pale with a brownish tint, the mixture is too poor.
- If it is the color of coffee with milk, or a brick tint, the mixture is what you need!
- If it is darker (coffee with a small amount of milk), the mixture is slightly richer.
- If it is dark brown or black, the mixture is too rich.
Source
Carburetor design
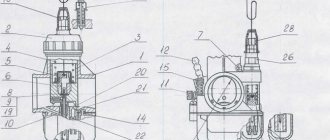
The design of the Neva agricultural machinery carburetor is quite simple. Studying it will not be particularly difficult, but at the same time it will allow you to subsequently easily carry out not only adjustments, but also repairs - if such a need arises. This part includes the following components:
- a float connected to a locking needle valve;
- float chamber;
- a chamber in which the fuel is saturated with air;
- diffuser and fuel atomization system;
- throttle valve;
- air and fuel valves.
The task of the float connected to the needle-type valve is to act as a kind of regulator, determining the volume of gasoline in the float chamber. When the amount of fuel decreases, the float moves down and opens the valve, which “admits” a new volume of fuel into the chamber, replenishing it to the required amount. As the chamber fills, the float rises and, when sufficiently filled, closes the valve, preventing excess fuel in the chamber.
In this video you will learn how to disassemble a carburetor:
The function of the atomizer, located between the float and mixing chambers, is to distribute the fuel into the mixing chamber, in which it is saturated with air. Air enters this container through the inlet pipe. It is worth emphasizing here that the gasoline level in the float tank should always be several millimeters below the outlet channel
This is important because when the unit’s engine is turned off, fuel should not splash out of the float chamber, not only when it is on a flat surface, but also when the walk-behind tractor is standing on a slope
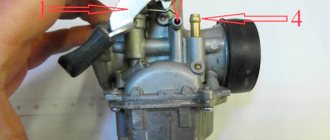
Why is the checkbox needed?
By the way, it’s worth telling a little about why you raise the flag up and why the Mikuni carburetor was equipped with it. The thing is that when the flag is in the upper position, the engine receives more fuel. Consequently, the motorcycle starts running at higher speeds. Using this flag is very helpful in cold times, for example, in autumn or spring. Also, motorcyclists often use it in the morning when the motorcycle has been parked all night.
The flag is necessary so that the biker has the opportunity to quickly start the motorcycle engine and warm it up. And if a cold start in the morning is not so difficult, then starting the engine in the fall is much more difficult. Thanks to the raised flag, you can let the motorcycle run for some time on “choke” and warm up the engine well. Then the flag moves down to the standard position, and now you can begin operation in its usual mode.
Types of Kopeyka carburetors
Jets for carburetors of VAZ 2101, VAZ 2103, VAZ 2106, VAZ 2107 cars
During the production of the VAZ 2101, several modifications of carburetors were installed in its system. They differ in the size of the jets, as well as the presence or absence of a vacuum corrector. In early Zhiguli models, a carburetor was installed with an ignition system without a vacuum corrector.
The most common carburetor on the VAZ 2101 car is the DAAZ carburetor model 2101-1107010. A vacuum corrector system is already used here. All modifications of carburetors can be adjusted using a similar scheme. But it is impossible to install a model with a vacuum corrector instead of a design without it, or vice versa. Carburetors of well-known brands DAAZ/Weber, Ozone, Solex are also often used; among non-standard carburetors, I would like to highlight Solex 21073 and Solex 21083.
Calibration data for DAAZ carburetors 2101-1107010-01, 2101-1107010-03, 2105-1107010-20, 2105-1107010 10:
| Parameter | Carburetor model and chamber number | |||||
| 2101-1107010-01 | 2101-1107010-03 | 2105-1107010-20, 2105-1107010 10 | ||||
| 1st | 2nd | 1st | 2nd | 1st | 2nd | |
| Diameter, mm: | ||||||
| diffuser | 23 | 23 | 23 | 23 | 21 | 25 |
| main fuel jet | 1.30 | 1.25 | 1.30 | 1,30 | 1.07′ | 1.62 |
| main air jet | 1.50 | 1,90 | 1.50 | 2,00 | 1.70 | 1.70 |
| idle fuel jet and transition system | 0.50 | 0.45 | 0.45 | 0.60 | 0.50 | 0.60 |
| idle air jet and transition system | 1.70 | 0.70 | 1,70 | 0.70 | 1.70 | 0.70 |
| accelerator pump nozzle hole | 0.40 | 0,40 | 0.40 | |||
| accelerator pump bypass jet | 0,40 | — | 0.40 | — | 0.40 | |
| ecomostat fuel jet | — | 1.50 | — | 1.50 | — | 1.50 |
| air jet econoepta | 0.90 | — | 0.90 | 1.20 | ||
| econostat emulsion jet | 1.70 | — | 1.70 | — | 1.50 | |
| starter air jet | 0.70 | — | 0.70 | 0.70 | — | |
| jet of the pneumatic drive of the throttle valve of the second chamber | — | — | — | 1.20 | 1.00 | |
| Spray calibration number | 4 | 4.5 | 4 | 4 | 3.5 | 4.5 |
| Emulsion tube calibration number | FI5 | FI5 | F15 | FI5 | F15 | F15 |
| Accelerator pump flow for 10 full strokes, cm3 | 7±0.25% | 7±0.25% | 7±0.25% | |||
| Distance of the float from the carburetor cover with gasket, mm | 7.5±0.25 | 6.5±0.25 | 6.5±0.25 | |||
| Clearance at the dampers for regulating the starting device, mm: | ||||||
| air damper | 8±0.5 | 7±0.25 | 5 | |||
| throttle valve | 0.75 | 0.85 | 0.75 | 0.85 | 0.7 | 0.8 |
Power system design
One of the components of the internal combustion engine is the fuel system. It is necessary for an uninterrupted supply of fuel to the engine. The system consists of a gas tank, fuel line, filters and carburetor. The latter doses gasoline to maintain a given crankshaft speed, depending on the operating modes of the walk-behind tractor. A gas tank is needed to store fuel reserves. Fuel lines connect all components to each other, and filters clean the fuel from foreign impurities.
The most complex and critical part in an internal combustion engine is the metering unit. The design of the carburetor installed on the walk-behind tractor allows the user to adjust the quality of the fuel mixture entering the engine. In general, the control system consists of the following:
- Float chamber. It contains the parts responsible for preparing the fuel mixture. Gasoline accumulates in the receiving glass, which affects the float. When the specified fuel level is reached, the latter, by pressing the shut-off needle, shuts off the fuel supply.
- Mixing chamber. It saturates the air entering the engine with fine gasoline dust. The latter is formed due to the rarefied atmosphere in the mixing chamber. The reduced pressure draws fuel from the float chamber, which, passing through the metering nozzle, is sprayed into the air stream.
- Throttle valve. This unit regulates the crankshaft speed. The damper closes the passage channel through which air enters the cylinder. The larger the cross-section, the faster the ICE output shaft will rotate. The position of the damper is adjusted using a steel cable attached to the handle of the walk-behind tractor.
- Idle speed regulator. Typically this is a metal or plastic screw that the throttle actuator rests on. Screwing in the regulator increases engine idle speed.
Please note! Depending on the manufacturer and purpose of walk-behind tractors, their remote control may be equipped with additional elements. But, regardless of this, all nodes work on the same principle.
Setting up the Mikuni vm22 carburetor
Hi all. It’s terribly cold in Ufa, yesterday I even got caught in a snow storm on the highway, and I don’t feel like driving at all. It's time to finish what we started and put a human carburetor on the Alpha.
Let me make a reservation right away: the point of this post is to help all owners of Chinese horizontal bikes, in particular pit bikers, figure out what is best to do and how. There is complete confusion and vacillation on the Internet on this issue, and I spent several evenings scouring the forums. In the last post, I started writing about my unequal struggle with the carburetor of a Chinese moped. After replacing it with 110 cc, the native one was categorically missed. And there was this Keihin pz-16 standing there.
In general, this is a whole series of carburetors, PZ-16, 19, 22 and so on. It is distinguished by its most elementary design, reliability and extreme vagueness of the “choke” system - the lever on it simply moves the damper, closing the flow of air into the carburetor; no additional channels are provided in it. Accordingly, when it’s cold, you need to start it with the damper closed, the position of the lever is selected experimentally, and guess what - if you close it completely, it won’t start, but opening it even halfway is the same as opening it completely, at idle there is no difference. In short, millimeter. At the same time, due to the lack of a suction system, this bastard carburetor has the following unpleasant feature - when the engine starts, it runs not at higher, but at lower speeds, and strives to stall all the time; for the first couple of minutes you need to stand and turn the handle. If you raise the idle so that it warms up properly, then the warmed-up engine will scream. For three years I tried to do everything possible with the carburetor, reconfigured it several times, but I could not get rid of this problem. This carb is suitable for 50-72 cc, and the 72 rode quite well on it. But when the engine increased in cubic capacity, the shortage in it began to be felt simply catastrophic. The engine, even in 3rd gear, stupidly refused to spin up. The main fuel jet was marked 75.
At first I decided to do the trivial thing. I went to the store and said “give me a 110cc carb.” They gave me carb. This time Keihin PZ-19. - it looks the same, so I didn’t look for the picture. So, in theory, it should have been enough for Alpha, judging by the scattered information, but that was not the case.
The freshly purchased carb was terribly poor. Only by fully raising the needle was I able to achieve at least some adequate reaction, but I could not completely overcome it. I raised the level in the float chamber, tried to rearrange the needle, danced with a tambourine, consulted with shamans, but no luck. At the same time, at high speeds everything drove perfectly, but at the bottom it was an epic failure. In the best traditions, the store refused to take this miracle back. The jet stood there without markings. I still can’t understand what’s wrong with this piece of Chinese industry, if anyone knows, please share...
^%';][] — I thought. The season begins, we need to go through a break-in, but Alfa doesn’t go. As a result, I put back the 16th carburetor, but screwed in the jets from the 19th. It turned out quite well, there was enough traction up to 5-6 thousand, but I still didn’t turn it any higher during the run-in. By the way, about the jets. On every corner they write that it comes from the Zhiguli Solex. It’s suitable, only the minimal one that I managed to find is there - marked 105 or 110, which was absolutely not suitable for me. Owners of 125-140 engines, keep in mind that you have room for creativity here. Of course, you can order a set from Alishka, but again wait
But now the run-in is over, we gradually begin to turn the handle - and we run into the same carburetor. Already in 3rd gear, the engine spins up extremely reluctantly above 6000; in 4th gear there is practically no acceleration at all. As a result, the maximum speed is no more than 70, and even that takes half an hour. I began to think about what could be done.
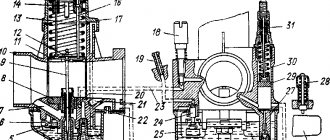
There is a wide variety of information on the internet about carbs. Basically, for 110-125 cc, everyone recommends the PZ-22. At the same time, many pit bikers write good reviews about Ebrov’s Mikuni VM-22. It should be noted here that despite the same numbers, the diameter of the outlet hole in Mikuni is not 22, but 26 mm, while in Keihin the numbers correspond to the cross section. For some reason, the title picture says 27, apparently there are different options.
In the end, I decided. Chinese friends have it for about 1900-2200 from different sellers, I found an offer from a Russian online store for 1990, and ordered it there. I also took a set of fuel jets for the carb.
The parcel arrived by SDEK in a week, which made me very happy.
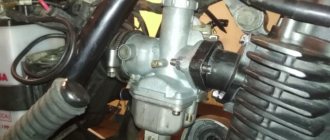
When I started the installation, I immediately ran into some difficulties.
1. Alf intake pipe on my copy with a diameter of 22 mm. As we remember, the hole in the carburetor is 26 mm. I ground down the step using cutters, making a smooth narrowing, and at the same time polished the inner surface of the pipe, the Chinese casting is so-so and the bumps stick out. There is a plastic heat-insulating gasket between the carburetor and the pipe; it broke during the boring process - while I’m driving without it, I haven’t noticed a difference, but I’m still thinking about cutting it out of something.
2. Anyone who has used Alpha knows that such an idiotic arrangement of the air filter should have been invented. It is located in the cavity of the frame, with access from the side through a small window, and you need to contrive to combine the two halves of the rubber-plastic body inside and tighten the clamp. The halves are very hard, do not bend, do not fit together and scratch your hands, as a result, replacing the air filter takes one or two hours and a lot of swearing. The same rigid pipe sticks out from the front of the frame and fits onto the carburetor. The Mikuni carburetor, although it fits the fitting on the pipe, has a slightly different slope; in the end it was not possible to combine them. I shortened the pipe sticking out of the frame and put a thermostat pipe from a Zhiguli found in the bins on it and on the carburetor, pressed it with clamps - the seal was good. 3. Mikunevsky carb is higher in height than the native one. At the top, the throttle cable almost rests against the frame, and at the bottom, the drain fitting from the float chamber prevents the carburetor from being installed. In the end, everything fit well on top, but I had to cut off the fitting from below, otherwise it wouldn’t fit. It may be possible to find a different shape for the intake pipe to avoid this problem, but then it will be even more difficult to mate with the air filter. I didn't find it in the end. The Alfovsky throttle cable fit perfectly.
4. Mikuni has a bolt for adjusting the mixture quality not on the side, but on the bottom, and turning it is extremely inconvenient; the cylinder gets in the way. I twisted the bat, clamped in small pliers. Fortunately, according to reviews, this carburetor holds settings for a long time. Adjustment of speed XX in a human way, from the side.
Having assembled everything and started the engine, I discovered why they write that it is not suitable for these engines. At idle the engine worked well, but as soon as I tried to turn the knob, it immediately tried to stall. The original GTZ was marked 95.
Through experiments, I selected a GTZ from a set marked 88, this is the minimum that was in it. And the drin went.
At the moment, the maximum speed on a flat road without wind is more than 80 km/h. I think you can do 90 while lying down, but it’s already in the red zone, so I didn’t check. The stars are worth 16-41. The traction has increased throughout the entire rev range, from the very bottom there is such a blast that you can easily lift the front wheel off the ground at the start - and I have 85 kilos. In fact, the carb overflows a little in full manual mode - the revolutions are below 6000, but this is a matter of habit. Nevertheless, I’ll try to install GTZ 85-86 if I come across it. By the way, the set contains a maximum GTZh of 120, so the carburetor will cope with an engine up to 150 cc with a bang.
Separately, I would like to note a normally arranged “suction” with its own channels and jets. Switchable with a flag, 2 positions on and off. When you start it in the cold, it starts and holds 2.5-3 thousand, gradually raising it to 5, after half a minute you turn it off, and after turning off the speed slowly decreases. Very conveniently made. In warm weather it is not needed, the engine starts perfectly and holds idle.
In short, I’m happy as an elephant, and I recommend it to anyone who doubts.
Carburetor, malfunctions, adjustment
Below is an algorithm for setting up a carburetor on a Neva walk-behind tractor with a Subaru engine.
Carburetor adjustment diagram
The diagram shows three screws that are responsible for the amount of fuel supplied.
- Screw 1 - number of full throttle revolutions;
- Screw 2 - number of idle speeds;
- Screw 3 - responsible for idling.
To adjust the carburetor, you must perform the following manipulations:
- Tighten screws 1 and 2 until they stop;
- Then unscrew them about 1 turn;
- Turn on the ignition and warm up the engine;
- Then place the throttle control lever until the engine is turned off (that is, until the speed is at a minimum level);
- Set the minimum idle speed level with the third screw;
- Then set the maximum idle speed with the second screw;
- If necessary, adjust the minimum speed again by adjusting the position of the third screw;
- Carry out the last two steps until stable engine operation is obtained;
- If there are interruptions, tighten the first screw again until it stops and unscrew it one and a half turns.
Good to know! Setting up the MIKUNI vm22 carburetor
Is your pit bike's carburetor set correctly?
The first and easiest way is by the color of the candle.
We unscrew the candle with a special key and look at the color.
- Brick - the mixture is correct. A gun! you can do nothing further and fly.
- White is a poor mixture. Well, so-so - it won’t fly.
- Black/ /smoky - rich mixture. Whoa, whoa, take it easy! It would be necessary to reduce Pita's appetites and not drown him.
If you have not yet gone deaf from riding without an exhaust pipe on your old moped, then you can determine the quality of the mixture by the sound and reaction to opening the trigger.
When you let off the gas, you hear shooting sounds - the mixture is lean (this is not a Subaru for you, if anything). In addition, the engine overheats and the exhaust pipe becomes red-hot.
When the gas is opened sharply, the engine seems to choke and there is no proper pickup - the mixture is too rich (please don’t drown your horse).
Having determined the quality of our mixture, we begin to turn the carburetor (not in our hands).
Attention! The carburetor must be adjusted with the engine warm and the choke closed.
First of all, we try to achieve the desired mixture by raising or lowering the needle one or two notches. Let's try to go for a ride. If the difference is felt immediately, we continue to conjure until the desired result is achieved (yes, small dances with a tambourine).
If the difference is not immediately visible, we ride longer, then evaluate the results of the adjustment by the color of the spark plug. If you can’t adjust the needle, then return the locking ring on the needle to the middle position (default) and select the jets.
The carburetor must be supplied with a set of jets of different sizes. They have two key parameters:
- thread diameter - m5, m6, etc.
- flow rate in cm3/min.
*The numbers are stamped on the jet itself.
Now we remove the carburetor.
You can change the jet or check its size by removing the carburetor from the pit bike, draining all the gasoline from it and opening the float chamber. The jet looks like a bolt for a flathead screwdriver with a through hole in the middle.
1- The “main” jet with a “flute” is responsible for supplying fuel to the engine at speeds above idle. The amount of fuel supplied is regulated by a needle having a different cross-section along the working length. When the throttle is lowered, the needle acts as a plug.
2- The float maintains the fuel level in the float chamber.
3- Idle jet
4- Mixture quality adjustment screw. Before unscrewing it, you need to screw it in, counting the revolutions, so that during assembly you can establish the original position
If the mixture is lean (the spark plug is white, the pipe is red, the motor is overheating) - raise the needle. Does not help? We increase the jet (the numbers are larger).
If the mixture is rich (the spark plug is black, there are dips when the gas is opened sharply) - lower the needle. Does not help? We reduce the jet (the numbers are smaller).
After you have adjusted the mixture on the carb, there is also a bolt with a spring that is responsible for idle speed (idle jet). If the pit bike stalls when the gas is released, the engine speed is too low - turn the screw clockwise (tighten it). If, on the contrary, the pit roars while standing on a stand, unscrew the screw counterclockwise. Do everything with the engine warm and running in order to immediately determine whether we have turned it up enough or not.
It happens that no setting helps. Alternatively, it could be due to dirt getting into the carburetor. Flushing and blowing all the channels in the carburetor will help here.
Jet
Next, based on the color of the candle, we change the jet.
- If the mixture is rich, reduce the jet by two orders of magnitude.
- If it becomes lean, we increase the jet by two orders of magnitude.
- If we are at the target, we change the jet in the range ± 1.
After each replacement, we roll back and forth at full throttle, then look at the spark plug. We turn off without releasing the gas. The process is quite long and tedious. Having received the desired color (coffee with milk), we proceed to adjusting the quality of the mixture at idle speed.
A correctly selected jet can also be determined by the following symptoms.
- If, when you sharply apply the gas and release the throttle, the speed seems to hover at the top point for a few seconds, and then reluctantly drops, this indicates a lean mixture.
- If, when you sharply apply the gas and release the throttle, the revolutions drop and sag almost until the moment the engine stalls, and then rise and level out to idle, this indicates a rich mixture.
With a normally adjusted mixture, after releasing the throttle, the engine speed should fall to the idle level within a second and operate stably at it.
Screw quality
We dose the fuel with the quality screw.
- By twisting, we lean the mixture.
- By unscrewing it, we enrich it.
- We tighten the quantity screw, listen to the engine and count the number of revolutions. As soon as the revs started to drop. we stop. We remember the position and twist it all the way, counting the revolutions.
- So we know one limit value. For example, at 1.5 turns of the quality screw from the stop, the engine speed began to fall).
- Now we begin to twist in the other direction (unscrew), listen to the engine and count the revolutions of the screwdriver. The engine speed should first begin to rise as we enrich the mixture, and then begin to fall as the mixture has become too rich. We record the number of revolutions of the quantity screw when the engine speed began to fall.
- Now we know the second limit value. For example, at 4 turns of the quality screw from the stop, the engine speed began to fall.
We need to set the midpoint between the two boundary points. If you plan to ride around the city, in the heat, with frequent stops, it makes sense to shift the adjustment to a richer side.
If you are too lazy to twist and count.
We tighten the quantity screw until the motor is still running stably, but is about to stall. And gradually we begin to unscrew the screw. The turnover will gradually begin to increase. As soon as unscrewing the screw stops affecting the engine speed, stop rotating.
All. We adjusted the amount of mixture at idle.
Let's move on to adjusting the needle position.
We get on the pit bike and start riding, watching its behavior. Then we raise the needle by two divisions (we put the latch in the lower groove), enrich the mixture.
We ride and look at the behavior of the pit bike. Then lower the needle to the very bottom (put the latch in the upper groove), lean the mixture.
Let's ride. We select the position of the needle individually according to how you feel. There should be no dips during acceleration.
If, after adjustment, the needle is in its extreme positions, it means that we selected the main jet incorrectly.
Source