How to bore a motorcycle cylinder
The engine of any vehicle is its heart, which makes the wheels spin, thereby driving the vehicle, including a motorcycle. Thus, the greatest loads during engine operation fall on its cylinders and pistons. This is due to the harsh conditions of high temperature and pressure in which the motor operates.
Causes of cylinder failure
The pistons, falling and rising inside the cylinder, are in constant friction with the walls of the cylinder, thereby leading to its wear. It is worth noting that a motorcycle cylinder can wear out completely unevenly, and therefore the cylinder becomes deformed, losing its original shape. Unfortunately, this defect is not immediately noticeable to the naked eye. However, the fact that the shape of the cylinder has undergone changes can be determined using special measuring tools.
It should be remembered that the piston moves inside the cylinder along the correct trajectory only theoretically; in practice it happens a little differently. The angle of deviation from the trajectory affects the wear rate of parts. Thus, the larger the angle, the faster the motor cylinders wear out.
The movement of pistons in cylinders along an incorrect trajectory is caused by several factors, one of which is the nature of the design (lack of axiality or perpendicularity in the position of the parts that are mating).
In addition, very large dimensional tolerances also contribute to rapid wear of pistons and cylinders, due to which the piston moves not only parallel to the cylinder axis, but also with a certain deviation from the horizontal.
It is also worth considering the temperature regime at which all this occurs, as well as the products produced. All this has a destructive effect on the cylinder walls and piston surface. Thus, as a result we can have not a round cylinder, but an elliptical one.
Cylinder and piston group of the Izh Planet motorcycle
Izh Planet motorcycle cylinder head
Possible malfunctions of parts of the cylinder-piston group are given in the section “Possible malfunctions of engines and methods for eliminating them.”
Piston Izh Planet
Since the Izh Planet engine has one cylinder, before disassembling the cylinder-piston group, do the following:
* remove the carburetor protective covers, seat, fuel tank, mufflers with exhaust pipes, air cleaner, carburetor, cap with high voltage wire from the spark plug; * disconnect the cable from the decompressor; * remove the ignition coil; * disconnect the oil line along with the sealing gaskets from the pipe.
Disassembly. Remove the spark plug and decompressor from the cylinder head if they need to be replaced or repaired. Unscrew the nuts securing the cylinder head and remove it from the studs. Unscrew the nuts securing the cylinder to the crankcase and, placing the piston in the lower position, remove the cylinder, avoiding damage to the gasket.
Remove the cylinder gasket. Cover the crank chamber with a clean cloth to prevent foreign objects from getting into it. Remove the piston pin retaining rings.
Press out the piston pin using a puller. To avoid deformation of the connecting rod, hold the piston with your hand. Remove the piston rings using 5-6 steel or brass plates 30-40 mm long, 3-5 mm wide, 0.2...0.3 mm thick. Insert the plates under the ring at the junction and spread them evenly around the circle between the piston and the ring, then remove the ring upward along the plates. You can remove the rings from the piston without plates, but you must keep in mind that if the ends of the ring are too far apart, it may break.
Remember the order of the rings in the piston grooves so that during assembly you can install them in their places.
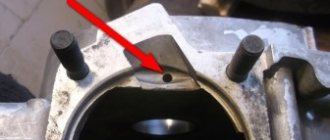
Inspect the condition of the threads in the spark plug head hole. If the threads are damaged, replace or repair the head as follows:
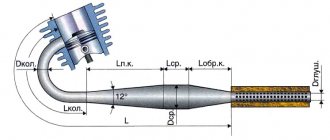
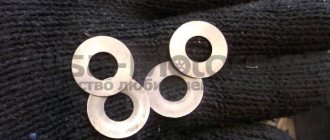
* drill the hole to a diameter of 18.43 mm and cut the thread M20x1.5; * make a bushing from bronze according to the figure * screw the bushing into the head until it stops and make a mark * turn out and adjust the lower end of the bushing to the sphere of the head; * Screw in the bushing and flare it on the inner surface of the head.
Inspect the condition of the head and cylinder parting plane. If there are nicks or irregularities on the planes (determined by traces of gas passage), remove them with a scraper and, if necessary, grind the planes onto the plate.
Remove carbon deposits from the head with a special solution. If there is no solution, use a metal scraper or scraper, then clean the surface with emery cloth and rinse in kerosene (unleaded gasoline).
Determine the amount of wear by measuring the piston and cylinder. If the gap between the piston and cylinder is more than 0.3...0.4 mm, they need to be repaired. Cylinders that have deep scratches and burrs on the working surface are also subject to repair. Carry out repairs using the following methods:
* selection and installation of a new set (of normal size) of a cylinder, piston and piston rings to replace worn ones; * boring and honing the old cylinder and installing repair sizes of rings and piston.
When replacing the piston and cylinders, select the same group (see table).
Spare parts for Izh Planet motorcycles include pistons and cylinders of four size groups. The piston group is marked with a stamp on its bottom, and the cylinder group is marked on the lower flange.
Measure the piston diameters given in the tables at a distance of 55+1 mm from the lower end of the piston, and the cylinder diameter at a distance of 30 mm from the upper end. In this case, install piston rings of normal size. The diameter of such a ring (with a gap at the joint of 0.25...0.45 mm) is 72 mm. When installing rings and a piston of repair sizes to replace worn ones, the cylinder must be machined by boring and honing to the diameter of the repair piston. Izh Planet spare parts supply pistons and piston rings of two repair groups
The piston group marking is indicated on its bottom, the ring group is indicated on the label in the packaging of the piston ring set.
The diameter of the processed cylinder must be 0.04...0.08 mm larger than the piston diameter (0.01-0.03 mm for an oval-barrel-shaped piston), ovality and taper along the entire length should not exceed 0.03 mm. An oval-barrel-shaped piston without piston rings must move in the cylinder under the influence of gravity of the piston, a piston with a split skirt and piston rings - with a force of 30...80 N (3...8 kg).
Replacing the piston and boring the cylinder
If such a situation occurs, then replacing the piston alone does not solve this problem.
It needs to be solved comprehensively, i.e. replacing a piston plus boring a motorcycle cylinder. Those. cylinders must be bored every time their wear has been detected. It is also worth considering that not all cylinders are subject to wear, even after quite a long period of operation in very difficult conditions. There are also cases where a vehicle lives out its life without ever boring the cylinders.
Parameters for determining cylinder wear:
- if at the top dead center of the cylinder its dimensions have changed by 0.05 mm from the original ones;
- if in the place where the piston skirt and the cylinder wall come into contact, the size has changed by 0.03 mm.
Thus, the two indicated parameters may well answer the question of whether or not it is worth boring the cylinder. If there is at least one of the changes listed above, then the answer is obvious - boring is necessary.
There are also worse situations when a so-called “stepped” defect appears in the upper part of the cylinder. The resulting step reduces the wear time of the cylinder, piston rings, and ring seats on the piston, resulting in very noticeable shocks during driving. However, this defect becomes noticeable without any measurements. When it changes, the nature of the engine's operation changes - it begins to vibrate strongly.
This is a direct indication for immediate repair, since the ellipsoidality accompanying this defect leads to the fact that the piston rings adhere worse to the cylinder walls. This, in turn, can lead to breakthrough of gases from the cylinder into the crankcase, disruption of compression in the engine, which also increases oil and fuel consumption.
As we see, in addition to the fact that untimely elimination of defects leads to the expenditure of money, they can also cause irreparable damage to the heart of the vehicle.
In this case, boring the cylinders will help restore the necessary parameters of this part of the engine. However, by boring we mean not only the restoration of the geometric parameters of the motorcycle cylinders, but the restoration of the normal position of the mating parts relative to each other. In other words, if you only correct the geometry of the cylinder, it will not be enough to restore normal alignment and the normal location of all the main surfaces.
MY MOTORCYCLE
Everyone knows that: the power and “thrust” of the engine directly depend on the condition of the parts of the cylinder-piston group. You also know that the friction surfaces of these parts wear out due to dust, the use of low-quality oils, and simply from prolonged use. Since it is practically impossible to measure engine power in everyday conditions, many use an indirect indicator - maximum speed, while others measure compression in the cylinder. The second method of assessing power is more preferable, because the speed capabilities of the device may decrease, for example, due to the fact that the exhaust system is coked, the ignition control is disrupted, or the carburetor malfunctions. If the engine is really stuck, do not rush to immediately bore the cylinder to the repair size. Experienced people usually adhere to the following sequence of actions: the first time they change the rings, the second time - the rings and the piston (both times - to nominal sizes), then they change the rings again (also to nominal sizes) and only then bore the cylinder for the first repair with subsequent installation of a repair piston with rings. When to start these replacements depends mainly on the operating conditions. The first replacement of the rings may be necessary after six to seven (and up to 25 for large-capacity devices) thousand kilometers, and the piston after 15-40. The degree of wear can be assessed by disassembling the cylinder-piston group. When disassembling, you need to firmly remember two things.
First, don't drop the retaining ring into the crank chamber. To avoid this trouble, immediately cover the camera with, say, a rag.
And second, don’t bend the connecting rod when you start knocking out the pin with a hammer. It is best to use a puller. So, the piston is in your hands. Carefully remove the rings from it (use three or four shims (Fig. 1) and insert them into the top of the cylinder.
“Align” the rings with the piston - insert it into the cylinder from below and measure the gaps in the ring locks (Figure 2). If they exceed 3 mm, the rings must be replaced. Gaps in the locks of new rings should not exceed 0.2-0.4 mm.
Immediately evaluate the condition of the piston: if the gap between it and the cylinder is more than 0.3-0.4 mm, the piston requires replacement. When selecting a new piston, it is convenient to follow the “old-fashioned” method: a washed and lubricated cylinder lies on the table, and you lower the piston into it. A “good” piston should lower under its own weight for about one second. If it fails with a knock or, even worse, gets stuck “halfway,” look for another piston. Each motorcycle model has from two to four size groups of pistons; their difference in diameter can be from 0.01-0.025 mm. The group marking is usually stamped on the top of the piston and on the lower end of the cylinder. Make sure these numbers match. Pay special attention to the condition of the used piston. Inspect it for cracks and, if there are any, throw it in the trash. As a rule, cracks appear in the area of the bosses on the inner surface of the piston and in the corners of the purge ports. One way or another, cracks always form in places of increased stress concentrations (Fig. 3).
These include sharp internal corners remaining after machining the piston, or due to casting defects. Round such places with a file, a cutter and polish thoroughly. However, cracks are not the only danger that awaits the piston in its endless reciprocating movements. Piston rings can also present a surprise. Most often, it is necessary to clean the ring grooves from carbon deposits when the rings themselves lose mobility (“become stuck”). Do this with a piece of an old ring or a sharp object such as a scraper. It is highly undesirable to use needle files or hacksaw blades for cleaning: you can clean off the “meat” of the piston along with the carbon deposits. You can imagine the consequences: due to gas leakage between the ring and the piston, compression drops with all the ensuing consequences. Locking pins are installed in the same grooves. They fix the rings so that they do not rotate on the piston. If in a two-stroke engine, in the cylinder of which there are intake, exhaust and scavenge ports, the ring begins to rotate (which is what happens when the pin falls out), then at one terrible moment the joint of the ring will inevitably end up in the area of the intake (or exhaust) port. The ring tends to unclench, its ends straighten a little and enter the window. The next moment, the opposite edge of the window cuts off the ends of the ring that had protruded “free,” and the engine, with a clang and roar, spits out its fragments into the muffler. But don't look for pins on four-stroke pistons. On them, the rings are simply separated with joints in opposite directions, because there are no “dangerous” windows at all. Is the difference clear?! So, now we know that the locking pin in a two-stroke engine is a very important part. The “correct” pin orients the joint of the ring to the section of the sleeve without windows (Fig. 4)
The next object of study is the hole for the piston pin. In the grooves of this hole on each side of the piston there are retaining rings with curved antennae. The purpose of the antennae is to facilitate the installation and dismantling of retaining rings in the piston. This is the story with them: the design of such retaining rings has not taken root on sports engines - due to the danger that the tendrils will be cut by the piston pin and get into the cylinder. Therefore, on all modern highly accelerated engines, exclusively “mustless” retaining rings are used. And for the convenience of their dismantling, a special groove is provided on the piston. But whatever the shape of the retaining ring, it must be buried in the groove by at least half the diameter of the wire from which it is made. By the way, we recommend a proven method that prevents the circlips from being pushed out by the piston pin. Remove the antennae from the rings, and slightly increase the chamfers at the ends of the finger along the outer diameter (Fig. 5). Now the finger will more reliably lock the locking ring with such a chamfer.
When the engine heats up, the gap between the piston and the liner should be uniform along its entire perimeter. Therefore, the piston in a cold state has a very complex shape: conical, stepped or barrel-shaped in height, and oval in cross section. The greatest ovality is in the area of the hole for the piston pin (up to 0.03 mm). Therefore, when measuring the piston, do not be surprised that it is “wrong”. So, you have selected the piston to the cylinder, now look for a suitable pin. The diameters of fingers, like pistons and cylinders, are divided into several (up to four) size groups. Select the finger according to the factory instructions. Usually a dot is placed on the end of the finger with paint of a certain color. A mark of the same color is applied to the boss inside the piston. At room temperature, the piston pins of modern motorcycle engines generally engage the piston boss with little force. However, on older models, the fingers were pressed into the piston, for which the pistons were heated in boiling water... Again, carefully read the instructions for your motorcycle. We remind you again: when working with the locking rings, cover the crankcase with a rag. This simple operation will save you from having to shake an upside-down motor until you are blue in the face to remove a part that has fallen inside. When installing the locking rings (with or without whiskers), check that they are seated correctly: each ring should sit tightly in the groove, but scroll around the circumference when you press with an awl on one of its edges. As an anecdote, you constantly hear about “craftsmen” who install pistons “back to front.” An arrow stamped on all piston heads of domestic two-stroke engines, without exception, will help you avoid inevitable breakage of the rings - it indicates how the piston should be oriented. True, all Izh-Jupiters have an arrow pointing to the carburetor. If the arrow is missing or not visible, orient the piston according to the location of the locking pins: they should “look” at the vertical sectors of the liner without windows…….
Cylinder boring process
The process of boring a cylinder is relatively simple.
However, it will take a lot of time and monotonous work. In addition to the mandrel, you will also need good, moisture-resistant coarse sandpaper, as well as a couple of sheets of fine-grain sandpaper for filling the mirror. When all the tools are available, you can proceed directly to the process of boring the cylinder. To do this, you need to insert coarse sandpaper into the groove, and then wrap it around the mandrel. The sandpaper should also be well soaked in oil and can be inserted into the cylinder.
You should ensure that the mandrel with sandpaper fits correctly into the cylinder, otherwise there is a risk of boring it out of size. To do this you need to check. After the mandrel is wrapped with sandpaper, it should be placed in the cylinder; if it fits in too freely, then you need to put paper under the sandpaper and try again. It is necessary to ensure that the mandrel with sandpaper fits tightly into the cylinder by rotating it. Once everything is done, you can begin to rotate the boring tool inside the cylinder.
In this case, the sandpaper should be lubricated with oil each time - this will prevent it from clogging frequently. As soon as you feel that the sandpaper inside the cylinder rotates easily, you need to put paper under it again and continue the process. As you bore the cylinder, you should periodically try to insert a repair piston into it. When the piston fits tightly into the cylinder, you can change the sandpaper to finer sandpaper and begin filling the mirror.
You should ensure that when boring the motorcycle cylinder, the piston does not dangle, but its movement is not impeded.
After all, motorcycles are air-cooled and the cylinder heats up very much, so boring it tightly can lead to the piston jamming when heated, and running in the motorcycle will bring nothing but torment.
Before you start boring a motorcycle cylinder yourself, you should remember that this job is best done by a specialist using a special boring machine.
In this case, the cylinder will be bored perfectly. But perfect boring may not be achieved manually, as a result of which precious time will simply be lost on empty work, which will still have to be redone. Therefore, it is best to take the cylinder to a workshop for boring.
Source
Cylinder-piston group - disassembly and assembly on a motorcycle
The cylinder-piston group can be disassembled without removing the engine from the motorcycle.
This, as a rule, has to be done to clean the piston and combustion chamber from carbon deposits, as well as to replace worn parts. 2. Unscrew the exhaust pipe nuts and move the pipes away from the cylinder.
4. Remove the tip of the high voltage wire from the spark plug, remove the ignition coil, and unscrew the spark plug.
5. Disconnect the decompressor cable and unscrew the valve.
14 mm socket wrench
Unscrew the six nuts securing the cylinder head in a criss-cross pattern.
14 mm spanner
unscrew the four nuts securing the cylinder to the crankcase.
9. Remove the nuts with spring washers.
10. Lower the piston to bottom dead center by rotating the motorcycle wheel or pressing directly on the piston. Remove the cylinder.
11. Cover the opening of the crank chamber with a clean rag to prevent foreign objects from getting into it.
12. Turn the cylinder over, install it on the studs and, carefully prying it with a knife, remove the gasket from the cylinder.
13. Similarly, remove the carburetor gasket (if it was not removed along with the carburetor).
14. Inspect the cylinder mirror. No scuffs, signs of heavy wear, grooves, enveloping of aluminum from the piston and other damage are allowed on it. This cylinder must be repaired or replaced.
You cannot grind the cylinder mirror with sandpaper and then polish it. The only possible processing is boring on a lathe to the repair size with mandatory subsequent honing. In this case, it is necessary to install a piston and rings of repair sizes (see below).
15. Using a scraper or knife, clean the cylinder exhaust windows from carbon deposits. Before this, carbon deposits can be softened with kerosene or acetone.
16. Check the condition of the threads in the spark plug hole. If the thread is damaged by more than a third in height, replace the cylinder head.
17. Similarly, inspect the thread of the hole for the decompressor.
If necessary, the cylinder head can be repaired by installing a liner in it. To do this, drill the spark plug hole to a diameter of 18.4 mm and cut an M20x1.5 thread in it. We grind a futor from brass or bronze (see figure) and, wrapping it into the hole, counter flare the lower edge. Such footwear is also available for sale.
Spark plug hole
18. Inspect the sealing band of the cylinder head. If unevenness is noticeable on the belt, grind the belt on a bench plate (with paste for grinding valves) or with an even, small abrasive stone.
19. Using fine sandpaper, clean the surface of the combustion chamber from carbon deposits.
20. It is useful to polish the combustion chamber with the finest sandpaper (with water), and then with GOI paste to a mirror shine. This way there will be less carbon deposits on it.
21. If the piston rings are to be replaced, they can be removed by breaking them. Otherwise, carefully place strips cut from a plastic bottle under the rings and remove the rings from the piston.
When using the old rings later, we mark them so that they can be installed in their original places during reassembly.
22. Using snap ring pliers or round nose pliers, squeeze and remove the piston pin snap rings from the piston. Do not compress the rings excessively to avoid permanent deformation.
23. Using a hammer, knock out the piston pin through a suitable mandrel (it’s easier to do this with two people).
25. We clean the piston bottom and ring grooves from carbon deposits (you can use a piece of an old ring). It is recommended to first soak the piston in acetone. It is also recommended to sand with fine sandpaper (with water) and polish the piston bottom (including a new one) with GOI paste, so less carbon deposits will be deposited on it.
26. We check the condition of the mating parts: cylinder, piston, piston rings, piston pin, bronze connecting rod bushing. The gap between the piston and cylinder, measured with a feeler gauge at the center of the piston pin, should not exceed 0.3 mm. The piston should be free of burrs, traces of melting, cracks and other damage. The surface of the piston pin must be free of traces of bronze, burns and heavy wear. A pin lubricated with engine oil and inserted into the upper head of the connecting rod should not feel any play. The finger should not enter the piston freely, but under light blows of the hammer. This is necessary in order to ensure working clearances between the pin and the piston when the parts heat up. The bronze bushing of the upper head of the connecting rod should also not have severe wear or signs of scuffing.
Making a “cutter”
In this operation we will need: a birch log, calipers, a marker, a chisel, a saw, a cylinder (the one we are going to sharpen), a piston (new and old), a rasp (you can use a file), a drill, a long bolt with a nut or a hairpin with two nuts , sandpaper sheets “10”, “6”, “5” and “0” (on a fabric basis - not suitable on paper). There are a few caveats - the stud or bolt must be at least 8mm in diameter. The best solution would be 12mm. Sandpaper is selected independently, depending on the type of boring. It is advisable to go through the “rough process” and bring it “to clean water”, and not to drive the rough one until you are blue in the face. Then fix the finishing one, and buy and select a new piston.
Let's start - measure the sleeve with a caliper:
Let's take an allowance of 10mm and measure it on the already trimmed log:
Let's outline approximately where we have “more meat”, and set some simple markings there and drill:
Immediately take a larger chisel and chop off the excess “meat”. Shape it into a cylinder.
But the shape of a cylinder will not work, it will turn out something like an oval:
The next step is to tighten the resulting cylinder onto the stud/bolt. Tighten until your teeth creak. When inserted into the drill, tighten until your teeth creak - it will unwind with a bang. If you tighten it harder, it won’t run away. Now secure the drill, make a stop for the chisel, and unwind the cylinder by pressing the gas on the drill. Take technology breaks more often. During breaks, tighten all nuts. If it comes loose, the results could be disastrous.
By substituting a chisel (smoothly substituting a chisel!) we ensure that we first get an oval:
Then the shape will remind us of a cylindrical object:
Later you will get a natural, perfect cylinder. I think there is no need to explain that the fine-tuning was no longer carried out with a chisel, but with a rasp, and later even with a file.
You should now have a long wooden piston for the cylinder.
. Only well weakened. Somewhere by 0.3-0.6 mm.
Measurements
We buy a new piston, one repair size larger (usually 1 unit) and see how and where it fits (if it doesn’t fit, then there’s still more to come
).
We push in different directions to understand where and what is in the way. If the cylinder worked in risky modes, it means it has a huge output. Mine worked with too early ignition, a slightly lean mixture, which gave quite high revolutions.
The cylinder mirror is excellent, but here's the breakdown:
What you see on the cylinder liner is dirt. That is, a lubricant that once was. After removing it, I preserved it for some reason. I don’t know why.
Having measured the piston (even if it goes inside, it jams right in the middle), I realized that it needs to sharpen just a little. If the piston doesn’t fit at all, then yes, let’s see how much grinding needs to be done. Usually in such situations they sharpen 0.1-0.15 mm. I sharpened 0.01-0.07. It is advisable to choose a piston in the store so that it barely enters. Then boring will turn out better because you can pick up the piston even larger and bore it again. In the pictures there is simply a worn-out cylinder that seems to have served its useful life during this repair.
You've been waiting for this for so long, let's start the process.