How to remove a tire from a scooter rim at home
How to change a tire on a scooter
Almost every scooter rider has encountered a tire problem. Those who are not in the know will be surprised, what could be so difficult if you puncture a tire on a scooter? Actually the problem is this...
Today you can see a lot of tire service stations, literally every 5 km. You'll definitely come across a tire shop. It would seem that nothing could be easier - unscrew the wheel
and brought it to a tire shop, or after puncturing the wheel, you can roll it quietly. The problem is that not many people agree to trim scooter wheels due to laziness or unwillingness to earn a small amount. Because to the master to tinker for 200 rubles. Sometimes you don’t really want to, due to the fact that repairing a flat tire on a scooter will take more time than on a car and the repairman will earn more for a car tire... In general, many scooterists find themselves in such an absurd situation that when they arrive with the wheel to the service center, they receive the answer - we We do not repair wheels of this radius.
It would be easier to put the harness in the tire yourself, it’s a 5-minute job... If only there were tubeless tires, which often does not happen. Most scooters have cameras installed, so you will have to remove the tire and seal the tube, or install a new one.
If you find 30-40 minutes of free time, 2 mounting tools and a hammer, then you can easily change the camera yourself.
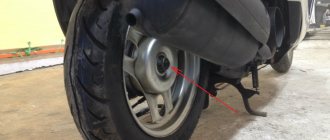
So... let's get started! First, unscrew the nut holding the valve stem. In our case there is a nut, but on some scooters it may not be there. Next, unscrew the nipple to bleed all the air from the chamber.
After this, use your hands to squeeze the tire beads around the entire perimeter, on both sides.
This is done to ensure that the tire does not stick to the rim.
Start inserting the assembly into the place where the valve stem is located. Insert the mount to a depth of 2-3 cm and carefully lift the tire above the rim.
Use the pry bar as a lever and press the other end of the pry bar towards the center of the disc.
While holding the first tire in place, install the second as close to the first as possible to pick up additional area of the tire.
After the second mounting tool has pulled the tire over the disc, press it in the same way as the first one to the plane of the disc. Next, carefully remove the second mounting and step back another 10-12 cm forward and hook up another part of the tire. In this way, you must go around the circle of the disk so that the entire tire
came out on top on one side.
When the side of the tire is completely out of the rim, try to carefully pull out the tube.
We continue to remove the tire from the rim. We again take the mount we know and insert it on the other side of the tire.
The most important thing is to insert the pry bar in the center of the disk.
Next, take the second one and insert it side by side at a short distance of 5-7 cm. After you have succeeded in inserting the second assembly, all you have to do is push it downwards with force along the edge of the disk until the tire comes off the disk.
If the tire is very old, then it has probably already lost its elasticity and may not be so easy to remove. If so, use a small sledgehammer or a heavy-duty hammer.
That's probably all! The tire has been removed.
When using mounts, pay attention to their ends. They should be rounded, without sharp corners, this is done so as not to damage both the tire itself and the tube. Before you start removing the tire, inspect the tool itself; if you see sharp corners or hooks, then treat them with a file or sandpaper.
When the tire is removed, pay attention to its configuration in the area where it contacts the rim. Several lines (circles) will guide you when you put the tire on the rim. From them it will be possible to determine that the tire sits on the disk in the center, and not like an egg.
After we have sealed the camera or are about to install a new one, we do exactly the same operation, only in the reverse order. Those. Place one side of the tire over the rim.
30% of the side of the tire will fit without mounting, and then you will have to take the mounting and insert it between the disk.
Run the tool around the entire circumference of the rim so that one side of the tire is completely tucked onto the rim.
Next, take the camera and insert the valve into the hole in the disk.
After this, we fill the entire chamber into the tire. The main thing is to avoid twisting the camera and not tearing it. Don't forget to screw the nut onto the camera valve.
Now we are trying to put on the other side of the tire, you can try to do it by hand. Squeeze the tire with two grips and press down on the rim so that a small area of the side fits over the rim.
After this, carefully insert the mounting bracket and tuck the tire onto the rim.
Walk small distances around the circumference of the tire to make it easier to fill the tire.
The last pull of the assembly should end near the chamber valve.
Pay attention to the valve (nipple) of the camera itself. It must be installed evenly, without distortions. After that, we inflate the tire and you can go for a ride.
At the end of the article, I would like to say the following: Never try to get by with screwdrivers, steel plates and other non-core tools, otherwise you will ruin the tire and, even worse, you will jam the disk. Even when using a mounting tool, be extremely careful, both with the disc itself and the tire. Scooter rims are made of thin metal or aluminum and are very easy to damage.
The article turned out to be very colorful and extensive, but in practice this whole thing takes no more than 30 minutes. And lastly... if you went to a tire shop and received an answer that they do not service such wheel radii, then you should go to the next tire shop, then another and another. Out of 10 tire shops, 1-2 will definitely take care of such a small wheel, and if you pay extra, you might be lucky with the first tire shop you come across.
Installing a new tire
First of all, if the wheels have spokes, check the condition of the rubber that protects the inner tube from the spokes and replace if necessary. On a new tire, you need to pay attention to the tread of the motorcycle tires, find the arrow that indicates the direction of its movement. There is also a mark that shows where the camera nipple should be located. Lubricate the new tire generously with soapy water, flange one edge over the rim, then insert the tube, lay it down, straighten it, and then insert the second edge. Now screw the nipple back into the valve, inflate the wheel and reassemble in the reverse order. Wheel pressure values are usually found somewhere on the motorcycle labels. The final tightening of the fasteners should be done with the motorcycle already installed on the ground; this should absolutely not be done while suspended.
Placing the tube in the tire.
How to disassemble a wheel on a scooter (photo and video)
Among inexperienced owners, the question often arises about how to properly disassemble and then bead a tire on a scooter. The work is simple, but it has a number of nuances. If you do not follow a number of recommendations, a perfectly suitable tire can easily be damaged. Even if the current tires are in poor condition and there is no point in putting them back, it is still important to do it correctly without damaging the disc.
Replacing tires on a motorcycle with your own hands.
Owners of motorcycles with rims are forced to go to a tire shop to install new tires on their motorcycle. When replacing tires on such motorcycles with your own hands, the disc may bend and lose its presentation. On the other hand, if you have an enduro or any other motorcycle with spoked wheels, you can easily change the tires yourself. Moreover, any normal endurist simply must be able to change tires in the field with the help of a pair of tire bars, since off-road trips often involve long runs on asphalt. In this case, it is advisable to go to the place of drowning in the mud on road tires, take a set of “evil” tires with you and put them on the motorcycle in an open field immediately before the off-road. Today we will talk about changing the tires of a motorcycle with spoked wheels yourself.
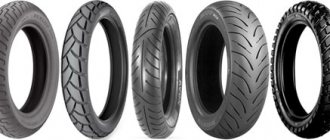
We will also talk about the types of motorcycle tires and indices in the names of rubber models, since this topic is worthy of a separate article, and maybe more than one. Today, within the framework of this article, I will give only one very simple classification. Motorcycle tires come in tubed and tubeless varieties. Tubeless tires are comfortable and are widely used on motorcycles with disc wheels. The disc is sealed inside, so all you have to do is install new tires, coat the joints with a special sealant, inflate them, and you’re good to go. Spoke wheels are not sealed internally because one end of the spokes goes right through the wheel rim. Spoke wheels use tires with inner tubes - it’s clear why.
Is it possible to install tubeless tires on a spoked motorcycle wheel by simply sticking a regular tube inside? Yes, easily! Now I will just install tubeless tires with cameras on my motorcycle.
What, then, is the difference between tubed and tubeless tires? Everything is very simple. Tubeless rubber has a special groove on the inside, it acts like a “hook” and increases the tightness.
Tube rubber does not have such a “hook”.
Also, many manufacturers claim that tubeless tires have a reinforced cord. I don’t see anything bad if we ride a motorcycle with tubes in the tires, and even with a reinforced cord