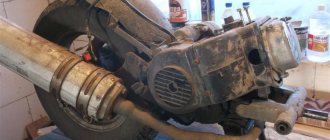
The popularity of scooters is growing every year. And this is not surprising. Low cost, ease of maintenance, good performance characteristics make the moped an indispensable thing in the lives of many.
In many countries around the world, the number of scooters on the streets exceeds the number of cars. They have high maneuverability, which allows residents of big cities not to think about traffic jams. However, sometimes situations arise when the moped breaks down and does not want to start.
You can repair the scooter yourself or take it to a workshop. This is everyone's personal decision. Having decided to repair it yourself, you need to prepare the space for this. Most often, repairs are performed in the garage.
The most common problems associated with changing oil and filters . Incorrectly selected oil may cause the engine to not start.
First you need to drain the old oil through the drain hole. Then the carburetor is completely disassembled.
The installation and repair of Chinese mopeds should not cause big problems for a person who understands this at least a little.
DIY scooter (moped) repair
The popularity of scooters is growing every year.
And this is not surprising. Low cost, ease of maintenance, good performance characteristics make the moped an indispensable thing in the lives of many. In many countries around the world, the number of scooters on the streets exceeds the number of cars. They have high maneuverability, which allows residents of big cities not to think about traffic jams. However, sometimes situations arise when the moped breaks down and does not want to start.
You can repair the scooter yourself or take it to a workshop. This is everyone's personal decision. Having decided to repair it yourself, you need to prepare the space for this. Most often, repairs are performed in the garage.
The most common problems associated with changing oil and filters . Incorrectly selected oil may cause the engine to not start.
First you need to drain the old oil through the drain hole. Then the carburetor is completely disassembled.
The installation and repair of Chinese mopeds should not cause big problems for a person who understands this at least a little.
How to detect a breakdown
In order to identify a scooter malfunction, it is necessary to check all elements in turn. The performance of any scooter depends on the proper functioning of components such as compression, fuel and spark. If one of the elements does not work, the scooter will not move.
Fuel may cause the moped to not start if gasoline has been added for a long time. As studies show, the octane number of gasoline decreases when it stays in the tank for a long time, that is, its quality noticeably deteriorates. There is only one result: a spark does not ignite such gasoline. If you know that you have been filling up with fuel for a long time, it is best to drain the old gasoline and fill in new gasoline in its place .
The second reason that the scooter does not start may be a dirty filter - fuel or air. A fuel filter is necessary to clean gasoline from various impurities and rust. The engine must receive clean gasoline, since this affects the wear of many parts of the moped.
The air filter is designed to clean the air that enters the carburetor. It needs to be changed quite often, since dust, dirt, etc. constantly settles on it.
The third reason that the engine will not start may be the lack of a spark. Checking whether the candles are to blame for this is as easy as shelling pears. It is enough to replace with new ones. If it is not possible to start, and the gasoline is fresh, you need to look deeper for the reasons.
❶ How to repair a moped
You will need
- Keys, screwdrivers, awl, vice, hammer and pliers.
Instructions
Inspect your faulty moped and determine which parts need replacement or repair. It is better to order new ones from a workshop or a specialized store. Don’t skimp on the details - they will pay for themselves many times over in the future, and besides, your safety on the road depends on their quality. Invite a more experienced friend to help you with the repair.
First, thoroughly wash and dry your moped. Remove elements that will interfere with your repair process. If the damaged parts are small in size, then it makes sense to take them to the table - this will make it much more convenient for you to deal with them.
When disconnecting individual elements of the moped, remember their sequence. Don't forget that eventually the entire structure will have to be put back together. Wash the parts to be dismantled in gasoline or wipe with a cloth soaked in it. Start disassembling the front wheels, boot and struts. Inspect even the smallest elements that may well affect the performance of the moped.
If a part is heavily rusted or has visible defects - chips, bends, dents, replace it without hesitation. It won't last long. After you have carefully inspected everything and removed the damaged parts, thoroughly lubricate each part.
Reassemble the structure in reverse order, replace the old parts with new ones. Try not to forget even the smallest details - they are no less important than the same wheels and steering wheel. It is better not to drag out repairs for a long time; if possible, do everything in a day or two. Otherwise, it’s easy to forget something or lose small details.
note
These tips can only help if the breakdown affected only individual parts of the rack. If, for example, your engine has failed, you are unlikely to be able to fix it yourself, and a visit to the salon will become inevitable.
www.kakprosto.ru
Do-it-yourself repair of individual parts
Having determined that neither spark plugs nor gasoline are the cause of the malfunction, we move on.
As noted earlier, engine problems can vary. Very often these problems are associated with spark plugs or the carburetor. The spark may not jump due to carbon deposits on the spark plug, which occurs due to the use of a rich mixture.
There may be a small gap, which also does not contribute to the appearance of a normal spark. In a two-stroke engine this gap is 0.6-0.7 mm. With a smaller gap, there is a high probability that the electrodes will melt. Increasing the gap causes current consumption to increase and more voltage is required to produce a spark.
There are situations when the moped stalls while moving, and then continues to move on. This occurs due to the detachment of carbon deposits from the electrode. For some time the spark is lost and the engine stops working. After self-cleaning, performance is restored.
Interruptions in engine operation may be due to moisture getting on electrical appliances and wiring. This results in a loss of voltage. After drying these parts , engine operation should be restored.
A fairly common cause in our climate is water getting into the fuel and then into the carburetor .
The reasons considered are easily eliminated by the driver themselves. However, if these steps do not bring the desired solution and the engine does not work, the scooter engine should be repaired.
Carburetor repair
As for the carburetor, the causes of malfunctions may be caused by improper mixture quality. If the mixture is lean or rich, the performance of the moped will be at risk. The quality of the mixture can be checked by the condition of the candle. A black color will indicate that the mixture is rich, that is, there is excessive oil consumption. White color will indicate a lean mixture and a decrease in engine power for this reason.
Repairing a scooter carburetor is performed on a warm engine. Before this, if there is a possibility of clogging, it should be cleaned and washed. The carburetor adjustment itself consists of the following actions:
- Step 1 – you need to adjust the idle speed.
This action is performed using the idle screw. In order to increase the speed, the screw is tightened, and to decrease it, it is unscrewed. After warming up the scooter, with the help of simple manipulations, you can set up stable idle operation of the engine.
Step 2 - check and adjust the quality of the mixture for the carburetor using a special screw.
The combustible mixture that enters the carburetor must clearly have the proportions set by the scooter manufacturer. If the mixture is too lean, the scooter loses power and overheats. With a rich mixture, fuel is used uneconomically. This problem can be solved by turning the screw. Turning the screw clockwise enriches the mixture, counterclockwise turns it leaner. The quality of the mixture will be indicated by the color of the candle. The candle is black and has carbon deposits, which means the mixture is rich. If, on the contrary, it is white, the mixture must be enriched.
Step 3 – set the quality of the mixture by moving the needle.
The following manipulations are performed with the needle: when raising the needle, the mixture is enriched, and when lowered, it is leaner.
- Action 4 – adjusting the fuel level in the float chamber.
Checking the fuel level is done with a transparent tube located at the bottom of the carburetor. The procedure is as follows: unscrew the oil screw, lift the tube up and check the fuel level. The fuel level is monitored while the engine is running. The tube should be kept above the carburetor. The fuel level should be slightly below the curb of the carburetor cover.
Features of repair of Chinese mopeds
Repairing Chinese engines does not cause any particular difficulties for most scooter owners. It should be remembered that the main fastenings of the “Chinese” are more delicate than in domestic mopeds, so there is no need to pull anything with all your might.
For example, sudden movements when repairing the carburetor of a Chinese scooter can damage the pipe . Then the muffler is removed. Many Chinese scooter manufacturers use plastic soldering. This must be taken into account when disassembling the moped.
Manufacturers have foreseen that many scooter owners will want to carry out repairs themselves, so there is simply nothing complicated in the design of such scooters. The repair manual for Chinese scooters will allow you to perform all the steps yourself. Anyone can figure out the main problems and repair the engine of a Chinese scooter.
A scooter repair video will answer most questions.
How to repair a moped
Home » Repair and service » How to repair a moped
You will need
- Keys, screwdrivers, awl, vice, hammer and pliers.
Instructions
Inspect your faulty moped and determine which parts need replacement or repair. It is better to order new ones from a workshop or a specialized store. Don’t skimp on the details - they will pay for themselves many times over in the future, and besides, your safety on the road depends on their quality. Invite a more experienced friend to help you with the repair.
First, thoroughly wash and dry your moped. Remove elements that will interfere with your repair process. If the damaged parts are small in size, then it makes sense to take them to the table - this will make it much more convenient for you to deal with them.
When disconnecting individual elements of the moped, remember their sequence. Don't forget that eventually the entire structure will have to be put back together. Wash the parts to be dismantled in gasoline or wipe with a cloth soaked in it. Start disassembling the front wheels, boot and struts. Inspect even the smallest elements that may well affect the performance of the moped.
If a part is heavily rusted or has visible defects - chips, bends, dents, replace it without hesitation. It won't last long. After you have carefully inspected everything and removed the damaged parts, thoroughly lubricate each part.
Reassemble the structure in reverse order, replace the old parts with new ones. Try not to forget even the smallest details - they are no less important than the same wheels and steering wheel. It is better not to drag out repairs for a long time; if possible, do everything in a day or two. Otherwise, it’s easy to forget something or lose small details.
note
These tips can only help if the breakdown affected only individual parts of the rack. If, for example, your engine has failed, you are unlikely to be able to fix it yourself, and a visit to the salon will become inevitable.
www.kakprosto.ru
❶ How to fix a moped
Instructions
To repair the front shock absorber struts, you must first remove them from the scooter. To do this, first remove the front wheel and release both struts. Unscrew the nuts, take them out, and then pull out first one and then the other rack. Clean dirt from them and rinse in gasoline. Remove the rubber boot from the stand. Next, remove the stopper from its socket. Do this with an awl or a very thin screwdriver. Clamp the chrome rod in a vice. Place the rack in a comfortable way and try to pull. Insert the pre-prepared axle into the hole for the wheel axle and hit it with a hammer in the direction the rod comes out. But be careful. Hit just a couple of times and the structure will move on its own. Carefully remove everything, clean and inspect. Wash this unit well in gasoline. Remove the bushings from the stem and assess their wear. After this, remove the damping spring from the rod. The main spring remains in the strut; you need to get it out, and don’t forget the rubber bumper in the very depths. Use a long screwdriver or narrow pliers. After this, thoroughly clean the inside surface of the stand. After disassembling and checking the parts, you can improve your racks. To do this, place two valve springs from the car in a row for shock absorption, as well as one spring for damping in a separate rack. Use an emery reamer in an electric drill.
Then proceed to making new bushings. Entrust this work to an experienced turner. Give him the rod and the old bushings with the stand. Please note that bushings cannot be made from aluminum, as they will instantly become unusable.
After this, check the stem. Don't worry if it turns out to be rusty. But if you still want to replace it, then order a new one from the factory.
And the final procedure is thorough lubrication. Drill small holes with an area of about 0.5 sq.cm in the lower bushing, which is located at the very bottom of the rack. Then the oil from the bottom of the rack will not interfere with the operation of the spring mechanism.
After this, reassemble the rack in reverse order. Don't forget to install the rubber bumper first. And be sure to check that you have put the retaining ring in place.
www.kakprosto.ru
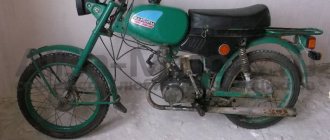
Alpha moped repair
The affordable price has made the Chinese 50 cc moped “Alpha” the literal favorite in the demand for “stools”; in the same bunch is its slightly more durable twin brother “Delta”. Economical, with an engine capacity of 72 cc and air cooling, the Alpha moped is unpretentious and easy to maintain. The clear design of the Alpha moped engine allows you to repair or tune the equipment yourself.
Alpha moped engine repair
Before disassembling the engine of the Alpha moped, we fix the scooter with the central stand and free it from the plastic. We disconnect all engine power systems and do not forget to drain the oil!!!
We remove the engine along with the transmission, and on a flat surface we continue the home repair of the Alpha moped.
It will help to properly dismantle the Alpha moped engine by disassembling it according to the following scheme:
- remove the muffler and exhaust pipe;
- remove the camshaft gear cover;
- unscrew all 4 bolts from the cylinder cover;
- remove the top cover and cylinder head;
- We look at valve wear, internal contamination and the condition of other system parts.
If this is your first time doing a DIY repair on an alpha moped and you need to disassemble it, don’t forget to sketch a diagram of how everything was in place! If the valves need to be replaced, or if there are gaps in the fit, then they need to be removed:
- Place the head on a level place. To prevent the valve from being damaged during dismantling, it is better to place a layer of thick rubber or a rag under it;
- we select the socket head, place it on the valve plate and hit it hard with a hammer;
- release the crackers, remove the top plate and valve washer;
- remove the valve and guide bushing.
To complete the repair of the Alfa moped engine, after replacing the parts, we begin assembling the engine in the reverse order, putting everything in its place, observing the marks. Don't forget to add fresh oil.
Alfa moped box repair
The gearbox of the Alpha moped sometimes fails and requires constant attention. Repairing a gearbox at home is not particularly difficult for a beginner.
We carefully read the instructions for the alpha moped, do-it-yourself gearbox repair.
Let's take it slowly, in order:
- We first dismantle the cylinder, then the rotor and clutch block;
- carefully remove the retaining ring (you need a screwdriver and a thin knife or blade) and the drive gear;
- To remove the speed unit, unscrew the fastener - the bolt on the back side.
- remove the gear shift fork;
- remove the crankshaft and drum.
When the repair of the Alpha moped box is completed, assemble the gearbox using the reverse algorithm.
Tuning
For many, Alfa moped repair begins almost immediately after purchase. Thanks to the presence of spare parts and the simplicity of the Alpha moped engine, tuning is common. This could be replacing the not very comfortable original seat, or increasing the engine capacity to 110 cc. Replacing the sprocket from 14 to 15 or even 16 will increase the speed to 10 km/h.
Increase in cylinder volume - replacement from 50 cc. at 70 cc., will add power, which is sometimes lacking. To do this, in addition to the cylinder head, you will have to change the pistons and carburetor. You can carry out such maintenance of the Alpha moped yourself. If you bought an Alpha moped, repairing the gearbox and engine yourself will be a good opportunity for you to study your equipment.
And finally, some useful tips that will make repairing an Alpha moped a more enjoyable experience for you.
Have you disassembled the timing belt and CPG? Place parts in separate boxes. Sketch the position of the gears and forks on paper before removal. If you decide to increase the speed of the Alpha moped using an asterisk, do not forget that the front and rear change at the same time.
Monitor the speed, prevent clutch wear, and change fluids in a timely manner.
Don’t be afraid of repairs, learn the hardware, watch video lessons, and you won’t need the services of a mechanic.
Hang panniers, change headlights and mirrors. The Alpha moped is from the series that will respond to any of your concerns with reliability in thousands of your future kilometers.
Rate this article
www.real-biker.ru
How to repair a moped?
Published: 08/01/12
A scooter or scooter is a popular means of transportation in Asian countries, but in the last ten years it has managed to win its admirers in our country. What is noteworthy is that if in Asian countries everyone rides scooters indiscriminately (adult men and women, teenagers), then in Russia this means of transportation is the prerogative of mainly young people. This statement is also supported by the fact that driving a scooter does not require a license. Although amendments to the legislation are already being considered to change this oversight.
Despite the fact that a scooter is a rather primitive vehicle, its repair still requires certain skills. This is not about replacing the battery. This is too simple an operation to consider, especially since you can buy a battery for a scooter at any auto parts store. Let's talk about more significant problems. The most common breakdowns of scooters include problems with the electrical part, with the engine, deformation of the body, as well as plastic parts. In addition, after serious accidents, additional welding and frame repair work may be required.
In order for this vehicle to last longer and not present unpleasant surprises in the form of breakdowns, it must be periodically taken for technical inspection. On average, maintenance costs scooter owners 1,500-2,000 rubles. During maintenance, technicians find faults and deficiencies. The need for electrical work may arise for several reasons. But it is important that it is the electrician who is responsible for starting the engine, as well as for the operation of all vehicle systems. Engine repair is a completely different story. Despite the fact that a scooter engine is not nearly as complex as a car engine, repair work can only be entrusted to specialists. Engine problems can lead to either an unexpected stop while driving, or to the fact that the moped will not start at all.
Body work, oddly enough, is no less relevant when repairing a scooter. And this despite the fact that their dimensions and quantity are miniscule. But the smaller the parts, the more difficult it is to repair them. That is why, in some cases, owners of these vehicles prefer not to spend money on expensive repairs, but to purchase new spare parts. These are the stages, in short, that moped repair is divided into. It is worth noting that scooter repairs in Moscow are carried out by a sufficient number of workshops, so there should not be any problems with finding a competent specialist.
How to fix a scooter
A list of the most common scooter problems that you can fix yourself without the help of specialists. Crime: the brake light does not light up, the brake lever limit switch does not work.
Analytics: one of the brake levers is not pressed or there is a malfunction in the brake light electrical circuit. Action: replace the light bulb, adjust the brake lever free play, or replace the brake lever limit switch. Crime: the fuse has blown. Action: Check and, if necessary, replace the main circuit and starter circuit fuse.
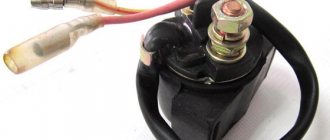
Crime: the junction of the terminal with the wire is covered with a loose coating of oxides. Analytics: The battery does not produce enough voltage, which can happen due to a fault in the circuit or if the battery terminals have oxidized. Actions: check the circuit, recharge the battery if necessary. Clean the terminals from oxides. A temporary measure is to start the engine with a kick starter.
Crime: you turned on the ignition, pressed the brake lever and the starter button, but the starter relay still does not click. Analytics: The electric starter circuit is faulty. Actions: clean the contacts on the relay and starter, “ring” the relay, electrical wiring, and starter windings.
The first thing we will need to do:
- Remove the muffler
- Remove cooling shrouds
- Remove the generator
- Remove the variator
- Clean and blow out connectors
Removing the muffler is very easy and simple: unscrew the two nuts and two bolts on the cylinder head that secure the muffler to the frame (139QMB) or the rear wheel booster (157 QMJ)
Cooling shrouds are even easier to remove: unscrew all the bolts and screws that secure the shrouds to the engine and remove them.
Scooter repair - general principle of troubleshooting
In order for an internal combustion engine to work, it needs three components: fuel, spark, compression. The main slogan of a motorcycle mechanic is “there are no miracles.” You must always remember that if, when troubleshooting and repairing a scooter, it turns out that there is a spark, there is compression, fuel is flowing, but the engine does not start, this, as a rule, only means that one of these components is actually missing .
DIY scooter repair
Too lazy to send the scooter in for repairs and pay money for it. Common situation. Then it's time to take on the repairs yourself.
The basic principle of troubleshooting and repairing a scooter is to step by step eliminate the elements of the system, trying to identify the cause of the malfunction in any of them. Search and repair must be carried out strictly sequentially, from the very beginning of the chain to the very end. That is, for example, if there is no spark, you should not immediately change the switch. First we need to make sure that our generator is “alive”, then test the wiring. Etc.
Important note: if you have a device in front of you that, according to the owner, “used to work like a clock,” it makes sense to ask whether old gasoline was poured into the tank. A couple of months of storage is enough for gasoline to lose its octane number to such an extent that it loses the ability to ignite.
It is important to remember that before making a final diagnosis and starting repairs on the scooter, you need to make sure that a known working spark plug is installed on it, and that the carburetor is functioning normally.
In addition, you need to know that the correct operation of the engine (even at idle speed) is closely related to the correct operation of the variator, clutch, as well as the camshaft and valve group. In other words, with normally functioning power supply, ignition and CPG systems, the problem may be, for example, in the transmission, since the crankshaft torque is directly transmitted to the variator.
When carrying out diagnostics and repairs, you must remember that in some circumstances that lead to the need to repair a scooter , it is necessary to check not a separate element, but the entire system. For example, if the carburetor is clogged, provided that the air filter is intact and saturated, you need to check whether there is dirt in the gas tank and fuel filter. If the scooter has been driven for a long time without an air filter, or with an unimpregnated filter, then everything needs to be checked: the CPG, the crankshaft and the main bearings.
Below are some problems that may occur, as well as basic steps to resolve them. The links indicate places where you can find information on this item.
Causes of malfunction
The Chinese Alpha moped, whose price is affordable, does not cause owners many problems. Interruptions in a moped engine have several causes, and once you understand them, you can quickly fix the breakdown.
Disassembling the moped engine
So, if the engine starts with great difficulty, the muffler “shoots”, and smoke comes out of the chimney, it means that the moped is “capricious” due to problems with the carburetor. In order to solve this problem with the Alpha moped, you need to:
If the Alpha slowly picks up speed, and its engine is not able to develop the declared power, then the reason is the incorrect operation of the moped valves. It can also “get sick” due to gaps and incorrect timing. In order to make the Alpha moped function normally, it is necessary to replace the used valves with new ones.
If the Alpha moped is not able to reach the required speed, despite the roar of the engine and solid revolutions, it is impossible to stop the spinning wheel, and gear shifting occurs intermittently, then the cause of the malfunction is clutch wear.
Moped clutch parts
To eliminate the breakdown, you must perform the following manipulations:
- remove the engine;
- remove the plastic cover;
- unscrew the tightening screw;
- Unscrew the adjustment mechanism and tighten the screw tightly;
- start a moped;
- turn on first gear and drive a few meters.
Another cause of moped engine malfunction may be wear on the drive sprockets. If they are very worn, they must be replaced with new ones.
You may encounter the problem of engine overheating. The situation can be corrected after adding oil. If oil leaks, you must urgently contact a professional service .
Alpha moped engine overheating
Engine disassembly
Disassembling the Alpha engine is quite simple. To do this you need:
- “arm yourself” with a key;
- Unscrew the bolts on the intake manifold (by 10);
- unscrew the cylinder covers and the bolts located there (4 pieces);
- remove the cylinder head.
After performing the necessary manipulations, you need to properly assemble the engine, installing all the parts in place.
A diagram can help you understand the nuances. Also, a lot of useful tips regarding repairing the most important “organ” of the Alpha moped are contained in the training video.
Scooter repair: what you need to know
For more than a decade, two-wheeled scooters (colloquially referred to as scooters) have become a common, cheap, affordable, inexpensive and, accordingly, widespread means of transportation in both cities and rural areas.
Their owners, like any other two-wheeled vehicle, regularly face such an unpleasant need as scooter repair. The reasons why you may need to repair your vehicle can be very diverse, ranging from factory defects or poor quality of components and assemblies to breakdowns caused by accidents or natural wear and tear of parts during operation, since nothing lasts forever in nature.
Major breakdowns
If you intend to repair the scooter yourself, and not use the services of special workshops, then you need to understand that all faults can be divided into several large categories, namely:
Each category also includes several subcategories. The most common faults are those related to electrical equipment and the engine power supply system. Therefore, we will consider them in more detail, since repairing a scooter often consists of eliminating them.
Gearbox disassembly
It is necessary to disassemble the gearbox in order to replace used parts. This is done after the following parts have been dismantled:
Gearbox disassembly
Repair of this part of the engine is carried out as follows:
- Using a screwdriver or blade, remove the retaining ring and the drive gear;
- Carefully unscrew the gear fixing bolt and remove the gear shift mechanism;
- remove the gear shift fork and shaft;
- remove the crankshaft and drum (including the core);
- After replacing the worn part with a new one, reassemble (in reverse order).
Troubleshooting
The first and main sign that the equipment needs repair is the inability to start the engine. Scooter repair begins with identifying the fault and then eliminating it. In this case, the breakdown must be looked for starting from the place where the thermal energy of the burnt fuel is converted into mechanical energy of the rotating crankshaft of the engine. So let's get started:
— determine whether fuel enters the combustion chamber,
— is there a spark between the spark plug contacts?
If all of the above factors are present, then the following malfunctions are possible:
1. There was a breakdown of the spark plug insulator. To do this, simply replace the spark plug.
2. The ignition timing is off, and the fuel mixture does not ignite at the moment when the piston almost reaches its top dead center (TDC). Here you can no longer do without an indicator, with the help of which the position of the piston in the cylinder relative to TDC is determined, and at what moment a spark appears on the spark plug, igniting the fuel mixture. In this case, repairing the scooter will consist of setting the correct ignition timing recommended for this type of engine.
If there is no spark at the spark plug, then the following problems may occur:
1. The spark plug is faulty.
2. The candle holder is faulty.
3. The armored wire is broken.
4. The ignition coil has burned out.
5. If the ignition is electronic, then either the ignition unit or only the Hall sensor may be damaged.
If the fuel mixture does not enter the combustion chamber, this may be caused by such problems.
If the scooter is two-stroke:
1. fuel filter clogged;
2. The carburetor is clogged or broken.
If it is a four-stroke engine, then a malfunction of the gas distribution system (burnouts or bent valves) may be added to the breakdowns.
Tools
- Generator puller
- Variator puller (you can make it yourself)
- Kickstart sprocket puller (157QMJ engine only)
- Heads for 8, 10, 12, 17 mm
- Phillips and flathead screwdriver
- Small hammer
- Wish
Most Chinese four-stroke scooter engines can be divided into two main types
- First type: 139QMB-series engine. This engine is very popular in the CIS countries and is installed on most Chinese four-stroke scooters
- Second type: 157QMJ-series engine. This engine has a larger volume than the first and, due to its higher price, is not so popular
Essentially, these two engines are a copy of the ancient Honda GY6 and differ from each other in displacement, kickstarter design, oil pump drive and electric starter drive. In all other respects, these engines are identical.
Typical 139QMB, in fact JL1P139QMB-2
And this is what a typical 157QMJ looks like, in fact LK162QMK
Troubleshooting
Malfunctions of electrical equipment and fuel systems are the most regular of all problems that arise among scooter owners.
It often happens that a breakdown suddenly occurs to the scooter. Repairing the carburetor, as a rule, allows you to resume the functioning of your “faithful horse”.
Usually, to do this, it is enough to remove the carburetor, clean the dust from the outside and the tarry deposits of gasoline and other debris inside. Clean and blow out the air and fuel channels and jets, check the condition of the fuel needle and throttle valve, and then reassemble and adjust it.
Fixing more complex breakdowns at home is not always possible, since specific tools are often required that are not widely available.
Thus, for a technically literate person, repairing a scooter with your own hands will not be very difficult if you have minimal knowledge and skills in handling equipment, as well as the necessary tools.
Removing the piston
We clean and blow off the cylinder connectors, cylinder heads and valve covers. Unscrew the bolts on the valve cover and remove it from the head
Unscrew the nuts and bolts on the cylinder head
Remove the camshaft bed. The camshaft bed is practically not subject to wear. After removing it, just wash it and check for cracks.
We remove the chain from the camshaft and take it out of bed. The camshaft has two problematic points that are worth paying attention to: wear of the support bearings and the working surfaces of the cams
The cylinder, head and camshaft bed are centered relative to each other using guide bushings. These bushings tend to fall out of their sockets and then try to find it. To avoid this, immediately remove the bushings and put them somewhere away. Here and below, the bushings will be indicated by arrows.
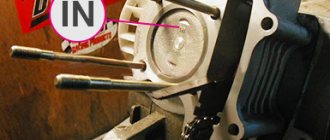
Remove the cylinder head. The cylinder head is the most vulnerable part of the engine and the operating parameters of the engine directly depend on its condition. To avoid problems later: the head must be completely disassembled, inspected for cracks, the valve seats cut, new valves installed, the valves ground into the seats, new oil seals installed and the plane ground in on a plate or milled
Remove the cylinder. Immediately after removal, check the cylinder for liner wear and
We remove the retaining ring from the piston boss, push it out of the pin, and remove the piston. We check the piston for cracks and wear, paying special attention to the condition of the ring grooves and the rings themselves
DIY Chinese scooter repair
DIY Chinese scooter repair
The rhythm of life in a metropolis leaves few options when choosing a means of transportation. You have to ride the subway, in close contact with similar sufferers, or spend a significant part of the day inside a car that is moving slowly in a traffic jam. There is another option. Buy a scooter at an affordable price and now you don’t have to be alone in a car showroom, or join the cramped society of a subway car.
Adjusting the idle speed on a scooter
After the engine is warmed up, you can adjust the idle speed, this is done using a special screw located on any carburetor. The idle speed is adjusted to ensure that the scooter operates correctly and smoothly when not in use. The location of the screw may vary depending on the scooter model. For example, the screw is located in the center, and the mixture quality screw is installed on the left side.
The adjustment process is quite simple, as soon as the scooter starts, rotate the screw, where when tightened the speed will increase, opening the jet reduces the speed. Again, adjustments are made only on a well-warmed engine.
DIY scooter repair
Do-it-yourself scooter repair involves troubleshooting by sequentially eliminating specific elements of the operating system. The basis of the operation of a scooter is three components: compression, fuel, spark. If any of these components are missing, then starting the scooter is impossible. Therefore, the entire algorithm for repairing a scooter with your own hands comes down to troubleshooting, and sometimes this is the most difficult thing in the work being performed. Remember: even if you checked all these three components, the scooter
still won't start, then you checked poorly!
For those who have worked with computer repair, I will give an example. Let's say your monitor doesn't show anything (black screen and that's it). Therefore, you first check the functionality of the operating system itself, then the monitor. If the tested components are functional, then the problem is different. You check the video card and find a problem. This is the principle of mutual exclusion, which is the basis for repairing everything, including scooters.
Repair
scooter repair always begins with the fact that it turns out that you are too lazy or sorry for the money to go to a professional workshop.
First of all, check the gasoline. Gasoline in the tank quickly loses octane number, which leads to the mixture not igniting. A couple of months of gasoline in the tank is enough for this. So we change the gasoline and try again.
The gasoline is fine, we checked it. Next, you need to check the performance of the spark plug, since the spark plug is often the main starting problem. I won’t explain how to check a spark plug; there are many articles on this topic.
Do-it-yourself scooter repair involves checking the functionality of your carburetor. To check the carburetor, you need to inspect the fuel level, clean the filters, and check the needle valve. By checking the carburetor, spark plug, starter, you will find the cause of the faulty start. This completes the power system check.
Repairing scooters also involves inspecting the variator - it must work properly and correctly. The operation of a scooter engine is also closely related to the clutch, camshaft and valves.
When repairing a scooter with your own hands, do not forget that if you find one problem, for example, the carburetor is clogged, then you must check the entire system - the quality of gasoline, clean the gas tank. Or the scooter was driven without an air filter, then it is necessary to check almost everything for clogging: the crankshaft, main bearings, and the CPG system.
It is impossible to describe all the faults here, so I talked about the main ones. Be careful when repairing, as repairing one thing may break another. I hope these tips will help you make the right repairs
scooters
How do you know if the mixture is rich or lean?
To find out this indicator, you should look at the condition of the spark plug, namely at its electrodes. When the mixture is lean, the electrodes are quite white and traces of melting are visible; when the mixture is rich, the electrodes are too black and strong carbon deposits are visible. Of course, the optimal mixture is characterized by the normal state of the candle.
It might be useful to read:
- Ethiopia: the country and its description;
- Solaris maintenance;
- The car shakes and the ESP light is on. The ESP on a Volkswagen is on;
- Galvanizing the body: which cars are better protected from corrosion;
- Which gear oil is better to use: test results and reviews Oil for the VAZ 2110 gearbox recommended by the manufacturer;
- At what age can you ride in the front seat?
- Particulate filter: why is it needed on a car? ;
- Weaknesses and disadvantages of the Nissan Note Driving characteristics of the Nissan Note;