MY MOTORCYCLE
This article will talk about the complete disassembly of the YAVY-638 front shock absorbers.
Many motorcyclists can recall how, even after a minor accident, a practically intact motorcycle ended up with a bent front fork. More often, the upper, so-called fixed pipes and shock absorber rods bend. After replacing them, the fork becomes like new again. From time to time, the seals wear out. Replaced it and everything was fine again. Simple, in general, operations. But even here, in order not to get lost in three pines, it is better to have some kind of manual at hand or know the sequence of disassembly and assembly. This will protect you from many minor troubles - such as, for example, an “extra” part remaining after assembly.
First you need to install the motorcycle on the center stand. If you are doing repairs outside, and even on a hot day, then it would be a good idea to place a piece of plywood under the support, since the support has a tendency to push through the heated asphalt. Then remove the front wheel and fender. Before you begin dismantling the feathers, you need to drain the shock absorber fluid from them. To do this, unscrew the filler plugs 25 (Fig. 1) and then the lower drain bolts 17 . Don’t forget to place a container in advance to collect the shock absorber fluid.
Inspect the O-rings
18 under the drain bolts and, if you notice cracks on them, replace them. If you don’t have ready-made ones, you can cut them out of genuine leather using old shoes. To make it easier to dismantle the feathers, you need to make a simple device in advance. Its appearance is shown in the figure.
After the oil has been drained, loosen the M 10 bolt that clamps the fixed pipe 1 in the lower bridge and, by tapping on the device screwed in instead of the plug, remove the feather. Clean it from dirt and wipe it with a clean rag. All further disassembly must be done on a workbench or table. Using a small screwdriver, carefully loosen the fastening ring 28 and remove it with the rubber boot. Remove spring 24 and liner 33 . Using an 8mm hex key, unscrew bolt 21 and remove it. All that remains is to remove the shock absorber from the bottom of the fixed pipe - to do this you need to remove the steel ring 12 . Now the fork is completely disassembled and parts that have worn out or failed as a result of an accident can be replaced. Unfortunately, you are unlikely to find spare parts for Java in the store anymore. Therefore, let’s say, a stationary pipe or shock absorber rod, which mainly bends during collisions, will have to be sharpened yourself - fortunately, any lathe will do. After each disassembly of the pen, it is advisable to change the oil seal 15 , installed in the upper part of the movable pipe and secured there with a steel ring 16 . The oil seal has dimensions 36X X 47X6.5—10 . We provide the sizes for reference - maybe there is something suitable. Reassembling the fork is carried out in reverse order. The manufacturer advises filling in shock absorber fluid before installing the spring. This guarantees dosage accuracy. Here it is necessary to recall two very important circumstances. First, having installed the feather in the bridges of the steering column, you must immediately tighten the upper plug 25 and only after that fasten the M10 bolt in the lower bridge. And, secondly, in no case should you try to increase the efficiency of shock absorption by increasing the volume of oil against the specified amount (200 cm/cube for each feather). If there is a need to make the fork more rigid, you can fill in a more viscous shock absorber fluid - but in the same quantity. This sometimes has to be done under severe operating conditions, especially in rural areas, as well as at elevated seasonal temperatures or high wear on the shock absorber.
We can end on this note. Repair and take care of your motorcycle......
content .. 41 42Disassembling the front fork leg of motorcycles Java-250, Java-350
Complete disassembly of the fork leg is done after the fork leg is removed from the fork bridges. Disassembly of the front fork leg is carried out in the following sequence.
Remove the rubber gasket (see Fig. 64), casing and spring from the main tube of the feather. Insert a specially made wrench into the hole for the axle (you can use an old or specially purchased wheel axle for this purpose) or clamp the eye of the tip in a vice with soft pads on the jaws and unscrew the nut with the oil seal. Remove the movable tip from the main tube of the pen. Remove the retaining ring from the lower end of the main tube of the feather. Using a special puller (Fig. 98), remove the bushings (see Fig. 64) and the spacer sleeve located between them from the main tube of the airfoil. If there is no puller, you need to heat the bushings evenly (one at a time, first the bottom one), for example with a blowtorch, after which they will fall off the pipe themselves. Remove the movable tip bushing from the main pipe. Moving downwards and acting carefully so as not to damage the edges of the oil seal, remove the gasket and nut with the oil seal.
Do not remove the nut with the seal by moving it up the main pipe. The hydraulic shock absorber is disassembled after removing the feather from the fixed tube, removing the shock absorber of the feather, remove the feather from the bridges and remove the movable tip from the fixed pipe (see above), why do the following:
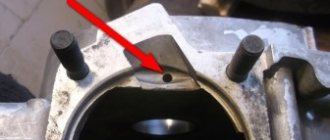
After removing the movable tip from the stationary pipe, remove the retaining ring of the hydraulic shock absorber cylinder located inside the stationary pipe. Pull the rod to remove the hydraulic shock absorber from the stationary pipe. Clamping the hydraulic shock absorber rod in a vice with aluminum pads on the jaws, unscrew the conical head of the rod using pliers and unscrew the lock nut from the rod with a wrench.
Disconnect the upper cylinder centering sleeve from the cylinder. The lower assembly of the hydraulic cylinder is non-separable, since the rod guide sleeve is rolled into it. After pushing the hydraulic shock absorber rod inside the working cylinder, remove it from the working cylinder. Holding the hydraulic shock absorber rod in a vice with aluminum pads on the jaws, unscrew the piston nut and remove the washer and piston from the rod.
Assembly of the front fork leg of motorcycles Java-250, Java-350
The hydraulic shock absorber is assembled and installed in a fixed pipe in the reverse order of disassembly. When assembling, it is necessary to secure the piston nut to the rod, and also carefully tighten the conical head of the rod and the locknut with it. When assembling (after completely disassembling) the pen, the hydraulic shock absorber should be strengthened in the fixed pipe immediately before connecting the movable tip with the fixed pipe. Reassembling the fork blade after its complete disassembly is carried out in the following order.
On the lower (polished) part of the main pipe, lubricated with oil, carefully place the oil seal nut and sealing gasket 34 (see Fig. 64), then the bushing 36 of the movable pen tip. Before installation, heat sleeves 11 and 37 of the main pipe with a blowtorch or in the flame of a gas burner. First, heat and install one bushing 37, then install the spacer bushing 17. After this, heat and install the second bushing 11, then the steel retaining ring 10. When installing heated bushings, you need to act quickly enough. If the bushing does not sit in place, you must immediately vigorously push it all the way down with a special mandrel or push it down by knocking the pipe on a wooden floor or log (with the bushing up, as when putting a hammer on). When installing the bushings, you must not knock them hard, as they can become deformed. Sufficiently heated bushings easily settle into place under the influence of their own weight. Install the assembled hydraulic shock absorber in the fixed pipe. After lubricating the ground part of the main pipe and the bushing with oil, insert the main pipe into the movable tip of the pen and tighten the nut with the gland. Check the ease of movement of the movable tip of the pen on the main tube (turn the pen over with the movable tip up). Install the conical head of the rod in the movable tip, proceeding as if changing the oil. Lubricate the upper (unpolished) part of the main pipe, the outer part of the nut with gland, the spring and the inner surface of the casing with grease and install the spring and casing on the pipe. Place rubber shock-absorbing washer 27 on the main pipe.
content .. 41 42
Java 350 fork repair
Many motorcyclists can recall how, even after a minor accident, a practically intact motorcycle ended up with a bent front fork. More often, the upper, so-called fixed pipes and shock absorber rods bend. After replacing them, the fork becomes like new again. From time to time the seals wear out. Replaced it and everything was fine again. Simple, in general, operations. But even here, in order not to get lost in three pines, it is better to have some kind of manual at hand or know the sequence of disassembly and assembly. This will protect you from many minor troubles - such as, for example, an “extra” part remaining after assembly.
fork
This article, prepared based on materials from the Czechoslovak Motor Review magazine, will talk about the complete disassembly and repair of the Java 350 front fork . First you need to install the motorcycle on the center stand. If you are doing repairs outside, and even on a hot day, then it would be a good idea to place a piece of plywood under the support, since the support has a tendency to push through the heated asphalt. Then remove the front wheel and fender.
Before you begin dismantling the feathers, you need to drain the shock absorber fluid from them. To do this, unscrew the filler plugs 25, and then the lower drain bolts 17. Do not forget to place a container in advance where the shock absorber fluid will drain.
Inspect the O-rings 18 under the drain bolts and, if you notice cracks on them, replace them. If you don’t have ready-made ones, you can cut them out of genuine leather using old shoes.
To make it easier to dismantle the feathers, you need to make a simple device in advance. Its appearance is shown in the figure. After the oil has been drained, loosen the M10 bolt that clamps the fixed pipe 1 in the lower bridge and, tapping on the screwed-in 24 and the liner 33. Using an external hex key “8”, unscrew bolt 21 from the bottom of the movable pipe and remove it. All that remains is to remove the shock absorber from the bottom of the fixed pipe - to do this you need to remove the steel ring 12.
Now the Java 350 fork is disassembled and ready for repair; parts that have worn out or failed as a result of an accident can be replaced. Unfortunately, you are unlikely to find spare parts for Java in the store anymore. Therefore, let’s say, a stationary pipe or shock absorber rod, which mainly bends during collisions, will have to be sharpened yourself - fortunately, any lathe will do.
After each disassembly of the pen, it is advisable to change the oil seal 15, installed in the upper part of the movable pipe and secured there with a steel ring 16. The oil seal has dimensions 36X X 47X 6.5-10. We inform you for reference - maybe there is something suitable...
Reassembling the fork is carried out in reverse order. The manufacturer advises filling in shock absorber fluid before installing the spring. This guarantees dosage accuracy.
Here it is necessary to recall two very important circumstances. First, having installed the feather in the bridges of the steering column, you must immediately tighten the upper plug 25 well and only after that fasten the M10 bolt in the lower bridge. And, secondly, in no case should you try to increase the efficiency of depreciation by increasing the volume of oil against the specified amount (200 cm3 for each feather). If there is a need to make the fork more rigid, you can fill in a more viscous shock absorber fluid - but in the same quantity. This sometimes has to be done under severe operating conditions, especially in rural areas, as well as at elevated seasonal temperatures or high wear of the shock absorber.
The material was published in the magazine "Moto".