Home > Service
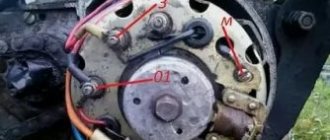
On IZH motorcycles starting from the fourth Planet, an alternating current generator 281.3701 is installed, which is a modern three-phase electric source of electricity. This source is used to power electrical lighting, alarm, and ignition devices. Together with the rectifier, the BPV-14-10 regulator recharges the battery. The generator consists of two parts, a stator and a rotor.
We recommend reading:
Diagram, types of carburetors, tuning algorithm
The IZH Jupiter 5 motorcycle has been produced from 1985 to the present period at Izhevsk Motorcycles OJSC. The basis for this popularity of the model is the design, good technical characteristics and successful wiring diagram of the IZH Jupiter 5, which, unlike the previous generation, allows the use of a large number of different electrical equipment.
Generator rotor 281.3701
The generator rotor 1 is located inside the stator. It is installed on the crankshaft using bolt 3 and key 5. An excitation winding 6 is wound on the rotor core with a copper wire with a diameter of 0.56 mm, 600 turns are made. The winding resistance is approximately 6.4 ohms. For contact with the winding, two copper rings 2 and carbon brushes are used. They perform the work of a current collector.
How to remove the generator rotor 281.3701
The breaker cam 4 is installed in one position on the rotor shaft in a special socket and secured with a mounting bolt 3. Under this cam there is a thread that is intended for removing the rotor from the crankshaft. To remove the rotor, you need to screw the screw from the chain disassembly device into the thread. The device is located in the motorcycle tool. If there is no screw, you can use a regular bolt with an M10 thread. The only condition for the thread must be at least 70 mm. Turn until the screw rests on the crankshaft. Then we apply more force to tighten it, and the rotor is removed from the shaft.
Content:
The fifth Jupiter model belongs to the middle class of road motorcycles, can travel on roads with different surfaces and, what is very important, is equipped with a cargo or passenger trailer with a carrying capacity of up to 100 kg, slightly inferior in loading to the Ural motorcycle with a sidecar. Other positive properties of IZ Jupiter 5 include:
- Powerful engine.
- Maintainability (do-it-yourself repairs are possible even in rural conditions).
- Economical to operate.
- Affordable price.
- High-quality electrical circuit with a powerful generator.
Among the technical parameters of the motorcycle, the main ones should be highlighted:
- power – 25.0 l. With.;
- engine volume – 348 cubic meters. cm;
- type of lubrication – joint;
- highest speed – 125 (95 with trailer) km/h;
- fuel – gasoline A76;
- cooling – air;
- frame design – welded tubular;
- electrical equipment voltage – 12 volts (battery sources, generator).
Battery
The battery in the motorcycle is low-power. The motorcycle does not have a starter, so its task is only to supply voltage to the ignition system and the generator excitation winding during starting. Thanks to the battery, designed for 12 volts, a stable start of the fifth Planet is ensured; up to the third model, the wiring was 6 volt, and the ignition was not always clear.
Possible battery malfunctions:
- - housings, plates, leakage of electrolyte.
- - determined by measurements using a hydrometer.
- - detected by measuring resistance.
- minus not on the body (frame) of the motorcycle - all the electronics will not work.
Electrical equipment IZH Jupiter 5
An important element of a motorcycle is a large amount of electrical equipment. The IZh electrical circuit includes the following elements:
- battery; — 12 volts
- generator: - 12 volts
- switch;
- headlight;
- dashboard;
- wiring;
- sound signal;
- turn relay, direction indicators;
- stop signal;
- charging relay;
- combination switch;
- ignition coil, spark plug;
- relay regulator;
- rectifier, fuses.
Given the presence of such a large amount of electrical equipment in the wiring on IZ Jupiter 5, many special terminals were used to fix connections, which made it possible, if problems were detected, to quickly disconnect the faulty element for repair or replacement.
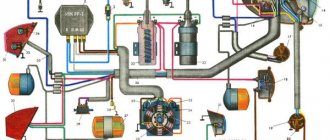
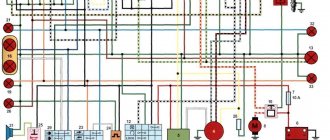
To properly disconnect faulty parts, owners most often used the IZ Jupiter 5 color wiring diagram with a detailed description, which, if necessary, could also be used to determine how to connect certain elements of the circuit.
Maintenance
The owner can independently perform some maintenance procedures:
set the gap between the breaker contacts;
The need to inspect and adjust the wiring arises if:
- the motorcycle moves in the rain for a long time, as this causes oxidation of the contacts;
- a motorcyclist rides in an area with a lot of vegetation that damages wiring;
- The driver rides in snow in winter, which can stick to electrical wiring parts and damage them.
Self-check of the Planet 5 motorcycle generator in case of loss of charge
The cause of loss of charge in the IZH Planet 5 battery is most often a breakdown of the generator.
To check it yourself you need:
- multimeter device;
- straight screwdriver.
Step-by-step instruction
The following steps must be followed:
- Disconnect the wires from the battery and remove the generator cover.
- Disconnect the top 5 wires from the generator, first unscrewing their fastenings. In order not to mix up the wires during assembly, it is worth marking them.
- Measure the winding resistance using a multimeter in ohmmeter mode. To do this, you need to touch the body with one probe, and the other should be connected in turn to the 3 wires of the winding. There should be no short circuits, as indicated by the inscription on the multimeter screen.
- Test the resistance between the stator contacts: you need to touch them one by one with the multimeter probes. The value on the screen should be 8 ohms.
The presence of a short circuit in the 3rd stage or a discrepancy in the indicators in the 4th will indicate problems with the generator.
Photo gallery: stages of checking the IZH Planet 5 generator in case of loss of charge in pictures
How to correctly set the gap between the contacts of the breaker?
In order to set the gap between the breaker contacts, you will need:
- straight screwdriver;
- wrench 10;
- candle key;
- probe 0.4 mm thick (+/– 0.05 mm).
Next, you need to follow the steps sequentially:
- Place the motorcycle on a stand and place the gearbox in neutral.
- Remove the right crankcase cover and unscrew the spark plug.
- Using a 10mm wrench, grab the generator rotor mounting bolt and turn the crankshaft to a position where the contacts are as far apart as possible.
- Loosen the screw securing the contact.
- Place the probe between the contacts and adjust the tightening of the eccentric screw until the probe passes the contacts with little resistance.
- Tighten the contact fixing screw.
Photo gallery: adjusting the gap between the breaker contacts
Troubleshooting the audio signal and improving signal quality
Poor sound signal quality is mainly caused by improper adjustment.
The following tools will be needed for setup:
- wrench 7;
- a simple screwdriver.
Step-by-step instruction
To adjust, do the following:
- Loosen the locknut with a wrench.
- Turn on the ignition.
- Press the button to turn on the sound signal.
- Adjust the sound by rotating the adjusting screw.
- When the desired result is achieved, tighten the locknut.
Photo gallery: sound signal of IZH Planet 5 and its settings
Major problem with motorcycle wiring
On IZ Jupiter 5, the wiring had a large number of contact terminals. Therefore, the main cause of malfunctions in the electrical circuit was a violation of the integrity of the connections. This led to such moments as: there is no charging for the battery, the generator does not provide the necessary 12-volt voltage to the system, the switch is not able to generate the necessary charge for the ignition coil, loss of functionality of all lighting devices, and a number of others.
The cause of loss of connection in the terminals was contamination and oxidation of the contacts. This was especially true for motorcycles produced at the beginning of mass production. The main way to solve this problem was to exclude these terminals from the IZ Jupiter 5 wiring.
To do this, we used soldering the wires directly to each other (by analogy with the Tula motorcycle), as well as sealing the terminals on the supply wires to the following main elements:
- battery;
- generator;
- coil and spark plug;
- switch;
- lighting devices.
This increased the reliability of the connections and, as a result, ensured the operability of the specified parts, and also made it possible to turn on charging for the battery in order to subsequently confidently start the engine of the IZH Jupiter 5 motorcycle.
Unlike similar Soviet-era motorcycle models, the electrical wiring diagram of the IZH Jupiter 5 motorcycle provides for operation from a battery with air-cooled equipment. This causes many problems for owners. The article provides recommendations for modernization that solves problems with sparking.
Generator - serviceability check
Checking the serviceability of the generator can be done on a motorcycle without disassembling the generator.
To carry out the work you will need a multimeter.
1. Place the motorcycle on the center stand or side stand.
2. Disconnect the battery by removing its fuse.
3. Remove the right cover of the power unit.
4. 6mm
unscrew the nuts securing the five “upper” wires of the generator. In order not to confuse the wires during subsequent assembly, we mark them or tie them with thin wire so that we get a cable.
5. Check the short circuit of the stator windings to ground. To do this, touch the probes of the multimeter to the generator housing and alternately the three terminals of the windings. The ohmmeter should show infinity.
6. Check the stator windings for breaks. To do this, touch the probes of the multimeter in turn to all three terminals of the stator windings. The resistance should be about 8 ohms.
7. Check for a short to ground in the excitation (rotor) winding. To do this, touch the probes to the generator housing and one of the terminals of the brush assembly. The ohmmeter should show infinity.
8. Check the field winding (rotor) for open circuit. To do this, install probes on both brushes. The ohmmeter should not show infinity.
Source
Improving the standard system
The ignition system can be improved in other ways. To do this, you need to identify what problems there are with the wiring. They can occur in the primary circuit between the coil and the 12V battery or due to operating conditions. A visual inspection of the primary circuit can reveal problems with connections, contacts and the ignition switch.
If operating conditions are ideal, the primary circuit will operate with a 12V battery without failure.
But when dirt and dust get into the circuit, the resistance at the contact points increases, which entails a decrease in voltage from 12 Volts to 7-8 Volts. This voltage is not enough for a powerful discharge to appear in the secondary winding of the coil. As a result, a charge of less than 12 V appears on the spark plug, which poorly ignites the combustible mixture in the cylinders. Burnt contacts, oily spark plugs and batteries with a charge of less than 12 V further worsen sparking.
Standard wiring after modification
The following measures help solve these problems:
- The plug connectors are removed and each wire is soldered using traditional soldering and then insulated.
- An additional toggle switch is installed that turns off all consumers when the engine starts. Thus, the coils are supplied with 12 volt voltage from the battery (diagram 1).
- Remake the ignition switch (IZ) (diagram 2). You need to take a wire and solder one end of it to the connector of lock 4, which is free, and the other to the positive terminal of the coil. The standard wire should be re-soldered from terminal 5 to terminal 6. After turning on this position of the key, power is supplied from the battery to the primary circuit according to a simplified scheme.
Thus, the changes made will make the electrical wiring of the IZH Jupiter 5 motorcycle more reliable and efficient.
How to check the relay regulator of the Izh Planet generator
First you need to check whether the generator windings are shorted to ground. To do this, take a 12 volt lamp, solder 2 wires (probe) to it, turn off the BPV, turn on the ignition, connect one wire of the lamp to the wire that connects to terminal X8 (BPV), this will be the “+” of the battery (AK). We connect the second wire one by one to wires X5, X4, X7, X1 - the lamp should NOT light up. If the lamp lights up, even not at full strength, it means that the windings are shorted to ground - these could be the wires that go to the generator or a short in the generator itself. X5, X4, X7 - stator windings, X1 - excitation winding.
(if the excitation winding is short to ground, quite unpleasant consequences are possible! such as melting of the brushes, blown AK fuse, if you have one of course :), if not, then the wiring will burn.)
We check the serviceability of the generator operation indicator lamp. To do this, we short-circuit X8, X3 (BPV is turned off, the ignition is on), the control lamp should light up, if not, check the lamp and the wires suitable to it. Now we check the excitation winding, for this we connect one wire of our probe to ground, and the second to X1 (the BPV is turned off, the ignition is on), the probe should light up, if it does not light up, the excitation winding is faulty. (this could be a stuck brush, a break in the wire leading to the brush, or a break in the field winding).br/> If all our tests give a positive result, we check the operation of the generator. To do this, we close wires X1-X2 (the BPV is off), turn on the ignition, start the motorcycle, connect the probe with one wire to ground, and alternately connect the second wire to wires X5, X4, X7, the probe should light up. If the lamp does not light on any wire, it means that the stator winding or the wire suitable for it is faulty. If everything is OK, then the generator is working.
After you have made sure that the generator is working, but there is no charging on the AC or the indicator lamp does not go out when the engine is running, it means that the BPV is faulty.
Source
Design
The motorcycle retained the crew part of the Izh-56 motorcycle, but had a completely new engine - a two-cylinder, two-stroke, with a vertical in-line arrangement of cylinders, air-cooled with a return-loop two-jet purge, with the preparation of the working mixture in the carburetor and its ignition in the cylinder from an electric spark . The carburetor is closed with special casings (with a metal valve for access during start-up), the air filter is a contact oil filter. The parts of the connecting rod and piston group (piston, connecting rod, piston rings, piston pin, retaining rings, bearing rollers of the lower end of the connecting rod) are unified with the corresponding parts of the K-175 motorcycle engine. The two-arm foot shift pedal and kickstart pedal are located on the left side of the gearbox housing. Izh-Jupiter, like all subsequent two-cylinder models, was equipped with an automatic clutch release mechanism. The front sprung mud shield is attached on a cast bracket to the lower bridge of the front fork, which eliminates the possibility of it becoming clogged with dirt.
Design
The motorcycle is equipped with a single-cylinder, two-stroke air-cooled engine with a return-loop two-jet purge, with the preparation of the working mixture in the carburetor and its ignition in the cylinder from an electric spark. The crankshaft is prefabricated and pressed. Carter is of block type. The crank chamber is located in the front part, and the gearbox is located in the rear part. The crankcase consists of two halves with a connector along the middle longitudinal plane. The foot shift pedal and kickstarter pedal are located on the left side of the gearbox housing, the engine is equipped with a 6 volt generator with a power of 45 watts. It is the first of a line of motorcycles to have turn indicators installed, has high structural strength, maneuverability, and is easy to repair and maintain.


